Full System Architecture of my React-Flask App
During last few months, while being locked at home due to COVID, I thought of using my free time to build something useful. So I built an App to help my wife manage her Recipes (which she has been complaining that she is having hard time managing). While I built the app it was a great learning curve for me where I learnt a few new things and got a chance to apply them to my app. Particularly I learnt a lot building the whole architecture for the app including the front end and the backend. If you want to view a preview of the app, watch these videos:
In this post I will be going through the architecture which I built for my app and currently the app is deployed with this Architecture. Hope this helps you understand a basic microservice Architecture design for a full stack app.
Since this is a theoretical post, I don’t have any codebase to share with this. You can follow through the process to deploy your own full stack architecture. If you need any help, contact me and I can give some directions for that. If you want an access to the app to play around, please let me know and I will create an user.
Overview
In this post I will be going through the overall setup of my app and how I deployed the same. Mostly this will be a theoretical post but I will be posting needed scripts wherever appropriate. I will be covering two versions of the architecture which I built:
- Free Version of the Architecture: In this version I will be covering the components where each app component is deployed to a free service which is available out there. I wont be endorsing any of those services but just explaining how I used those services to deploy my app components.
- Actual Version: This is the actual version of the app architecture where I will describe how each component is designed and designed on a Production ready platform like Kubernetes.
Both of these will give you a good basic understanding of a full stack architecture involving React and Flask API. I am still evolving the architecture to make it more available and fault tolerant so the architecture I define here is the current state. I will try to update the post too as I update my actual component architecture.
Pre-Requisites
I wont be going into much practical scripting or to-do steps in this post, but to have a good understanding of the content described in this post its good if you have the below pre-reqs. Not mandatory but good to have:
- Basic understanding of Kubernetes and related terminologies
- Understanding of React and Python/Flask
- Some basic understanding of system design and architecture
-
If you want to implement this on your own, need below components installed or have accounts registered:
- Kubernetes
- Free account on Heroku
- A registered domain for the deployment
I will try to explain all the components in detail so its easy to understand how I have setup my app.
About The App
Before I go into the architecture, let me describe what the app is about and what it does. The app is a Recipe manager which helps an user manage his/her recipe list and get the needed recipe easily through the search. To have a better understanding about the app, I have divided it in two sections. One section described the functional part of the app and another part described the technical part of it.
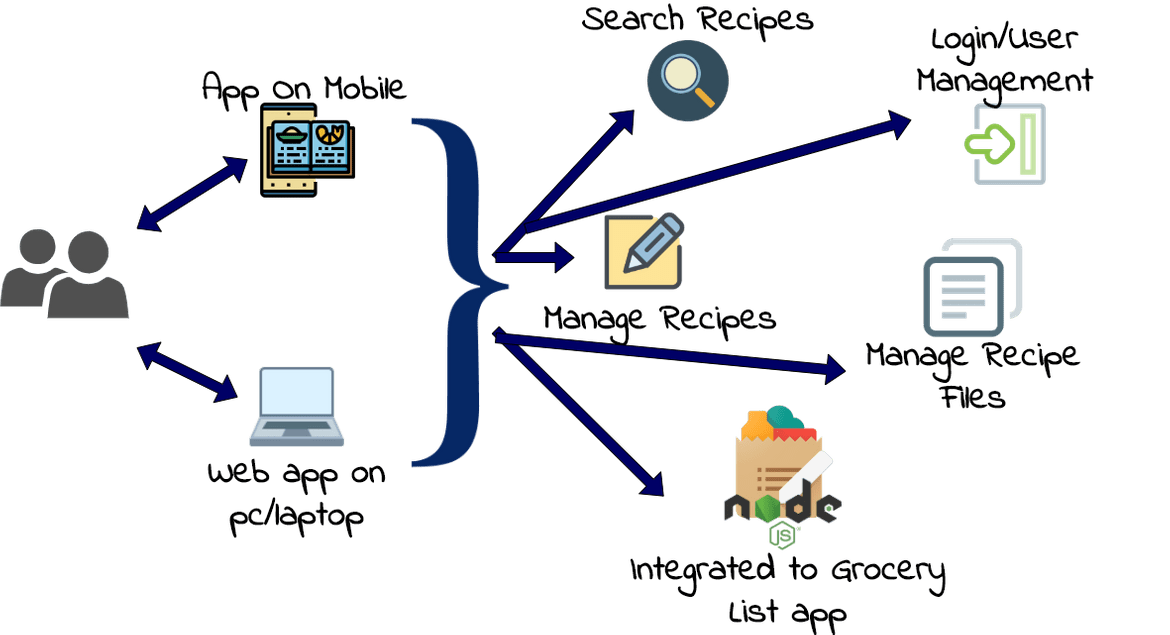
Basic Functionality
Above image should describe what the app does.
App Modes
There are two versions for the app. It can be opened on a pc/laptop as a web app. It is also designed as a PWA( Progressive Web app) which enables the app to be installed as a mobile application on Android phones(IOS is not supported yet). Both modes have different looking UI suiting the respective devices.
User/Login Management
An user is able to login to the app using provided credentials. There is no self register functionality yet and that feature is in list. Once the user is created by an admin from the backend, the app provides a capability to the user to login to the app using those credentials. It also provides a logout option for the user.
Search Recipes
User is able to perform a keyword search and the app shows a list of Recipes which contain that keyword in the name. By default when user logs in to the app, it lands on a Search page. From there user can either perform a blank search to show all of his/her recipes or perform a keyword search. The search only searches on Recipes which the logged in user has created. So it has the access boundary and doesn’t show Recipes across users.
Add New Recipes
User can add new Recipes to be stored in the app. There are various details which can be provided for each Recipe. User can also add the Ingredient detail for each Recipe as separate Ingredient rows. Recipes can be deleted too as needed.
Support for files
User can upload a recipe file or document too to the app to serve as a document store for the recipe file. The app provides a capability where user can select and upload a local file while creating a recipe. The file can be anything, from a text file to an image file. The app stores it in a File server an serves it back to the user via a CDN.
Integrated to another App
This app is inherently integrated to one of my other app which lists and tracks a grocery list. So an user can directly add the ingredients needed for a specific recipe, to a Grocery List, which will add it to the Grocery list app as an item to be shopped. User needs to be provided access to both of the apps.
App Components
Now that we have a basic functional understanding of the app, lets see how all of these functionalities translate to different technical components. Below image should provide a good overview of each layer of the app and the technical components involved in each layer.
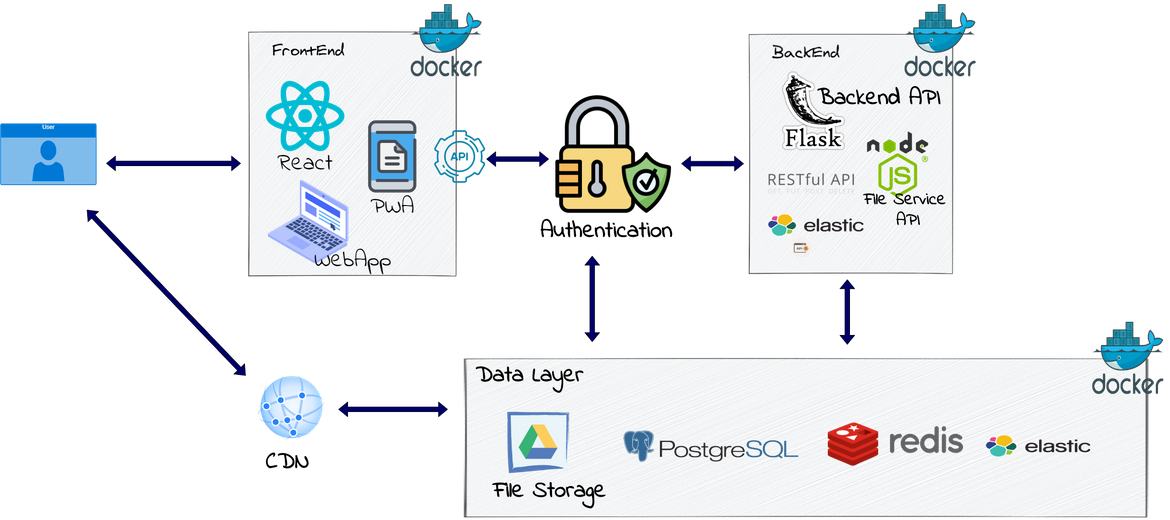
Lets go through each component:
FrontEnd
The Front end for the app is built on React framework. All operations and communications with backend are performed via various REST API endpoints. The frontend is built to behave as PWA so it can be installed on Android phones as an app. Depending on whether the app is opened on a pc/laptop or a mobile phone, different frontend UI us presented to the user.
Backend
Backend for the app is built as a REST API. It provides various API endpoints to perform various functions like adding recipe, deleting recipe etc. The REST API is built using Flask. The API endpoints perform all operations of connecting with the DB, Authenticating, Searching etc. CORS is enabled for the API so it only accepts requests from the React frontend.
Data Layer
App Data: For the Database to store all Recipe and user related data, I am using PostgresSQL database. The Flask API backend will be performing all DB operations connecting to the DB and getting requests from the frontend. There is also a cache deployed in front of the DB to cache queries and offload from the DB. There is also a backup DB deployed which stores a copy of the data from the primary DB. The data replication runs every 5-6 hours to have a backup of the data. Anytime there is an issue with the primary DB, the DB DNS can be switched in the Flask API backend so the backend connects to the backup DB and continue working.
Auth Data: There is also another DB involved to store the user session data. When an user logs in and a session is established with the app, the session token and related data is stored in a Redis data store. This data makes the session of the user persistent in the system they are opening the app on. For e.g if the app is opened as a PWA on a phone, once user logs in, the session data is stored in the Redis database. Any time user closes and reopens the app, the app verifies the session connecting to the Redis database using API.
Elasticsearch
To enable the search functionality in the app, an Elasticsearch service is also deployed. This stores just the name and related user for the recipes. There is just one index created for the Recipes. Anytime user searches a recipe on the app, the search is performed on the Elasticsearch instance via the Flask API to return the Recipe ID. Using the ID, rest of the details are fetched from the Postgres DB when user clicks on a Recipe to get to the detail page.
Authentication
For the authentication, I have built my own auth mechanism for this which authenticates the user before every call to the Flask API backend from the frontend. As I explained above, once authenticated, the session data is stored on a Redis database for a re-verification when user reopens the app. The password for the user is stored in hashed form in the DB. At a high level the authentication flow for any action in the app is below:
- User performs an action like click on a recipe row
- The frontend calls the backend API to fetch the Recipe data. Passes the locally stored session data with the API call
- Flask API reads the sessions data and verifies with the stored session data from the Redis database
- Once verified, the request proceeds and the API responds with the response. If the verification fails, a 401 error is thrown and sent to the frontend
File Service and CDN
To support the file storage capability of the app, there is a separate File service deployed to handle the File related operations from the app. The files are served back to the user through the app using a CDN (Content Delivery Network). The CDN makes serving the static files faster and users can access/download them faster and easier. The file service itself is a Nodejs API using Express. It provides endpoints for various file operations like upload file, delete file etc. The frontend calls the file service endpoints to perform the file related operations when an user works with files like images on the recipe. The API stores the files to a Google drive storage create for the file storage. The CDN serves the files to the frontend from this Google drive storage.
App Architecture
Now that we have some info about the various components/services involved in the app, lets move on to how to place and connect these various components to get the final working app. I will describe two versions of the architecture. In one version, I will be showing an actual deployable architecture which can be used to deploy other similar apps too in a production environment. This will be an ideal production ready architecture. In another version, I will describe the actual version I used to deploy my app using free resources. Since its just a side project of mine, I have deployed the app using as much as free resources as possible. This info can help you stand up your own side project architecture too with minimal costs.
Lets get on with it.
Actual Version
In this version of the architecture, I will describe a proper Production scenario deployment (when its not your side project). I will design this architecture in two ways:
- Deployed on servers: In this the components will be deployed on Kubernetes and cluster will be running on multiple EC2 instances. The components will be deployed as separate Kubernetes deployments and exposed via services
- Serverless Deployment: In this I will try to design the architecture using as much Serverless component as possible. Agreed some of the components from above will still need their own servers so it wont be totally Serverless deployment.
Deployed on Servers
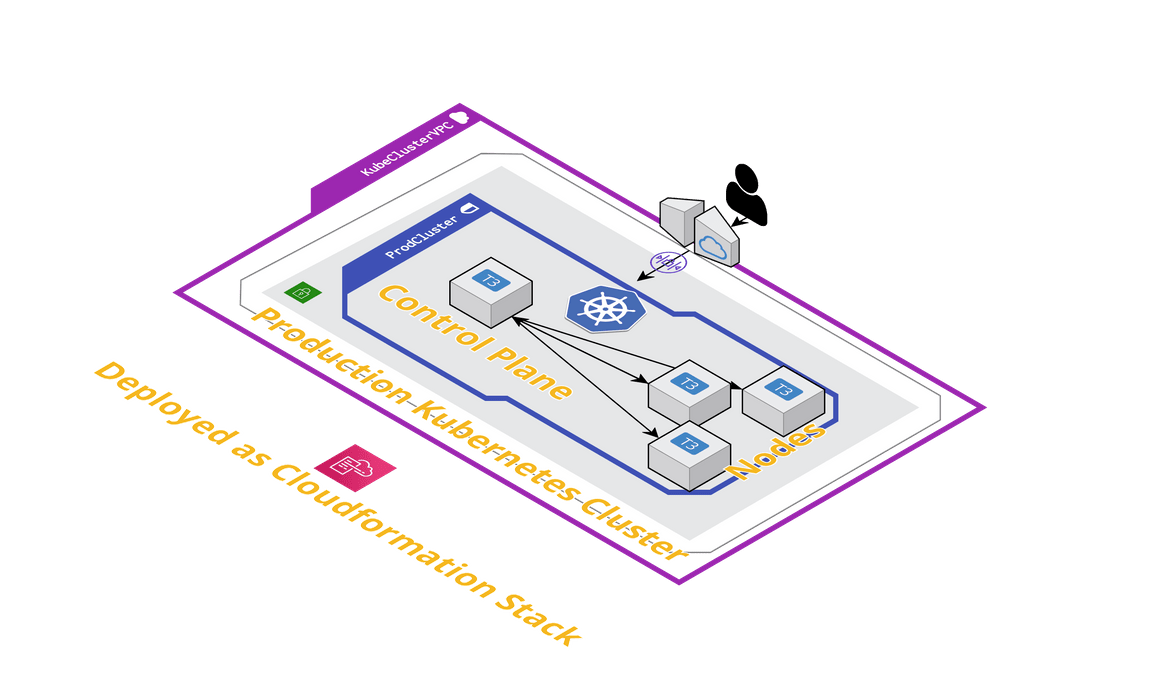
Below image should give an idea about this deployment architecture. Each of the component is deployed as a Kubernetes deployment.
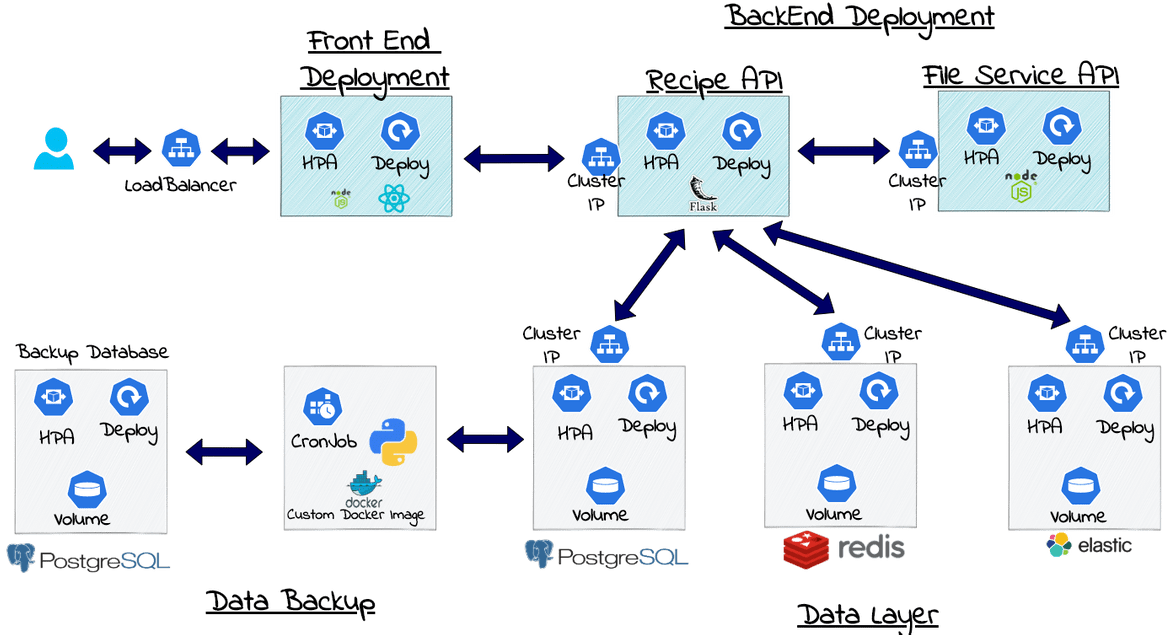
Once the components are deployed, any changes to the components can be handled using various deployment strategies. I wont be going through all of the strategies and just follow a rolling deployment strategy for now.
-
Docker Images:
Custom Docker images are created for these app components. The custom images are stored in a private registry:
- React Front End static files in a custom Nginx image providing custom routes
- Flask API Backend
- Nodejs File service
For other components, OOB Docker images are used by Kubernetes: PostgresDB, Redis, Elasticsearch
-
AWS Architecture:
For the Kubernetes cluster, I will spin up few EC2 instances in a VPC on AWS. I am using CloudFormation to deploy this whole architecture:
-
Kubernetes Cluster:
A Kubernetes cluster is deployed across multiple EC2 instances. I am not adding any auto scaling capability to the control plane of the cluster and the master node is only deployed on one of the EC2 instances. Rest of the instances are joined as nodes.
-
Kubernetes Deployments:
Different components of the app are deployed as microservices in form of Kubernetes deployments. Each of the deployment use the Docker images specified above. These are the deployments which are specified in the Kubernetes specs:
- Frontend React app on Nginx
- Backend Flask API
- NodeJS API
- PostgresDB
- Redis
- Elasticsearch
-
Services to expose the Components and connect them:
Kubernetes Services are created which expose each of the component and make them discoverable by other deployments in the cluster. This enables each of the deployment to talk to each other. Different types of services are created for different components based on whether they are publicly accessible or not. Below are the different Kubernetes Services which get deployed for each of the component:
- A LoadBalancer Service to expose the Nginx deployment serving the frontend files
- All the other services are not needed to be publicly exposed because they are just accessed by the Flask API endpoints which gets routed through the Nginx custom routes defined in the custom config for Nginx. So all other services are exposed via ClusterIP and accessible only intra-cluster.
-
Persistent Volumes for the data:
We need to persist the data on our DBs beyond the lifecycle of the Pods. The Pods for the deployments can get recycled for many different reasons. We don’t want our app data to get lost when a pod gets killed a new one is spun up by Kubernetes. So we create persistent volumes to persist the data on disk for these DBs:
- PostgresDB
- Redis
- Elasticsearch
-
Horizontal Pod AutoScaler:
To have a level of scalability on the architecture, I am also deploying an auto scaler for each of the deployments. This will scale the number of pods running for each deployment based on the load. So the parameters for the hpa:
- CPU percent threshold: 70%
- Min pod number: 2
- Max Pod number: 10
-
File Storage and CDN:
For the storage of recipe files which are uploaded to the app, I am using Google drive as the backend storage. Google drive is connected to the app via the File service API endpoints. To serve the files back to the user via the App, a CDN is deployed and the CDN endpoint is shown on the app for the end user. I am deploying a CloudFront domain with a custom origin pointing to the Google drive account. The CloudFront endpoint is exposed on the app to access the files.
-
Domain for the app:
Finally for the app to be accessible, we create a custom domain pointing to the Kubernetes LoadBalancer service for the Front end which I described above. The domain is created on Route 53 on AWS and a hosted zone is created pointing to the Loadbalancer endpoint. This domain is used to open the app on a pc/laptop or as a PWA on mobile.
-
Database backup process
I have also developed a Python script which backs up the Postgres DB(the recipe related data) to a secondary database. To run the process periodically, a Kubernetes cron job is deployed to run every 2 hours. A custom Docker image is built for the python script and the cron job uses this image whenever it runs.
Serverless Architecture
This image shows an overview of the whole serverless architecture for the app. The deployment is not fully serverless but I am using as much serverless components as I can. I am using various AWS services to design the whole architecture.
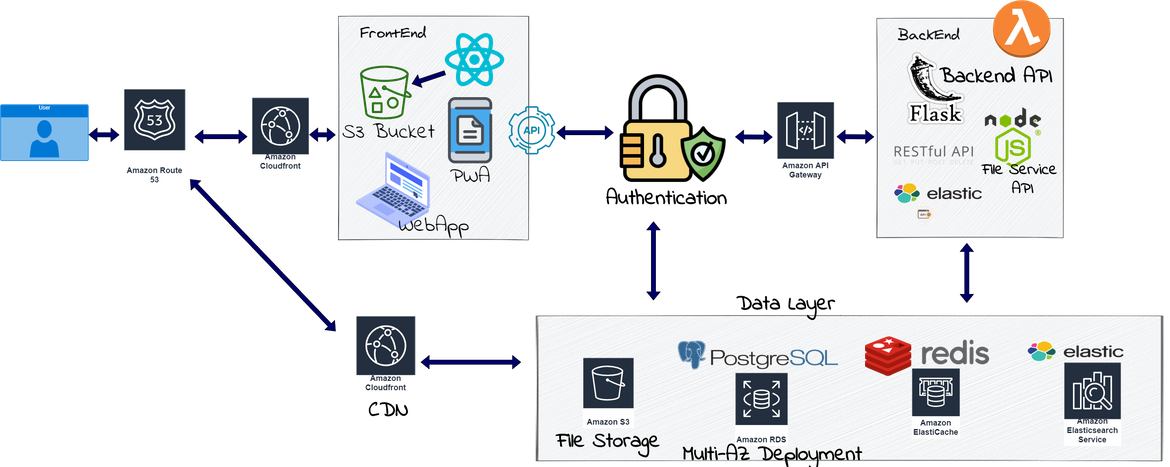
-
Frontend
The static files generated from the React Production build, will be stored in an S3 bucket. The S3 bucket is converted to serve a website. This will provide an endpoint through which the app can be accessed. To have a better performance on the frontend, the S3 bucket is selected as an Origin to a CloudFront domain. The CloudFront will act as a CDN for the app frontend and provide faster access through the app pages.
-
Lambda Functions for the APIs
All the backend APIs are deployed as AWS Lambda functions. Lambda functions are totally serverless and our task is to upload our code files to create the Lambda functions along with setting other parameters. I use Serverless Framework to manage all my Lambda functions. Below are the APIs which are deployed as Lambda functions:
- Backend Flask API
- File Service API
-
API Gateway to expose the Lambda functions
To expose the Lambda functions and make it accessible by the Frontend, AWS API Gateway is deployed. API Gateway defines all the endpoints for the APIs and route the requests to proper Lambda function backend. These API gateway endpoints are called by the frontend.
-
Database
There are various types of Database involved in the app. These are services deployed for the different databases:
- AWS RDS for Postgres: This will be deployed for the main recipe database
- Elasticache for Redis: This will be deployed for to store the auth/session data
- AWS Elasticsearch: Elasticsearch service will be deployed for the Search functionality of the app
All of the endpoints for these databases will be updated in the respective Lambda functions as environment variables.
-
File Storage and CDN
To support the file management capability of the app, a file storage need to be deployed. I am using an S3 bucket as the storage for the files which are uploaded from the app. The file service API calls the AWS S3 API to store the files in the bucket. To serve the files back to the user, a CloudFront distribution is created with the S3 bucket as the origin. This will serve as the CDN to distribute the static files faster to the end users.
-
Route 53
All of the services described above have their own separate endpoints. To bring all of them under a single domain a custom domain is created in Route 53. Since we only need publicly exposed endpoints for the frontend and the APIs, below are the domains defined in the Route 53:
- Apex domain points to the frontend bucket endpoint from the S3
- Sub domains pointing to the two APIs: Flask backend API and File service API
- Sub domain pointing to the CloudFront distribution for the S3 bucket serving the user uploaded files
-
Database Backup Process
We don’t need to run a separate backup process here. We can activate automated snapshots for the RDS Postgres DB. These snapshots will serve as backups and can be used to recreate the DB if the primary one fails. To have a fail-safe on the Database, the RDS DB is deployed in a multi-AZ configuration to have a secondary DB ready in case of any failures.
Above points should give you a good idea about how the app architecture is designed for an actual Production environment with scalable and HA incorporated in the architecture. Both the Serverless and the “Server-ful” deployments provide a resilient architecture for the app to run smoothly on both a mobile phone and pc/laptop.
Now I will dive into a skinned down version of the above architecture designed only using free and lightweight services. This is the version I am using currently to test out the app within my family members. Since in this version I have deployed using all free services, so the speed and resiliency of the app may not be as comparable to the actual architecture described above.
Free Version
Below image show all the services which build up the app architecture. The architecture overall remains the same as I described above. The difference is that all the components are implemented using free services to just get the side project up and running.
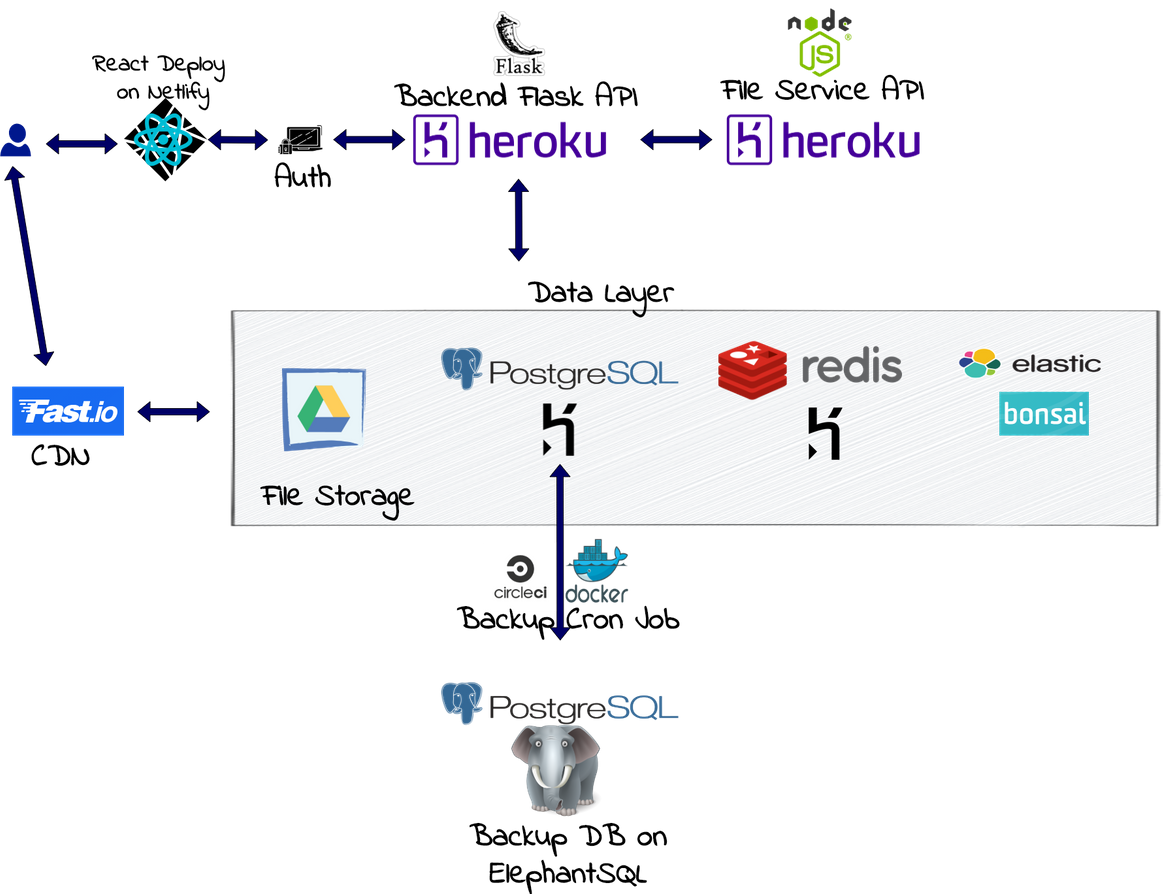
-
Frontend
The React Production build files are deployed on Netlify. Through Netlify the files can be uploaded to create a new deployment quickly. There is a very generous free tier on Netlify which will be enough for any side project. Netlify also provides a CDN which is included in the deployment. Due to the CDN, the app is accessible faster across regions in the world.
-
Backend APIs
All the backend APIs are deployed on Heroku. This provides a free option to deploy the API services as separate deployments(called apps). Heroku also has a free tier using which the APIs can be deployed. Only catch is that in free tier the deployments sleep after a period of inactivity. So the app may take some time to start after a time of inactivity. Below are the APIs which are deployed on Heroku:
- Backend Flask API
- File Service API
These API endpoints are used on the Frontend deployment as environment variables so these can be called by the Frontend.
-
Database
There are few different services involved for the different databases involved in the app. Below are the different services used for the Databases:
- Heroku Postgres Database for the Recipe database. Its a free option which can be enabled with the Heroku Flask API deployment and the endpoint can be exposed in the Flask API as environment variables
- Heroku Redis Database for the Auth/Session data. Heroku also provides a free Redis Database which can be added as Add-on to the API deployment. This is used as the store for the auth data used in the API authentications
- Free Elasticsearch service from Bonsai. There is a free Elasticsearch service provided by Bonsai. There are limits to the usage but enough for a side project with limited usage
-
File Storage and CDN
For the file storage I am using Google Drive. All the files uploaded by the users from the app, are stored in the Google drive using the File service API. To serve the files back to the user, a CDN is deployed using the Fast.io service. This provides an option to serves the Google drive files using a CDN for faster and quick access of the files. Fast.io is connected to the Google drive account to serve the files
-
Custom Domain
To access the app, a custom domain is registered using Google domains. This is the only paid part in the whole architecture. A custom domain is registered and below components are mapped to the custom domain:
- The Domain is pointed to the Netlify name servers so the app opens when the domain is accessed
- Sub domain is pointed to the Heroku Flask API and the Heroku File service API
- A sub domain is also mapped to the Fast.io CDN. This endpoint is specified in the app for the files to be served on the app
-
Database backup process using Circle CI
I am using a scheduled Circle CI workflow to run a periodic database backup of the Recipe database. I created a custom Docker image with the script I developed in Python. This Docker image is used in the Circle CI workflow to run the workflow as a Cron Job which runs every 5 hours.
Hopefully I was able to explain the whole architecture for my app. Both of the versions are designed to build the same architecture and can be used as needed, interchangeably.
Deployment Method
As a bonus step, I will also go thorough briefly about the process I am following to perform the deployments in Dev and PROD environments. I am using automated deployments for both Dev and PROD environments. Since I am using various different services decoupled from each other, I am using separate deployment pipelines for each of the services.
Dev Pipeline
Before I deploy the app services to PROD, I am deploying all services to a Dev environment. Any changes which I am making to any of the Services, first get deployed to the Dev environment and once I test and confirm, the changes get deployed to Production. I haven’t automated any of the testing steps and still handling that manually. Below are the different components which are deployed to constitute the Dev environment:
- Separate GIT repositories for each of the component codebase
- A separate branch for Dev changes. Any commit to the Dev branch automatically deploys changes to Dev environment
- Two separate Heroku deployments for Flask backend API and File service API
- Separate Netlify deployment for the Dev front end
Below I provide high level description of steps I follow for the Dev deployment for each of the component.
- Flask Backend API and File Service API
- All Development done on a separate branch. Changes get pushed to this Dev branch during development
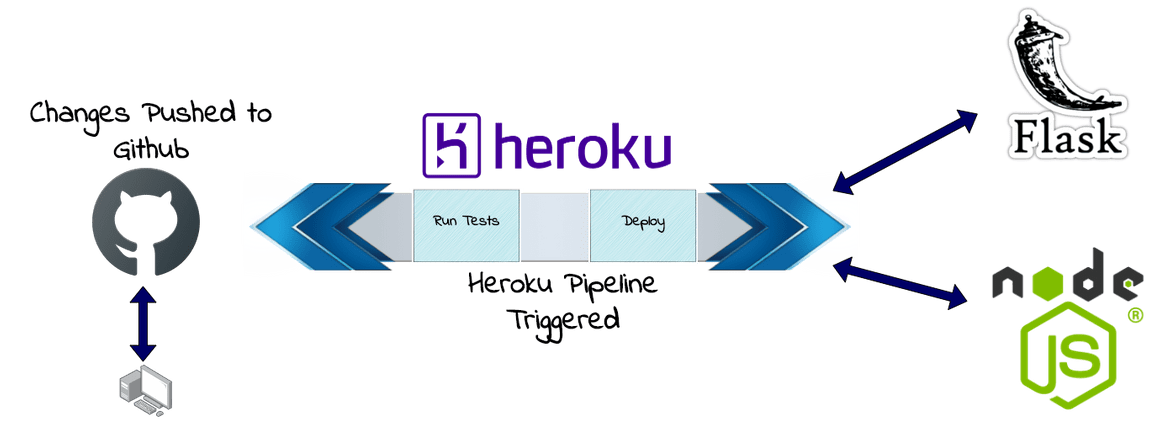
- Heroku Pipeline is used for the deployments
- Any time a change is pushed to the Dev branch, Heroku pipeline automatically deploys to the Heroku deployment
- Front End deployment
- Front end deployment pipeline deploys to the Dev Netlify deployment
- I developed a Github actions flow to deploy the frontend static files to the Netlify deployment
- A custom Docker image is used in the Github actions to deploy changes to Netlify
- Whenever changes are pushed to the Dev branch, the Github actions flow triggers and deploys to Netlify
More details for the Netlify deployment can be found Here
PROD Pipeline
For the Production deployment, the deployment to Production services get triggered whenever changes are pushed to the master branch of the respective GIT repository. Below are the pipelines I built for each of the Service deployments:
- Flask Backend API and File Service API
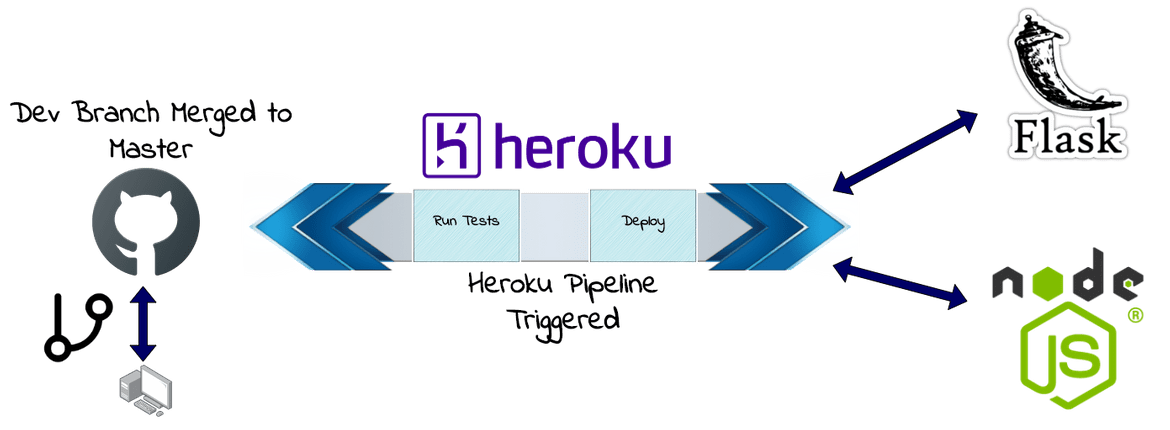
- Heroku pipeline is used for the Production deployment
- Whenever the Dev branch is merged to the master branch, the Heroku pipeline deploys the changes to the Production Heroku deployment
- Front End deployment
- Github actions is used to deploy the changes to Production Netlify deployment of the Frontend
- A separate workflow is defined in the Github actions config YAML file which deploys the changes from master branch to the Production Netlify deployment
- Any time the Dev branch is merged to the master branch, the Github actions flow runs and deploys changes to the Netlify deployment
Conclusion
Hopefully I was able to describe in detail about the system architecture which I am using for my Recipe management app. There are still rooms for improvements and I am continuously working on making the deployment more HA and fault tolerant along with having a quick access to the app data. But this post should give you a good idea about how to design a basic full stack architecture for an app using the microservices patter. If you have any questions about any part, please contact me from the Contact page.
