An automated workflow for blog posts using Gatsby and Github Actions
An automated workflow for blog posts using Gatsby and Github Actions
I went live with my blog recently. I like to automate all of my repetitive tasks. So I automated the process of posting to my blog too. I wanted to share the process which I developed for the automation as I think this can help some of you to launch your own blog easily.
When we hear about blog we imagine of setting up a database, setting up a web server and using a content management system. All of these steps require heavy effort and costs too. When I considered to launch my own blog, I thought of Wordpress. But all those heavy weight steps made me re-think my strategy. Thats when I came across Gatsby and JAMstack.
Gatsby provides a new way of building and launching websites. Using Gatsby I was able to launch my full fledged blog as a static website consisting of static HTML and Javascript files. In this post I will describe my process of how I automated posting of new posts to the blog. Since the blog is essentially a set of static pages so a new post is merely a new static page.
There are few ways by which we can automate deploying to a static website.
- Deploy and host the static website on Netlify. Automate using Github actions. This is what I am following and I will be describing in this post
- Deploy and host the static website on an EC2. Automate the deploy using Lambda and Jenkins. I will provide an overview for this process
- Deploy the static website to S3. More about this process can be found on my earlier post Here
- Use Github pages to host the static blog website. Not much automation needed here since just pushing the files to the repo, published the website.
The full code base for the process can be found Here
I have renamed the github workflow folder to add a ‘_temp’ so that a workflow is not triggered on this repo. You will have to remove that part from the name to use it.
Pre-Requisites to build your own
There are few pre requisites which are needed if you want to build and deploy a similar blog of your own:
- Some React knowledge to customize the Gatsby starter templates
- Install Node on local machine
- Install Gatsby on local machine
- A web server or some web hosting solution to host the static files as the blog website
-
If you want to automate the posting workflow:
- Github account
- If choosing the Jenkins for automation then a Jenkins installation
- Optional: Docker to launch a web server container
Technical Details about the Blog
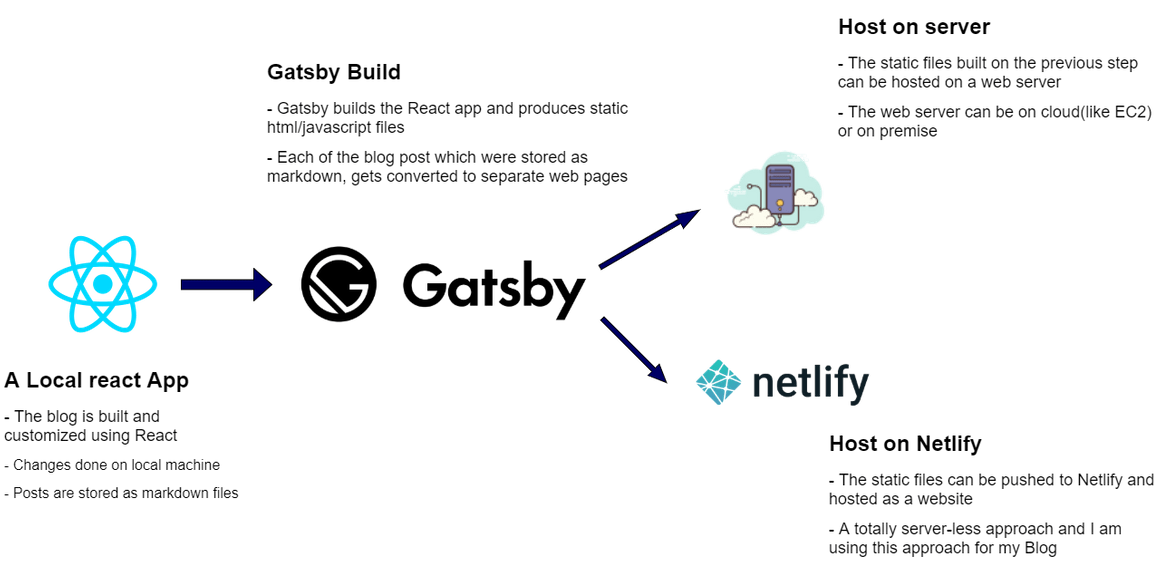
My blog is built and customized from a Gatsby starter template. Gatsby is an open source framework based on react which helps to build and deploy websites easily. The development and customization of the website is done using React framework. Once ready Gatsby builds and generates static HTML and JS files. Those static files can be hosted on any web server and the whole website gets ready as a static website seemingly service dynamic data. Since blog content is not ever changing so static files and content make the whole blog very lightweight. Below image describes overall how the pages are built and then hosted.
Each of the blog posts are written as separate markdown files on a local machine. Since these are simple markdown files, all of the general markdown syntax can be used to build the content. In addition to that, as we are working with a React app, HTML tags can be embedded too within the posts. This is a big plus since there are many cool things which can be achieved by embedding HTML content. A typical flow for writing a new post and publishing the same to web involves:
- Develop the post content locally on the markdown file. Embed images as needed by storing the images in the images folder. Based on what starter template you are using the folder will differ where the markdown files have to be stored. But mostly it will be src/content folder.
-
Once done, build the React app using Gatsby command
gatsby build - This will generate the static files which are to be hosted
- The static files can be hosted either on a web server or on one of the cloud static hosting providers(like Netlify or surge)
Easiest way to get started with Gatsby is heading over to Gatsby website and grabbing one of the starter templates. The template can be customized according to personal need and taste. Now enough about how I built the blog, let me jump into how I automated the repetitive blog posting flow which I listed out above.
About the Process
As I mentioned there are few different ways using which the blog posting can be automated. In this post I will be going through two of those options:
- Serverless Way: This is the method I use for my blog posts. Its total serverless way to deploy the static files to Netlify
- Web Server Method: This is another option where we can host the the static files to a web server on EC2 and automate the blog posting using Jenkins. I will be explaining how overall this flow will work. But I don’t have much code or scripts for this as after I designed this flow, I decided to go towards the serverless method.
Custom Docker Image
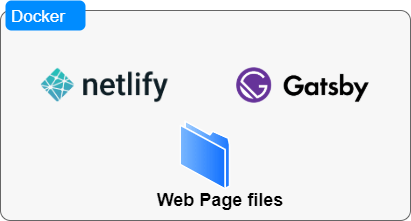
For both of the flows, there’s a common custom Docker image which is in use. I created the custom Docker image to have Gatsby and Netlify CLI pre-installed in the container which is launched. The image is hosted on Docker hub: awsacdev/netlifycustom:2.0. If you want to customize the image I have also included the Dockerfile in the repo. Its a simple Dockerfile:
FROM node:14.3
RUN npm install netlify-cli -g
RUN npm install gatsby-cli -g
RUN mkdir /deployfiles
WORKDIR /deployfiles
CMD ["bash"]
Lets go see how each of the flows work.
Serverless Method
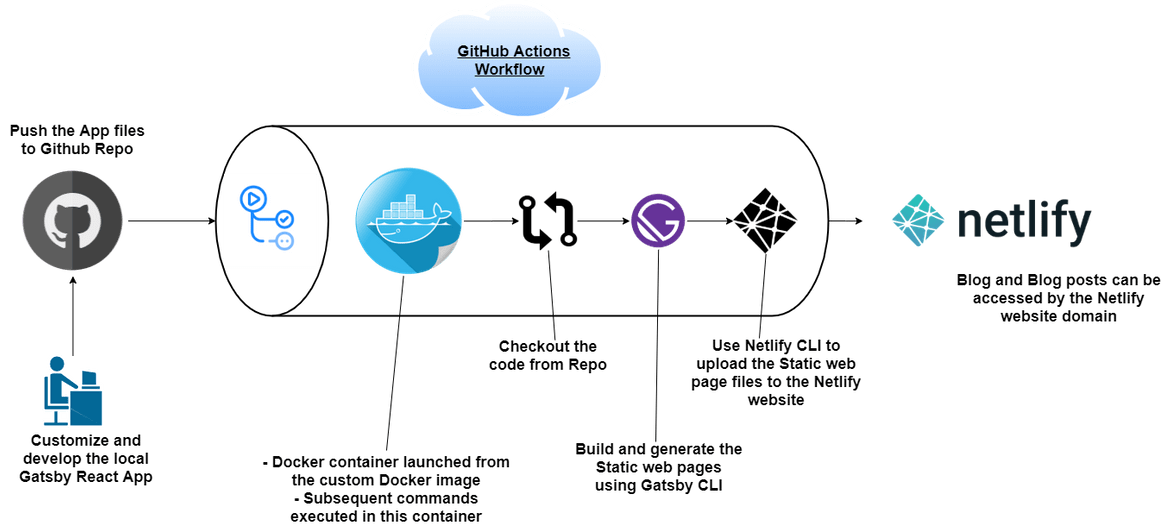
With this serverless method, you wont need to launch your own servers for hosting or even for the automated flow. We will implement the build automation using Github actions and deploy the website files to a Netlify website. If you don’t know about Netlify, it is a platform where static websites can be deployed easily without worrying about launching any servers. Below flow architecture can help explain the overall functionality.
Pre-requisites
There are few pre-requisites which are needed before this method can be followed:
- A Github account and repo
- Netlify account and a website created on Netlify
About the Github Actions Flow
I have included the Github actions workflow file which I use in the Github repo I mentioned above. This flow performs all the tasks to build the React app and uploads the static files to the Netlify website. To run the Gatsby and Netlify CLI commands a Docker container is launched from the custom Docker image I mentioned above. The image is: awsacdev/netlifycustom:2.0.
The container has Gatsby and Netlify CLI installed so the corresponding commands can be executed. For the Netlify CLI, we will need an auth token and the Website ID which are injected as environment variables when the container is launched by Github actions. The workflow details are scripted in a YAML file and stored in .github/workflows folder under the repo folder.
steps:
      - uses: actions/checkout@master
      - name: Build and Deploy
        run: |
          cd webtest
          npm i
          gatsby build
          netlify deploy --dir=public --prod
The auth token and the Website ID can be found from Netlify which I will describe below. Overall these are the steps which the workflow performs:
- Launch the Docker container from the custom image. Provide the needed environment variables from the Github Repo secrets
- Checkout the app files
- Run the Gatsby build command to generate the static files
- Run the Netlify CLI command to upload and deploy the static files to the specific Netlify website
Setup Details
Let me give a short walkthrough of the steps needed to setup this process. I have created a custom Docker image which will be used by the Github actions flow to run all the necessary build and deploy commands. Let me explain each step:
-
The blog post and the website is customized/developed locally. All the changes are done on the local React App which is generated by the Gatsby CLI locally. If you are starting the blog development from scratch, following commands have to be executed locally to initialize the local React App
gatsby new my-blog
cd my-blog
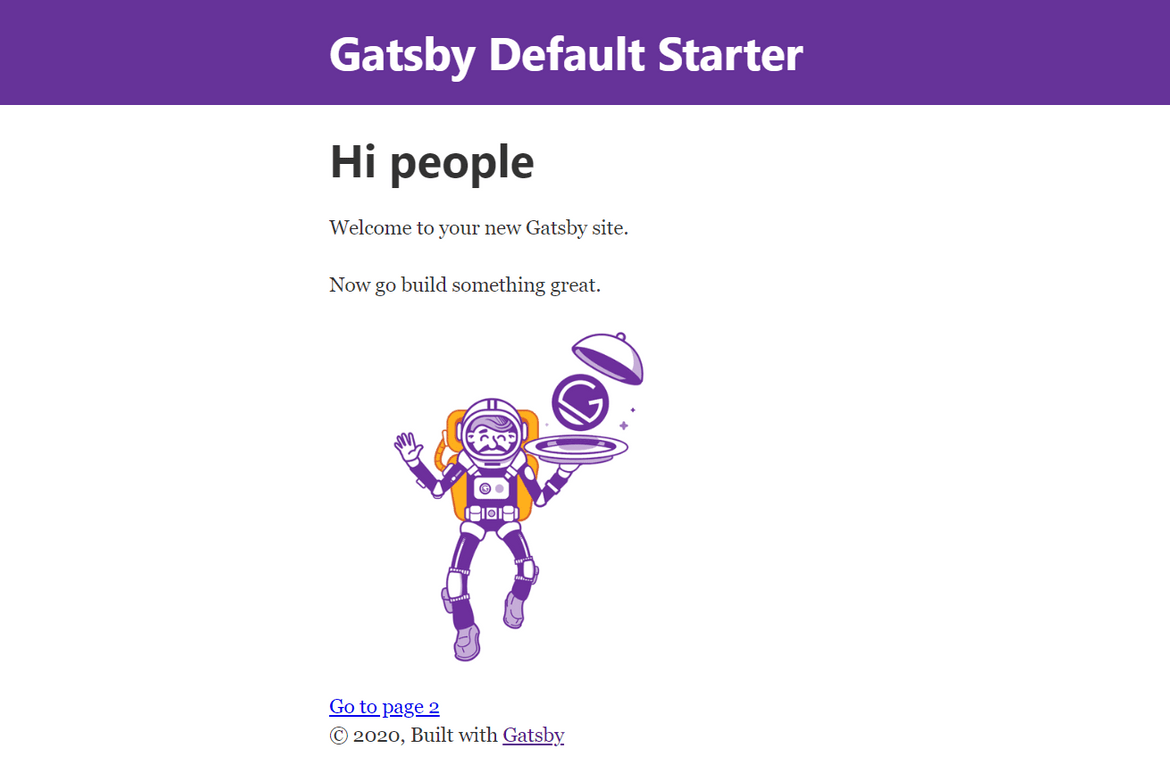
This will generate the basic Gatsby template as the local React App. You can go ahead and customize the App according to your needs. Once the changes are done the static files can be generated with:
gatsby buildThe static files can be hosted as the blog website. This brings us to the next step where we have to post new post content to the blog.
-
To be able to automate the blog posting process, we need to commit the local React app to a GIT repository. If not already done, make sure to initiate a GIT repository in the App folder and commit all the files to the repo. Also create a Github repo and push the app files to the Github repo
git init git commit -m "initial commit" git push -u origin <github_repo_url> -
Now that we have the Github repo and all the files pushed, we will need to build the Github actions workflow. I have included a sample Github workflow file in my Github repo. The workflow file need to be included in the app folder inside a child folder. Make sure this file is created and placed in the proper location
mkdir .github
mkdir .github/workflows
cd .github/workflows
touch main.yml
Copy the contents from the workflow file in my repo. Make any changes as needed. Once the repo along with this file is pushed to Github, the Github actions workflow will start running and perform the deployment to the Netlify website.
-
Before the workflow can run, we will also need to provide the Netlify auth token and the Netlify website ID as secrets on the Github repo. These will be injected as environment variables to the Docker container. The auth token is needed by the Netlify CLI in the Docker container to authenticate with the Netlify account. The website ID specifies which Netlify website we want to deploy the files to.
Netlify Auth Token: To get the token login to the Netlify account and navigate to User Settings—>Applications. Create a new Personal access token and copy the value. Add the token as a secret named NETLIFY_AUTH_TOKEN on the Github repo
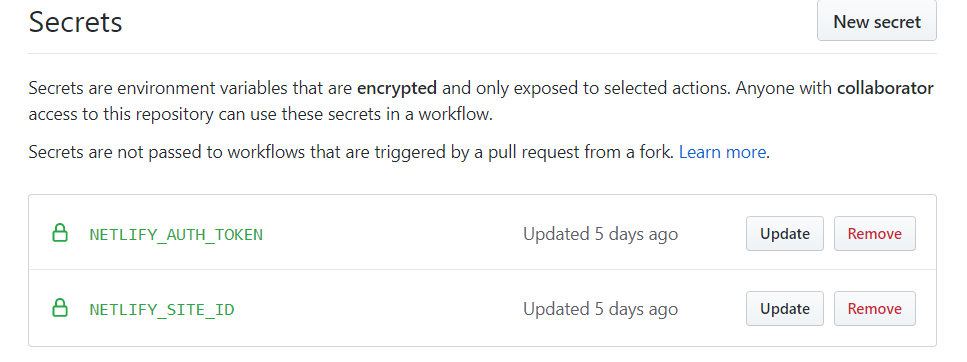
Netlify Site ID: To get the site ID, navigate to the website on Netlify and from the Settings page copy the API ID. Add the API ID as another secret as shown above. - Once the setups are done, go ahead and push the local files to Github Repo. Once pushed open the Github repo and navigate to the Actions tab. You should see the workflow running. Click on the name to see details about the run and if there are any errors those will show up on the console:


- Once the workflow completes successfully, navigate to the website URL. You should see the changes or the new post on the website.
-
Now every time when you need to publish a new post, write the new post in a new markdown file on your local machine. To test locally run:
gatsby developOnce satisfied, commit and push the files to Github repo. Once pushed the Github actions workflow will run automatically and deploy the new post to the live website. Any issues with the deployment, just revert back to the last commit on Github and it will again deploy the last commit to to Netlify
Bonus Section: Web Server method
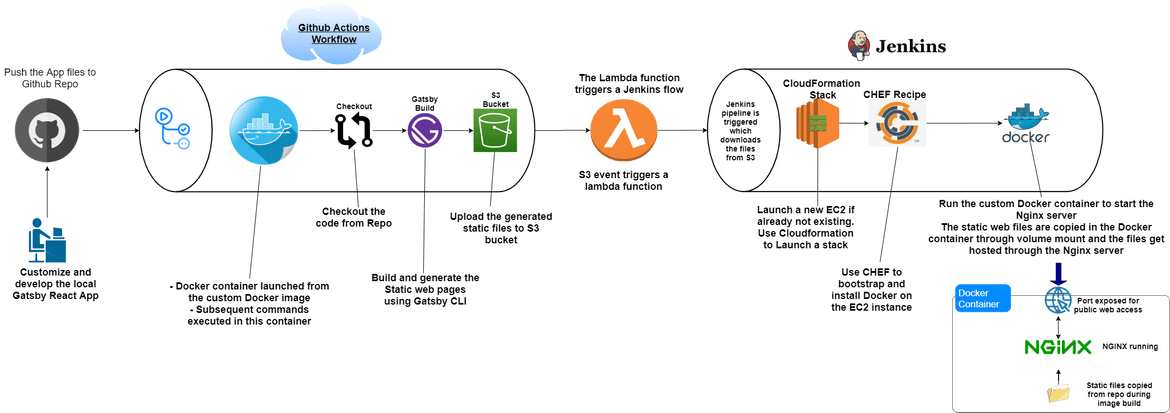
This is another way to host the static website files which will involve launching server instances and running web servers on them. The static files are hosted on the web server. I will walk through a high level process of how we can automate deploying of the website or new post to an EC2 instance. This diagram will provide an understanding of how the deployment flow to the EC2 instance will work.
There are two sections involved in this flow which will automate different aspects of the deployment pipeline. The Github actions workflow will get triggered automatically every time an updated app folder is pushed to the Github repo.
Pre-Requisites: There are few pre-requisites if this process is to be followed:
- An AWS Account
- Create a S3 bucket for the static files
- Jenkins installed and running
- EC2 Instance for the web server and hosting of the website files
- Creat a Lambda function to launch the Jenkins pipeline and create an S3 bucket event to launch the Lambda function when a new file is uploaded
GitHub actions Workflow:
- This will first launch the Docker container from the custom Docker image. The custom Docker image has the Gatsby CLI installed which is needed here
- Once the Docker container is ready, the app files are checked out from the repo inside a folder in the container
- Commands for Gatsby build is executed to generate the static files
- The static files from the ‘public’ folder is uploaded to an S3 bucket which was already created
- Once the files are uploaded to S3, the bucket event triggers a Lambda function
- The Lambda function triggers the Jenkins pipeline and provides the necessary inputs to the pipeline too
Jenkins Pipeline:
- The Jenkins pipeline first launches a CloudFormation stack to launch an EC2 instance. If the EC2 instance already exists this step can be skipped
- Runs a CHEF recipe to bootstrap the EC2 instance and installing necessary packages and tools(installs Docker)
-
The CHEF recipe then runs the docker command to launch the docker services specified in the docker-compose file. The docker-compose file builds a custom Docker image installing Nginx and copying the static website files to a location in the container for hosting by the web server. I have added both docker-compose file and the Dockerfile in my Github repo.
version: '3.1'
services:
webserver:
build:
  context: .
  dockerfile: Dockerfile_nginx
ports:
  - '80:80'
FROM nginx:latest COPY $PWD/public /usr/share/nginx/html EXPOSE 80 - Once the container is launched successfully, the live website can be accessed from the EC2 instance public DNS name. Going forward, any time a new change or post is pushed to the Github repo, this whole flow will get triggered and publish the changes to the EC2 instance
That completes the explanation for both of the flows and based on which path you choose, one of these pipelines will be running on your Github repo.
Conclusion
This should be a helpful explanation for anyone who is looking to launch a blog or a website as this provides a very non-complicated way to host the websites and its pages. Of course this is not suitable for apps or pages which are dynamic in nature and are dependent on continuous backend data. But using APIs and we can convert these static pages to a dynamic website. That’s a discussion for another day. Static page websites using JAMStack are becoming common now and gives a very easy way to get up and running with a full fledged website. This is an area I suggest you should explore more. Any questions or issues, please reach out to me directly from the Contact page.
