How to Build a Whatsapp Bot: Build Whatsapp as a channel for Amazon Connect using Lex
Recently I have been playing around with whatsapp API to learn some aspects of it. So I thought what better way to learn more about the API than using that in an actual project. So I planned to build a Whatsapp bot which uses Whatsapp API and Amazon Lex, Amazon Connect. This bot enables communication to Amazon connect via a new custom communication channel namely Whatsapp. Basically this will enable someone to communicate to Amazon connect agent simply from whatsapp. I think this will also provide a good learning for someone to use Amazon Lex and Amazon connect APIs. Here I will explain the overall workings of the bot and the deployment approach for various components of the whole bot architecture. This bot involves the below components using which the whole architecture is built:
- Whatsapp API (via Twilio API)
- Amazon Lex
- Amazon Connect
A demo of the bot can be found at below links:
The GitHub repo for this post can be found Here
I have checked in some of the parts of the code here while I clean up rest of the code. Reach out to me if you need help with the build and I can get you the code.
Pre Requisites
If you want to follow along and deploy this solution for yourself, there are some pre requisites you need to fulfill:
- A Jenkins server to run the pipelines
- Basic knowledge of Terraform and how to deploy using Terraform
- A free Twilio trial account with a Whatsapp sandbox. I will cover how to get this
- An AWS account. Free tier should be fine
What is a Whatsapp Bot
I can assume that you all know what is Whatsapp. It is a very popular messaging platform provided by Meta(formerly facebook). This messaging platform has become very famous nowadays and is like a go to platform for messaging amongst individuals. So it is sure to have capabilities to support some business scenarios too. Thats where Whatsapp bots come in. At high level this is what a whatsapp bot does:
- You have a number which is supposed to be monitored by the bot
- Send some specific keywords to the number and based on the keyword, bot will respond with corresponding answers or perform some task on behalf of you
- The bot will respond back in a message like a normal message reply along with the needed info or outcome of the task
This is high level a bot performs. Now the bot can be complicated based on what task it is performing. For this example I have taken two use cases to demonstrate the process of building the bot. Let me explain them below.
Functionality of the Bot
Let me first go through the functionality of the bot. For this example I have built two use cases which are handled by the bot:
- Get automated Stock prices based on a symbol name sent to the whatsapp number
- Chat with an Agent via the whatsapp message. The agent is online on the other side from an Amazon connect instance
Both of these use cases happen right from the whatsapp message interface. Let me go through in detail about each of these use cases and how they work from an user perspective.
Functional Flow
The 1st scenario is when someone wants an automated stock price from the bot. This is the message flow which happens when getting an automated stock price from the bot
Get Stock Price from Bot
The stock price response gets sent as a reply on the same whatsapp chat thread.
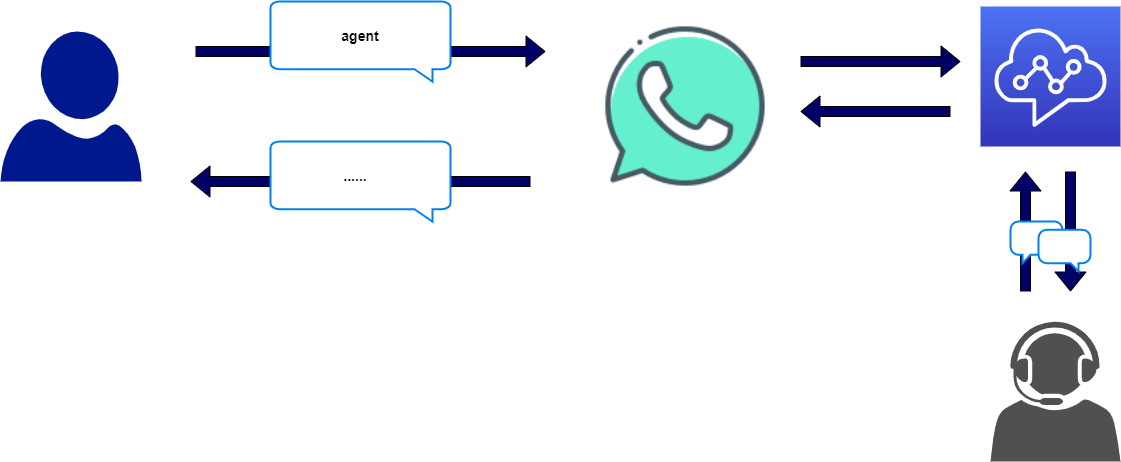
For the second scenario, the correspondence starts with the ‘agent’ keyword which connects the user to and agent who is online on Amazon connect. This is the message flow for the same:
Talk to an agent via Whatsapp bot
The chats from the agent gets sent as reply messages on the whatsapp chat thread.
Tech Details
Now lets get into some technical details of this whole functionality. In below two section I explain the:
- Technical components which are involved in the whole functionality
- How the data is flowing right from the message is being sent on whatsapp to the response is being received back
Tech Architecture
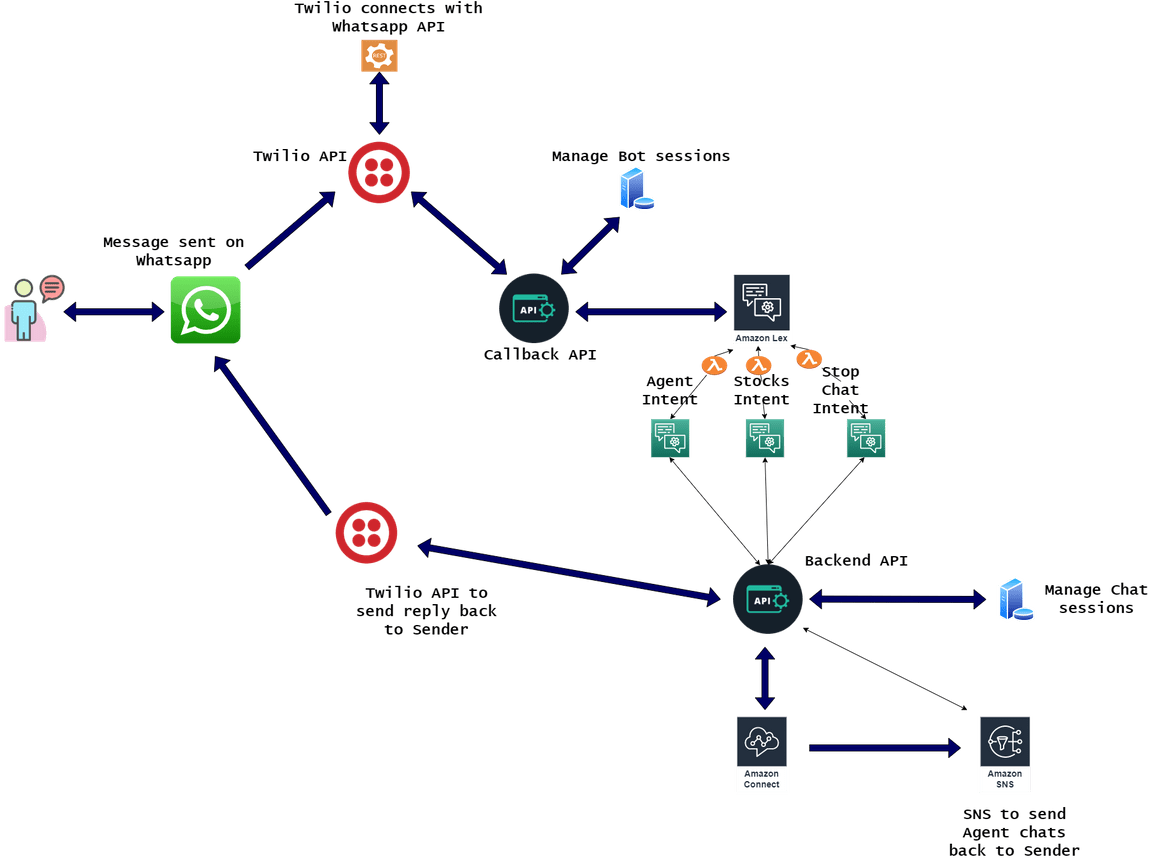
Below diagram will show a high level architecture of all the components involved in this whole functionality end to end.
Let me explain each component a bit:
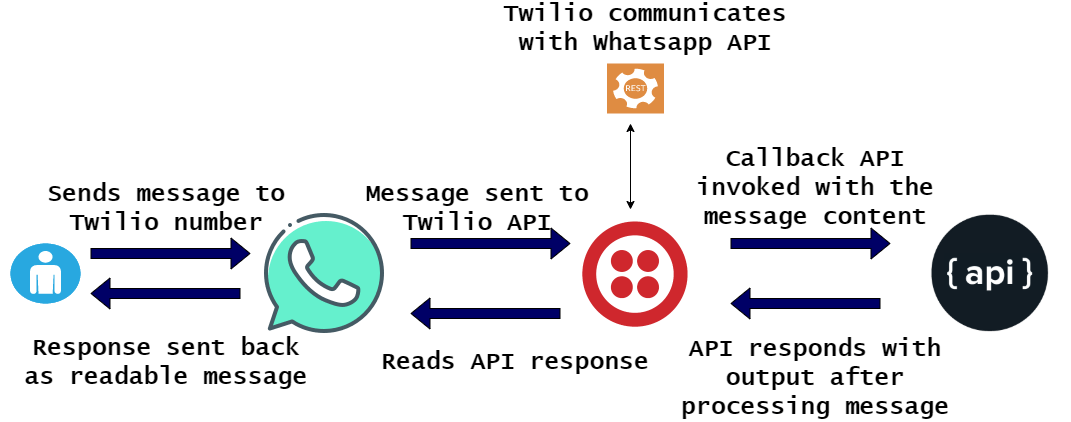
Whatsapp and Twilio API: This is the Whatsapp API component of the solution. Twilio provides a wrapper for Whatsapp API which can be easily used to communicate with Whatsapp API. A Twilio whatsapp API connection is being used here to get the message content and send to Amazon Lex for further processing. When a Twilio whatsapp environment is established, a speicific phone number is generated which can be used to receive messages and do further processing on that message. For more info about Whatsapp API usage via Twilio, you can refere Here
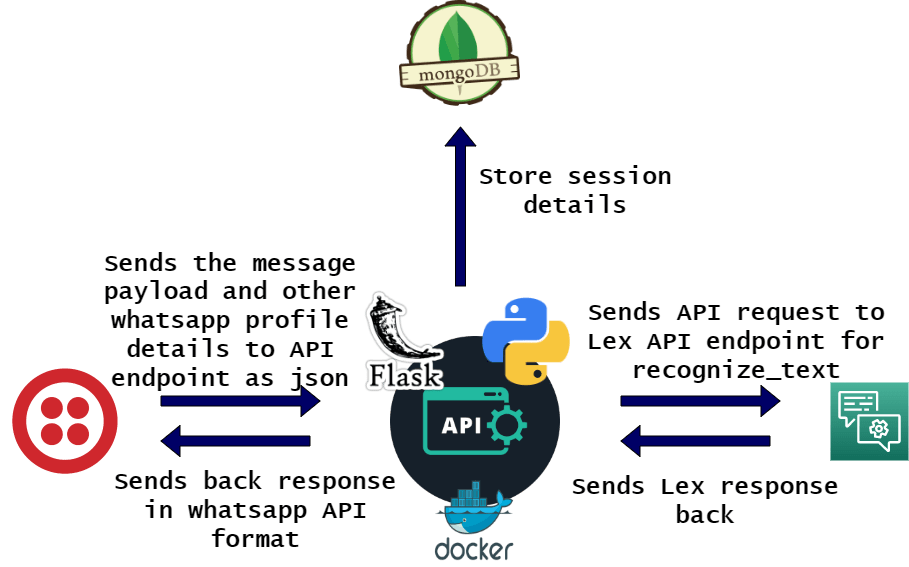
Callback API: When a message is sent to whatsapp, since Twilio API is integrated to that specific number, the message gets sent to a Callback API for further processing. This Callback API reads the message sent to the whatsapp number and sends a request to Amazon Lex bot to get a response outcome. This API is responsible for translating the message payload from Twilio API to the request format needed by Lex bot for consumption.
Sessions Database: This is the database which holds information about an ongoing chat session. This is needed to keep the continuity between various messages within a single conversation thread. A Bot session and an agent session is stored separately in separate tables within the same database. At end of the chat conversation, the session info gets deleted from the DB.
Amazon Lex Bot: This is the Bot brain behind the scenes. A Lex bot is defined with different intents to handle the scenario for automated stocks or connecting to an agent. Based on the input message text, the Lex bot interprets which intent to trigger and correspondingly sends request to respective API via a Lambda function for further steps. Here I have used Lex V2 which is latest version of the bot.
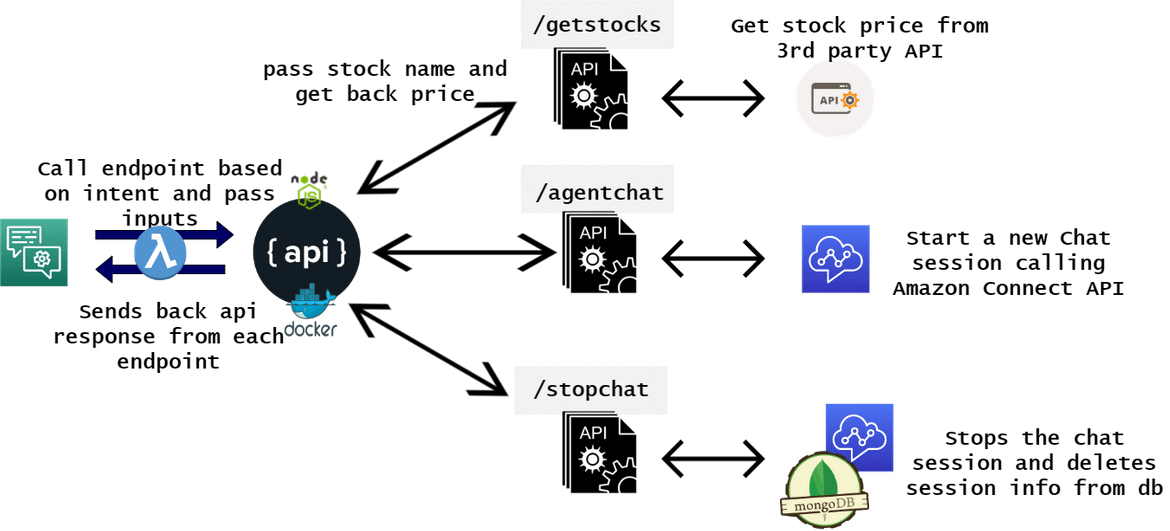
Backend API: This is the backend API which receives the requests from Lex bot and performs respective tasks. This API has separate endpoints for:
- Getting Stock data from a 3rd partrty API
- Call Amazon connect API to start a chat session with agent
- Getting Agent chat replies from the SNS topic and send whatsapp message replies
Based on the intent invoked in Lex, respective API endpoint is called by the Lex lambda. This API responds with the needed response
Amazon Connect: This is the backend service for the Agent connect scenario. When the Lex intent for agent scenario is invoked, via the backend API, a new chat session is started using Amazon Connect API. A Contact flow is created in Amazon connect which gets invoked by the API and routes the chat to an available agent.
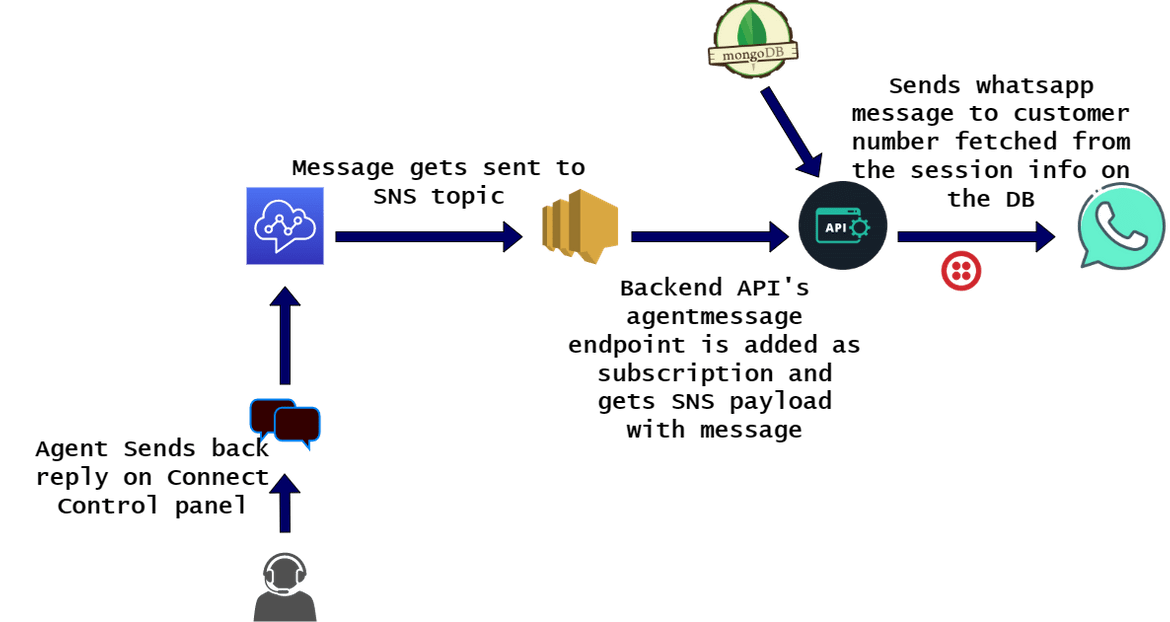
SNS Topic: When an agent accepts the chat session from the whatsapp incoming chat, the replies from the agent has to be sent back to the customer as a whatsapp message reply. This is achieved by an SNS topic. When a new Amazon connect chat session is started from the backend API, the SNS topic arn is passed as parameter. This way the SNS topic receives the payload as the messages which are sent by the agent from the Amazon connect Control panel. This payload is forwarded to the subscription which is the Backend API endpoint to process agent chats.
End to end Flow
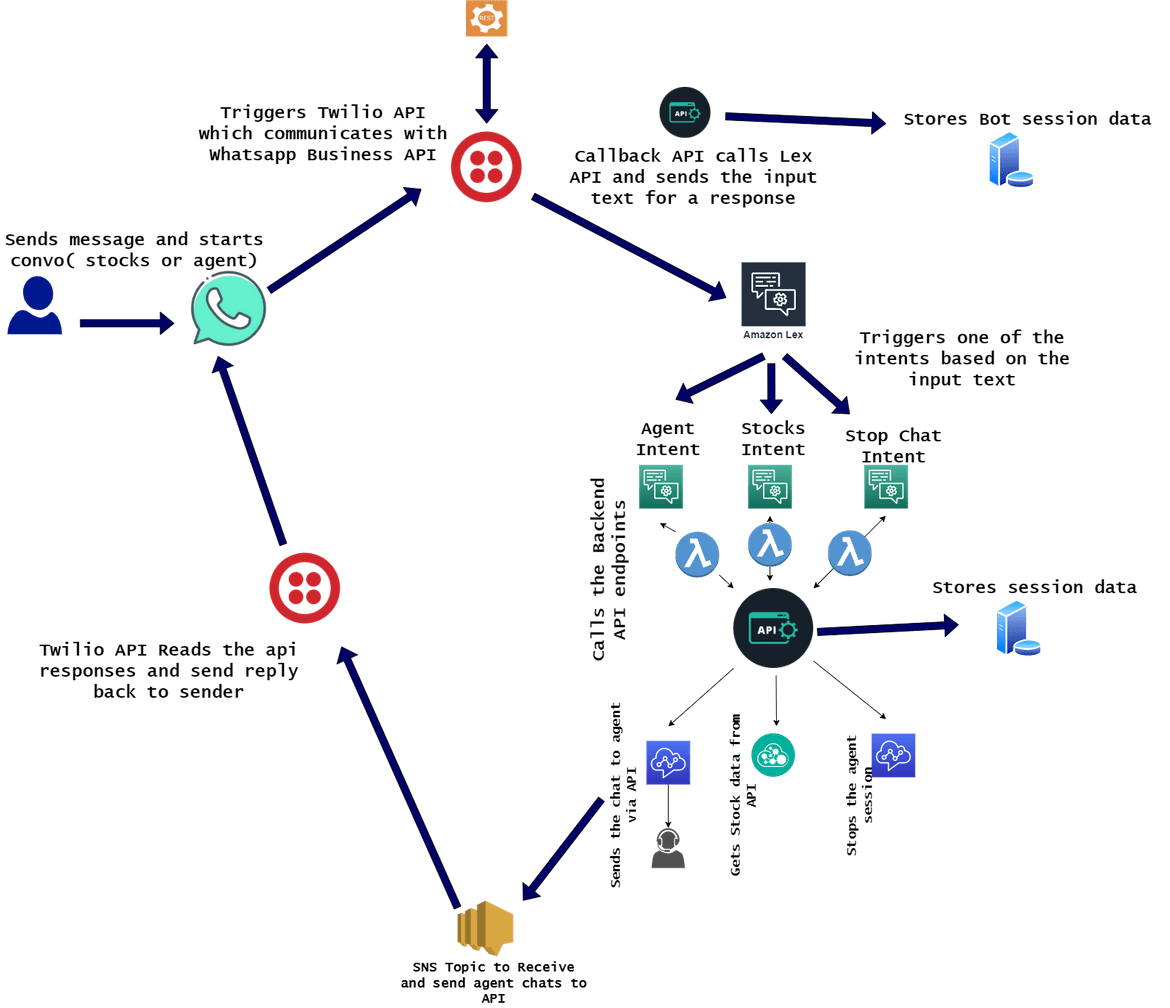
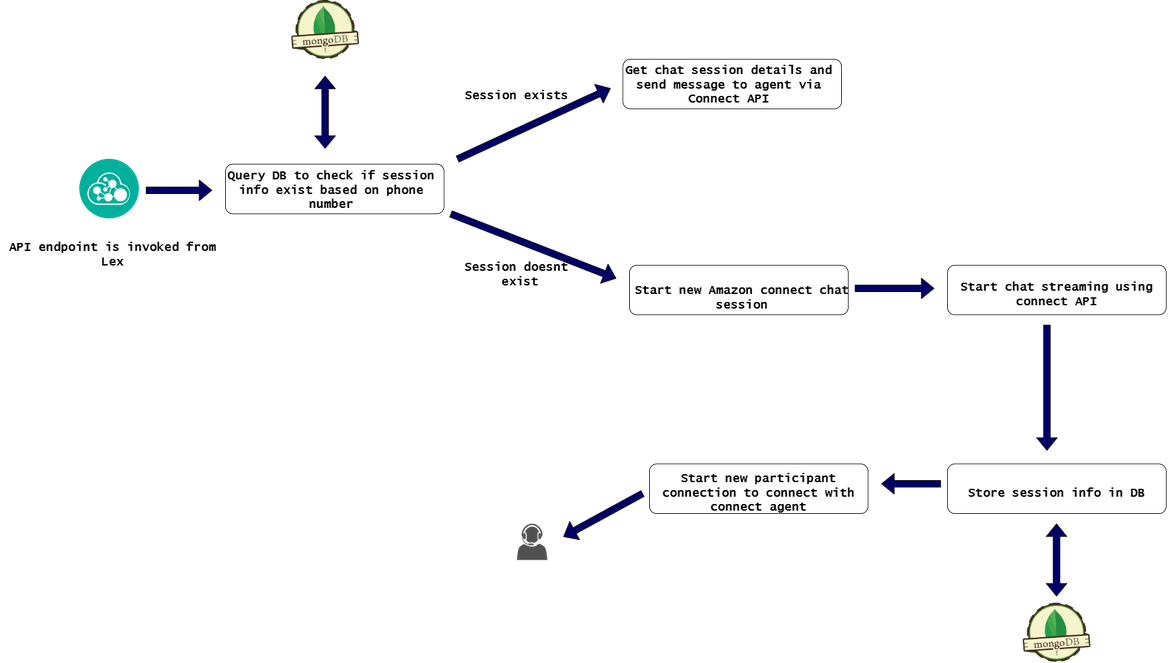
Now that we know what are the components involved in the whole solution, lets understand how the flow works technically. This diagram shows how a typical flow will happen from the start when a message is sent to the whatsapp bot number, to the reply being received on the same thread.
Let me explain the flow. Let me take the example of the scenario where user types ‘agent’ and sends to the whatsapp number:
- When the ‘agent’ message is sent to the whatsapp number, the text is sent as inout to the Twilio API for whatsapp
- Twilio API invokes the callback API and sends the text as input along with other details from whatsapp like sender number, profile name etc.
- Callback API saves the session in the database along with a session id. The session id is the whatsapp account id. Type of session is saved as ‘agent’
- The callback API invokes the Amazon Lex API endpoint and sends the ‘agent’ text as input to ‘recognizatext api
- Based on the input, Lex invokes the intent for ‘Agent’. This intent triggers the lambda for Agent condition
- The Agent intent calls the backend API endpoint for the Agent chat
- The backend API calls Amazon connect API and starts a new chat session. Session details are stored in the database table
- The new chat session starts the corresponding contact flow and delivers the chat to an available agent
- Agent accepts the chat and gets the first welcome message along with the customer name
- Agent sends a reply to message and the message gets delivered as an event to the SNS topic
- The SNS topics sends the payload to the subscribed backend API endpoint
- Backend API gets the message text from the input SNS payload and sends as input to the Twilio for Whatapp API. The Twilio API sends the text as message to the customer’s phone number. So the agent’s reply gets sent as message to the customer as whatsapp message reply
- Further messages which are sent from customer, gets sent to the Twilio which invokes the backend API, agent endpoint and directly sends the message to the already open chat session. The unique session ID for the chat session is read from the database
- Once customer is done, sends ‘stop chat’ as message. This calls triggers the Lex intent for Stop Chat which in turn invokes the endpoint to stop the chat. This stops the chat session and deletes the session infor from the DB
- If agent ends the chat, this sends the stop event to SNS which invokes the backend API endpoint to delete the session details from the DB
Overall Architecture
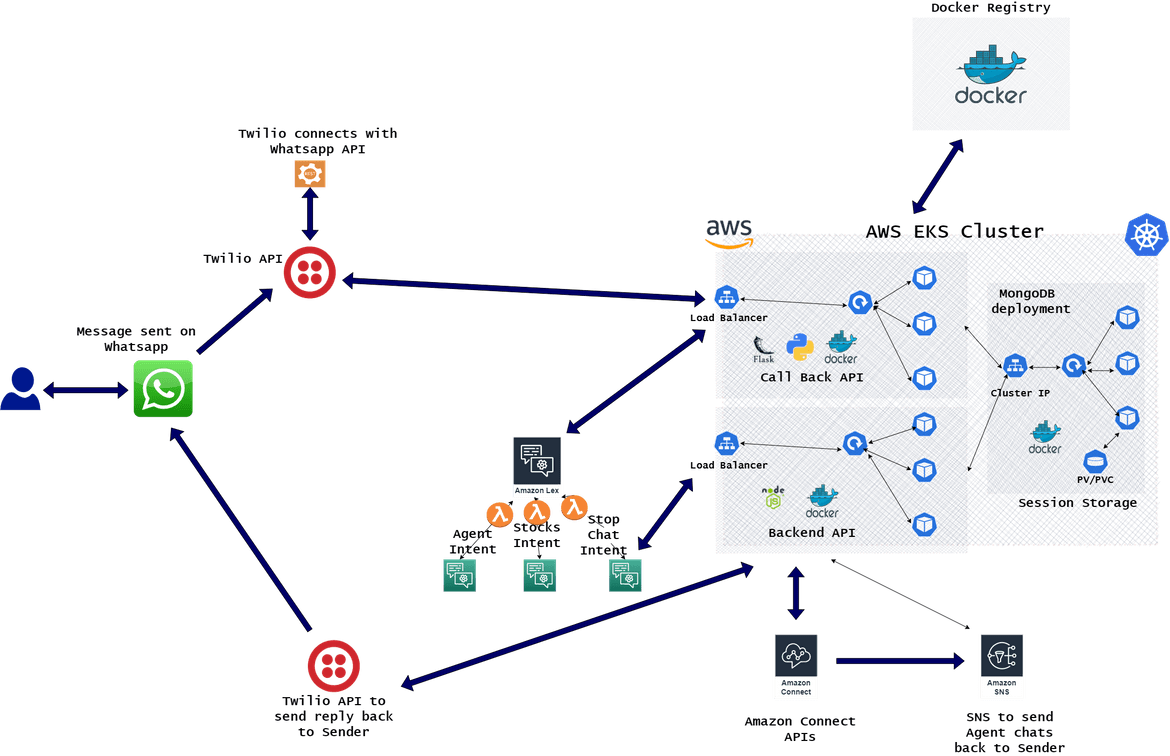
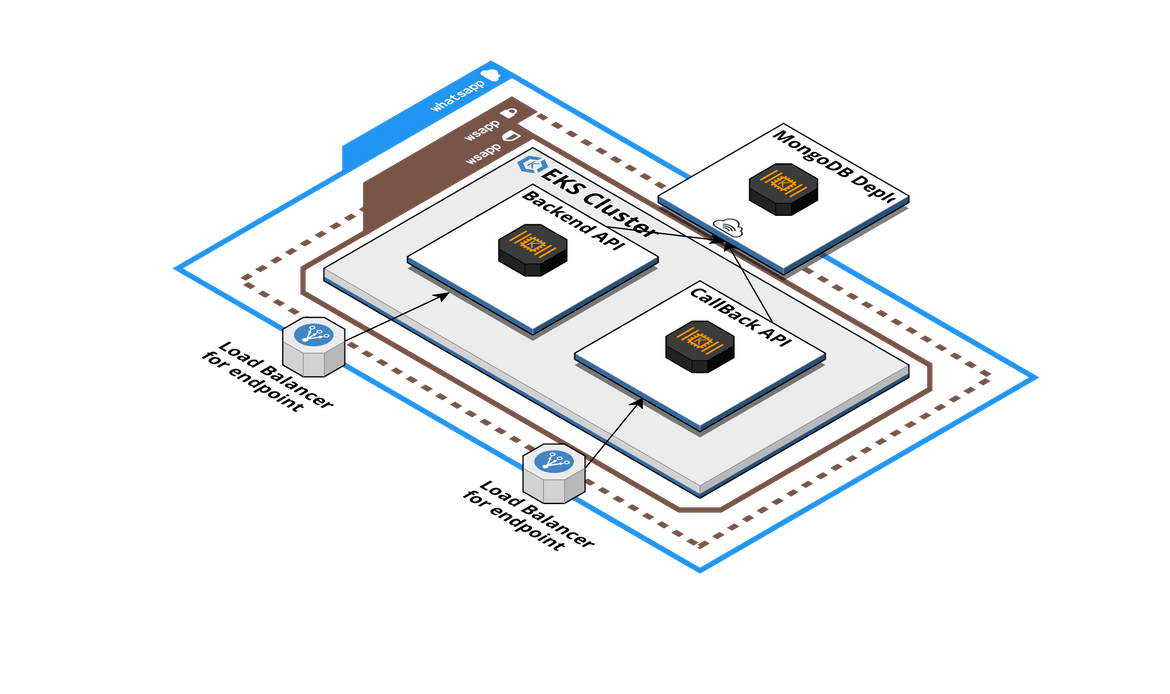
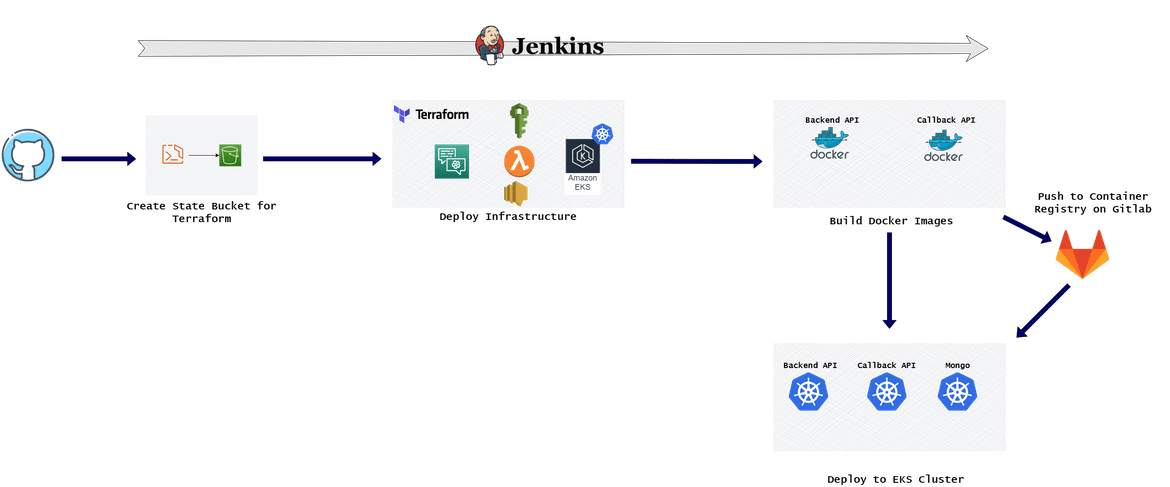
Now we have a good idea of how the overall bot works. Lets understand now how each component of this whole architecture is deployed. Below image shows how each components are deployed.
Let me go through each of the component:
Twilio API for Whatsapp: I am using Twilio API to communicate with Whatsapp API. When using Twilio API, it provides a specific number which invokes the whatsapp API. Below flow shows how the Twilio API works for Whatsapp.
For this example I have created a whatsapp sandbox in Twilio. More on that later.
Call Back API: This is the API which is invoked from Twilio after each message is sent to the bot number. The API is deployed on a Kubernetes cluster. Below shows high level what the API does.
It is a Flask API built with Python. The API is converted to a Docker image and deployed to a Kubernetes cluster. The Kubernetes deployment is exposed via a Loadbalancer which exposes the endpoint for the API. The load balancer gets created on AWS from the EKS deployment. An application load balancer gets deployed when the Kubernetes stack for the call back api is deployed.
Backend API: This is the API performing actual actions invoked by each intent from the Lex. This API has 3 endpoints which when invoked handles those different intent related tasks. Below shows how the API works
It is a NodeJS API using express framework. Three different routes are added in the API for three different API endpoints. Based on the Lex intent invoked, respective API endpoint is called and the response is sent back to to Lex. The API is built as a Docker image and deployed as a Kubernetes deployment. The API endpoint is exposed via a Load balancer service which is deployed with the Kubernetes stack for this API.
Mongo DB Deployment: This is the database to store all session related data for a specific chat session. At high level this is what is stored in this DB in separate tables. Since the data is short lived for the chat session, I am using a No-SQL DB here.
- When a bot session starts for the automated stock price response, the session id is stored in this DB to correlate different inputs from the message as Slot value inputs for the same Lex chat session. At end of final response from Lex, this session record is deleted
- When a new Agent chat session is initiated, the Amazon connect Contact ID is stored along with some profile info so the chat messages back and forth can be tied back to the same chat thread on Amazon connect side
The DB is deployed as a Kubernetes deployment with a Persistent Volume for data storage. The docker image for Mongo DB is deployed on the EKS cluster and since it is only to be accessed internally within the cluster (from the APIs), the endpoint is only exposed via a Cluster IP service.
Amazon Connect: An Amazon connect instance is deployed which will enable the agent to receive the chat sessions. A contact flow routes the incoming chats to an available agent in a queue. The contact flow can be configured to route the chats to a specific queue. High level this is what the Contact flow does:
SNS Topic for Agent Replies: When a chat session starts from whatsapp which routes to an agent, the agent replies have to end up back at the same Whatsapp thread as a reply. This is ensured by this SNS topic. This SNS topic is created to handle and deliver the agent replies to the same Whatsapp message thread. Below diagram shows how this is achieved.
The SNS topic is used in the step where a new chat session is initiated when the respective backend API endpoint is invoked by the Lex based on the whatsapp message sent. The SNS gets registered as part of that new chat session and it monitors the replies from agent. Any replies from agent get delivered to the SNS subscription (https endpoint) of the backend api endpoint. The API uses Whatsapp api to send back a message reply to customer number with the agent reply as message text.
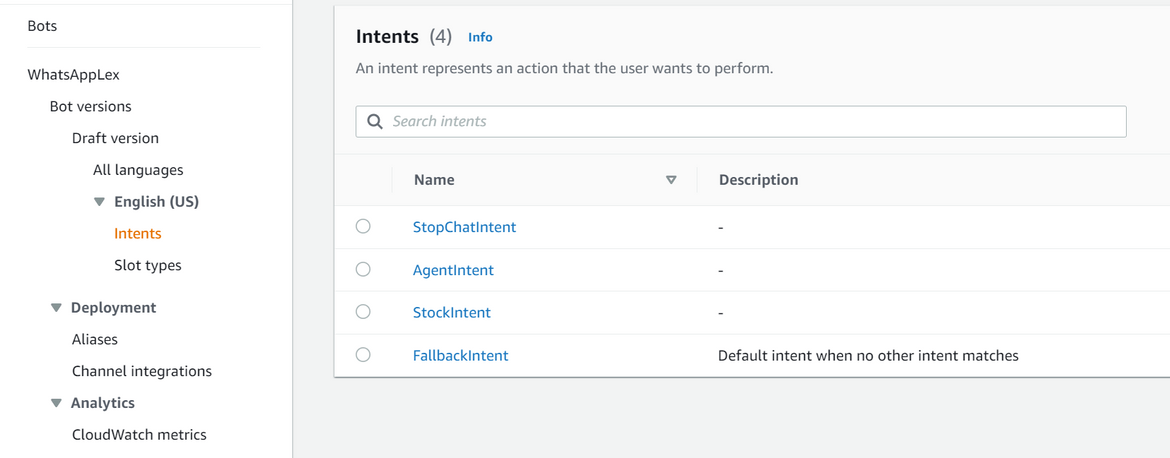
Amazon Lex Bot: A Lex bot is deployed to control the flow of conversation based on input keywords in the whatsapp message. There are three intents configured on the Lex bot and each invoke a different API endpoint to achieve the corresponding task:
Every intent triggere is fulfilled by a Lambda function. The Lambda function executes different backend API calls based on the intent name which is fulfilled.
- Agent Intent: This intent is triggered on agent keyword in the message. When this intent is fulfilled, the Lambda function calls the API endpoint to start a new chat session on Amazon connect and pass the chat to an agent.
- Stock Intent: This intent is triggered by the stock keyword in the message. When this intent is fulfilled, the lambda function calls the backend api endpoint which handles the stock price task. It gets the response and sends back as resply from to Lex
- Stop Chat Intent: This intent is triggered with stop chat message. This intent invokes the backend API endpoint which closes the agent chat session and deletes the session info from database.
Deployment Approach
Now lets move on to deploying the bot to make it functional. There are various components which are to be deployed here. I am using a Jenkins pipeline to deploy the whole infrastructure and the application code components. Here I will go through how I am deploying each of the component of the architecture we discussed above.
A note about using Whatsapp API via Twilio
Before I dive into the components, let me first explain a bit about using Twilio for Whatsapp API. Since Twilio is a very integral part of this whole solution, it is important to understand how to start using the same. Here I am explaining high level how you can get a sandbox Twilio Whatsapp environment for your use for learning or POCs:
- Register for a free account at https://www.twilio.com/
- Once registered, login to the Twilio console and navigate to the Send whatsapp message section
- Here you can get started with a new whatsapp sandbox
- Once sandbox is created, it will provide a screen to specify the call back api url and the message to be sent to join the sandbox from whatsapp. This number is the bot number to which messages will be sent
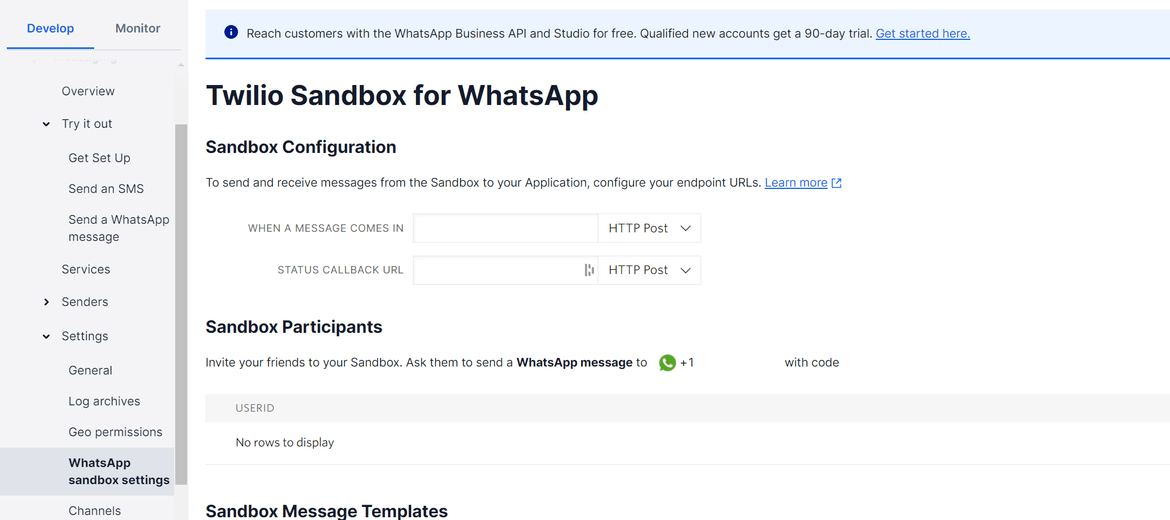
- Also make sure to note down the Account SID and auth token as that is needed for the api codes to connect to the Twilio api
- To use the API in code, there are SDKs available for variuos languages. Anyone of them can be used based on which language code is being written
- To join the sandbox from whatsapp, send the specified message from the console earlier. Only after joining the sandbox the bot can be tested:
For more details of using Twilio for Whatsapp, you can check Here
Repo Structure
There are three Git repos involved here. Three GIT repos are to deploy different parts of the whole bot architecture.
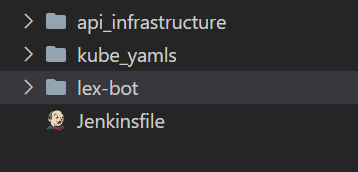
- Main deploy repo: This is the main repo which deploys the application via a Jenkins pipeline. Here is the folder structure I have used for this repo:
apiinfrastructure:This is the folder which contains Terraform scripts to deploy the whole infrastructure. This contains the Terraform module to deploy all the infrastructure needed for the components.
kubeyamls:This contains all yamls to deploy the APIs to EKS cluster. This is used in the pipeline to deploy the API components
lex-bot:This folder contains the json files to deploy the lex bot to AWS
-
Repo for Callback API: This repo contains the files for call back api. These are the files in this repo:
- API code files
- Dockerfile to build the Docker image for the API
-
Repo for Backend API: This repo contains the filese for the backend API. All the nodeJS related files are checked in to this repo. These are the files in this repo:
- API code files
- Dockerfile to build the Docker image
Deployment Components
Now lets move to deploying each component of the bot. Let me go through each part of the technical architecture which we deployed earlier, and explain how each part is deployed from infrastructure to the application code.
Backend API: The backend API is deployed to the EKS cluster as deployment. The Dockerfile to build the Docker image is part of the backend API repo.
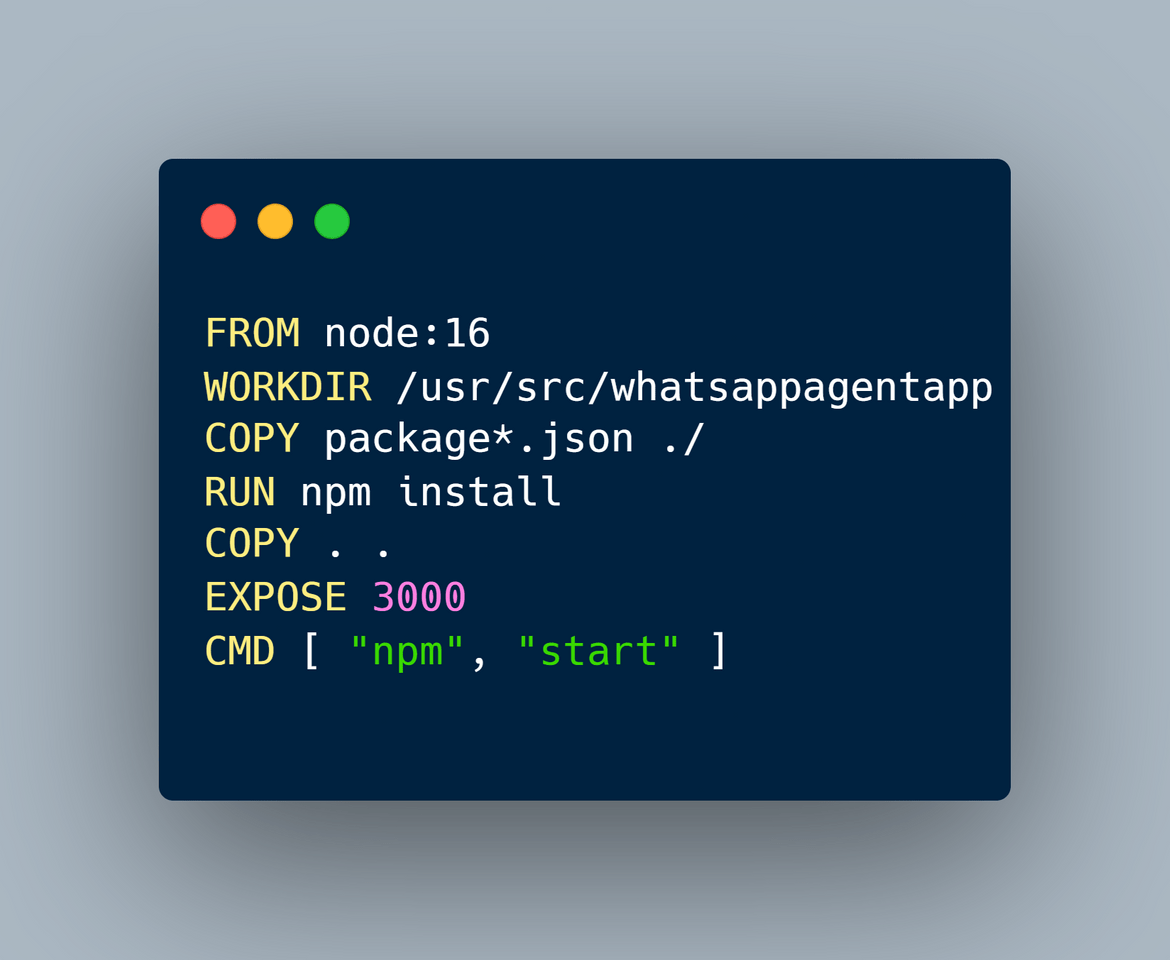
This image is specified in the Kubernetes Yaml to deploy the API as deployment to the cluster. Below is the Yaml file used to deploy the API deployment to EKS cluster
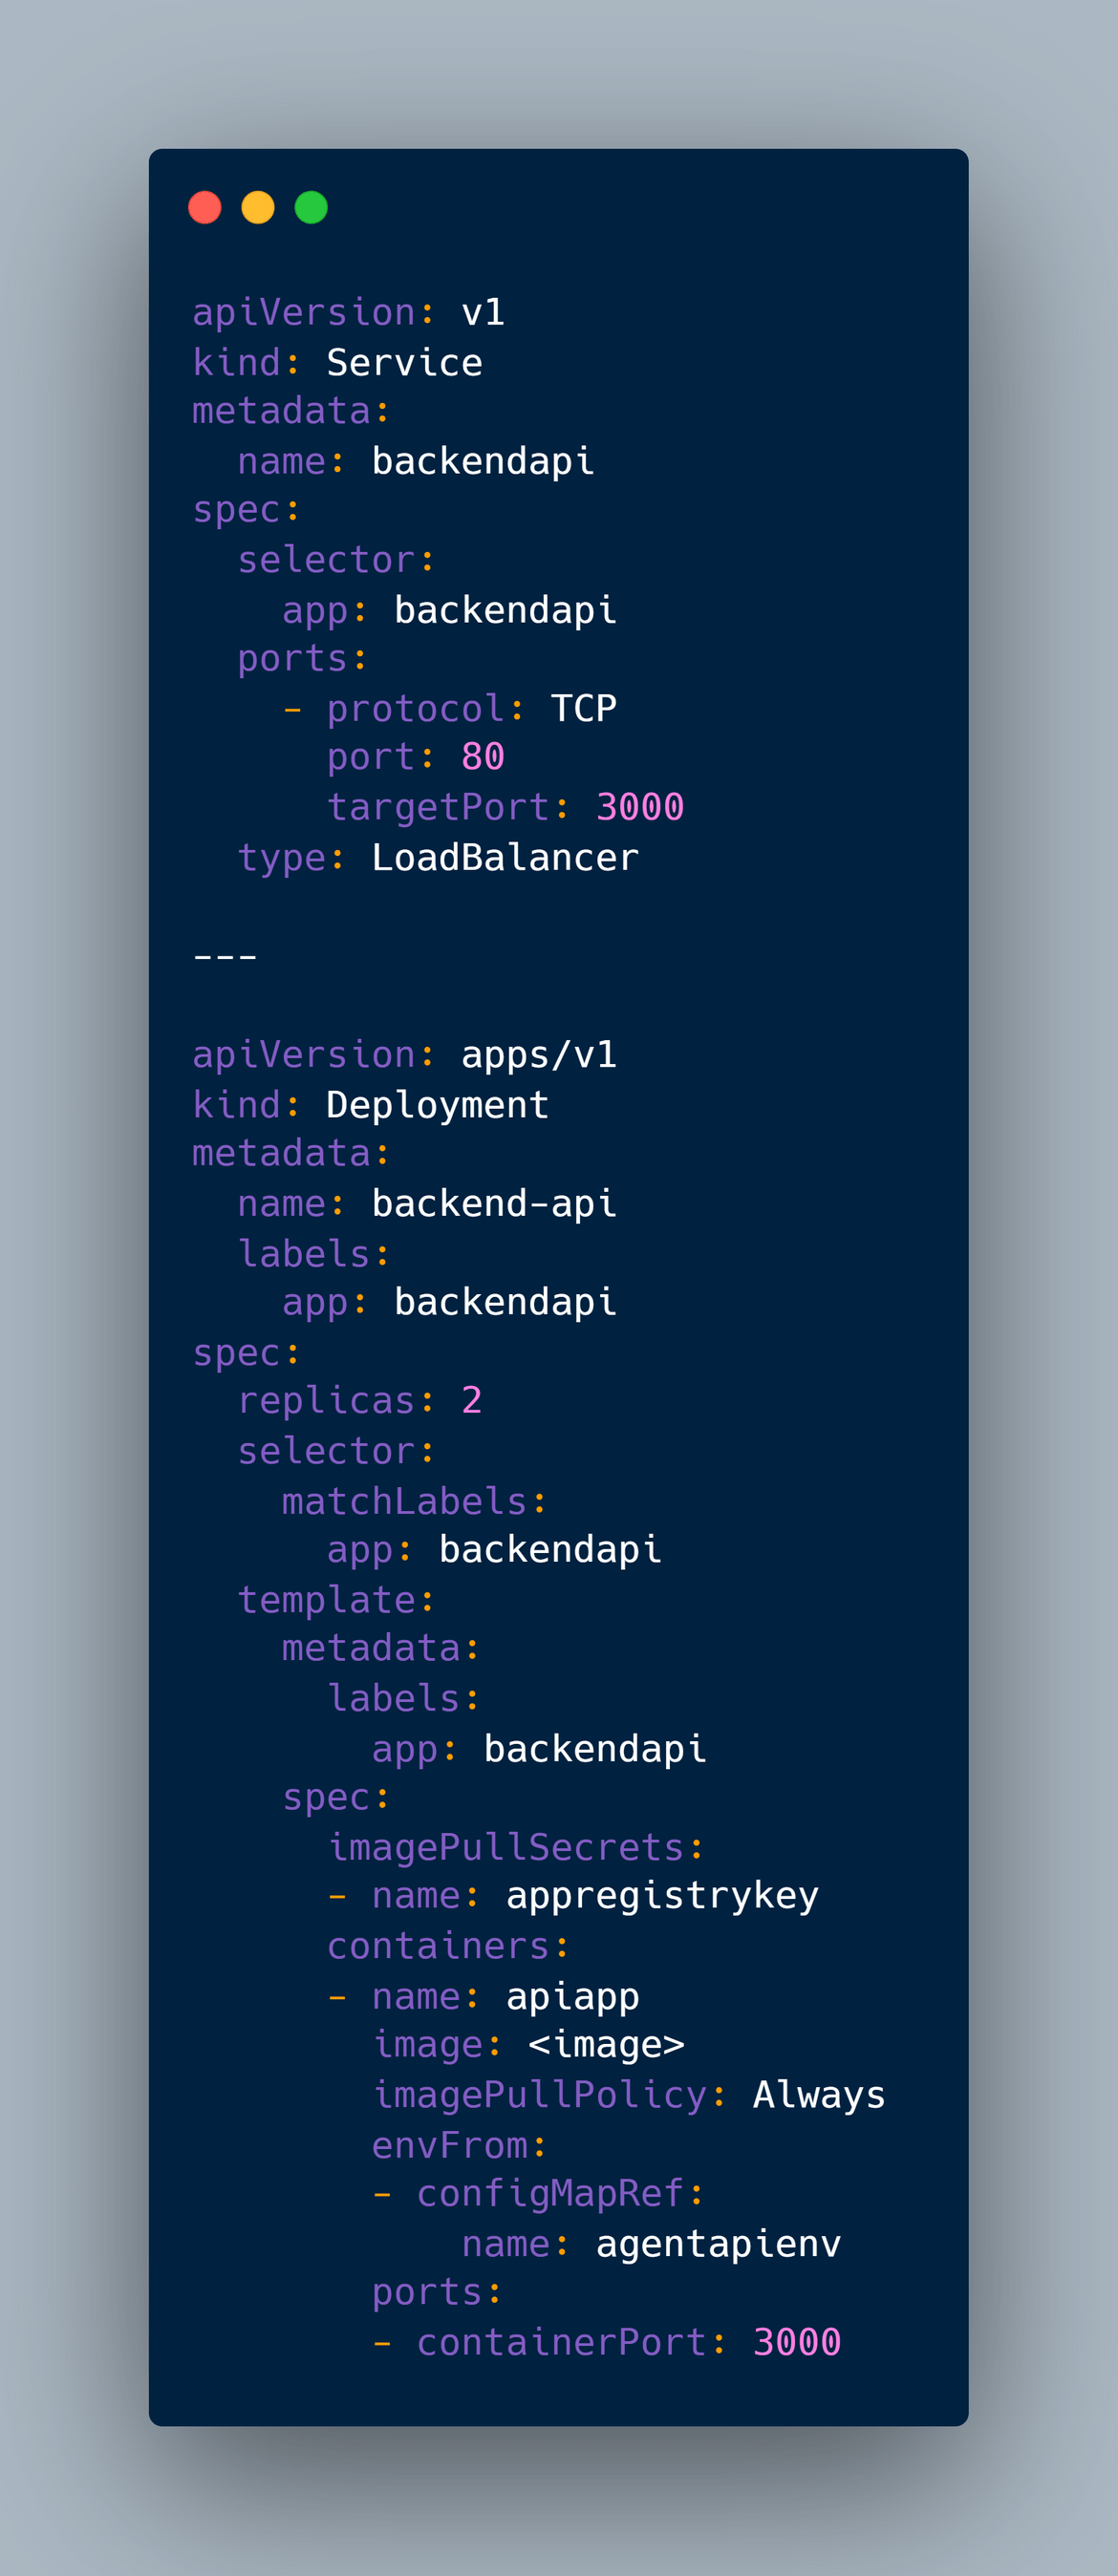
The deployment is exposed via a loadbalancer service.
Call Back API: The Call back API is also deployed as a Deployment on the EKS cluster. The Dockerfile for the docker image is part of the call back api repo. Below is what the Dockerfile consist of and it builds the Docker image to be pushed to the repository:
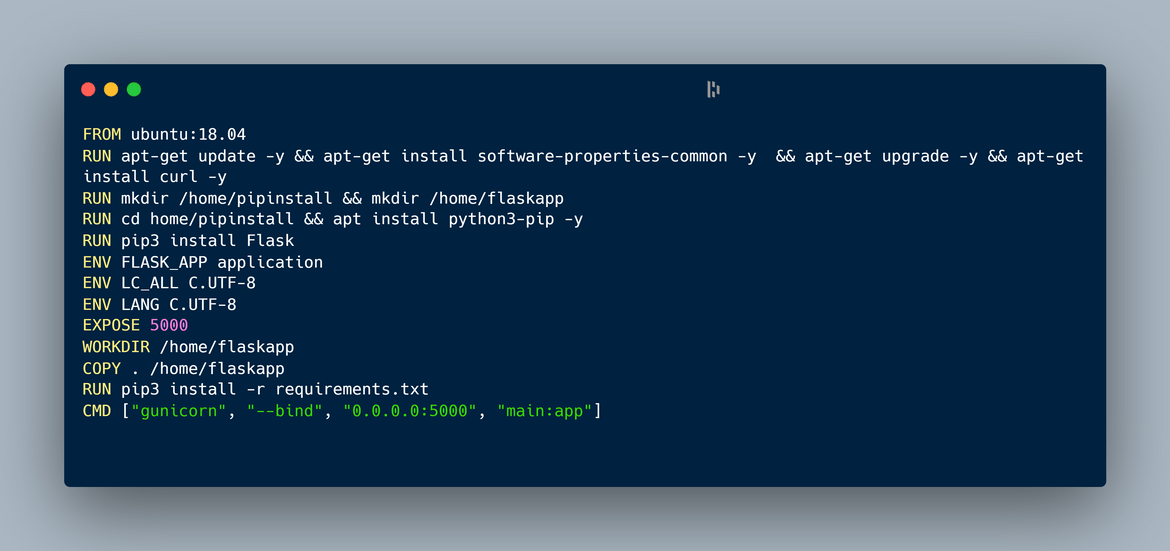
This image is pushed to a private container registry from which Kubernetes pulls the image to deploy. Kubernetes Yamls are defined in the main repo to perform the deployment for this call back API.
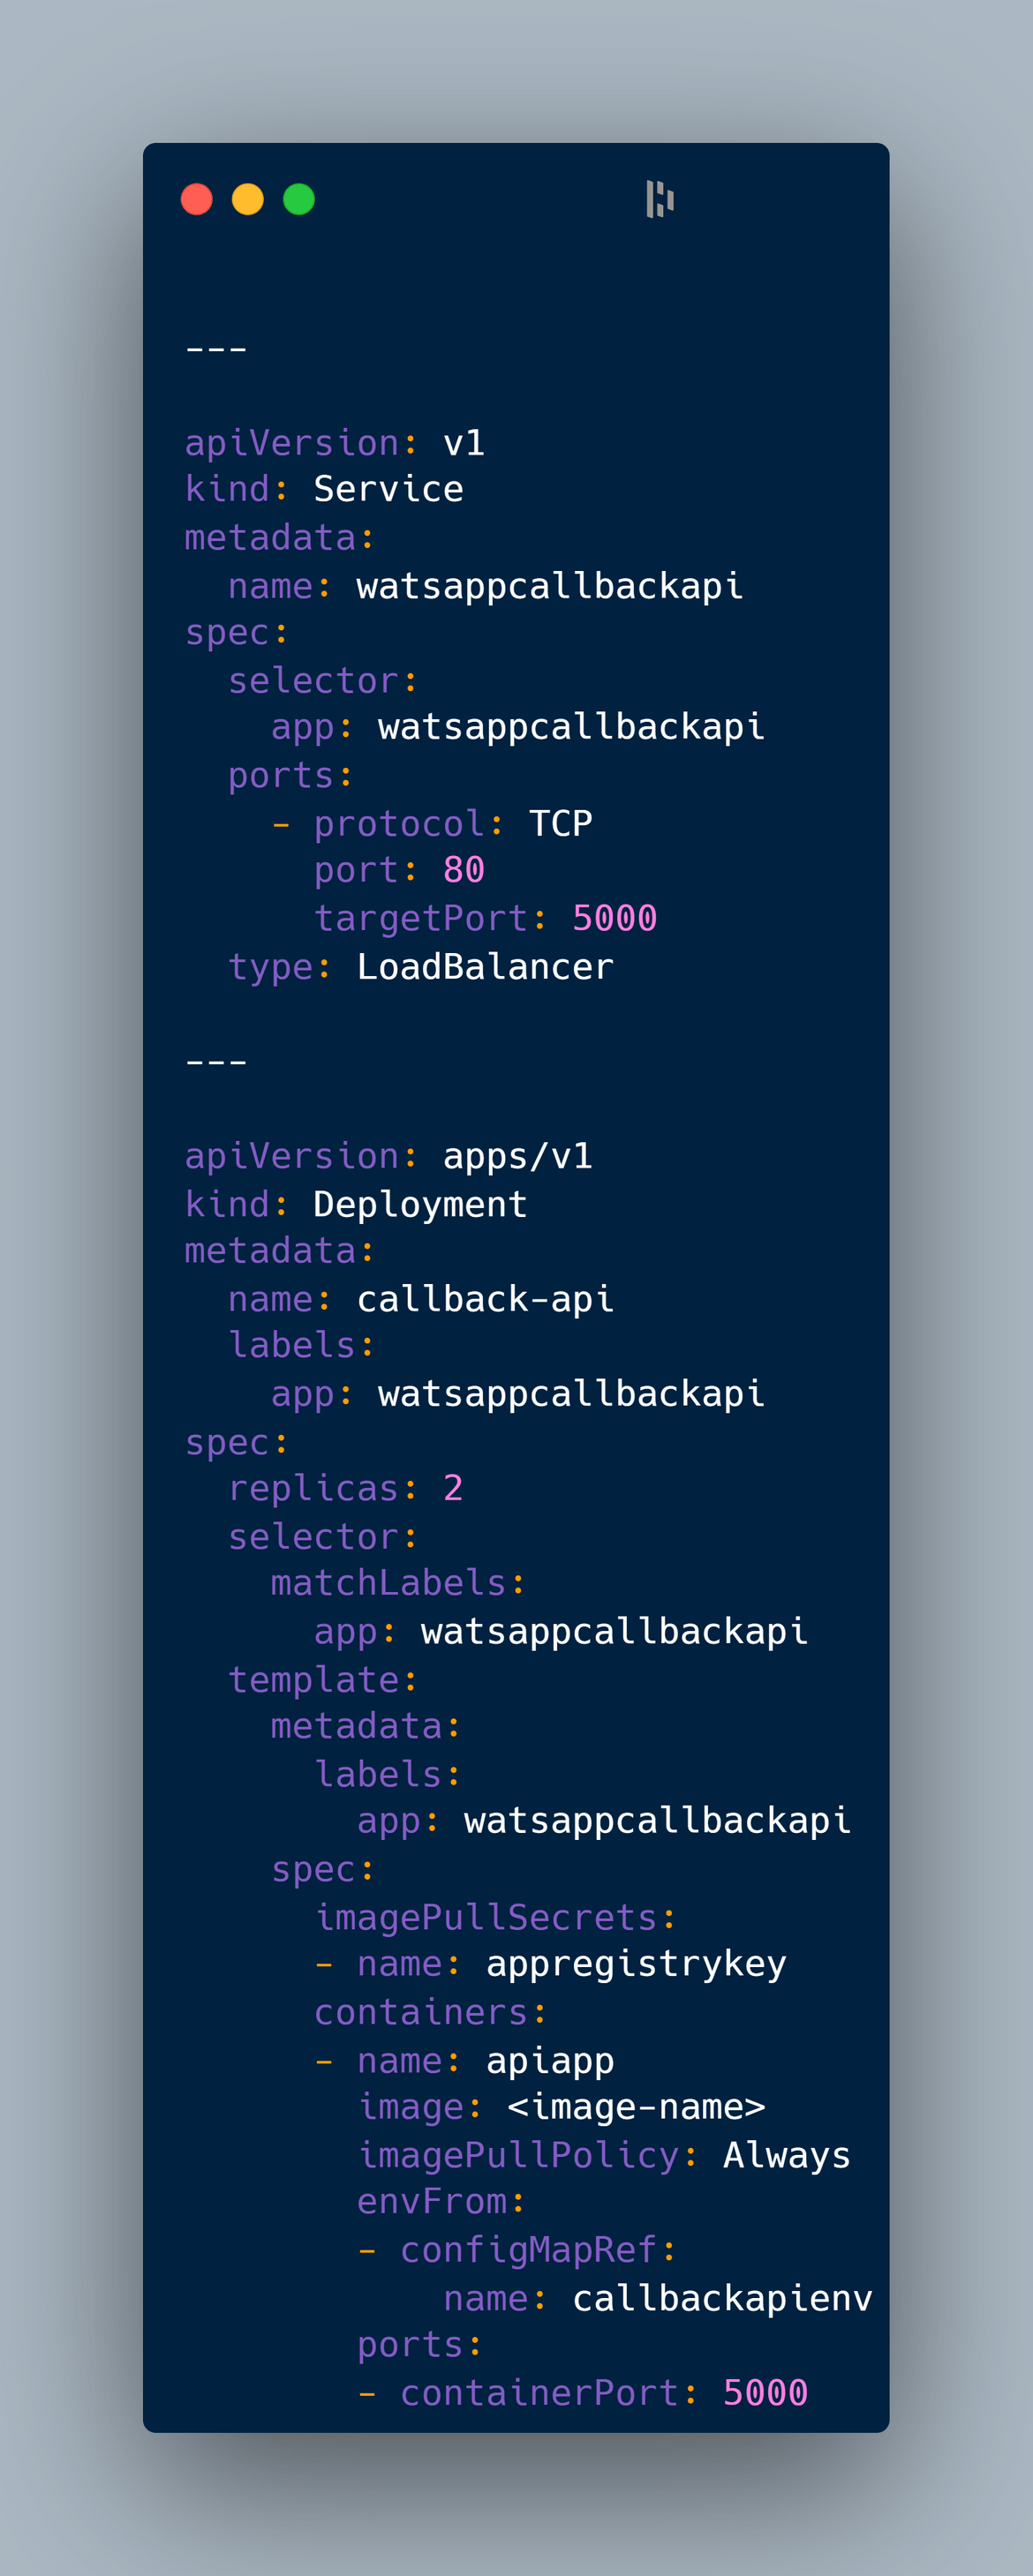
This API endpoint is exposed via a Load balancer service.
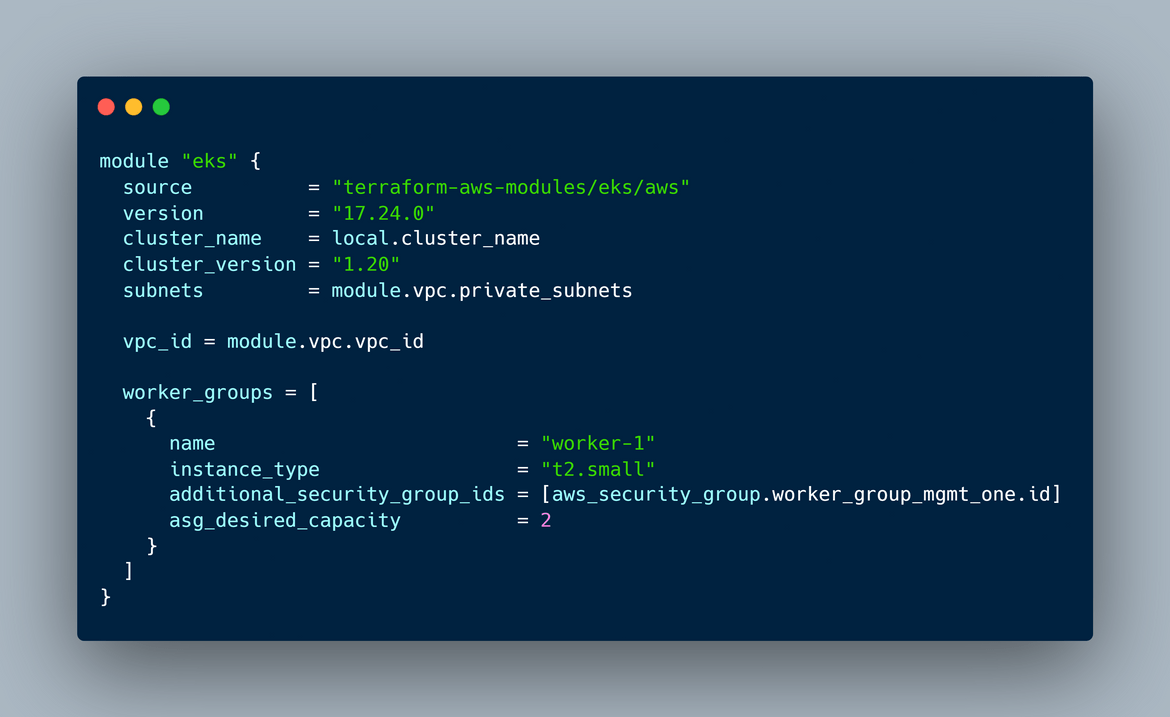
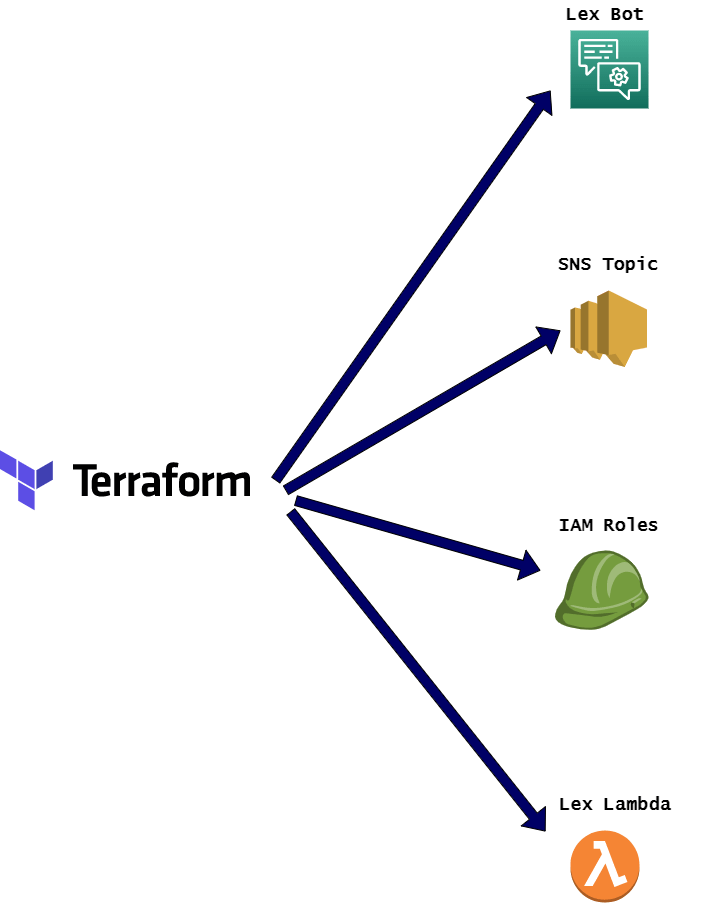
Other AWS components: Other AWS components involved in the solution are deployed using Terraform to AWS. Below shows which are the ones deployed using Terraform.
Deployment Pipeline
Now we have an understanding of how each component of the whole architecture is deployed. Lets bring all of these components together and deploy the application. The application is deployed via a Jenkins pipeline. The Jenkinsfile for the deployment is part of the main deployment repo. Here is an overview of what the pipeline is doing. I will go through each stage one by one.
Environment Variables:Some of the values used on the pipeline are defined as environment variables in the Jenkinsfile. These are the environment variables which are defined in the pipeline
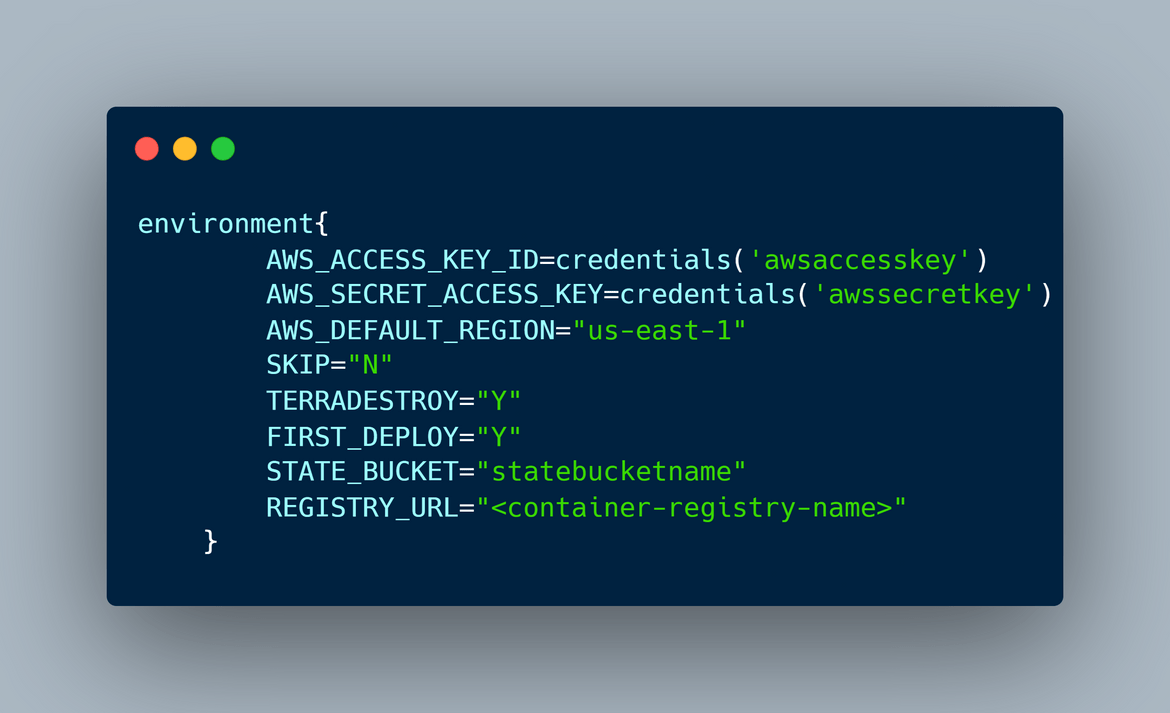
Create State Bucket: In this step first the S3 bucket is created to store the Terraform state. This step is only executed for the first time deployment. That is controlled by the environment variable for first_deploy.
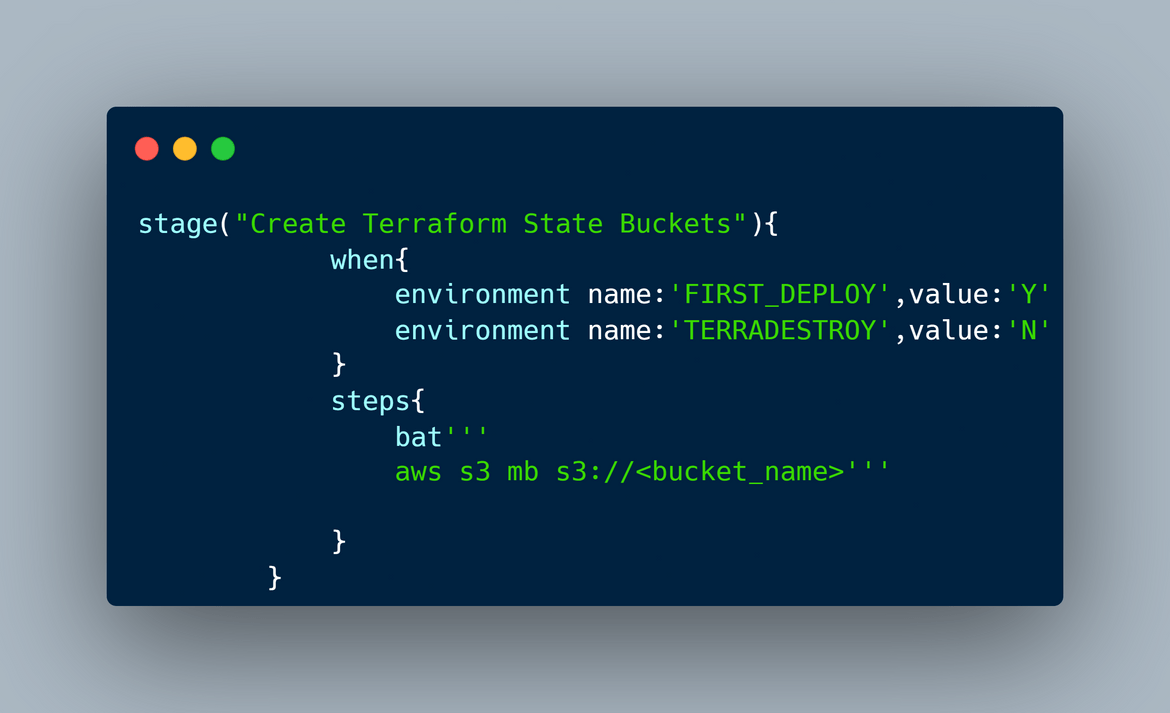
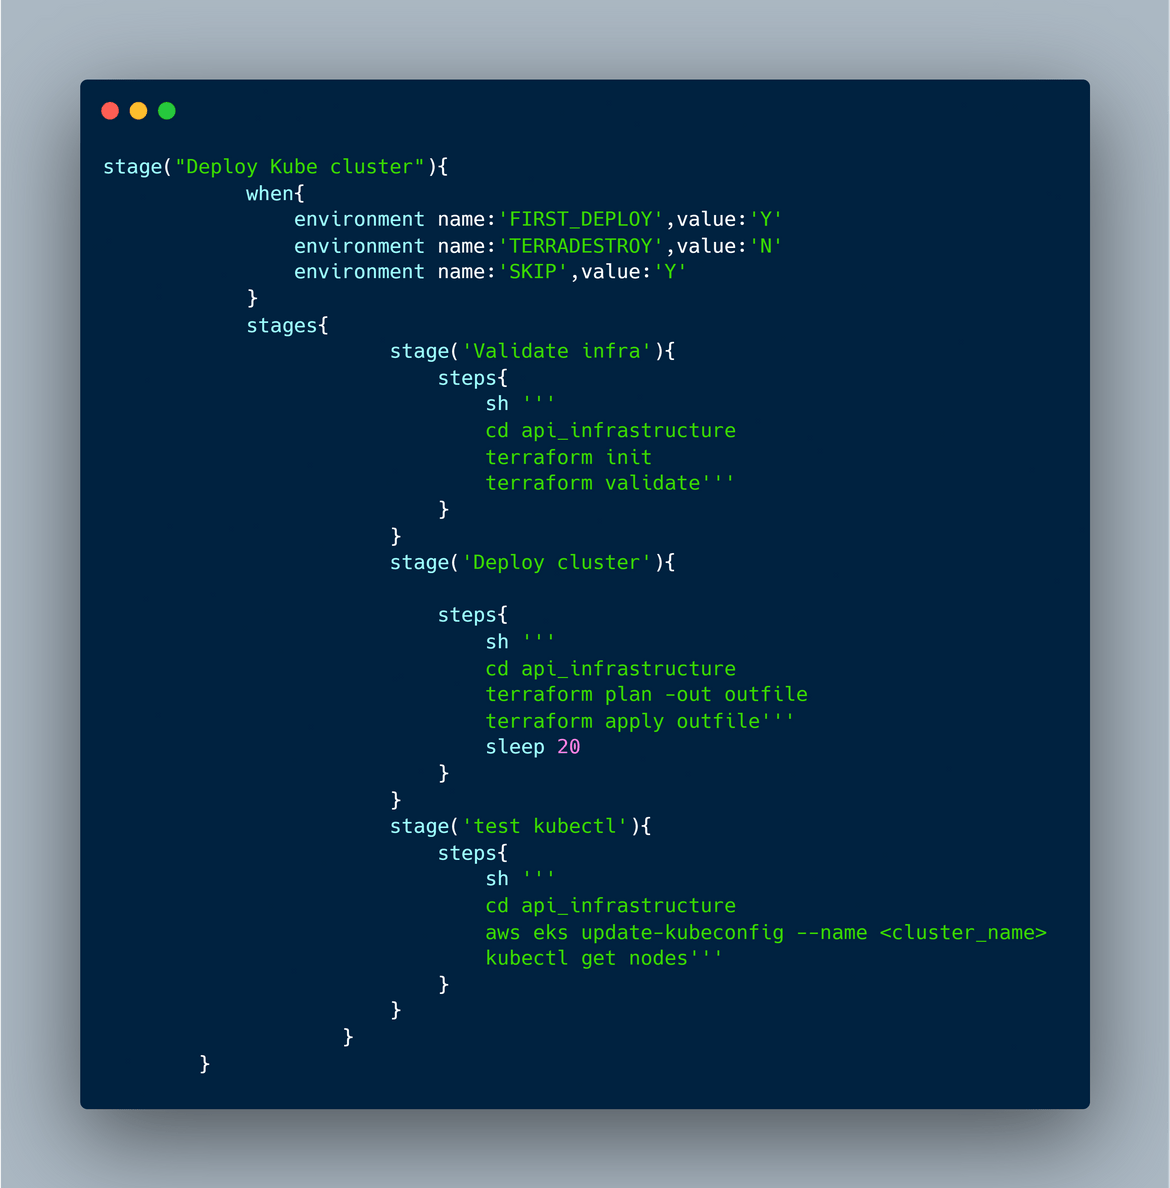
Deploy Cluster and infrastructure: In this stage the infrastructure related components are deployed. Terraform is used to deploy each of the infrastructure component. The Terraform modules called are stored in separate folders in the deploy repo. These are the items which are deployed in this step:
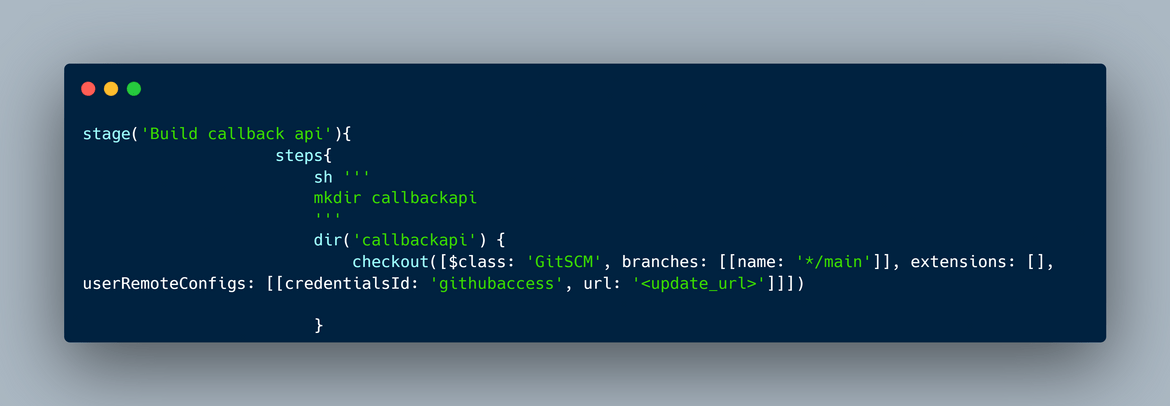
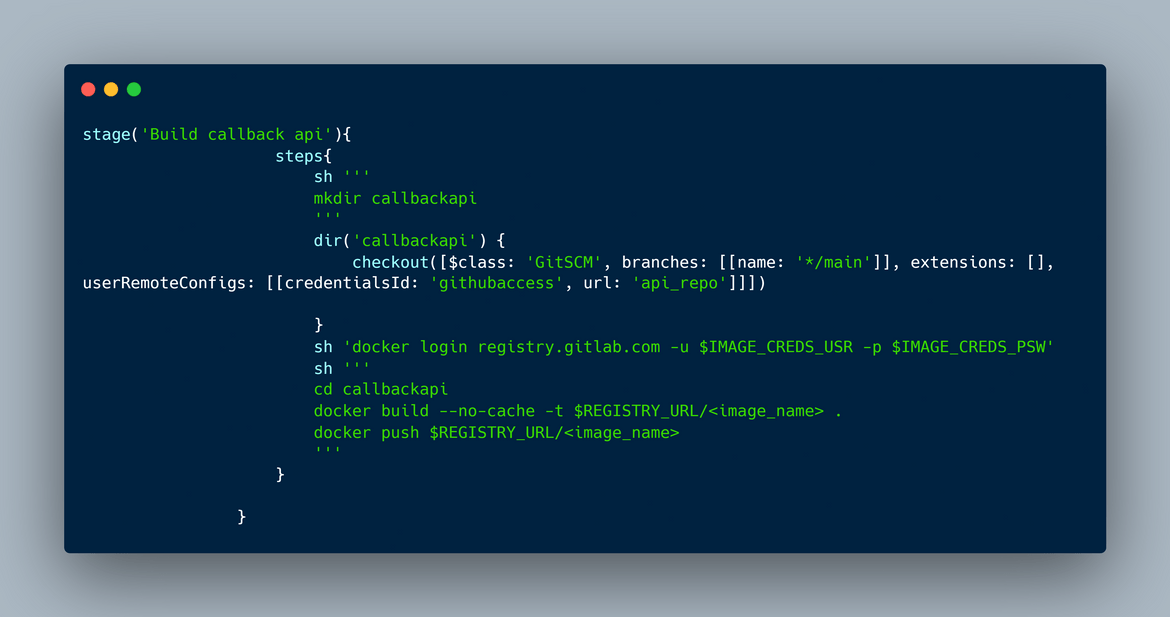
Build Docker Images: This step performs the building of Docker images for the API’s involved. This also pushes new versions of the built image to a Gitlab container registry. Both Callback API and Backend API are built in this stage and pushed to the container registry. Since the API codes are in different repo, this stage first checks ut the code from other repos to local workspace and then performs the build step.
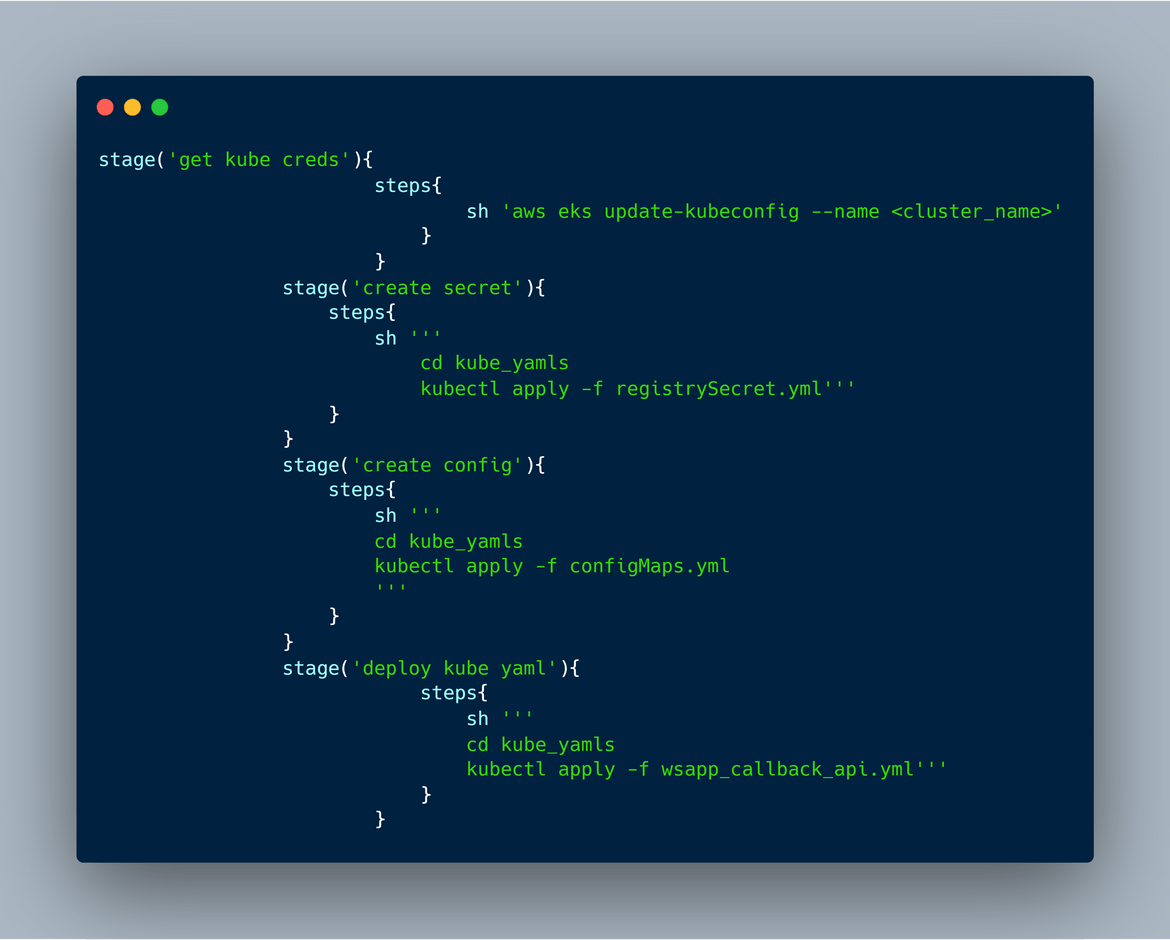
Deploy to Kube cluster: This is the final stage to deploy the APIs to the Kubernetes cluster. This is the sequence followed in this stage to deploy the APIs:
- Fetch the kube credentials in a kubeconfig file
- Create the secret for container registry credentials
- Create the configmap for APi environment variables
- Deploy the API deployment from the yaml file
All of the different deployments are specified in the Yaml files in separate folder. The services are also defined in the yaml file.
That completes the whole deployment pipeline. This whole pipeline gets defined in a Jenkinsfile and gets triggered everytime a commit or merge happens on the repo. Next we will see the actual pipeline being deployed and executed to deploy the whole application.
Deploy the app
Now that we have all the theoretical understanding of the bot. Lets deploy this. There are few steps to follow for this to be deployed first time and then going forward for any changes. I will go through the various changes needed in sections below.
Repo Setup:There are three Git repos which are needed to be setup for this. If you are using my repo as starting point follow these steps to clone my repo and then create 3 repos from the folders:
git clone <repo_url>
cd <repo_dir>
git add .
git commit -m "adding to repo"
git push -u origin <remote_name>  ```
In my repo, there are two separate folders for the two APIs which need to be separated out and created as separate repos before deployment:
AWS Setup: Some of the pre-requisite setup have to be completed on AWS before the deployment.
- Create the IAM User: An IAM user needs to be created which will be used for deploying the components on AWS. This user needs to have programmatic access. Can be created from console or CLI
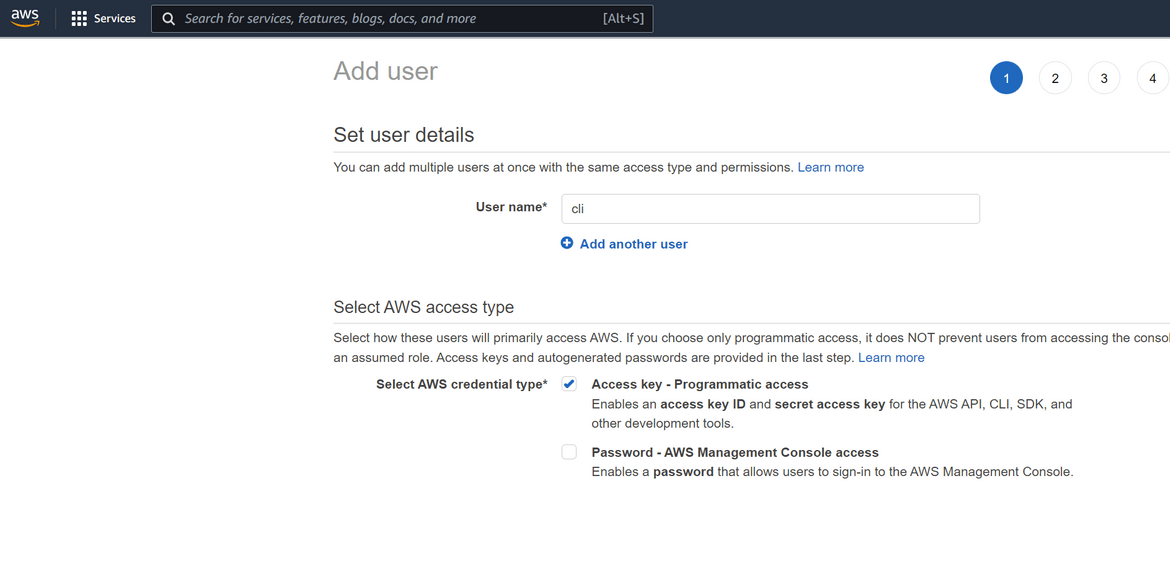
Necessary permission can be granted as required.- Amazon Connect Instance: An Amazon connect instance need to be created on AWS. Once created, note down the Instance ID as it will be nedded by the APIs as environment variables. Update the Instance ID on the environment variables for the APIs as needed.
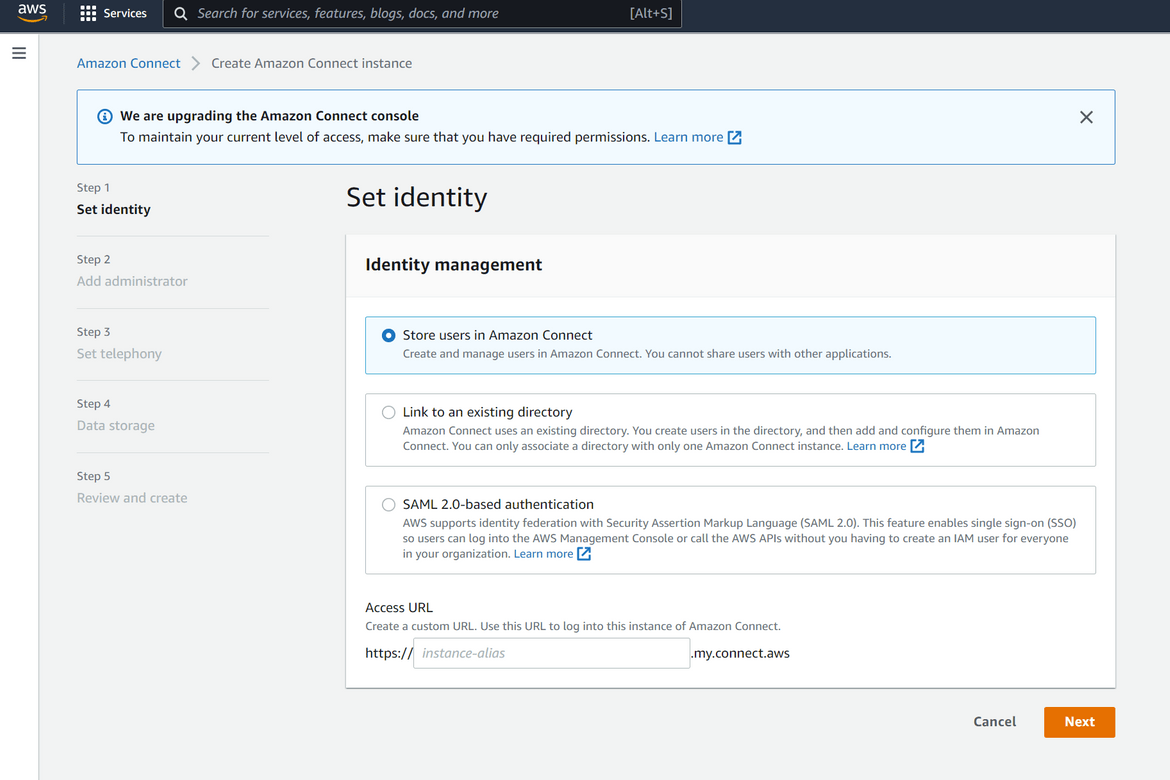
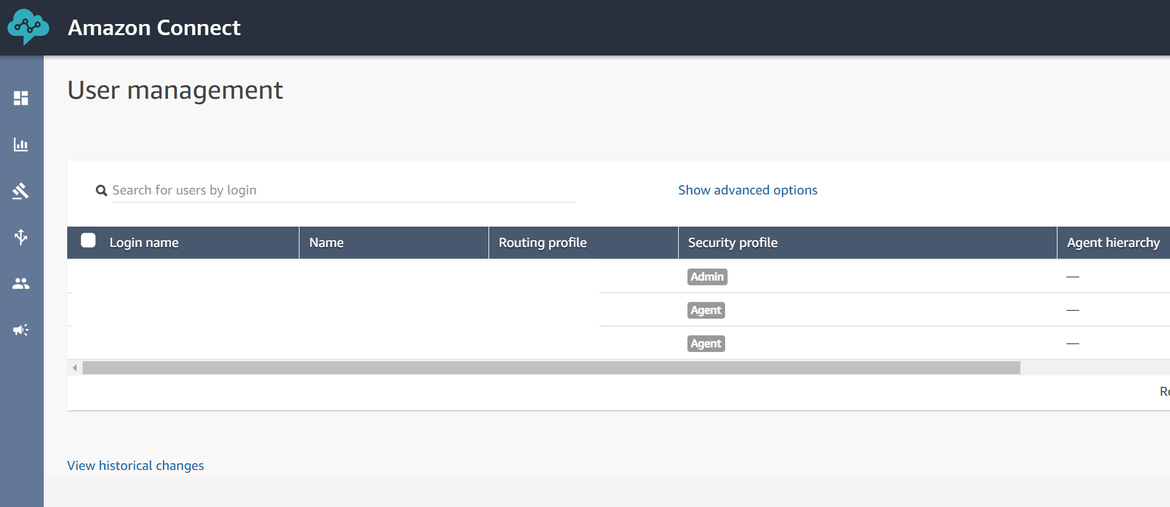
Once the instance is created, agents and queues need to be configured so the incoming chats can be received.
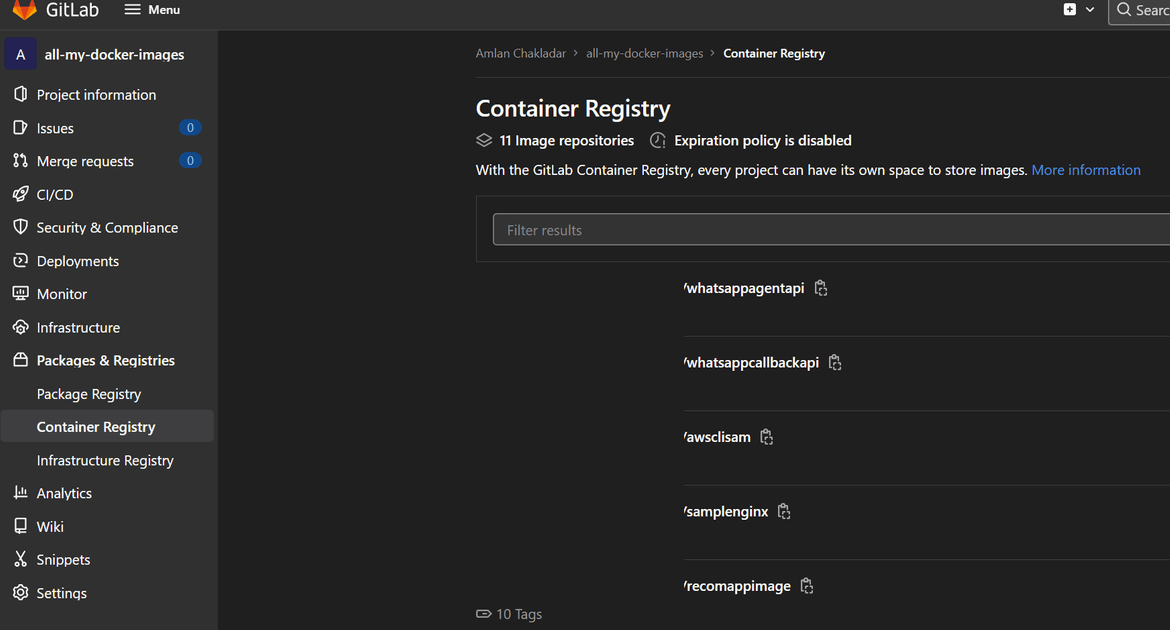
Gitlab Registry Setup:Next for the Docker images the private registry need to be setup. Gitlab provides an option to host private container registries where the Docker images can be pushed and pulled from. Register for a free account on Gitlab and create a project. The container registry will be an option on the Gitlab project:
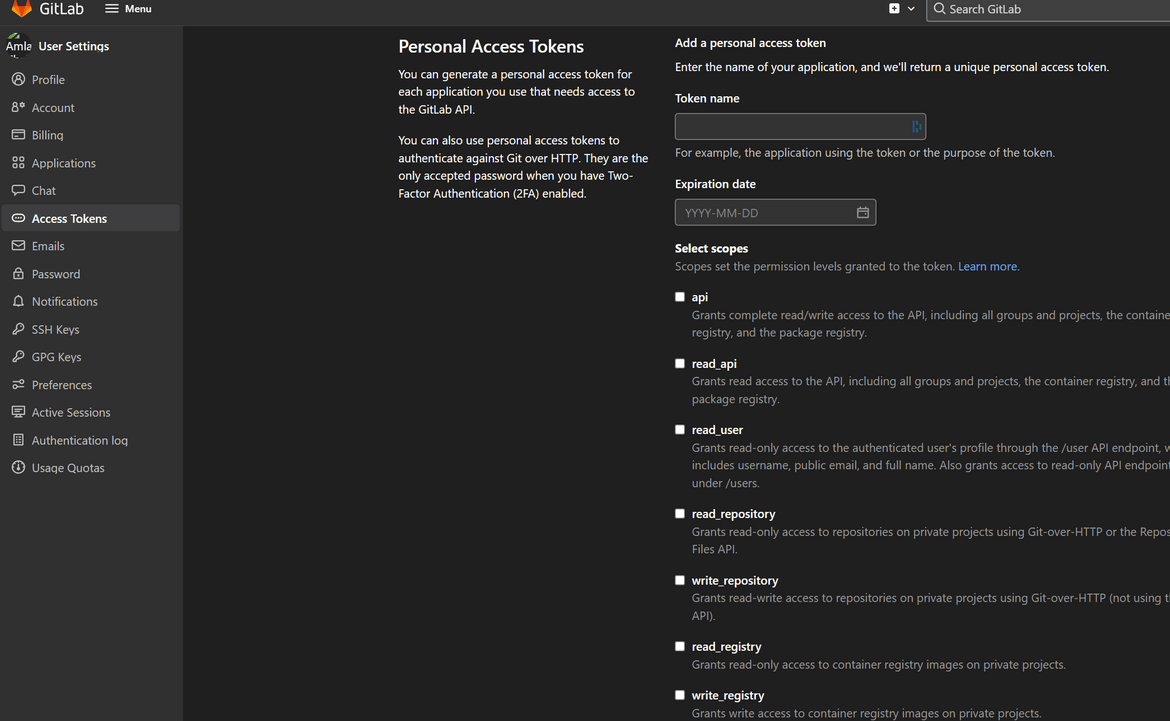
Create a personal access token on Gitlab with registry access. Note this token down as this will be used to create the secret on EKS cluster to pull the images.
Jenkins Setup:Next setup the Jenkins pipeline from the main repo. The Jenkinsfile is part of the main repo which defines the pipeline stages.

Login to Jenkins and create a new Pipeline
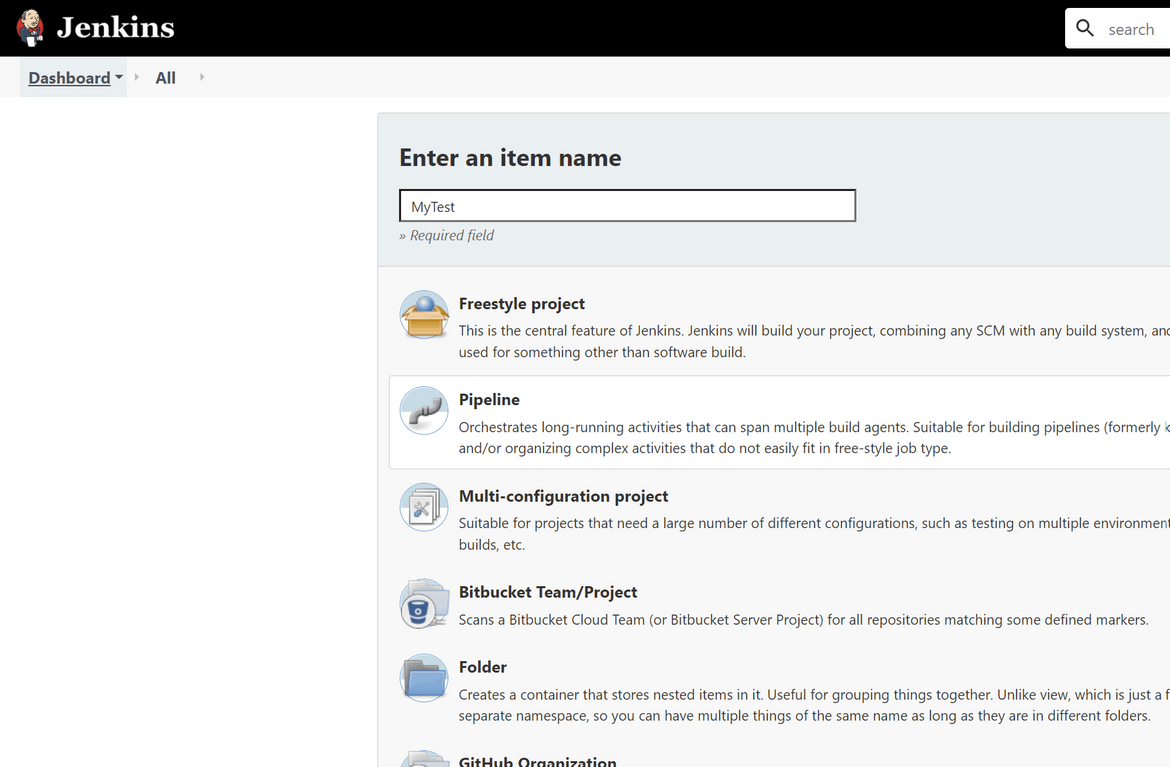
For the pipeline, select the main repo as the source and specify the branch if needed
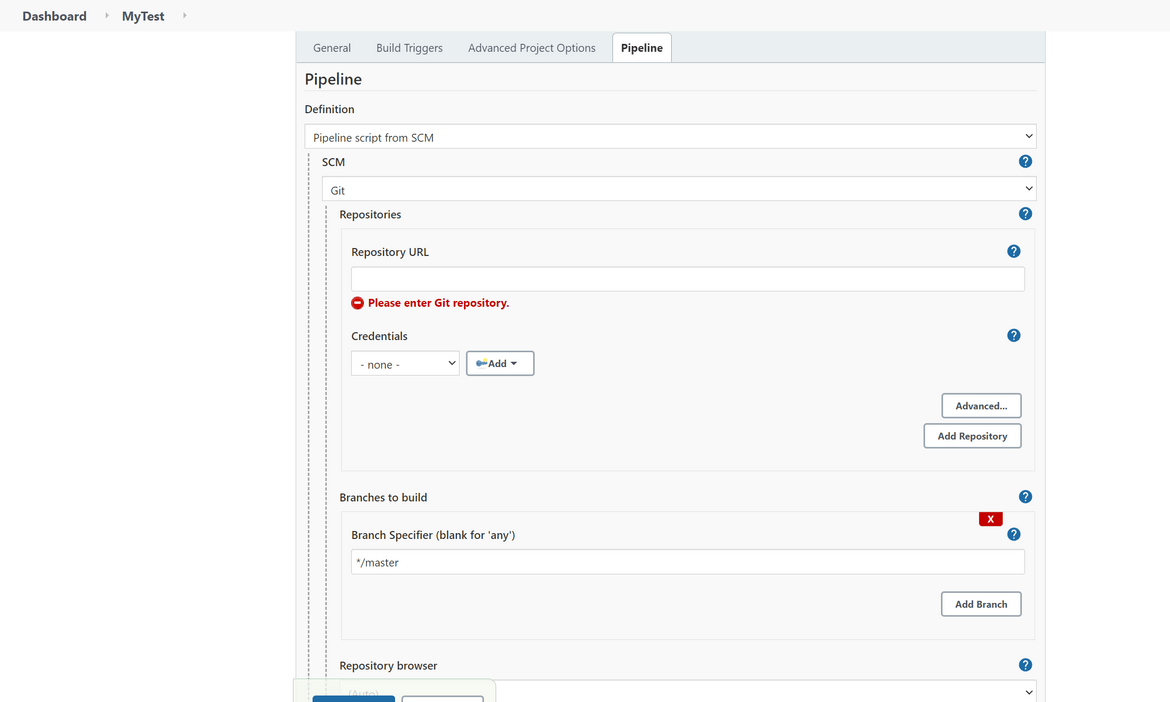
That should create the pipeline. Before running the pipeline, add the AWS credentials which were created earlier. Add those access keys as Jenkins credentials:
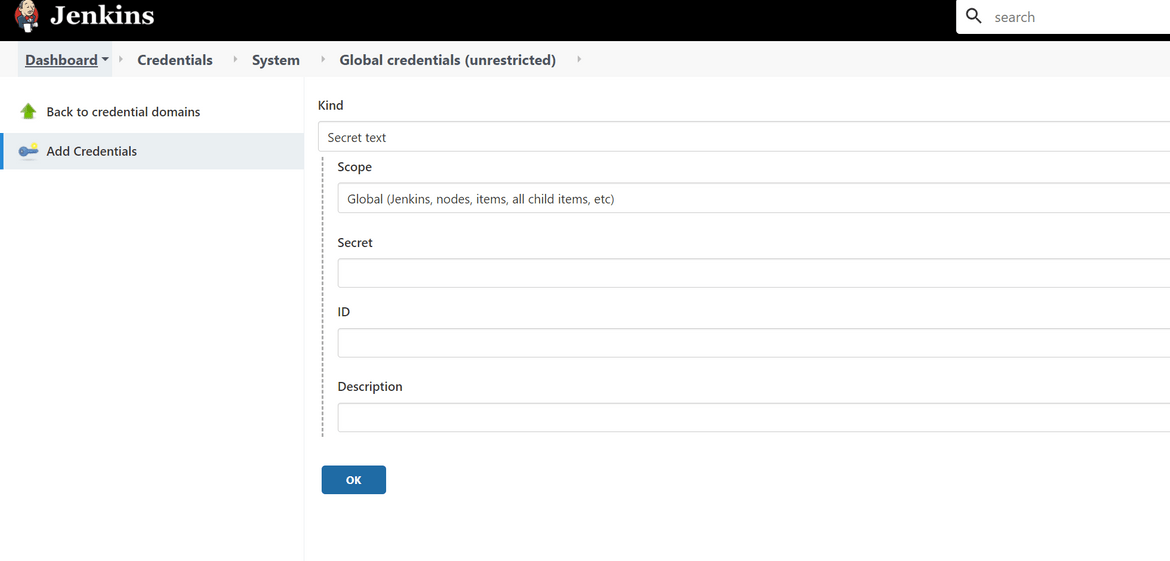
Make sure to use the same name for credentials which is specified in the Jenkinsfile environment variable. Once its added, go ahead and run the pipeline. This should take some time for firs time deploy. Once the pipeline finishes, you should have all the components deployed and the APIs deployed on the EKS cluster. The cluster can be validated and the API endpoint can be drawn from the loadbalncer which is launched.
Note down the endpoints as that will be needed for next step.
Twilio Settings:Once the callback API is deployed, the API endpoint for the Twilio to post messages has to be updated on Twilio. Login to Twilio, and on the whatsapp sandbox, update the callback api url to the api endpoint which is suppoed to process the messages from whatsapp:
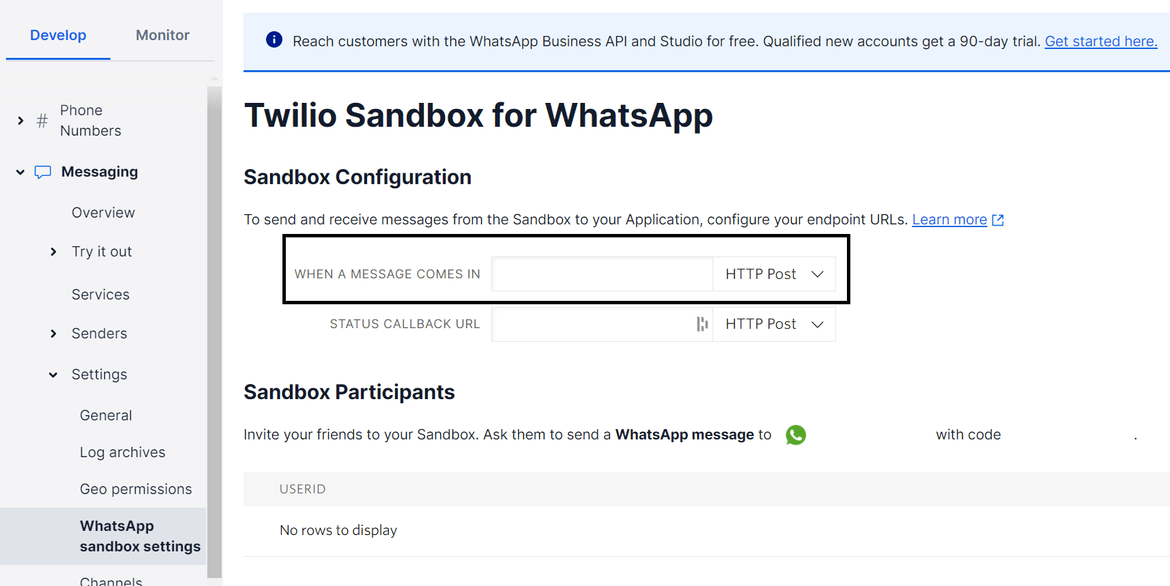
That completes the whole deployment. Now the bot can be tested by sending the messages to th whatsapp sandbox number.
Testing
The bot has been deployed and its now live. To test the bot send the needed message keyword to the whatsapp number for Twilio sandbox. Here I have recorded two videos for my bot in action. Each video is for each scenario.
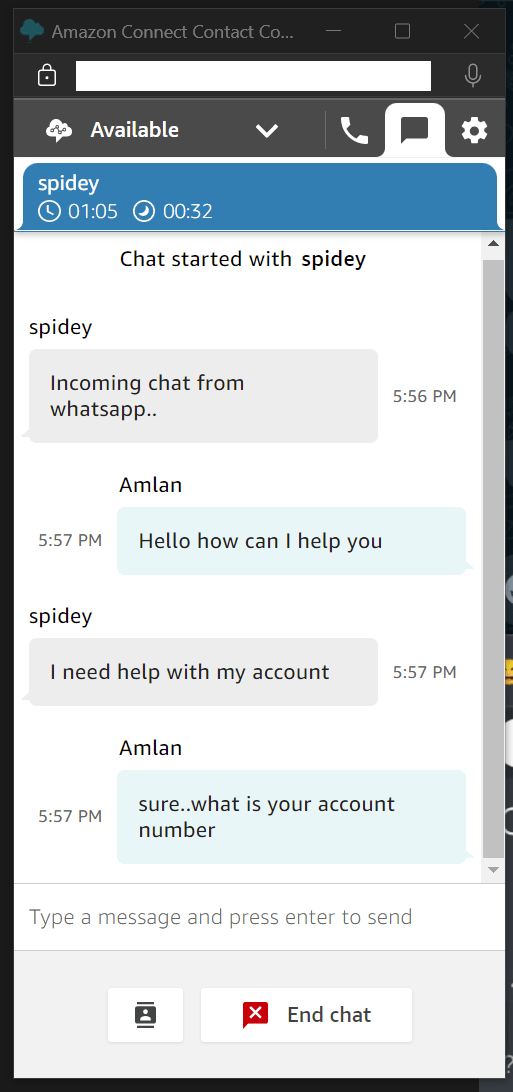
The Amazon connect side of the conversation is shown below:
Conclusion
In this post I explained in detail the process to develop a Whatsapp bot with AWS as backend. This same pattern can be used to extend the bot for other use cases. Hopefully this helps you learn the process and develop your own bot. Whatsapp has become very popular messaging app now and combining with power of AWS this becomes a very useful use cases for many businesses. Please reach out to me from the contact page if nay questions or issues.

