How to Launch your own Kubernetes Cluster on AWS
How to Launch your own Kubernetes Cluster on AWS
Any time we start learning some new technology, the first thing what comes to mind is how do I install this on my machine. I had the same thought when I started learning Kubernetes. But this is a problem I faced while learning Kubernetes. I couldn’t find a good resource to guide me through a setup of Kubernetes cluster for my learning. So I thought let me document the steps which worked for me so that it can help someone too. The steps which I will be describing here will help you stand up a Kubernetes cluster for your learning practice. I wouldn’t recommend use this method for a Production cluster as there are many other considerations to take into account for a production environment.
I will be installing Kubernetes on an EC2 instance to act as master and join another EC2 instance as a node. To launch the infrastructure I am using CloudFormation. The template and codebase is all present in my Github repo: Here
What is Kubernetes?
If I quote from the official docs, “It is is an open-source system for automating deployment, scaling, and management of containerized applications”. In simple words, it is an orchestration tool to manage running of containerized applications. You can declaratively maintain how and where the containers run for an application. It can easily scale the application and its underlying containers without much effort from ops team. Kubernetes is being used in many of modern large applications to manage automated deployments and work in tandem with CI/CD pipelines. Kubernetes supports many different container runtimes but I will focus on Docker.
Installation of Kubernetes and setting up a cluster can be a challenge as there are multiple steps to stand up a full fledged cluster. The steps I go through will setup a basic cluster which will be enough for any learning and practice you want to do.
About the Setup
Before I start the setup let me explain a bit about what exactly I will be setting up.
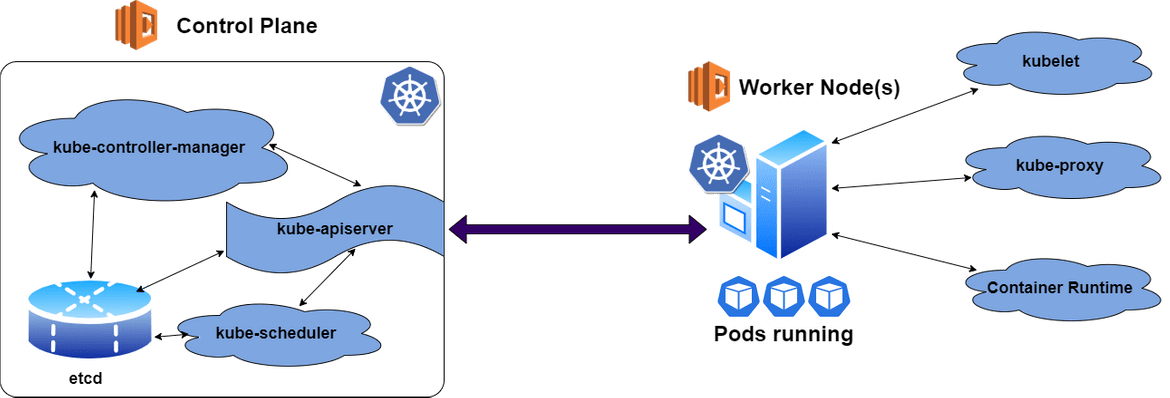
There are two main components in a Kubernetes cluster:
-
Control Plane: This is the main component of the cluster. It acts like a manager for the cluster and controls how the containers are scheduled and ran on the child nodes/workers. The control plane can be run on any system in the cluster but normally one of the machines is selected to run the Control plane. Containers are not scheduled on this machine. For a production grade cluster, various measures are takes to make the control plane highly available since it is manages the rest of the cluster. The control plane runs various services which control different aspects of the cluster:
- kube-apiserver: This exposes the Kubernetes API for use by rest of the cluster.
- etcd: A highly available key-value store to store all cluster related data.
- kube-scheduler: Select nodes and run pods on them. Manage how the containers run on the pods.
- kube-controller-manager: Runs all controller processes.
-
Node/Workers: These are multiple or even a single machine which communicate with the control plane and run the pods(containers). These provide the runtime environments for the Kubernetes cluster. The control plane select between these worker nodes to schedule and run the actual pods which starts up the application. Nodes run various other services which helps it to communicate with the control plane and perform its tasks:
- kubelet: This is an agent which runs on each node of the cluster. This makes sure that the pods are running as expected on the node.
- kube-proxy: This handles all the networking related functionalities for each of the nodes. Network policies are not included as a core functionalities in Kubernetes. So there are many third party networking plugins available to implement the networking portion in Kubernetes. We will be using one such implementation in our setup.
- Container runtime: This runs on each node and runs the actual application containers within the pods. Kubernetes supports various types of container runtimes but we will be following a Docker runtime in this post.
There is one more component which is important and that is the Networking component. As I mentioned above Kubernetes by default follows a flat Network structure. All Pods can talk to each other to be precise. To control and customize networking behavior within the cluster, there are third party network plugins available which can be used. I wont go into much detail about networking but know that this is an important consideration while launching a production grade cluster. For this post I will be using Flannel (Read More) as the Network plugin.
Overview of the Steps
I will be following the below high level steps to get the full cluster up and running.
-
Provisioning: Here I will be provisioning the instances which will constitute the cluster. Since I will be running a basic cluster so I will be provisioning two instances:
- Control Plane: This will be one EC2 instance where the Control plane will be initiated
- Node/Worker: This will be one more EC2 instance acting as the node communicating to the control plane
I have used CloudFormation to launch the whole setup as a Stack in AWS. The template is included in the Github repo and can be re used.
- Bootstrapping: In this step I will be installing the required packages in each of the machines. There are steps which need to be executed separately in the Control plane and on the worker node. After the installation there are some config steps to start up the services and enable the control plane to accept node connections.
- Plugins: In this setup I will be only using one third part plugin for networking. I will be installing Flannel as the networking implementation for the cluster.
- Join Nodes: Finally once all steps are done, I will join the node to the cluster using the join command. This will complete the cluster setup of 1 Control plane and 1 node.
Pre-Requisites
There are few pre-requisites before you can start the cluster setup:
- An AWS account
- Basic AWS knowledge
- Some knowledge of command line
- Basic understanding of Kubernetes
I have tested the process with below versions:
- OS Version: This process is tested on Ubuntu 16.04
- Kubernetes Version: v1.18.0
Walkthrough
Let me go through each of the above phases and explain step by step how to complete each of them.
Provisioning
I will be provisioning two instances. Here I have used CloudFormation to ease the launch of EC2 instances but you can do these steps manually too from the AWS console. To get the CF template first clone my Github repo to your local and navigate to the folder
git clone <repo_url>
cd repo_folder
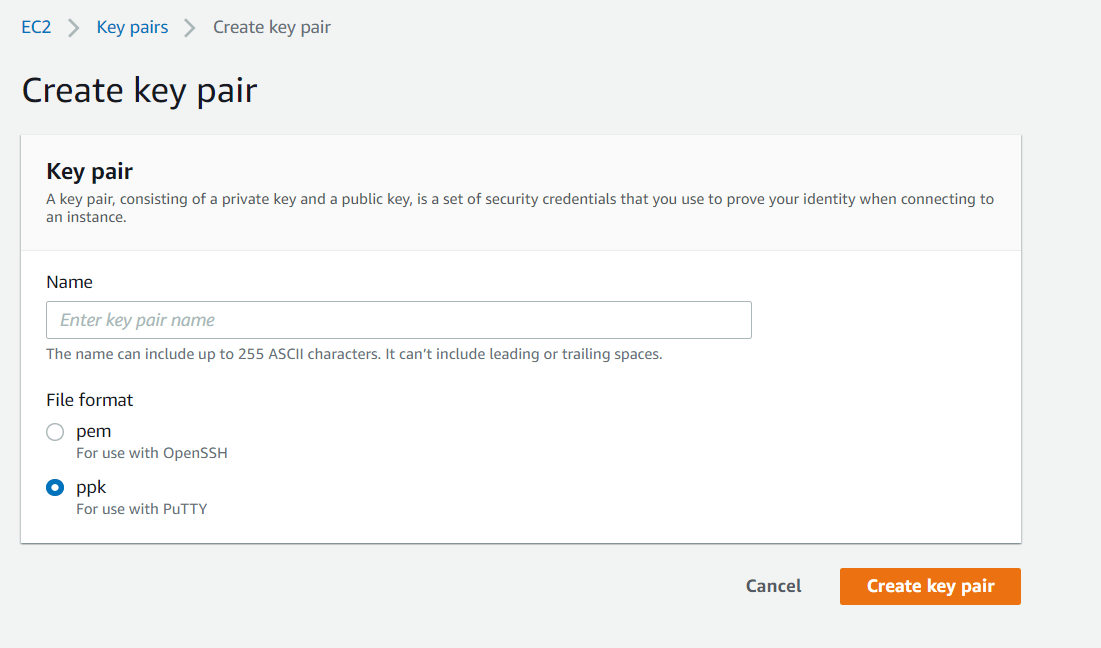
Before you start launching the instances, you will need to create a key pair in AWS. Navigate to AWS console and create a Key pair from the EC2 Services page:
Make sure to download and keep the key safe. Now you can start the provisioning steps.
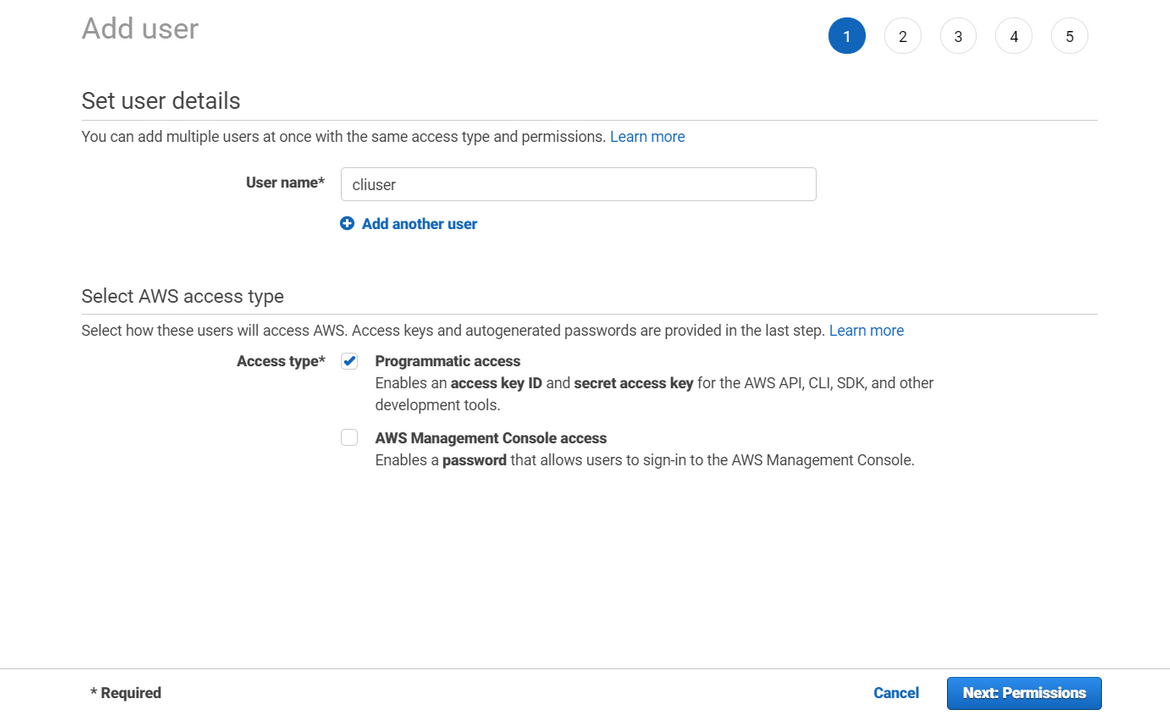
- Create IAM User: I will be using AWS CLI to launch the CF stack. Before I can do that I have to configure the AWS CLI. Create an IAM user in AWS which will be used for all further tasks

Copy the Access Key ID and the Secret Access Key values from the create success page.Configure AWS CLI: On the local machine run below commands to configure the CLI
aws configure --profile kubeprofileFollow the steps on screen to complete the setup
Launch CloudFormation Stack: Run the below command to launch the CF stack on AWS. It will take a while to complete. Make sure to use the proper AWS profile name, proper CF template file name and proper key name(created above).
aws cloudformation create-stack --stack-name myteststack3 --template-body file://deploy_ec2_network_v1.json --parameters ParameterKey=KeyP,ParameterValue=awskey ParameterKey=InstanceType,ParameterValue=t2.micro --profile kubeprofileCheck the status of the stack on AWS console. Once the creation is finished, you will have two EC2 instances launched.
Note down the Public DNS names or Public IPs for both of the instances. We will need this in next steps.
Bootstrapping
Once we have the instances, we move over to installation of Kubernetes and required dependencies. I will separate out the commands which you need to run on both machines and which only on the Control plane. SSH in each machine to run the commands.
-
Run on both machines
-
Install dependencies: Run the below commands to install the dependencies:
sudo apt-get update && apt-get install -y apt-transport-https && apt-get install -y software-properties-common && apt-get install -y curlIf you get an error related to lock, run each of the above installs separately.
-
Install Docker: Run the below commands to install Docker:
curl -fsSL https://download.docker.com/linux/ubuntu/gpg | sudo apt-key add - sudo add-apt-repository \ "deb [arch=amd64] https://download.docker.com/linux/ubuntu \ $(lsb_release -cs) \ stable" sudo apt-get update sudo apt-get install docker-ce docker-ce-cli containerd.io -
Install Kubernetes: Run the below command to add the key for Kubernetes install:
sudo curl -s https://packages.cloud.google.com/apt/doc/apt-key.gpg | sudo apt-key addAdd a new repo by creating a file at /etc/apt/sources.list.d/kubernetes.list with just one line:
deb http://apt.kubernetes.io/ kubernetes-xenial mainsudo vi /etc/apt/sources.list.d/kubernetes.listRun the below commands to install:
sudo apt-get update
sudo apt-get install -y kubelet kubeadm kubectl
To successfully run Kubernetes, swap need to be disabled on master:
sudo swapoff -a
-
-
Run on Control Plane only:
-
Initialize the Control Plane: SSH to the Control plane machine and tun the below commands:
sudo kubeadm init --pod-network-cidr=10.244.0.0/16Once this completes, it will show the command which will be used by the worker nodes to join the cluster. Make sure to note this command.

Note: If you get an error related to CPU, then relaunch the control plane machine with a higher size and more >CPUs. To save the Kube config file on the Control plane system, run the below commands:mkdir -p $HOME/.kube sudo cp -i /etc/kubernetes/admin.conf $HOME/.kube/config sudo chown $(id -u):$(id -g) $HOME/.kube/config -
Install the Network plugin: To install the 3rd party networking plugin run the below commands. I am installing Flannel network plugin:
sudo kubectl apply -f https://raw.githubusercontent.com/coreos/flannel/master/Documentation/kube-flannel.ymlOnce it completes, verify that the cluster is up and running:
kubectl get nodeskubectl get pods -A
-
-
Run on Worker Node: Run the cluster join command which you copied on earlier step. This will join the node to the cluster:
sudo kubeadm join 172.31.38.106:6443 --token ylvhzt.x08rlr48yn4oshoa --discovery-token-ca-cert-hash sha256:e874ec753be756bd2a5a7164a481855a40a7cf73b4257909578dd35966c93570Once it completes, you should be able to see this node joined. Run the below command from the Control plane machine:
kubectl get nodes
Testing
Now that the cluster is up and running, go ahead and test the cluster by running a simple pod. Run the below command which will launch a Nginx Pod.
kubectl run pod/mynginx --image nginxVerify that the pod is running successfully.
kubectl get pod/mynginx -o wideConclusion
I hope the steps I went through will help you with launching your own Kubernetes cluster. Kubernetes is becoming a very widely used Container orchestration tool and it will be very useful if you have your own practice cluster while you are learning Kubernetes. If you are planning to launch a Production grade cluster, make sure to go through the extra considerations to improve the cluster in relation to security and networking. For any questions, please reach out to me.


