Stream Heroku logs to AWS Cloudwatch using an EC2 instance and Docker
I am pretty sure we all have one or more apps deployed on Heroku. It is one of the most popular platform to deploy apps encompassing various technologies. I use Heroku to deploy many of my side projects as it has a generous free tier. But one thing I always struggled in Heroku was to manage the logs. I agree it is easy to get the logs on Heroku CLI with just one command but I wanted a more automated a stable solution to track the Heroku logs.
I really like how AWS enables tracking application logs in Cloudwatch Logs. Its easy to setup and we can setup multiple actions on the logs like setup alerts, prepare reports from the log data and on and on. AWS Cloudwatch is a vast solution and I cant fit its all features in one post. So I will just go through some overview.
So to have a better tracking of the Heroku logs, I went ahead and integrated the Heroku logs to Cloudwatch where I can perform further analysis on the log data. In this post I will be explaining how to achieve the same and stream any Heroku app logs to an AWS Cloudwatch log stream. Hope this will be useful for your Heroku deployments. This can also be used in any enterprise scenario where any application is deployed on Heroku.
Without further delay lets jump in to the interesting stuff. As always the whole code base is available on my Github Repo Here
One thing I wanted to mention here is that, the method I mention here is a very custom method of streaming the logs. With this you will have to launch your own resources and track the usage. I found this service very useful to stream your Heroku logs to AWS without worrying about managing your own resources. You can setup the stream from Heroku to AWS S3 or Cloudwatch easily without worrying about setting it up on your own. Logbox service is a 3rd party service which I have used in many of my side projects and it works well. You can explore and setup your own Heroku to AWS setup from here: Sign Up
Pre-Requisites
Before we start there are a few pre-requisites you need if you need to follow along the setup. If you are using this as a guide for your work, these may already being setup for you. Also I wont go through the steps to setup each of these but I will post the document link which you can follow to perform the setup.
- An AWS account
- Jenkins running on a server. If you need t install, follow along this document Here
- A private container registry. You can use Docker hub too but the Docker images pushed wont be private. If you need private container registry, you can setup a Gitlab account. I will be using the same. Details Here
- A CHEF manage account for node bootstrapping. It is free. Get it Here
- CHEF installed on local system and on the Jenkins system
- Docker installed on the Jenkins system. You can follow this Here
- Heroku account and a Heroku app deployed
Apart from the setups you should have some basic knowledge of:
- Docker
- Jenkins
- AWS
- How to deploy an app to Heroku
I will be explaining everything in detail but to fully understand you should understand the basics.
What is Heroku
First let me explain a bit about Heroku. If you are first time hearing about Heroku, its worth for you to visit Here for a more detailed introduction.
In a nutshell its a cloud platform which enables you to deploy and host apps easily without worrying about the infrastructure. You can deploy apps across multiple technologies like a Nodejs app, a Flask app etc. To deploy the app, its just as easy to just run a deploy command on the application folder. You can deploy the app to Heroku cloud platform and make it available and accessible over the internet.
Heroku is also very much open source friendly. It has a generous free tier and you can deploy your side projects to Heroku staying well within free limits.
What is CloudWatch
Cloudwatch is an AWS monitoring and observability service which helps us monitor our applications, infrastructure and lot more. It is not only limited to monitoring and it can also send out alerts based on events in the AWS ecosystem. Cloudwatch collects monitoring and operational data from all AWS resources and provide an unified dashboard view to easily track the metrics from those resources.
Collecting and visualizing logs is an important feature of Cloudwatch. We can ship any application logs to a Cloudwatch Log stream to have a better view of the log. Using the Cloudwatch console you can analyze the logs, search for error keywords, create and send out alerts based on error keywords from the logs and much more. You can even export the logs to S3 for storage or stream the logs to an ELK stack for further detailed analysis.
But I wont be going into all the details of each of these feature. I will be using the Cloudwatch log streams to stream logs from a Heroku application.
Overview
In this post I will be describing a process of getting the logs from a Heroku app to a Cloudwatch log stream on AWS. Since Heroku is a Cloud platform and we cant directly connect it to Cloudwatch, I will be using an intermediate EC2 instance to perform the log streaming from the Heroku app to the Cloudwatch log stream. This can be used in any enterprise scenario too where a Heroku app is deployed as a Production app. Lets get on with the solution.
Solution Details
To setup the log streaming to Cloudwatch, there are few steps need to be followed before the streaming starts. Of course there are other ways to achieve the same but I found this way simplest and I am using this for some of my side projects too.

At high level this is what the whole solution will be performing:
- Launch an EC2 instance to act as an interface between Heroku and Cloudwatch
-
Launch a Docker container from a custom Docker image on the EC2
- Stream the Heroku logs in the Docker container and write to a file on EC2
- Stream the file from above step to Cloudwatch via Cloudwatch agent
- View the Logs on Cloudwatch
Lets get into the details of each step and implement the solution.
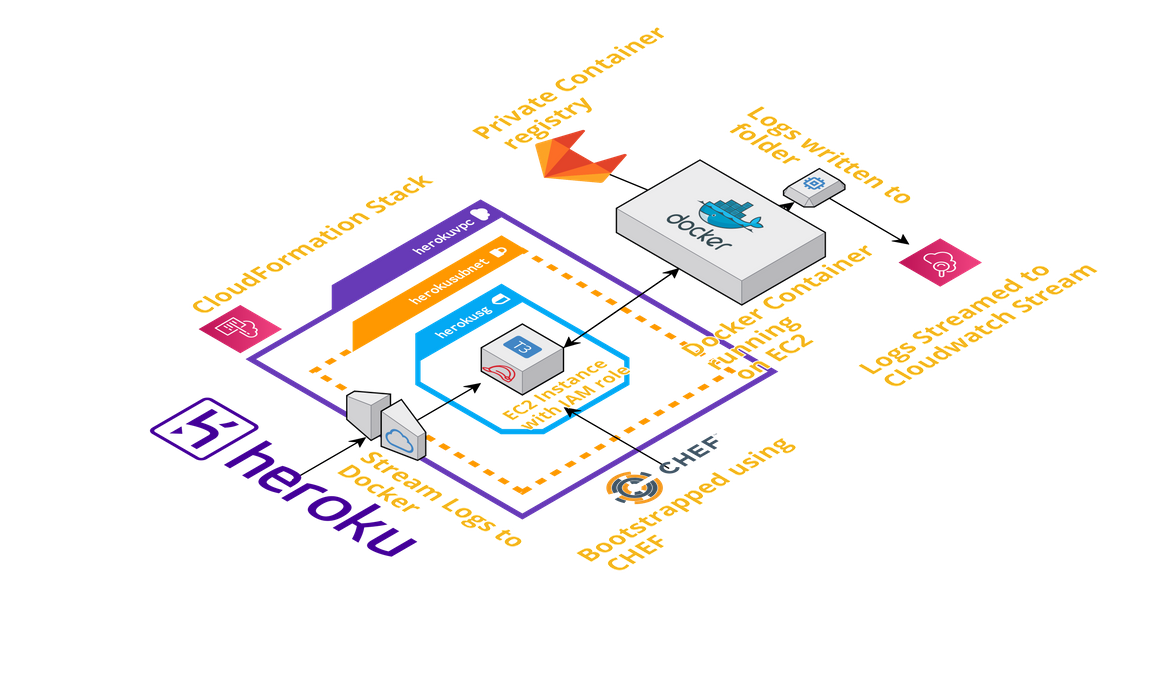
Overall Architecture
Above image should provide an overall view of the solution architecture. I will be going through in detail about each of the component involved. Below are the solution components which I will be going through in this post:
- Heroku App: The app from where we will be streaming logs
- Intermediate EC2 instance: The EC2 instance connecting Heroku to Cloudwatch
- Docker Container: Docker container running on EC2 performing all the commands
- AWS Cloudwatch Log Stream: This is the log stream where the logs from the Heroku app will be streamed to
Component Details
Let me go through details of each of the component above.
-
Heroku App
This is app which is deployed to Heroku. We will be streaming the logs from this app to Cloudwatch. I will be using a sample app I have which is deployed on my Heroku account. The logs can be viewed on Heroku here:
-
EC2 Instance
This is the instance which will be launched on AWS and act as interface between Heroku and Cloudwatch. Since it will be pushing the Logs to Cloudwatch, we will have to attach an IAM role to the instance so proper permissions are assigned for the instance to be able to push the logs to Cloudwatch. Below are the steps needed to prepare the instance for streaming the logs:
- Install Docker
- Install Cloudwatch logs agent
- Configure the Cloudwatch logs agent to track a local log file and start the agent
This should prepare the instance for the next component
-
Docker Image and Container
The actual function of getting the logs from Heroku and writing to a local file is handled by a Docker container which I will be running on the interface EC2 instance. I have created a custom Docker image to perform the same and I am using my private container registry to host the image. You can create your own container repository on Gitlab too. Below are the steps being followed in the Docker image to get the logs:
- Using Ubuntu as base image
- Install Heroku CLI
- Copy the Heroku credentials file to the home folder in the docker image
Once I have the image I will be launching a Docker container on the interface EC2 instance. The Docker container will: - Run the Heroku logs command using Heroku CLI command
- The output will be streamed to a file which is mapped to a mounted volume. The mounted volume is mapped to the location on EC2 instance which is configured to be tracked by the Cloudwatch logs agent
-
AWS Cloudwatch Log Stream
This will be the log stream to which the EC2 instance will be streaming the logs via the agent. Now we wont be creating this manually as once the log streaming starts, the agent will create the Log stream based on the agent config file.
Now that we have some idea about the solution, let me explain how I setup a deployment process for the same.
Deployment Pipeline details
To launch the different components of the solution, I developed a Jenkins pipeline which will be launching each component and using CHEF for configuration management. Below image will provide an overview of the pipeline
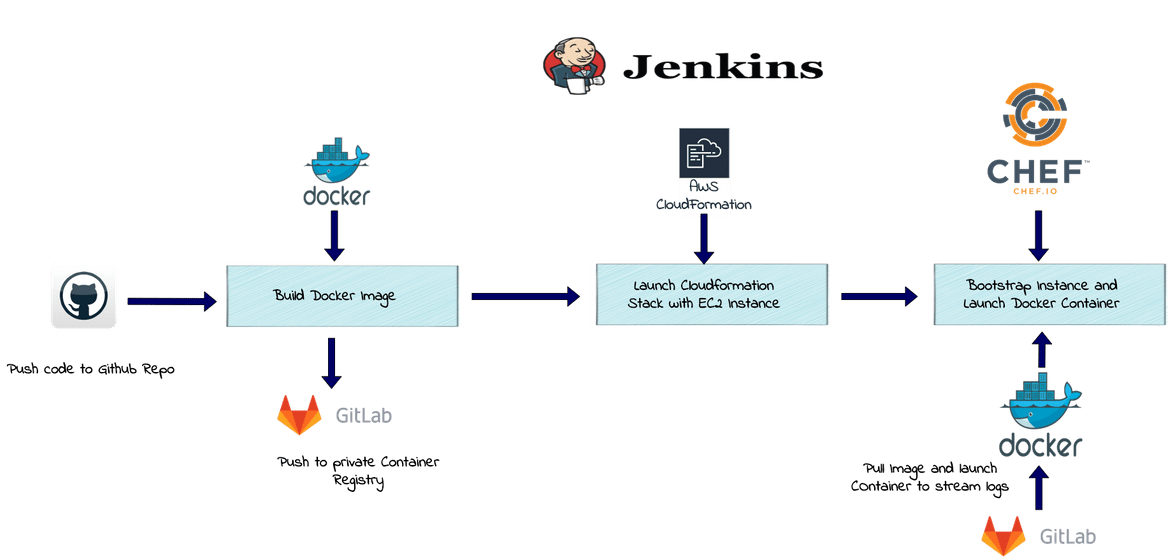
Let me go through each stage of the pipeline:
-
Build Docker Image
In this stage the custom Docker image gets built. It will build the custom Docker image based on the Heroku credentials file placed in the folder. In this stage I am also pushing the custom Docker image to my private Container Registry hosted on Gitlab. I have setup the Gitlab Credentials as Jenkins Global Credentials. That credential is used as environment variable to perform login to the Gitlab Container registry before pushing the image.
-
Launch the Instance
In this stage the interface EC2 instance will be launched. I am using a CloudFormation template to create a stack on AWS. The stack consists of:
- VPC
- Subnet, NACL and Security groups
- IAM role for the EC2 instance. This role will provide permission to the EC2 instance to send logs to Cloudwatch
- Of course the EC2 instance too
Once the stack gets created, the IP of the launched instance is stored in an environment variable to be used in a later stage.
-
Bootstrap the Instance
In this stage, the instance launched on the earlier stage, is bootstrapped using CHEF. I created a CHEF recipe which performs all the required installations on the instance and starts the Docker container from the custom image. The CHEF recipe is uploaded to a managed CHEF server(provided by CHEF). The CHEF recipe is executed to bootstrap the instance. In brief these are the steps which happen in this stage:
- Navigate to the CHEF recipe folder of the codebase
-
Execute the CHEF bootstrap command. The CHEF recipe performs the below tasks on the instance:
- Create the folder to store the log file
- Install, Configure and start Cloudwatch logs agent
- Login to the Gitlab container registry and run the Docker container from the custom Docker image. The streaming logs from the Docker container are mapped to the local log file on the instance via the volume mount
Once the instance get bootstrapped, the running Docker container continues to stream the logs via the Heroku logs command and writes the log to the local file. Since this file is configured to be tracked by the Cloudwatch logs agent, the logs are streamed to the Cloudwatch log stream.
Now that you have a full view of the solution, let me explain the steps to set this up on AWS. Before proceeding, you will need to make sure you have the pre-requisites fulfilled which I specified earlier.
Setup Walkthrough
Let me go through the steps using which you can set this whole architecture on your own AWS account. Make sure you have the AWS account registered before proceeding further. Below image will show you on high level what we are setting up here

-
Prepare a Jenkins installation and make sure below packages are installed on the Jenkins instance:
- Docker
- CHEF Workstation and CHEF DK
- AWS CLI
- Update the required files in the code folder for the Jenkins pipeline to launch components specific to your account
- Setup the private container registry on Gitlab
- Configure the required credentials on Jenkins
- Setup the Heroku app
- Setup the AWS account pre requisites
- Setup a CHEF manage account and upload the CHEF recipe to be used by the Jenkins pipeline
Lets jump on the actual steps.
Pre-requisites Setup
-
AWS Pre-requisites
We will need a key pair for the EC2 instance which will be launched by the CloudFormation. Create/import the key pair on your AWS account. Make sure to make a note of the key pair name

Also create an IAM user and provide admin access to the user. This user will be used by the Jenkins pipeline to launch AWS resources. If you do not want to provide admin access, you can select and provide just the required access to launch specific resources. Note down the keys for the IAM user.
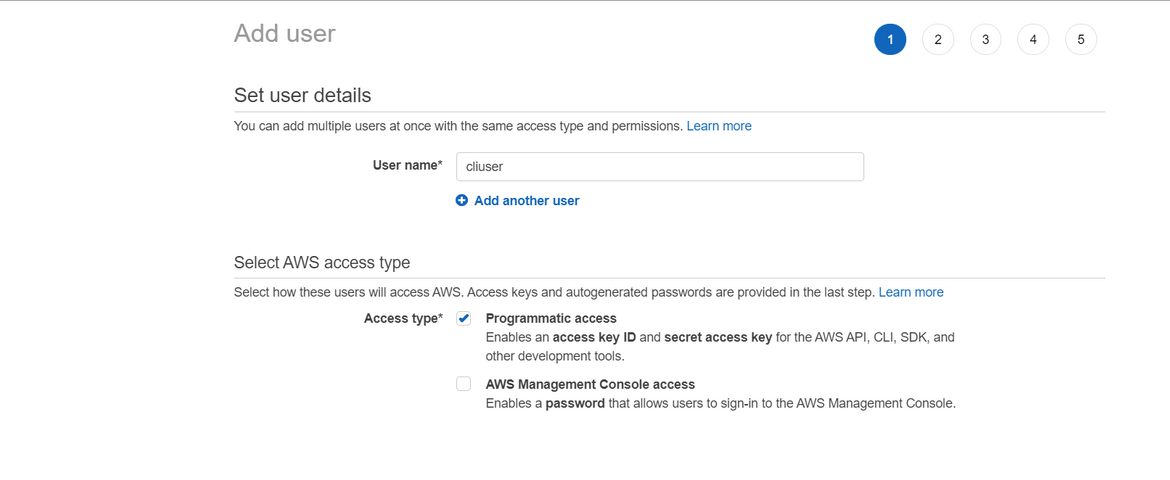
One more thing to make sure is that you are using proper AMI for the EC2 based on your region. Update the AMI to respective AWS Linux AMI in the CloudFormation template file, based on your region. -
CHEF Pre-requisites
Before we can use or execute the CHEF recipes to bootstrap the instances, we will need a CHEF server to perform the bootstrapping. Register for a free CHEF manage account Here. Create an org on CHEF manage. Generate the knife file and the user key file. Make sure to download the key files. For this example I am keeping the key files in .chef folder in the CHEF recipe folder. But that is not a good idea. For an actual implementation, upload the key files to S3 and make the Jenkins pipeline download the file from S3 before running the CHEF bootstrap commands. For more details on CHEF manage steps go Here.
-
Jenkins Setup
I will not go through the Jenkins installations steps. If you need to install and setup Jenkins, please follow the steps from Here. We will also need below packages installed on the Jenkins:
- Docker: Follow the instructions Here
- CHEF DK: Follow the instructions Here
- AWS CLI: Follow the instructions Here
Once the installations are done, lets configure Jenkins to get ready for the pipeline: -
Add Github Credentials: For Jenkins to checkout the code from Github, I am adding the SSH key as Credentials on Jenkins and configuring Github to connect using the same SSH key. Follow these steps to set it up:
-
Generate the SSH key pair. Run the below command
ssh keygen -b 4096 -t rsa -C 'email@email.com'This will generate two files at the specified location: a .pub file and a .pem file.
- Add the public (.pub) key from above to Github. Navigate to Settings and ‘SSH and GPG Keys’ to add the key

- Add the private key from above to the Jenkins credentials page. Login to your Jenkins and navigate to Manage Jenkins—>Credentials
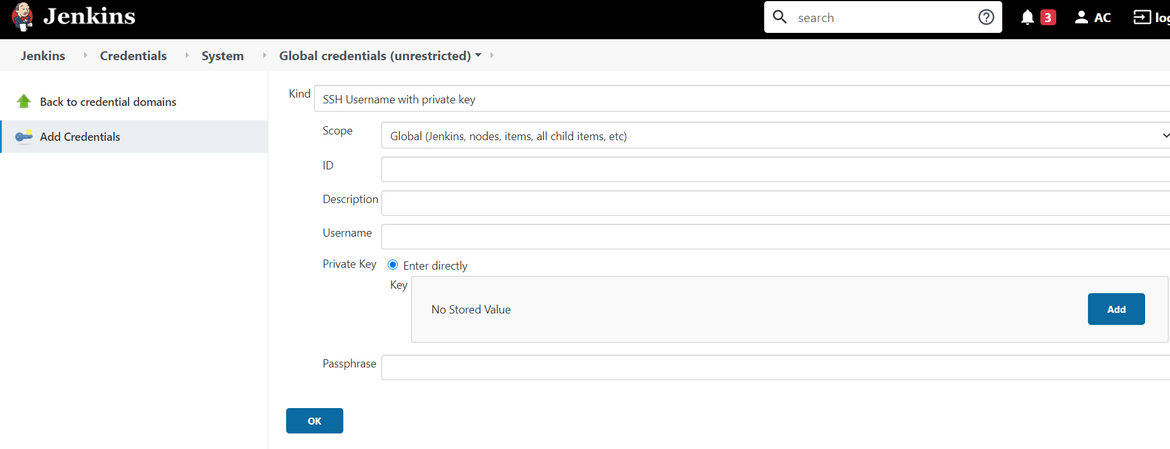
-
- Add Gitlab Credentials: For Jenkins to be able to connect to the private container registry to pull the custom Docker image, we will need to add the Gitlab credentials. Add the Gitlab credentials on the Jenkins Credentials page. Make sure to note the Credential name from the Jenkins page
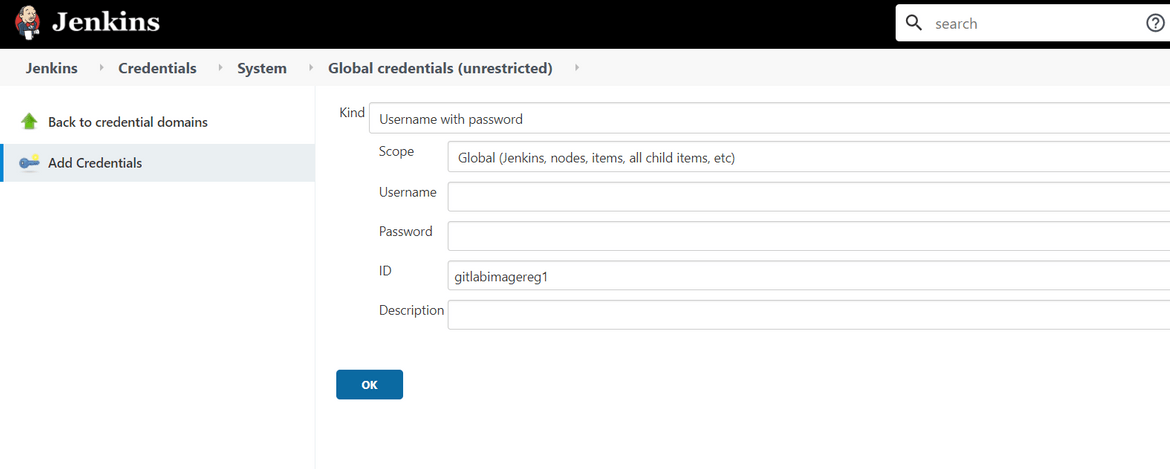
That should prepare your Jenkins for the Heroku logs deployment pipeline.
-
Gitlab Container Registry
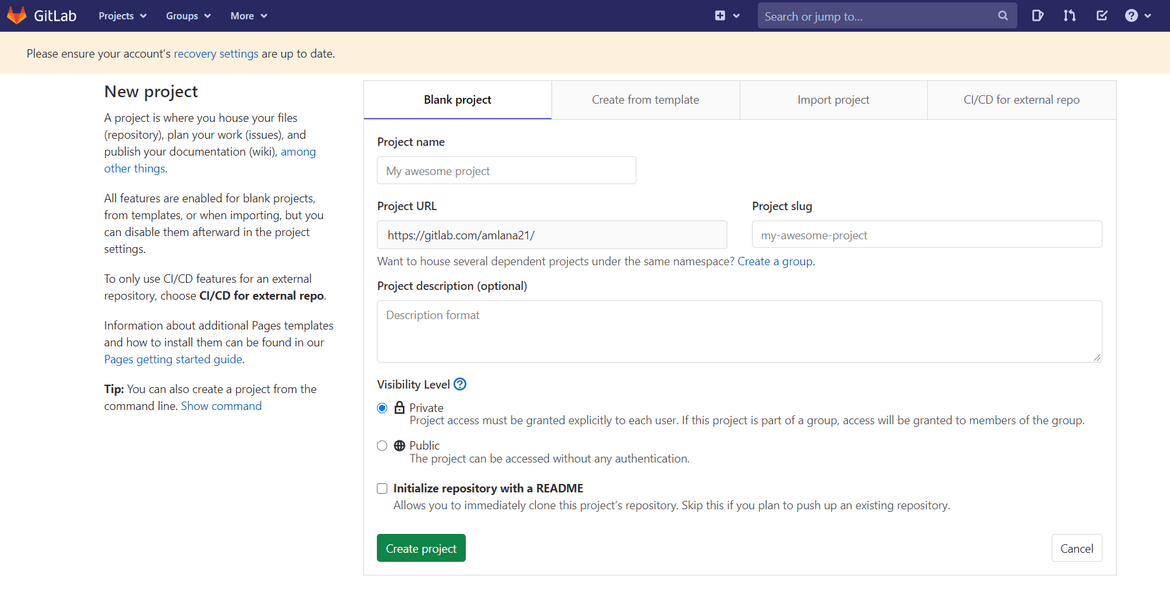
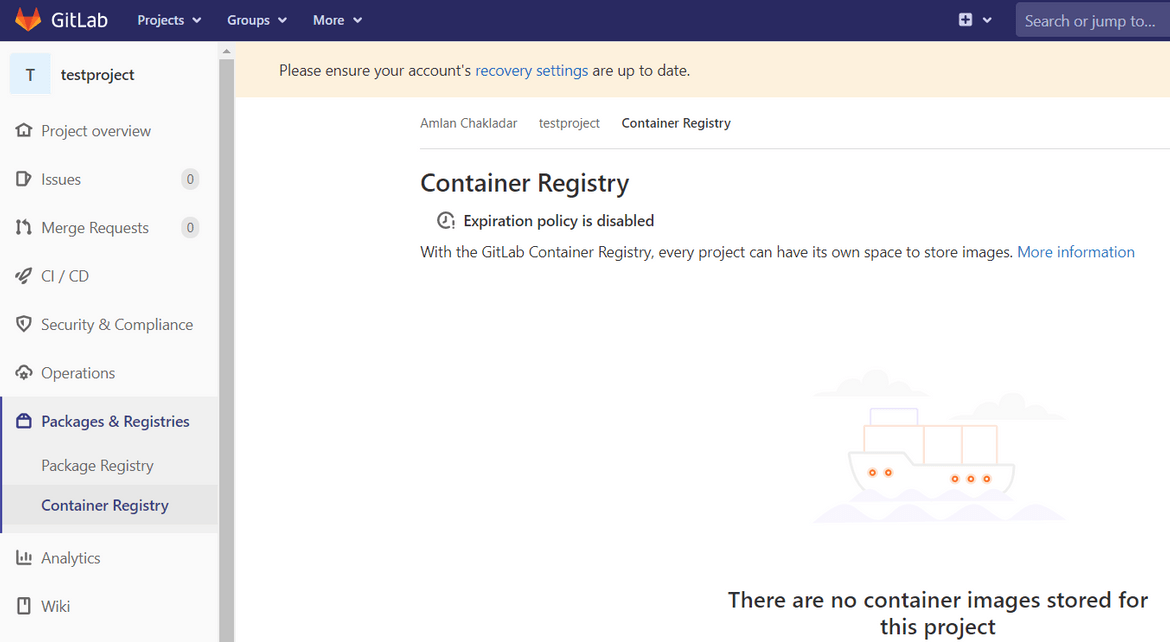
To host the custom Docker image I am using a private registry. I registered the private registry on Gitlab. I created a new project and created a container registry in the project. Follow below steps to create your own private registry:
-
Heroku Credentials file
To enable to Docker container to automatically login to Heroku and get the logs, we will be needing a Heroku credentials file. To get the Heroku credentials file, install the Heroku CLI to your local machine. Follow the steps Here. Once the CLI is installed run the below command to login to Heroku
heroku loginThis will prompt to open the browser and complete Heroku login with proper credentials:

Once you complete the login, the credentials file will be stored at your home folder. Open the file to inspect. The file name is .netrccat ~/.netrcYou will see the below details in the file. These will be the credentials which Jenkins will use to connect to the container registry:
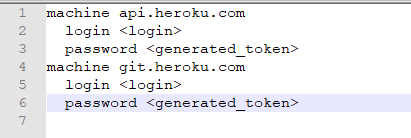
Copy the file and keep it for the Jenkins pipeline later.
If you face issues connecting to Heroku using the above credentials, then get an API key from your Heroku account. Login to Heroku and navigate to Account Settings. Copy the API Key from the API key section:

Replace the generated tokens from the above .netrc file with the copied API key. This will make the authentication work using the API key.
Heroku Setup
There is not much to setup separately on Heroku. The logs for Heroku are enabled by default. If you have an app deployed on Heroku, you can check the logs on Heroku by logging on to Heroku and opening the app.
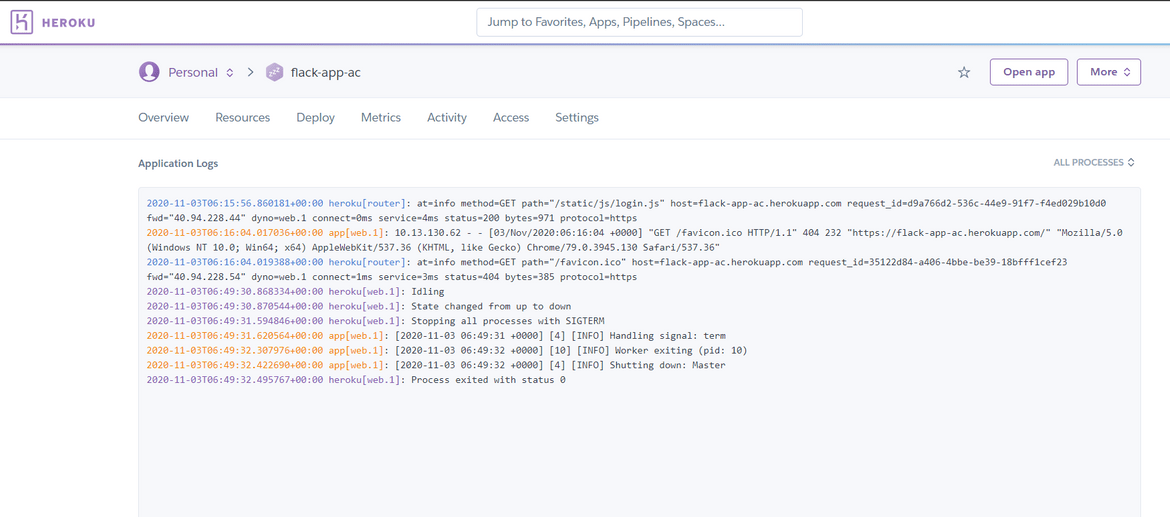
I am using one of my sample apps to demonstrate the steps for this post. Make sure to note down the name of the Heroku app to be used in next step for deploying the pipeline.
Deploy the Setup
Now that we have all the initial setups done. Lets go ahead and deploy the pipeline to start streaming the logs. To start the pipeline setup go ahead and clone my Github repo as that will contain all the code and scripts for the pipeline. Run the below command to clone the repo and navigate to the folder
git clone <repo_url>
cd <code_folder>
We need to modify some of the files so that the pipeline deployment is specific to your account/deployment.
-
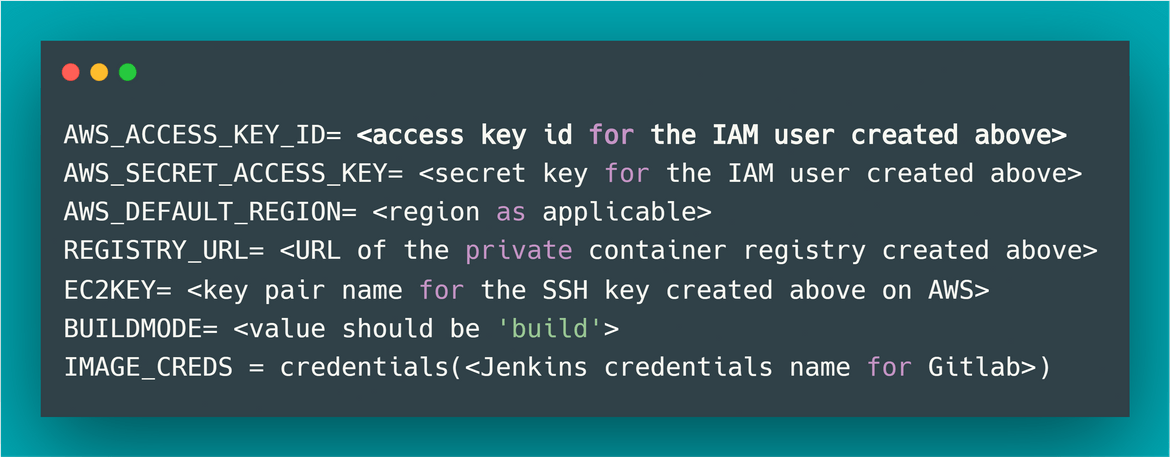
Jenkinsfile Changes
-
Docker file changes
The Docker file related files are in the folder named Dockerfiles. Navigate to the folder for below changes.
cd DockerfilesTo customize the Docker image which will be built by the pipeline, make the below changes based on your details:
-
CHEF Recipe changes
Navigate to the CHEF recipe folder to make these changes.
cd monitorlogsThe CHEF recipe need to be updated so the bootstrapping of the EC2 instance is done for specific use case. Update the following to customize the CHEF recipe:
-
Copy 3 key files to the .chef folder. I will pint out again that this is not a safe way to do it and these should be uploaded to S3. But for this demo I am going this route:
- The CHEF knife file and user key file which was generated before from the CHEF manage console
-
The private key from the key pair which was created in AWS on an earlier step. This will be used by CHEF to SSH to the instance and perform the bootstrap
Once copied, navigate to the recipe folder and open the recipe file named bootstrapec2.rb.cd cookbooks/monitorlogsec2/recipesUpdate the Docker registry URL to the URL you copied from your private Gitlab registry or any other registry you are using:
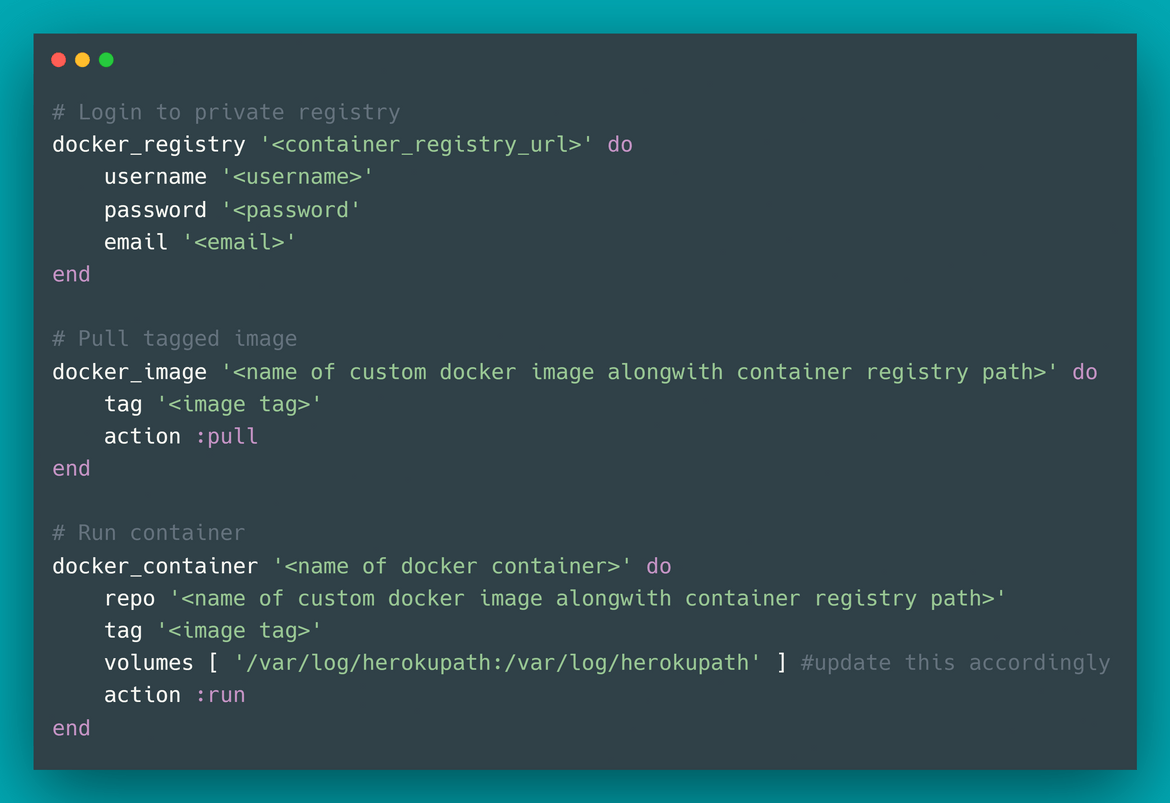
Make sure to update the volume mapping to the proper local folder which is configured on the Cloudwatch agent config. If you need to change the agent config, it is located in the Templates folder. Update the config.json.erb file to customize the agent config.
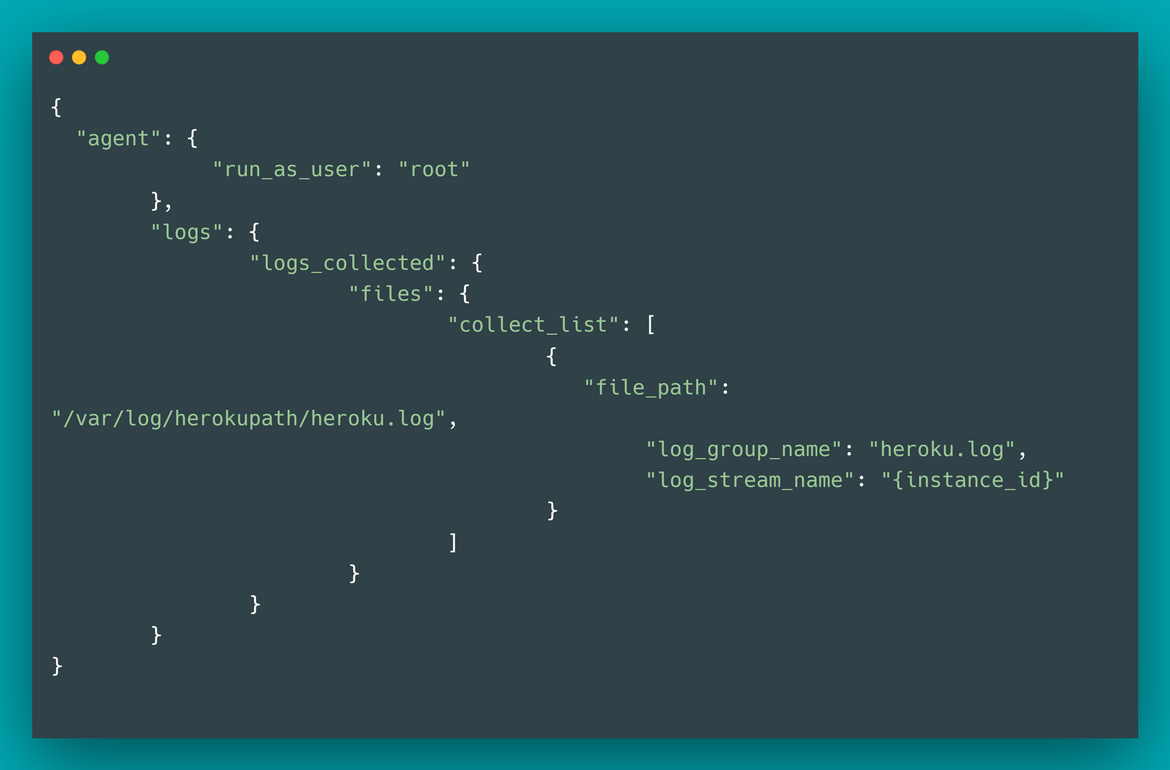
Also make sure to update the .netrc.erb file in the Templates folder to update with proper Heroku API keys.
Once the changes are done, we need to upload the recipe to CHEF manage server. Run the below command in the folder to upload the recipe to CHEF manage serverberks install berks upload
-
-
Deploy the Pipeline
Next we are ready to deploy the pipeline to Jenkins. I will go through high level steps to create and deploy a new pipeline.
- Login to Jenkins and create a new pipeline
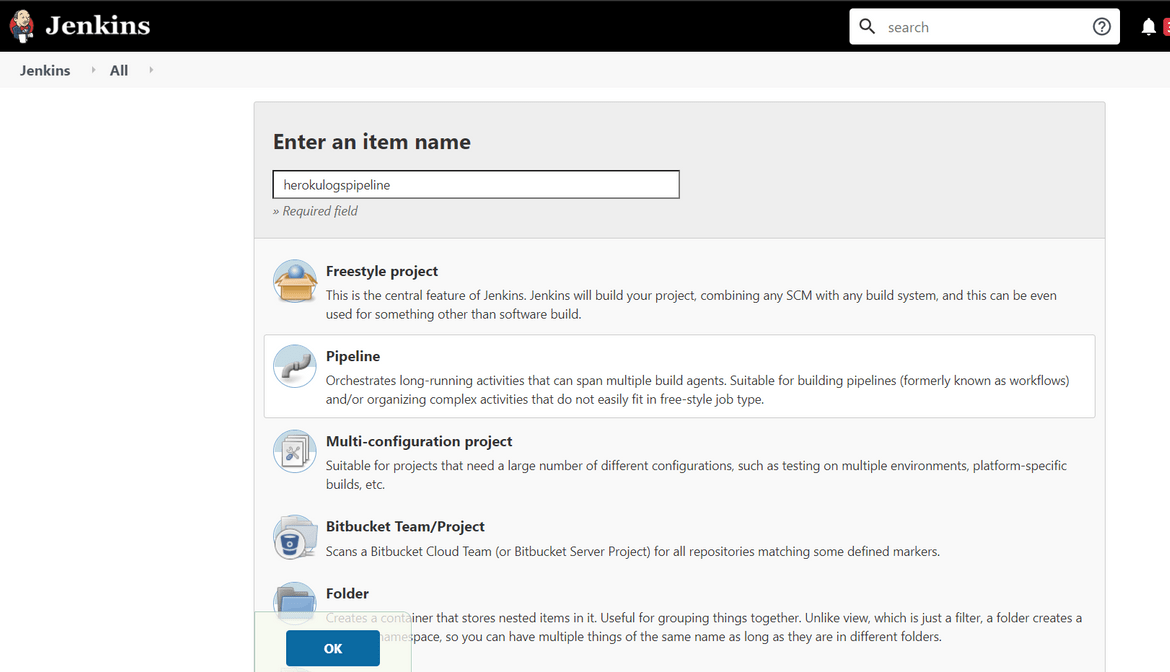
- On the config page of the pipeline, provide your GIT URL where you have pushed your updated code from the earlier steps. Make sure to select the proper Github credentials. This credential was added to Jenkins on an earlier step.
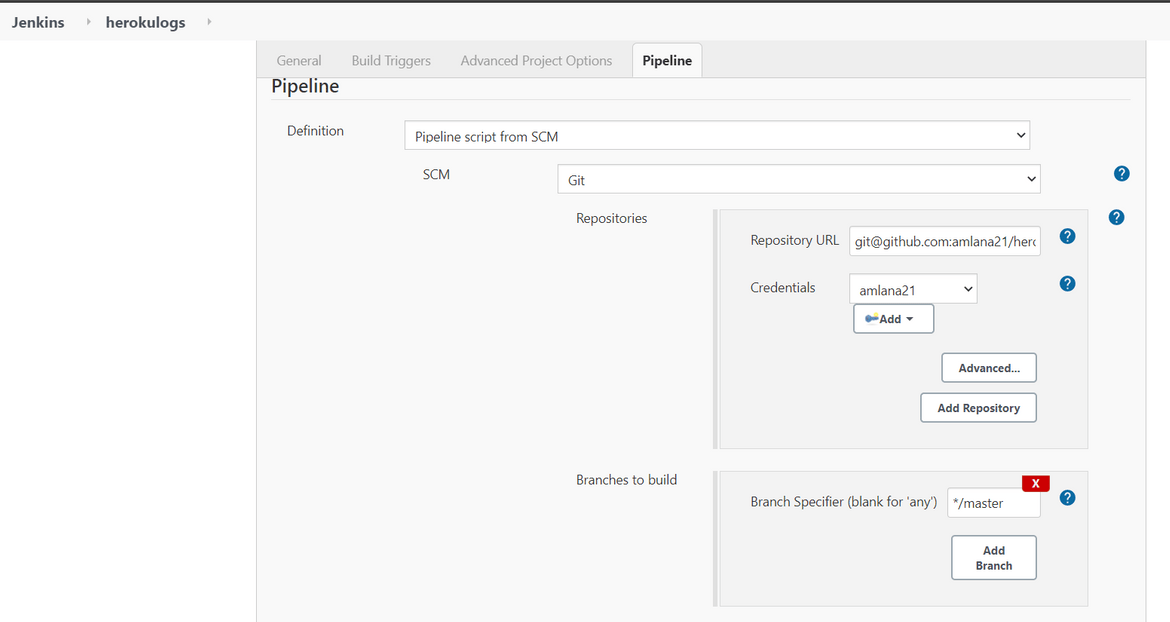
- Once saved, go ahead and run the pipeline. The pipeline should complete in success after a while.

At this point the streaming of logs should have started. Login to AWS and navigate to the Cloudwatch page. Open the Cloudwatch log stream named after the EC2 instance ID. You should see the logs from Heroku inside that log stream
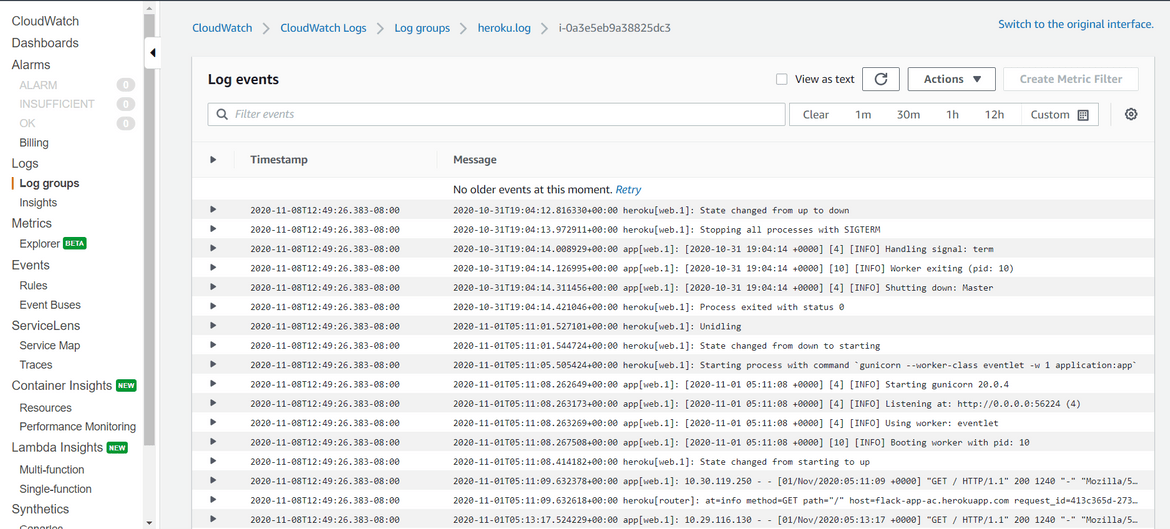
- Login to Jenkins and create a new pipeline
That should complete the deployment of the pipeline. The logs from the specific Heroku app will keep on streaming to the Cloudwatch log stream. Access your Heroku app couple of times to see new log events added to the Cloudwatch log stream.
Scope of improvements
Here I described a way to stream the Heroku logs to a Cloudwatch log stream. Since you have the log data now available in a Log stream, it can be further used for analysis, alerting etc. using various other AWS services. Some examples to make the solution more advanced:
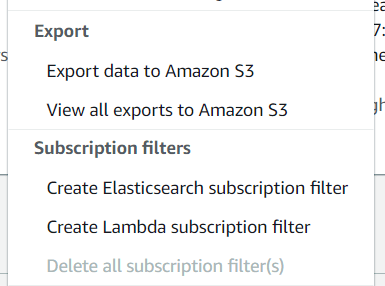
- Subscribe the Log stream to an Elasticsearch domain. Using that the log data can be analyzed on Kibana for more detailed analytics
- Export the logs from the log stream to S3 for storage
- Setup alerts on the Log stream based on error keywords to get alerts regarding errors from the Heroku app
Conclusion
Hope I was able to explain in detail about the solution I developed to stream and analyze the Heroku logs on AWS Cloudwatch. I feel its easier to analyze the logs in AWS Cloudwatch than watching the logs on Heroku. Cloudwatch also makes the log data actionable. This post shows you an easy way to get the logs from Heroku to your AWS Cloudwatch. If you have any questions regarding the process and face any issues implementing this, contact me from the Contact page.
