Deploy a Flask REST API - The Docker way and the Serverless way
Deploy a Flask REST API - The Docker way and the Serverless way
Python has become a very famous programming language in recent times. Part of the reason for its popularity is that Python also has a Web framework which enables us to develop WEB API’s and Web Apps. Flask is a very lightweight web framework and very easy to deploy via multiple ways.
One of the useful functionality which can be implemented using Flask is build and host a REST API. Using Flask and a backend database, an API interface can be easily materialized and the data from the database can be accessed over the API endpoints. The API endpoints can be invoked by a client web application to operate on the data from the database. It provides a secure interface for the client web app to access backend data. Using API endpoints for different services is also a very useful design pattern for applications which use microservice architecture.
In this post I will be going through process to deploy a simple REST API implemented in Flask. There are various ways by which we can deploy and make the API available over the web. Here I will be discussing two ways yo deploy a Flask API:
- Deploy using Docker: Deploy the API as a Docker container.
- Deploy using Lambda: Deploy in a Serverless way on AWS. Using Lambda and API Gateway.
The full code base is available on my Github repo: Here
Pre-Requisites
There are few Pre-requisites which are needed to be able to follow through and deploy the REST API:
- An AWS Account
- An EC2 instance launched in the AWS Account
- Some Python knowledge
- Python installed on local machine
- Docker installed on the EC2 instance
What is REST API
REST is acronym for REpresentational State Transfer. It is a design style to architect systems which follow decoupled patterns. Main principle it follows is the client-server pattern. A client web app communicates with the API endpoints to work on some data and then display the data on client side. API gives a way for the client to access the backend data in a secure way.
There are ways to implement REST API in different coding languages like NodeJS, Flask (Python) and a very common design pattern for modern apps.
Here I will we describing how you can implement REST API using Python and Flask.
Overview
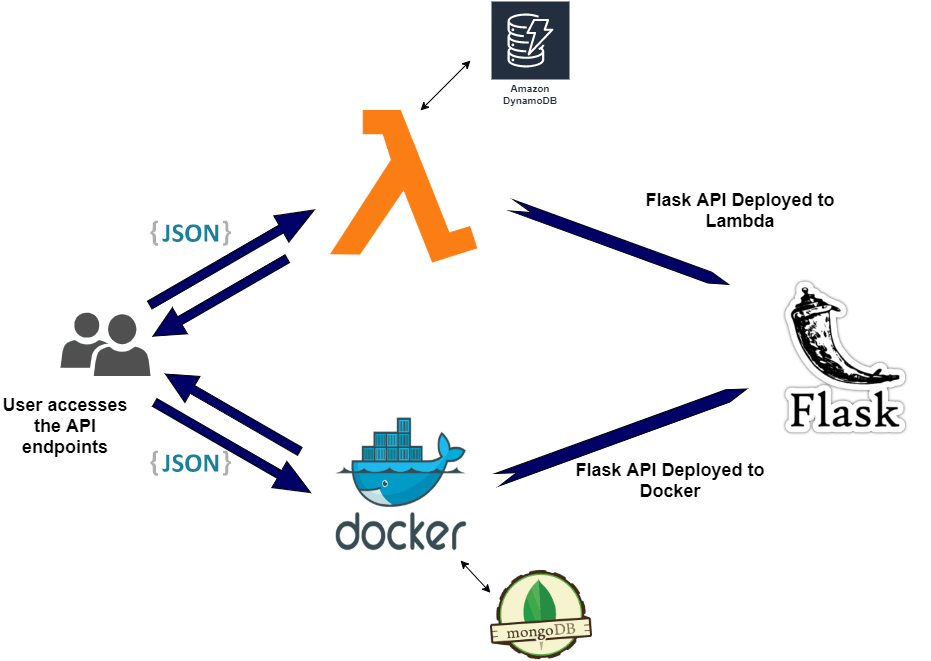
I will be going through two ways to deploy the Flask REST API. Both of them are equally useful but the difference is just that one of them follow the Serverless pattern and no servers are needed for that. Both of these paths are widely used in many applications. You should be able t use either of these to deploy your own API. This graphic sums up the overall architecture.
- Deploy to Docker: The API is deployed as a Flask App to a Docker container. This is deployed as a stack with other Docker services for Nginx(to serve the API publicly) and Mongo(for backend Database). The stack can be deployed to a Docker swarm and the API gets exposed via Nginx endpoint.
- Deploy as Serverless to AWS Lambda and API Gateway: In this the Flask App is deployed as a Lambda function. Serverless framework is used to deploy the Lambda function and expose the API endpoints via API Gateway. It also deploys a DynamoDB table to serve as a backend database and makes the whole architecture totally serverless.
Lets go through each of the methods to understand how we can stand up our own API using Python.
Deploy Flask REST API to Docker
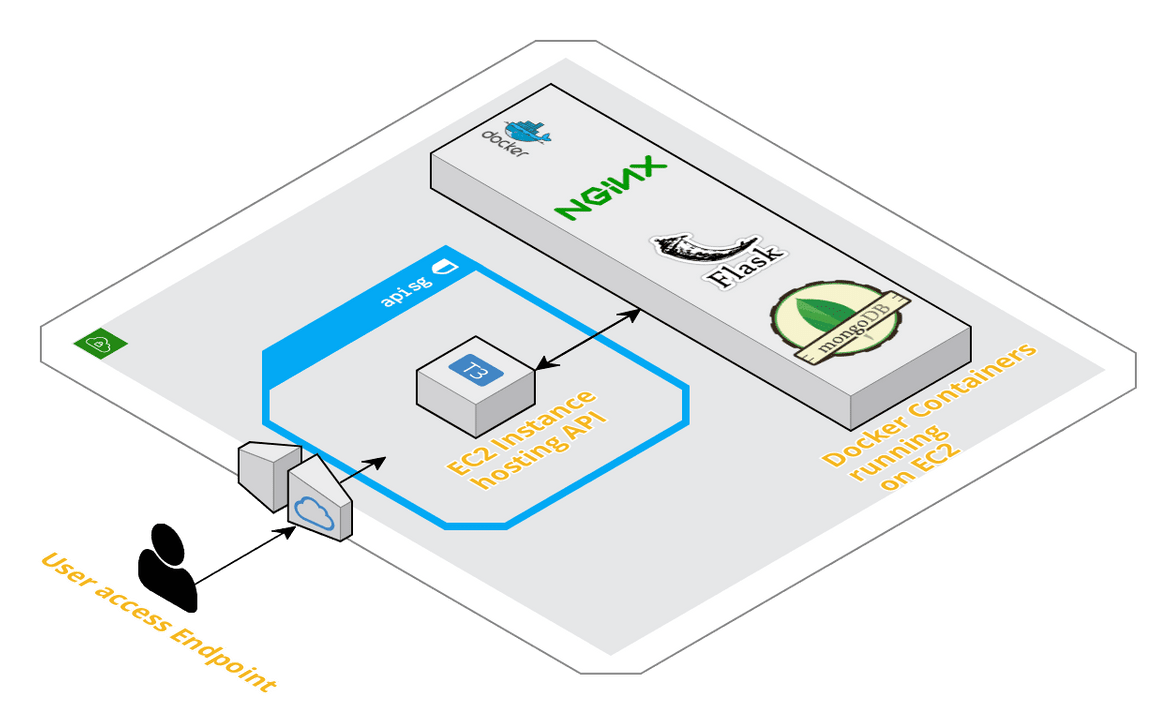
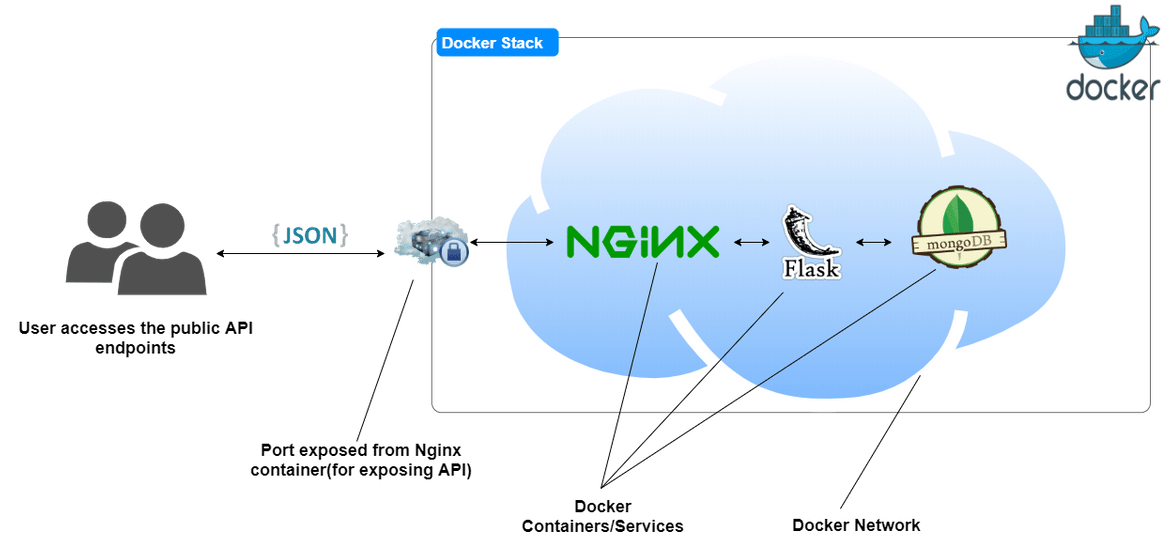
In this method we will be deploying multiple Docker containers/services for the API and other portions of the API deployment. Below image describes what we will be deploying through this method.
As a part of the deployment we will be launching below services on Docker:
- Flask App: Main app which will provide the API endpoints.
- Nginx: Acting as a reverse proxy to expose the Flask App API endpoints to web
- Mongo: Backend database serving as the data layer. The Flask app will be querying data from this database and respond with the data to invoking client.
Details about the API
The app which we will be using here as an example is a Flask App. The app consists of a single endpoint which when invoked, will respond with user data from the backend database. The code can be found in the Github Repo. It uses PyMongo Python module to connect with the Mongo database. To test the API locally, clone my Github repo and navigate in the flask_app folder. Run the below command to start up the Flask App and serve locally. If you do not have any Mongo DB setup, accessing the API endpoint will give an error since there is no backend to connect to. We will fix that with the deployment.
python -m venv sampleenv
sampleenv/Scripts/activate
pip install -r requirements.txt
python app.py
You should see the below output to confirm the local API server started successfully
Deployment Details
Lets go through the deployment steps. We will be launching three services as Docker containers as part of the deployment. I have created custom Dockerfiles or the services to customize the settings and parameters based on my needs. For the backend, I am using a Mongo DB image and using the standard image with no customization. All of the services are deployed as a stack connected through a common Docker network. I have created a docker compose file to orchestrate all of these services and various settings.
Below are the details about each of these Docker container/service which we will deploy:
- Flask API: This is the Docker service which will be running the Flask app. The custom Dockerfile is extended from a base image of Ubuntu. After installing all the necessary packages and the Flask app Python requirements, the Flask service is started and served over port 5000 of the container. The app gets served via Gunicorn which is widely used to serve Flask APIs. The DB name or the container name for mongo is passed as an environment variable in the docker-compose file.
FROM ubuntu:18.04
RUN apt-get update -y && apt-get install software-properties-common -y  && apt-get upgrade -y && apt-get install curl -y
RUN mkdir /home/pipinstall && mkdir /home/flaskapp
RUN cd home/pipinstall && apt install python3-pip -y
RUN pip3 install Flask
ENV FLASK_APP app
ENV LC_ALL C.UTF-8
ENV LANG C.UTF-8
EXPOSE 5000
WORKDIR /home/flaskapp
COPY $PWD/flask_app /home/flaskapp
RUN pip3 install -r requirements.txt
CMD ["gunicorn","--bind","0.0.0.0:5000","wsgi:app"]
High level, this is what the Dockerfile achieves and commits in the Docker image:
- Install Python and required tools
- Install Flask and set environment variable for the App name
- Copy the Flask app code to the app directory in the container
- Install all dependencies
- Launch the Flask app via Gunicorn. Expose the app over port 5000
- Nginx Image: This is extended from the latest Nginx Docker image. The image is customized with a custom config file to route the traffic from the Flask API container and expose it to public web. Since it is launched on the same Docker network as the Flask app, it can talk to the API container using the service/container name.
FROM nginx:latest
WORKDIR /etc/nginx/conf.d
COPY default.conf default.conf
EXPOSE 80
The custom config file can be found in my Github repo. When the image is built:
- Copies the custom config file into the container and replaces the default one
- Expose port 80 so that the API is accessible via port 80
- MongoDB image: The mongo DB image is used as is and without any customization. This will deploy a basic mongo DB database as a Docker container. Other settings are specified in the docker-compose file. It is always a good idea to use volume with the database container to persist the data beyond the container lifetime.
All of these containers get deployed as a stack to a Docker swarm. There is a docker compose file to orchestrate these containers and how they talk to each other. The file can be found in my repo (docker-compose.yml). I wont go through the whole YAML file but I will give an overview what its performing:
- It builds the custom Docker image from the Nginx and Flask Dockerfiles
- Launches all three Docker containers/services: Nginx, Flask App, Mongo
- Creates a Docker network so all of the three containers can talk to each other
- Exposes port 80 on the Nginx container
- Set the root passwords for the Mongo DB. I will suggest change and set your own password when deploying
- Map the mongo data location to a docker volume for data persistence
Setup Details:
To follow through the setup steps, make sure below pre-requisites are ready for the deployment:
- An AWS account
- Launch an EC2 instance. If you already have an existing instance, that will work too. I have included a CloudFormation template in the repo to help launching the EC2 instance.
- Install Docker and Docker compose on the instance
- Install GIT
Once you are ready with the above steps, go ahead and clone my Github repo. If any changes are needed, make those changes to customize accordingly to your need. Make sure to copy your own Flask app in the folder: flask_app. Push the changes to your own repo.
git clone <repo_url>
git add .
git commit -m "updated files"
git remote add origin <your_repo>
git push -u origin master
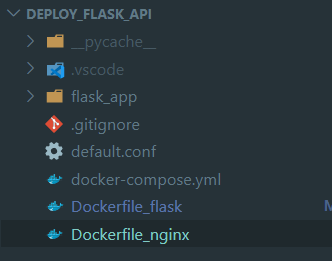
Once the files are in the repo, SSH to the EC2 instance and checkout/clone the repo to a folder on the instance. The folder structure should look like this:
Now we just have to start up the docker services/containers with just one command. Make sure you are at the root of this folder before running the command:
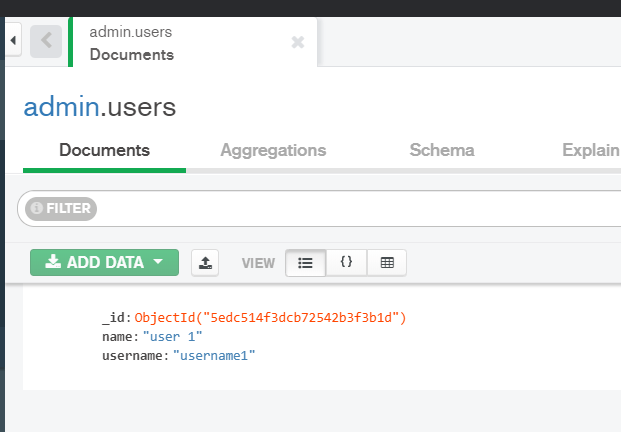
docker-compose upIt will take a few minutes to launch all the containers. Once launch is complete we can test the API. To test the API first insert a single user record in the database. The API endpoint should respond with this user data. Here I have used Mongo DB compass to connect to the Mongo DB Docker container. The connect string should be of this format. I have mapped the host port 4505 to the Mongo container port 27017. The below screenshots are from my example API and assuming you are using my example API. If you are deploying your own, the test steps will differ according to your API code.
mongodb://root:mypassword@mongo:4505/admin Once connected, add a single user record in the ‘users’ collection:
To test that the API is returning this record, send a GET request to this url:
http://<ec2_instance_dns>/ You should see the single user record returned as response:
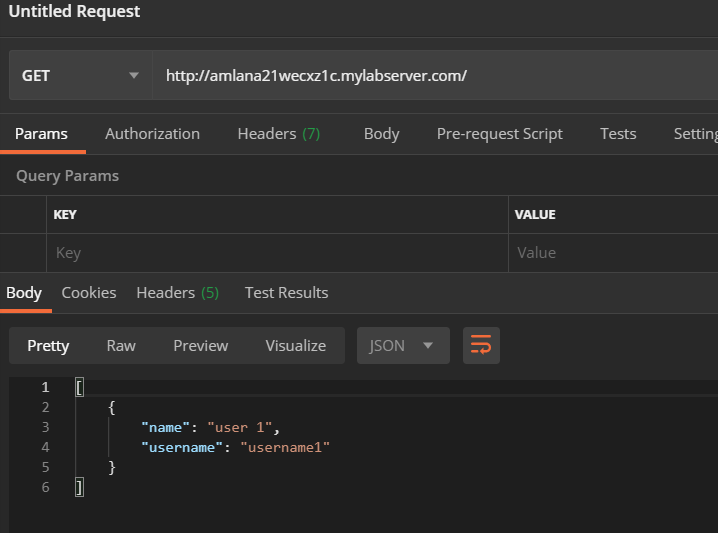
This completes the API deployment. The API endpoints can be accesses from the instance public DNS. If further updates are needed to the API, a better way to handle that is to include a CI/CD pipeline to handle the changes. For manual updates, after getting the updated files from the Github repo on the instance, run the following commands in the repo root folder:
docker-compose down
docker-compose build --no-cache
docker-compose up
Deploy Flask REST API to AWS Lambda using Serverless
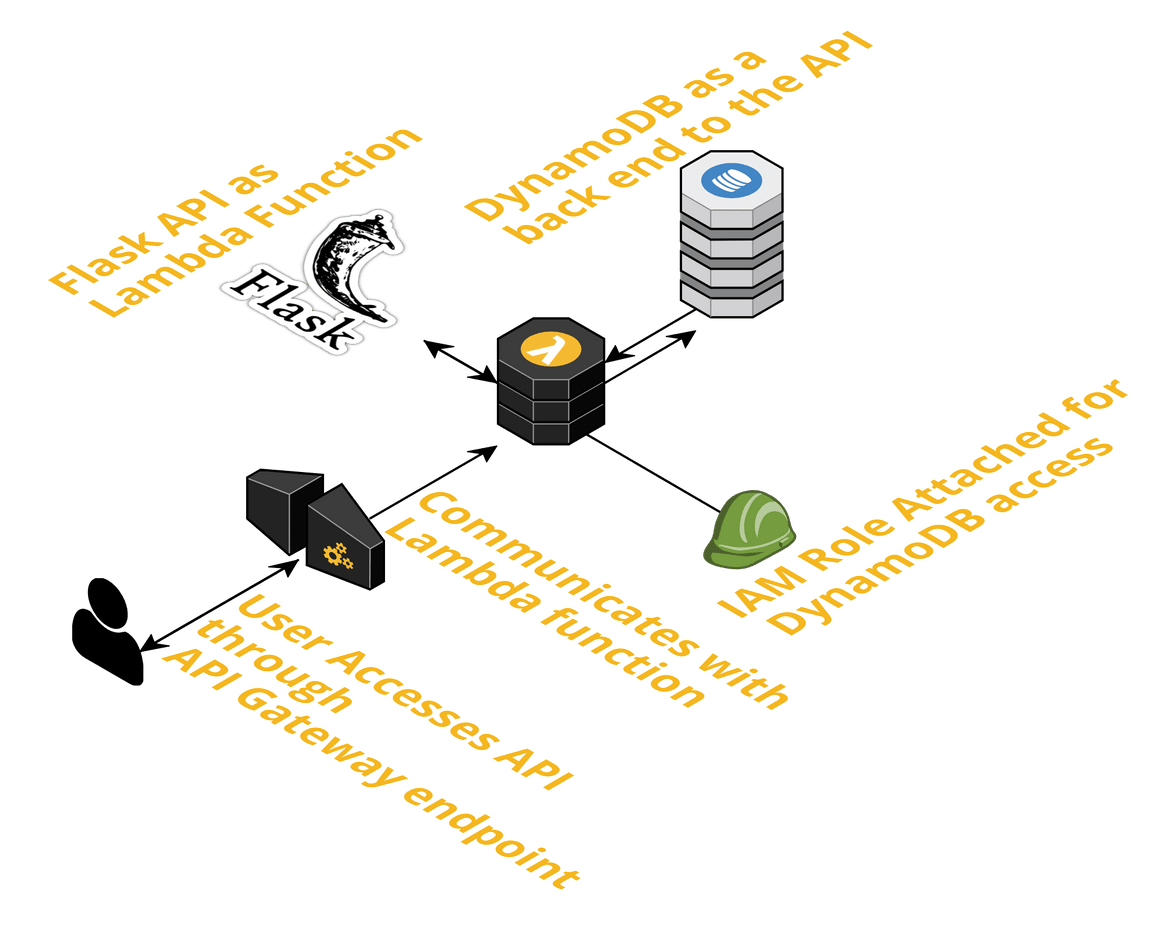
In this method we will be deploying the Flask REST API as an AWS Lambda function. All of the components for the API will be deployed in a serverless way on AWS. Below image will explain what we will be deploying here.
For this deployment we will be launching/deploying below services on AWS for the different layers of the REST API:
- Lambda Function: This will be our main Flask App code.
- API Gateway: This will expose the Lambda API endpoint to be used publicly. API Gateway will control all requests and responses going in/out to the Lambda function
- Dynamo DB: Backend database serving as the data layer. The Lambda function for the Flask app will be querying data from this database and respond with the data to invoking client. This is NoSQL database similar to Mongo DB but it is totally serverless as you don’t have to manage your own server to host this.
- IAM Role: This will be created and assigned to the Lambda function so Lambda can access Dynamo DB.
Pre-Requisites:
There are few pre-requisites which you will have to complete before you can deploy the API code to AWS:
- An AWS account (of course)
- Install Serverless on local machine (I will be going through the steps below)
- Create an IAM user on AWS and give it needed permissions. Copy the Secret key and Access key. Will need this later
- Install Node and npm locally
About the API
For the Flask API functionality, as a demo I will be using the same app functionality from the last Docker method. The API will only have one endpoint (‘/users/
python -m venv sampleenv
sampleenv/Scripts/activate
pip install -r requirements.txt
python app.py
Deployment Details
The app I am using an example is a simple Flask app with a single API endpoint. Invoking the endpoint will fetch data from DynamoDB and respond back to client with the user data. Below will describe what are the services involved in the deployment and how we will be deploying.
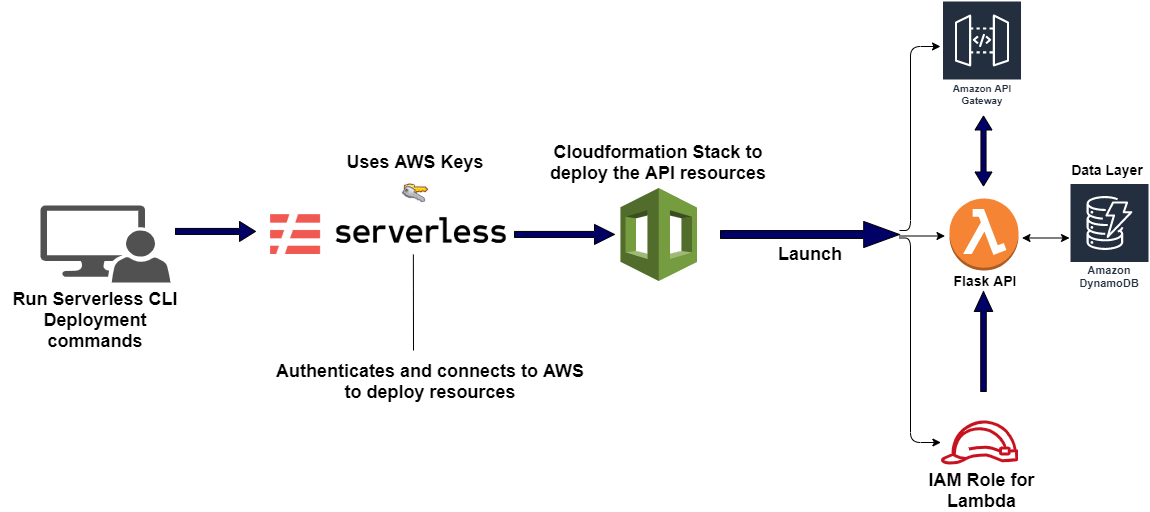
I have already described above what are the services we will be deploying. For the deployment itself, we will be using Serverless framework. I wont go into much details about what Serverless framework is but just specify a few lines. Serverless framework provides an easy way to develop and test Serverless applications(like Lambda functions) locally and deploy to the cloud using few simple commands. The framework uses CloudFormation templates to deploy all necessary components for the API to function. The details of the deployment are specified in a YAML file (serverless.yml) which acts like a spec for the deployment. The YAML file is kept at the root of the API app folder. It will also pass an environment variable to the Lambda function to specify the DYnamo DB table name (USERS_TABLE). For our example we will deploy:
- Flask API Lambda function
provider:
name: aws
runtime: python3.6
stage: dev
region: us-east-1
memorySize: 128
profile: flaskprofile
- Dynamo DB
resources:
Resources:
  UsersDynamoDBTable:
    Type: 'AWS::DynamoDB::Table'
    Properties:
      AttributeDefinitions:
        -
          AttributeName: userName
          AttributeType: S
      KeySchema:
        -
          AttributeName: userName
          KeyType: HASH
      ProvisionedThroughput:
        ReadCapacityUnits: 1
        WriteCapacityUnits: 1
      TableName: ${self:custom.tableName}
- IAM Role
iamRoleStatements:
  - Effect: Allow
    Action:
      - dynamodb:Query
      - dynamodb:Scan
      - dynamodb:GetItem
      - dynamodb:PutItem
      - dynamodb:UpdateItem
      - dynamodb:DeleteItem
    Resource:
      - { "Fn::GetAtt": ["UsersDynamoDBTable", "Arn" ] }
- API Gateway
Once the Serverless framework deploys the App, it creates all of the above resources on AWS and exposes the REST API through the API Gateway.
Setup Details:
Before we begin the deployment, we need to install Serverless on the local system. Follow the below steps to install and configure Serverless on your local system:
- Install: Assuming npm is already installed in the system, run the below command to install Serverless:
npm install -g serverless
- Configure: Get the AWS IAM user’s secret keys which you copied earlier. using the values configure Serverless with a custom AWS profile.
serverless config credentials --provider aws --key 1234 --secret 5678 --profile apiprofileNow we are ready to deploy the API to AWS. Here I am taking example of the API from my Github Repo. Same steps can be followed in your own API too. Follow the below steps to finish the deployment:
-
Get the code: Clone my Github repo and navigate to the Lambda folder
git clone <my_repo_url> cd lambda -
Install the needed Serverless plugins: Run the below command to make sure plugins required by the Serverless framework is installed:
serverless plugin install -n serverless-wsgi serverless plugin install -n serverless-python-requirements -
Install Dependencies in the Virtual Environment: We need to install all the dependencies needed by the Flask App in the virtual environment which will be packaged with the Lambda function.
python -m venv apienv apienv/Scripts/activate pip install -r requirements.txt -
Local Test: To test the API locally, run the below command and the API will start up with a local version of the serverless deployment:
serverless wsgi serve -
Deploy: Once we are satisfied with the local testing of the API we are now ready to deploy the services to AWS. To make sure the Serverless framework is using the custom AWS profile for the authentication, I have added this line in the serverless.yml file:
profile: apiprofileMake sure you are in the app root folder and run the following command. This will take a few minutes to complete. Once done this will deploy all the services to AWS:
serverless deployThe commandline should show the progress of the deployment and at the end will show the API endpoints to use. These are the endpoints created from the API Gateway.
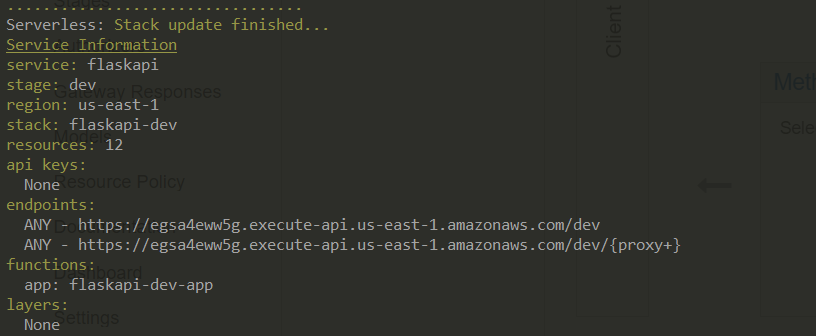
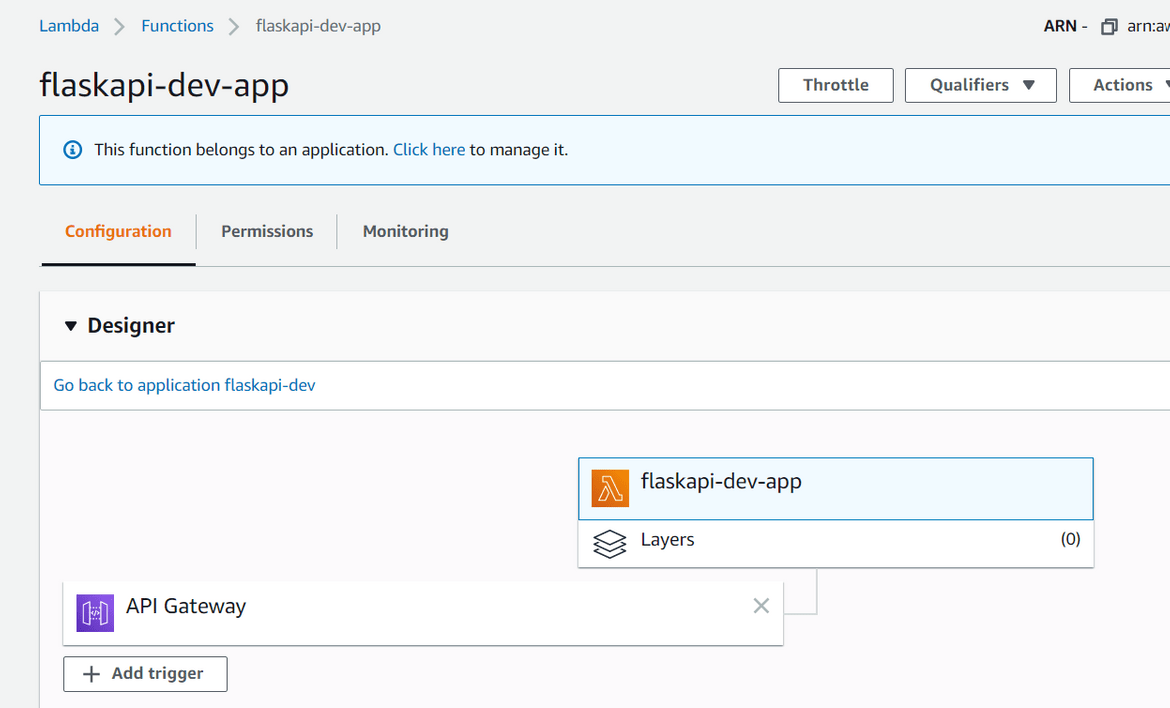
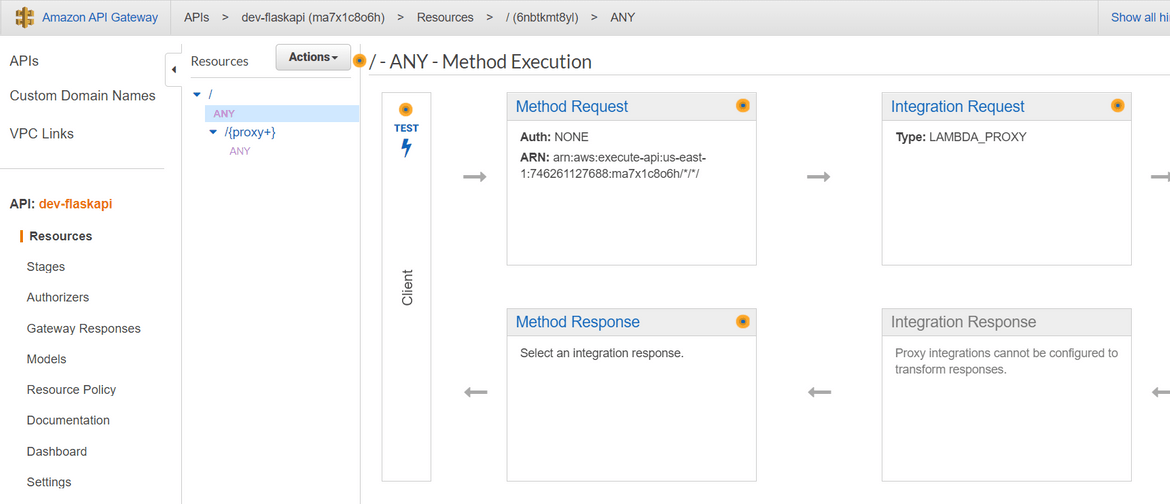
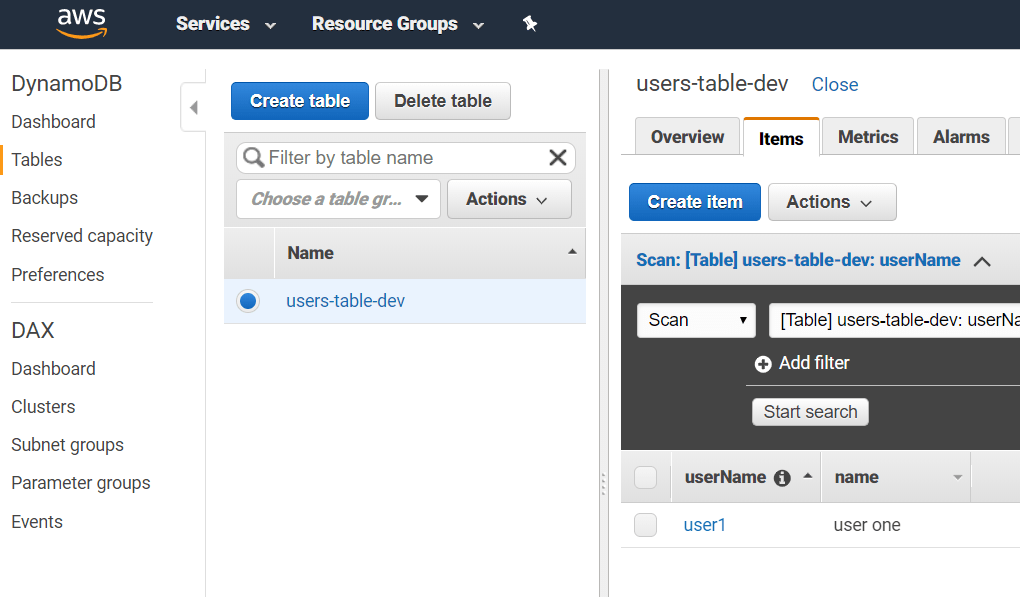
Once you log into AWS console, you should be able to see all of these services deployed:
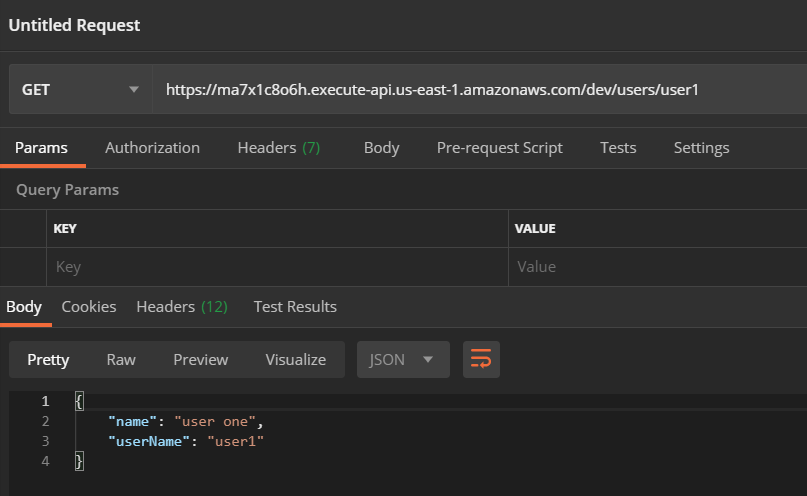
To test the API, navigate to the endpoint which was shown on the commandline after running the Serverless deploy command. Using that endpoint and passing the username, send a GET request. You should see the response with user data:
This completes our deployment of the API to Lambda. Any futher change to the API, make the changes to the code on local system. Then re-run the deployment command to update the change back to the Lambda. If there are any other changes to the AWS resources, serverless.yml can be edited accordingly.
Conclusion
Phew that was a long post. Hopefully you are able to get to the end. This should help you with deploying your own Flask REST API. Select the method which suits you best. A REST API in Flask can be very useful serving as backend to different type of web apps. The Serverless way gives a cost effective option for any of your personal side projects as it doesn’t involve managing any servers. These methods can also be used as part of any Enterprise deployment where AWS is an option. So go ahead and launch your own REST API and develop your own apps. Any questions or issues, please reach out to me from the Contact page.
