A Zoom bot for a CRM application using AWS Lambda and Deployed via Jenkins
Recently Zoom has become very popular with many companies as a go-to means for communications. During the Covid period this year, Zoom has become a primary communication mode as many companies switched to remote work. Since Zoom is already an integrated part of the companies now, I thought why not integrate it to the Sales processes too. Sales users who are already using Zoom should be able to to use it to operate on their CRM too.
This is when I came across Zoom bots. I will go through details below regarding what actually is a Zoom bot. So to give the Sales user an ease of working on their CRM without leaving the already-logged-in Zoom app, I developed a Zoom bot through which user can work with a CRM application via Zoom chat.
In this post I will explaining about my Zoom bot and how I integrated with a CRM application(I am using SFDC here). I will be explaining a high level general overview of building a Zoom bot and how it can be deployed via a CI/CD pipeline. Hope this will also help you on building your own Zoom bot.
Without further delay lets jump in to the interesting stuff. As always the whole code base is available on my GitHub Repo Here. I have included a basic Bot API code and wrapper API code in the repo.
Also here is a short video showing the bot in action: Here
Pre-Requisites
Before I start, if you want to follow along and build your own bot, here are few pre-requisites you need to take care of in terms of installation and understanding:
- An AWS Account
- Jenkins installed on a server or system (to build the pipeline)
- For local development install NodeJs on your system
- Install Serverless framework (Guide Here)
- Python Installed for CRM Wrapper API
- Some basic understanding of AWS Lambda
- Some basic understanding of Jenkins
About Zoom and Zoom Bots
Lets first understand about Zoom bots. I am sure you know about Zoom. Those of you don’t know, it is a Video telephony software developed by Zoom Video Communications. It allows users to chat or communicate with others via text IM or Video calling. It is widely used now as a video conferencing software for multiple companies. One of the primary use of it is to handle intra-company communications. Company employees can communicate with each other via chats on Zoom.
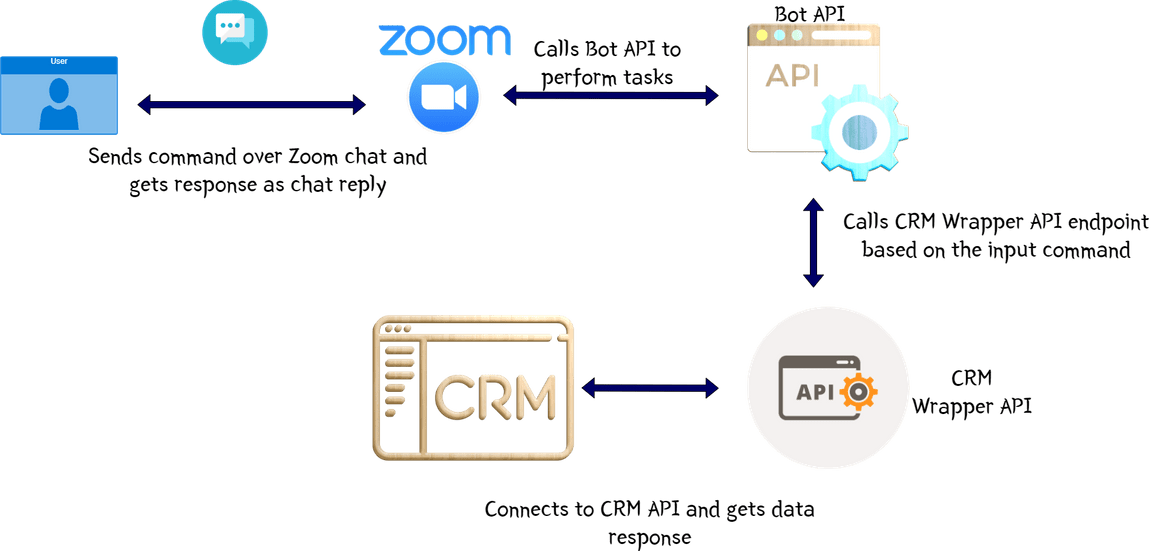
One of the features of Zoom is to provide the ability to create Bots. Zoom bots are nothing but custom apps which can be installed on Zoom and can be used to extend functionality of Zoom. Bots are generally used to give Zoom ability to communicate with other enterprise apps like JIRA, Teams and of course an enterprise CRM system like SFDC or Oracle Sales Cloud. The bots can be developed in a language of choice of the developer and then exposed as an API. Zoom will communicate with the API to perform the expected functions. Below image will help understand how Bots work and communicate with other applications.
For more details about Zoom bots navigate Here
What is CRM and how a bot can help
Now lets move on to the next and most important component of this solution. The CRM application. CRM is in integral part of any company and a crucial business process. CRM stands for Customer Relationship management. So basically CRM means how a company mages customers and customer related processes like handling leads, managing tasks related to sales and service to customers and so on. CRM is a vast topic to cover in this single post. A CRM application is an application which systemizes the CRM processes and provides a way for CRM users to automate some CRM processes.
How does a bot fit into the CRM landscape? Well as technologies are evolving, it is also evolving the ways in which a Sales user performs sales and work on the CRM application. I feel it is a non-efficient way for a CRM user to always log in to application and operate on a CRM application for simple tasks. A bot can automate simple CRM operations and provide an easy to use interface for the user. For e.g using a zoom bot, user can easily get an open task to work on by simply sending an IM to the bot. Bot will handle all the CRM related steps and return back with necessary info to the user. All of this without having the user to leave their already logged-in Zoom app. Similarly some other simple CRM steps can also be automated providing the user a chance to focus on their actual work, “selling”.
Here I tried to automate some simple CRM steps via a Zoom bot and help a CRM user to communicate with the CRM application. Lets get on to describing about what I developed.
What did I build
Here I will be describing a Zoom bot built on Node JS. For this post, I will be going through some simple tasks which the bot can perform. The bot will be communicating with an SFDC application and provide the results back to the user.
What does it do
Let me explain what functionalities the Bot can perform. In the current state I have developed the bot to perform some simple CRM tasks and provide data back to CRM user. Still working on enhancing the bot to achieve more. The bot works based on certain commands. To work with the bot, this is the high level process:
- Open the chat thread with the bot in Zoom
- Type the respective command for the specific task
- Get the response back from the Bot on Zoom chat
These are the commands which are currently functional on the bot:
-
help
This command will show back a list of commands which an user can type to perform other CRM tasks on the bot. This is like a general help command for the user to know which commands they can use.
-
connect
This will be the first command user has to provide so the user gets logged in to CRM with specific user. This will connect user’s zoom to the CRM app via the bot. Subsequent commands will use the provided credentials to communicate to CRM so user specific data is returned by the bot. I am working on making this connection way secure as the current way is not very much secure. Once user types the command, the bot responds back asking to provide the credentials. Once provided, bot test the login and returns a confirmation.
-
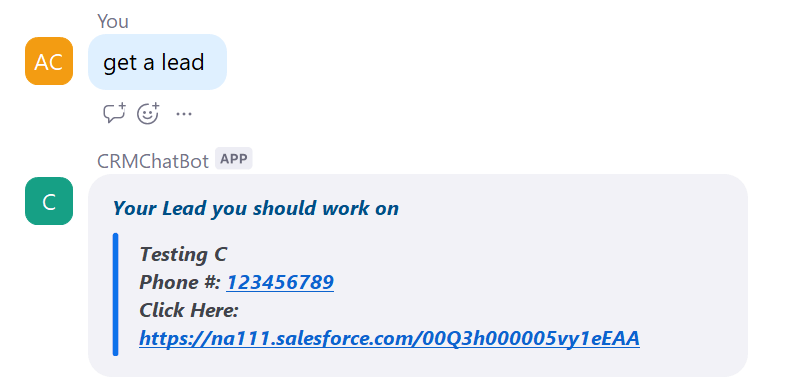
get a lead
When user types this command, the bot communicates to CRM using the connected credentials and queries for the oldest open lead. The bot responds back on the chat with the query result from the CRM
-
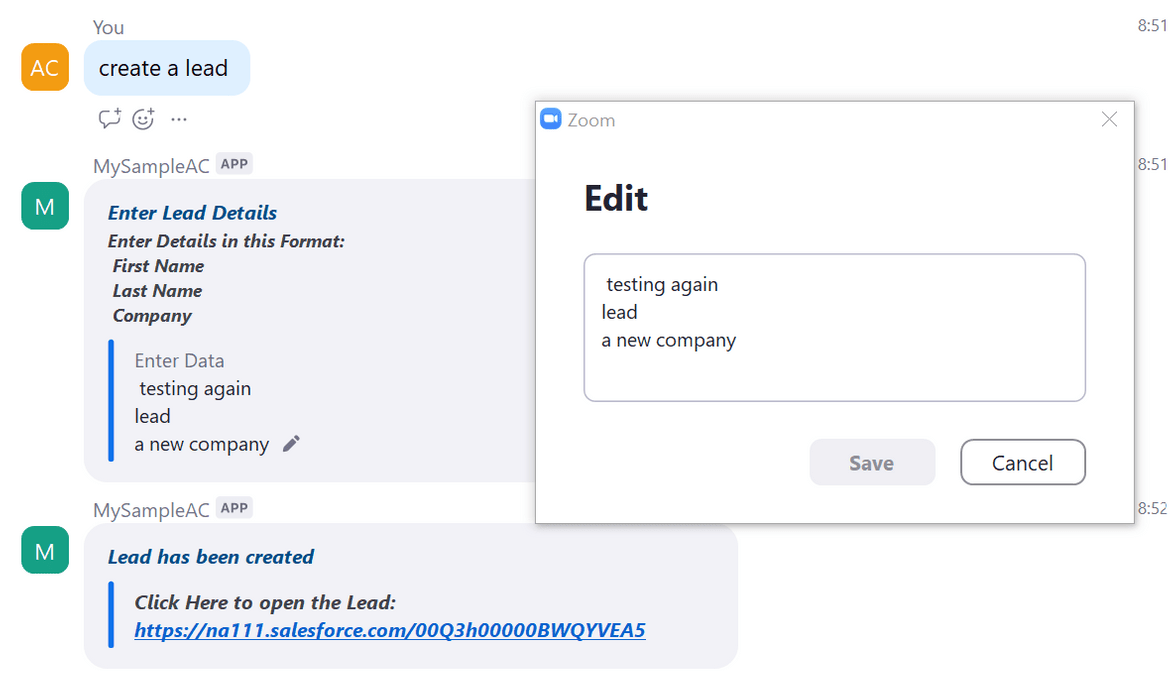
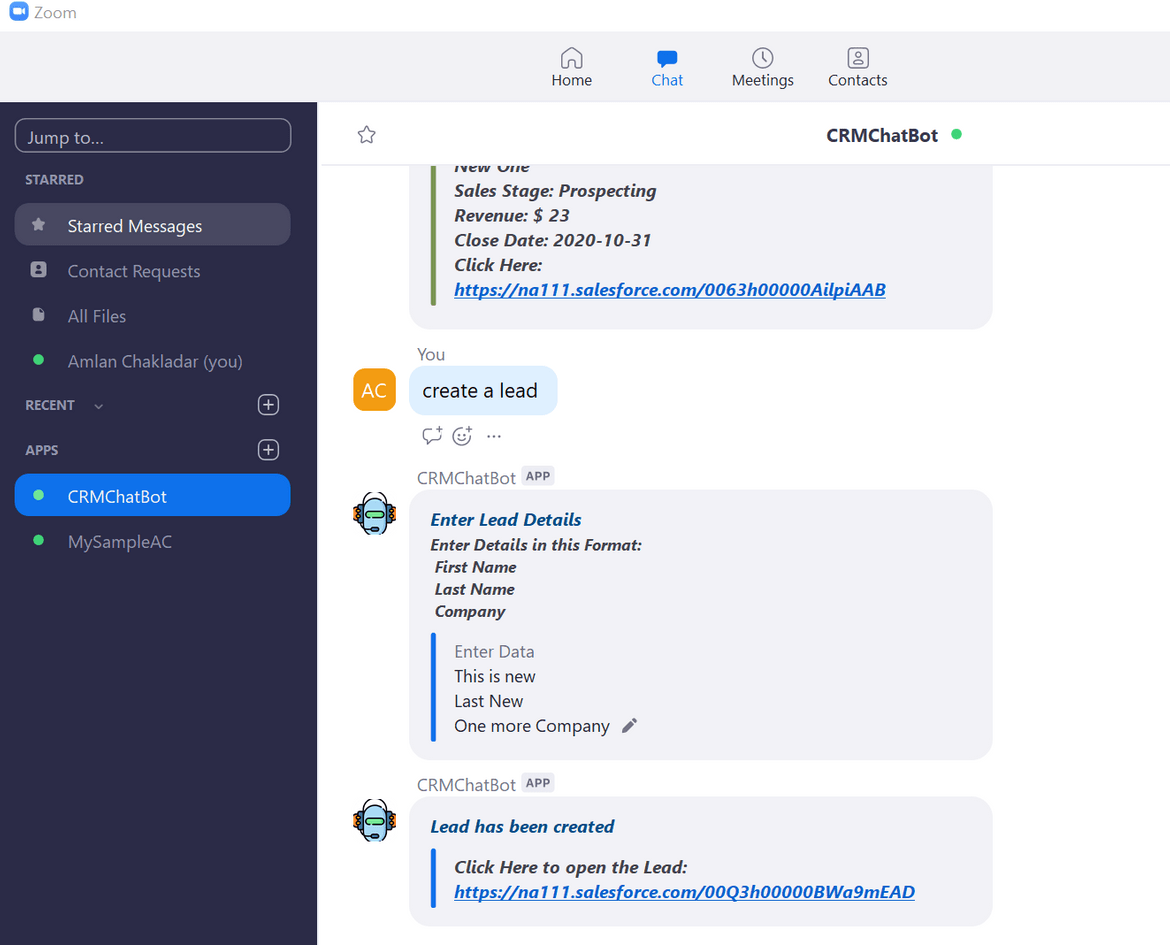
create a lead
When user executes this command, the bot creates a lead based on the details provided by the user. Once the user executes the command on Zoom, these are the steps which happen:
- Bot asks the user to provide Lead details
- Use enters the details and clicks Save
- Bot communicates with CRM, creates the Lead and responds back with a link to the Lead record
-
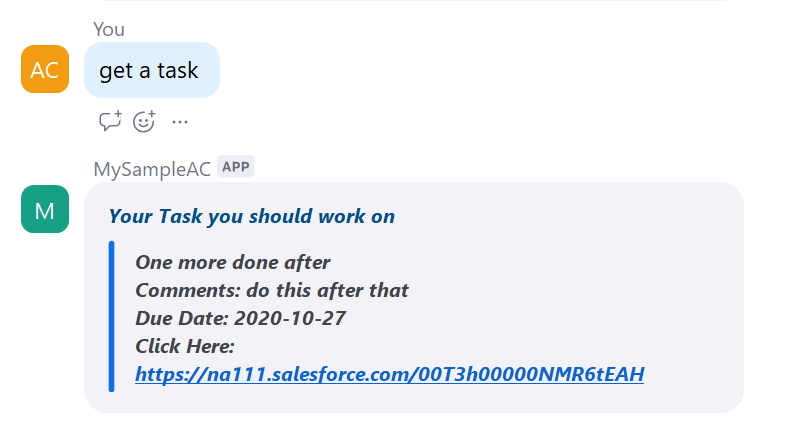
get a task
This command will return an oldest open task owned by the current user. The bot queries CRM for the oldest open task based on the current user credentials and responds back with the task details on the Zoom chat.
-
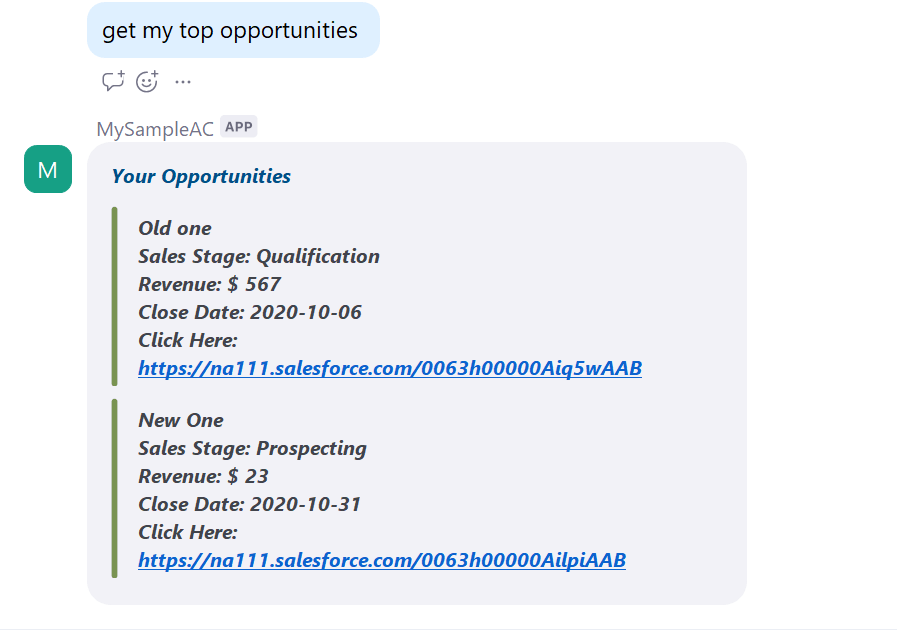
get my top opportunities
When user executes this command, the bot will query CRM for top 5 open Opportunities based on the revenue. The bot will respond with the details for oldest top 5 open opportunities. User can navigate to any of the Opportunities.
For now these are the features which I have built in the bot. A Zoom user can execute any of the above commands on Zoom chat and get corresponding data back as reply. Now lets see how the application flow works in the backend.
Overall Flow
Below flow image will give an overview of the end to end functional flow.
1. User types and sends the command on Zoom chat
Based on the need, a Zoom user types the respective command on Zoom chat and sending it to the chat thread with the bot.
2. Zoom client sends the command to Bot API
Once the Zoom user hits enter, Zoom app sends the command to the Bot API backend. I will go into the details of the API later in the post. The bot API performs all the tasks for the bot.
3. Bot API sends request to CRM Wrapper API
Once Bot API receives the command, it decodes the command and executes the corresponding method to call the CRM wrapper API. For e.g if the command was to get a lead, the bot API will call the CRM wrapper API method to query the CRM Leads. If the command needs the Bot API to get more information, it sends back respective prompt to the user to gather the information which the user can provide accordingly. This information is used with the query which is sent to the wrapper API.
4. CRM Wrapper API communicates with CRM
Based on the method which the Bot API called from the wrapper API, the wrapper API communicates with the CRM application via REST API and reads the response from CRM. For e.g if the bot API sent request to query leads, the wrapper API sends a query REST API request to CRM along with required conditions and get the Lead records back as response from CRM. The wrapper API sends the response back to the Bot API as the response.
4. Bot API sends response back to user
Once the bot API gets the response back from the wrapper API, it gets the record details from the response. The bot transforms the response to a form which can be properly showed back to the user. It sends back the response back to the Zoom app as a text chat response.
5. User gets the chat response
The Bot API sends the respective response back to Zoom app as a chat response. The Zoom user views the response as a chat reply form the Zoom bot. The Zoom app processes the response from the bot API to represents it in a presentable chat like response to the user.
Hope that gives a high level view about the Bot and what it can do. Let me get into the technical details of the Bot and its architecture. The steps below will also help if you want to build a Zoom bot of your own.
How Did I build it
In this section I will explain the technical part of the Bot and how it works behind the scenes. This will also help you understand a general Zoom bot architecture to help you build your own.
Overall Tech Architecture
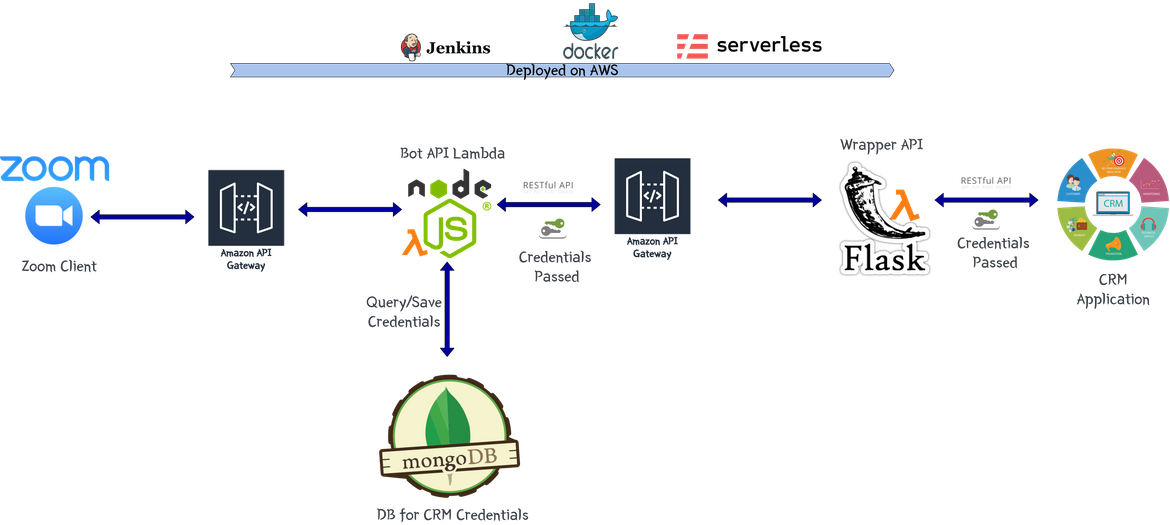
Below image shows overall components involved in the whole solution architecture.
- Zoom Client

This the Zoom app installed on the user’s machine. Through the app user will be communicating with the bot. Its the normal Zoom app which user should have already installed if Zoom is being used as mode of communications, meetings and conference calls. I don’t need to go into much details for this component as this is available out of the box to download and install. - Bot API as AWS Lambda Function

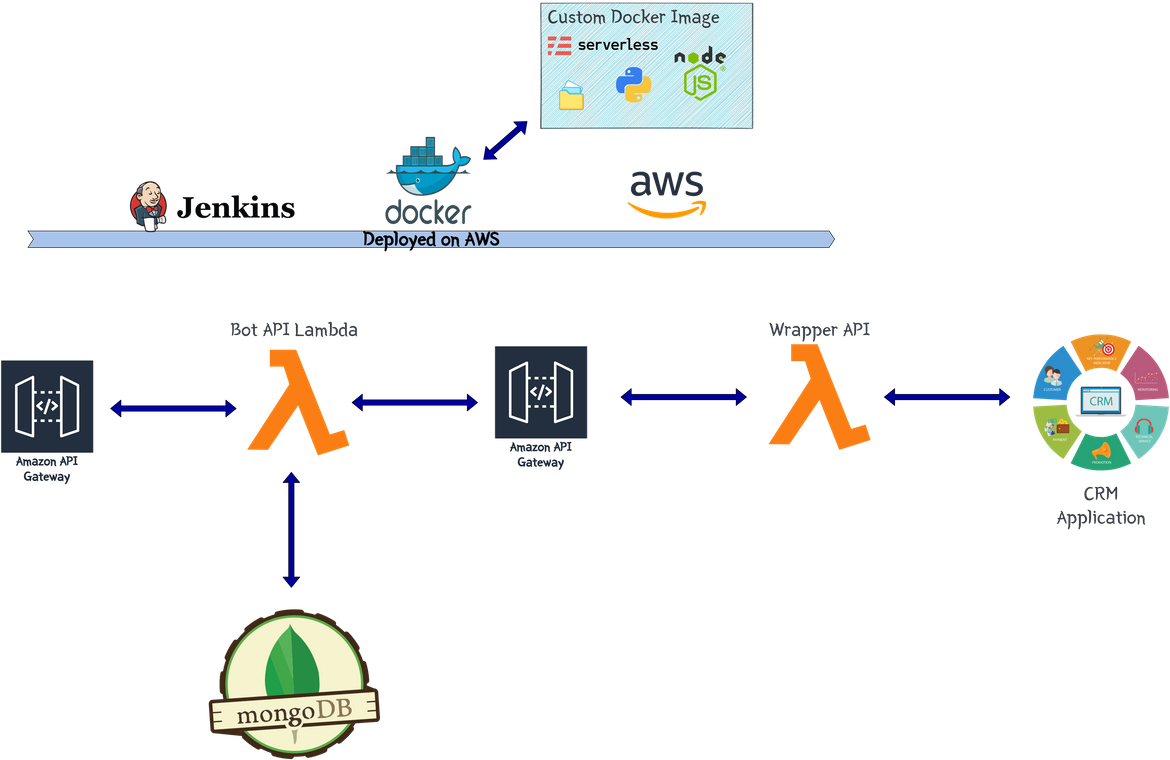
This is like the main “brain” of the bot. This will be performing all the required tasks after parsing the commands from the user from the Zoom client app. The API is a NodeJS-Express API with different routes to be called by each of the different commands supported. When a specific command is sent over the Zoom chat, it invokes one of the API endpoints from this Express API. This API also connects to a Mongo DB database where the user specific CRM credentials are stored. These credentials are used the API to connect to the CRM application.
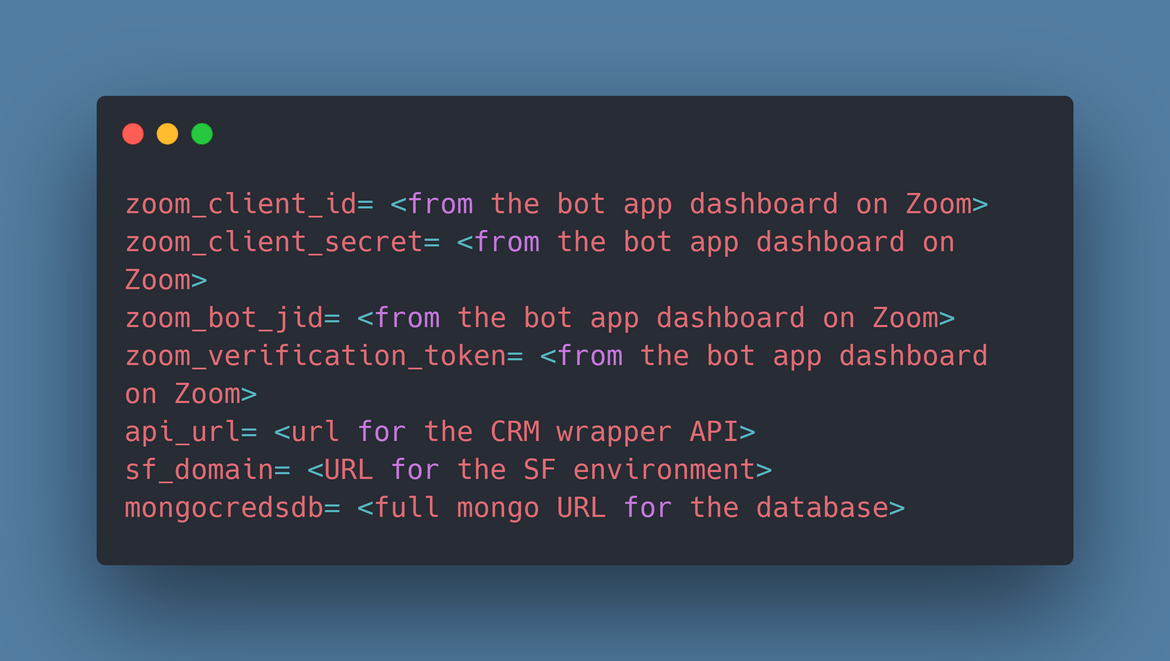
I have deployed the API as an AWS Lambda function. An API gateway is also deployed to expose the Lambda function to public. There are various options defined as environment variables and being passed as parameters to the API.
In my Bot the API endpoint which is called by the Zoom app is: /botcrm
High Level this is what the API does:
- When user sends the command via Zoom chat, the Zoom app calls the API endpoint and sends a POST request with the command and other data.
- The API endpoint calls a function to parse the input command
- Based on the command, respective CRM API function is called
- Before it connects to CRM, the function queries Mongo DB with the Zoom account ID to retrieve the stored CRM credentials
- The CRM function calls the CRM wrapper API endpoint to get the data and passes the credentials from the above step
- Once the CRM wrapper API returns data, the Express API sends back the response JSON along with required data
- Zoom client app parses the JSON response and shows the data to end user in legible format
-
CRM Wrapper API as AWS Lambda
This is a wrapper API which uses SFDC native REST APIs to communicate with SFDC. I wanted to reform the data responses in my own format so I decided to go with my own custom API which connects to SFDC REST API and transforms the returned data from SFDC before sending back the final response.
This is an API build using Python and Flask. There are different routes for various CRM functions which directly map to respective SFDC APIs. Here are some of the endpoints available now:/getall: This is the endpoint to query records from CRM application. This takes the query string as the input URL parameter. Responds back with the data in JSON format.
/createrecord: This is the endpoint to create a record in the CRM application. This is a POST endpoint. The data for the record is sent in a POST request body to this endpoint. The object name is passed in the URL. It calls a function to invoke the respective CRM REST API and creates the record in CRM. It responds back with the ID for the created record, in a JSON format.
Both of the endpoints accept the CRM credentials as auth headers. Thats the credentials used to connect to the CRM application. Since I am using SFDC as the CRM application here, to use the REST API there is an app registration involved to get the Oauth details. I wont go into the details for that and can be found Here. All of the Oauth details are passed as environment variables to the API.
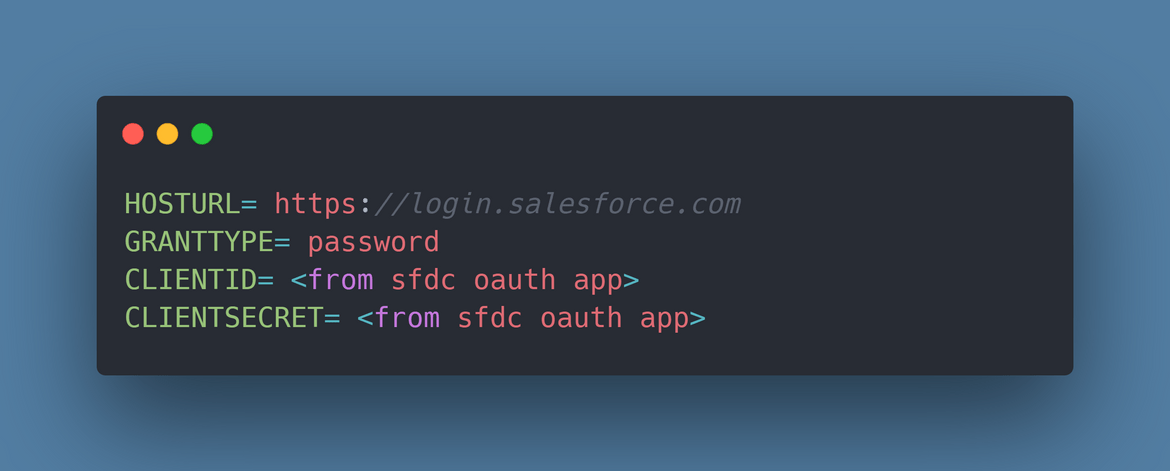
This API is also deployed as an AWS Lambda function. The environment variables are passed to the Lambda function. An API gateway is deployed to expose the API endpoints for use by the bot API.
- Mongo DB
I am using a Mongo database to store the CRM credentials. The bot API queries this DB to get the stored credentials corresponding to respective zoom account. The returned credentials is used for all communication with CRM. This gives personalized data bask to the user since user specific credentials are used.
I havent deployed a separate Mongo DB instance as such and just using the free Mongo DB provided by Mongo. You can register yours at Here.
Now that you have some understanding regarding the technical components involved with the Zoom bot, let me explain the working of the bot with a sample command flow and what happens in the backend when a command is sent via the chat.
Tech Flow for one sample Request
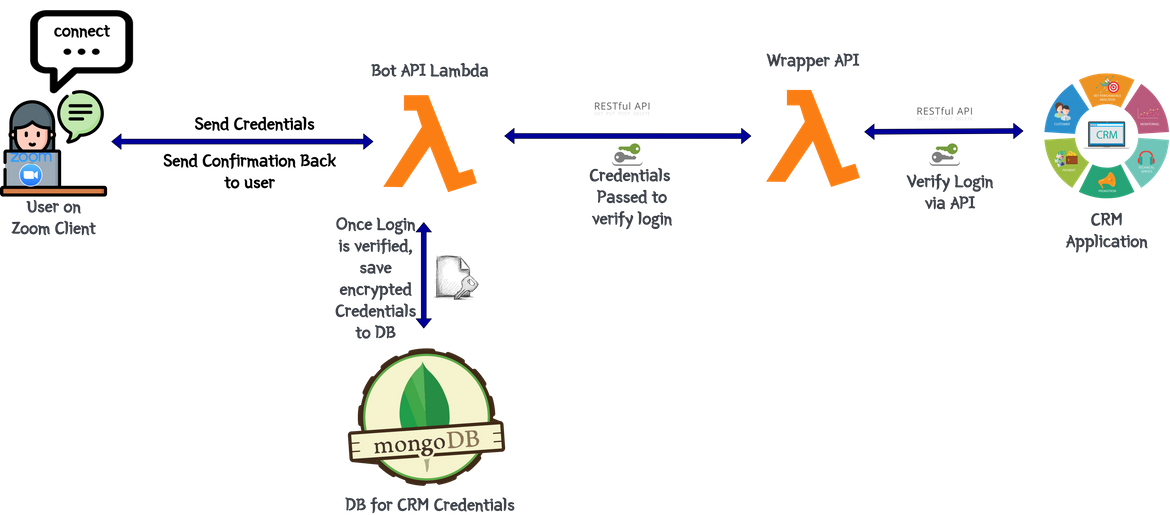
Before I go into a sample command flow, before any task can be performed, when user first logs in, a Connect command has to be performed so user’s CRM credentials get connected with the user’s Zoom account via the Bot API. Below image will show the overall connect flow and how components talk to each other in this flow.
Overall this is what happens when user types ‘connect’ and sends the chat to the Zoom bot on the app:
- The Zoom app sends the command text along with other Zoom account details to the Bot API endpoint as a POST request body
- Bot API parses the input JSON and translates the command text
- Since its a connect command, the API responds back to the Zoom app with a prompt for the user to provide CRM credentials
- User provides the credentials and hits save. The data from the prompt is sent back to the API endpoint
-
The API gets the data from input and saves the credentials to a Mongo DB data base table. The details stored in the table are:
- userid: the Zoom account ID
- username: the Zoom email/username
- enccreds: The credentials converted to base64
- crmusername: username of the CRM user
- Once saved, the Bot API sends a confirmation to the user as a chat response on the Zoom app
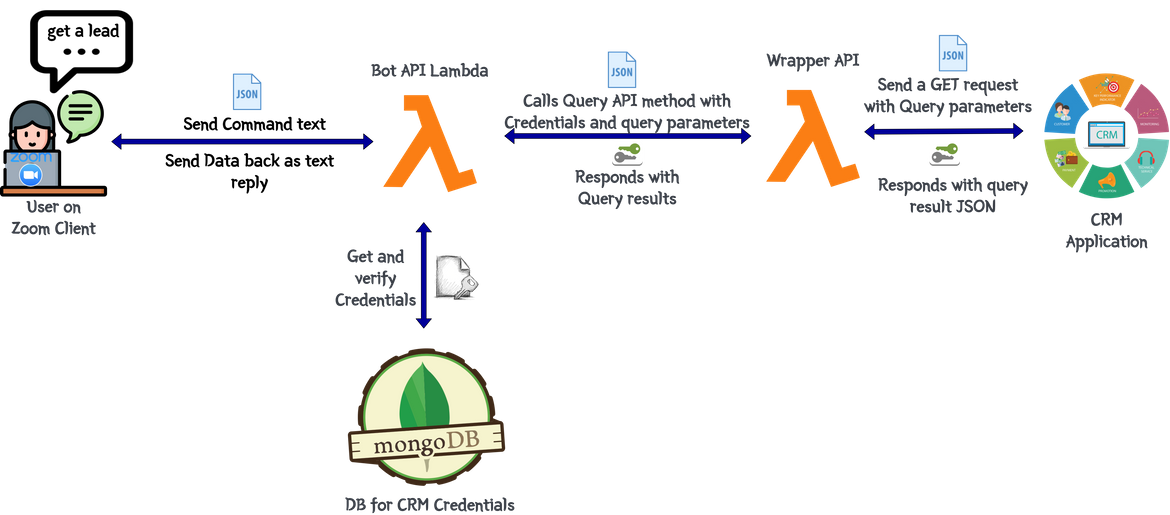
Now that we have connected the CRM credentials with the Zoom bot, lets get on with a sample command. Below image shows a basic flow architecture of a sample command sent by the user on Zoom. This flow shows the flow from the point user sends the chat command to the point user gets the data back as reply.
Let me explain a bit about the flow. Here I have taken a sample command where user types ‘get a lead’ on the chat.
- Once user sends the command on chat, the Zoom app gets the command text and sends to the Bot API endpoint along with other Zoom details, as a POST request
- The Bot API parses the input and translates the command text. Based on the command text it calls the respective method. Here it calls the method to query data from CRM
- The called method first gets the Zoom account details from the input JSON and queries Mongo DB to retrieve the respective CRM credentials
- Then it calls the wrapper API endpoint for querying data from CRM. The retrieved CRM credentials from the Mongo DB, are passed as auth headers with the POST request to the CRM wrapper API endpoint
- The query parameters are sent via URL parameters to the wrapper API
- The wrapper API parses the input URL parameters and sends a query GET request to the CRM REST API endpoint. The URL parameters are sent as query parameters to the CRM app
- The credentials sent by the bot API is being used by the wrapper API to communicate with CRM app
- CRM application responds with the query response based on the query string sent
- Bot API parses the response from the wrapper API
- The bot API then sends the parsed data response back to the zoom client along with appearance related information
- The zoom client parses the data response from Bot API and shows the data back to user as a chat response
Hope I was able to explain a technical overview of the Zoom bot and its API/backend. Lets move on to deploying the components to AWS Lambda and connect them to the Zoom bot app.
High Level Deployment Walkthrough
I will be deploying the Bot backend components to AWS as Lambda functions. I have kept all of the components serverless except the Mongo database. Below image shows on high level the components which I will be deploying.
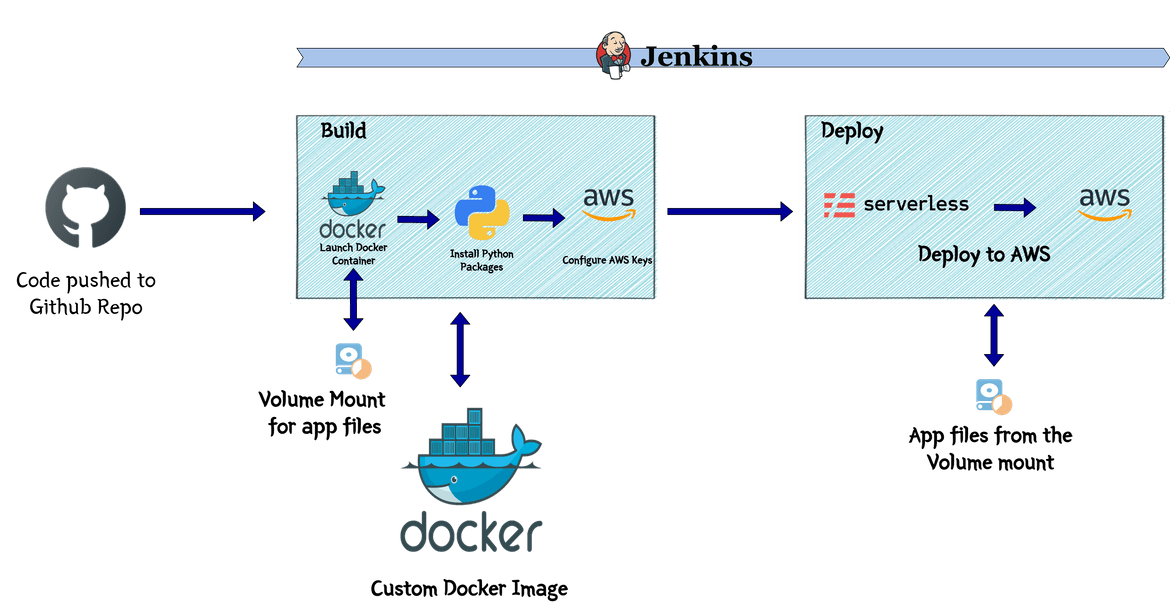
I have developed two Jenkins pipelines to deploy the Bot API and the CRM wrapper API backends. Both of these APIs are deployed as Lambda functions and exposed via API gateway for public access. I am using Serverless framework to perform the deployments via Jenkins pipelines. These are the components which are part of this deployment:
-
Serverless Framework in a Docker Container
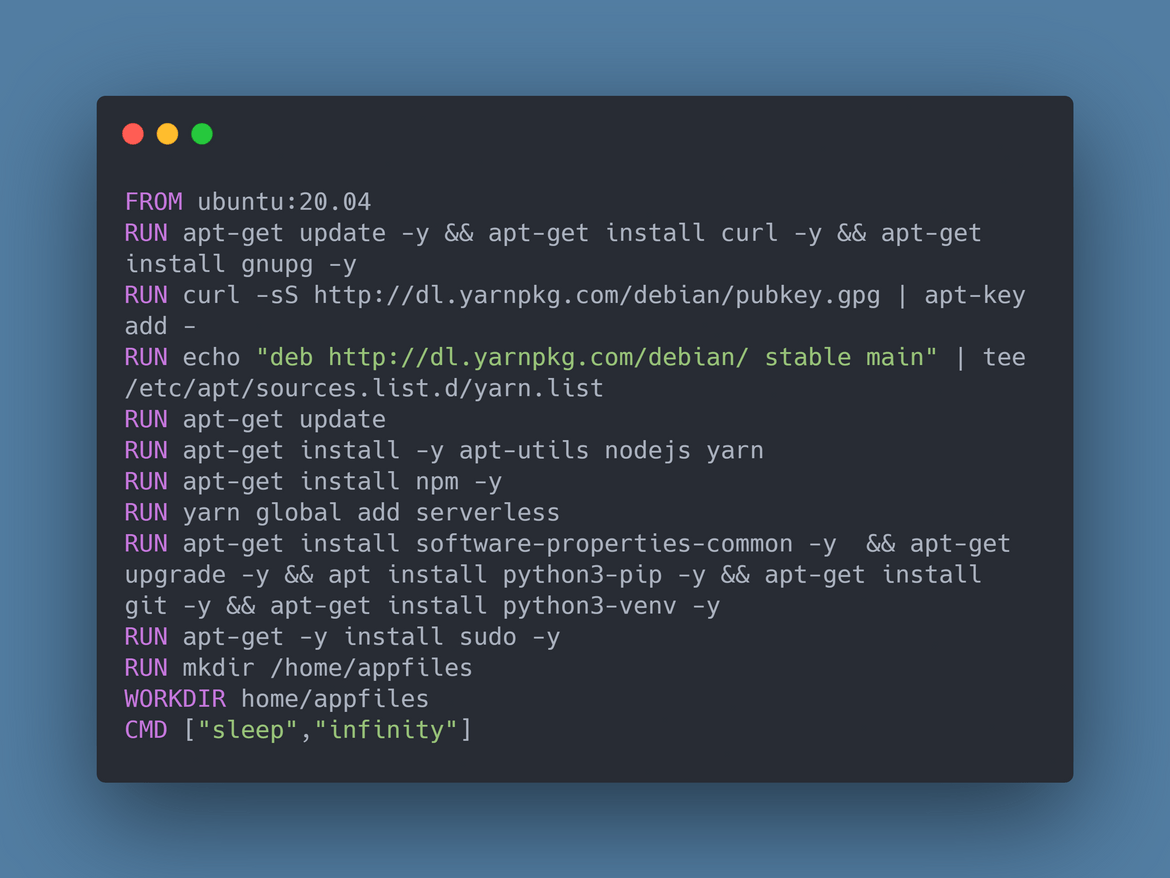
All the components are being deployed as AWS lambda function to an AWS account using Serverless framework. To perform the deployment using Serverless I have created a custom Docker image. The Dockerfile is included in my repo. It is also available on Dockerhub Here. The Docker image used is awsacdev/serverlessdocker:1.5. Below are the packages which are installed on the Docker image:
- Serverless
- Yarn
- NodeJS and NPM
- Python and Pip
- A folder for the temporary app files which will be deployed by the Serverless framework
-
Bot API (NodeJS API) and API Gateway
This is a NodejS API deployed as a Lambda function using Serverless framework. I have added the serverless YAML file in my repo. This Serverless file defines the parameters for the Lambda function which will be deployed. The Lambda function is exposed via an API gateway. Environment variables are defined in the serverless YAML file and is used by the Bot API
-
CRM Wrapper API and API Gateway
The CRM wrapper Flask API is also deployed as a Lambda function. The serverless YAML file defines the environment variables used by the API. It used the wsgi plugin to deploy the Flask API on Lambda. An API gateway is also deployed by the Serverless framework which exposes public endpoints for the API.
-
Mongo DB
This is the only component which is not being deployed using the pipeline. I created a free Mongo DB from Mongo Compass cloud. The DB connection details are being passed to the Bot API as environment variable to the Lambda function.
Now lets see the deployment pipelines. Both are Jenkins pipelines. I wont go into step step by step of setting up the pipeline. I will just describe what the pipeline will be performing as part of the deployment.
The Pipeline for Bot API
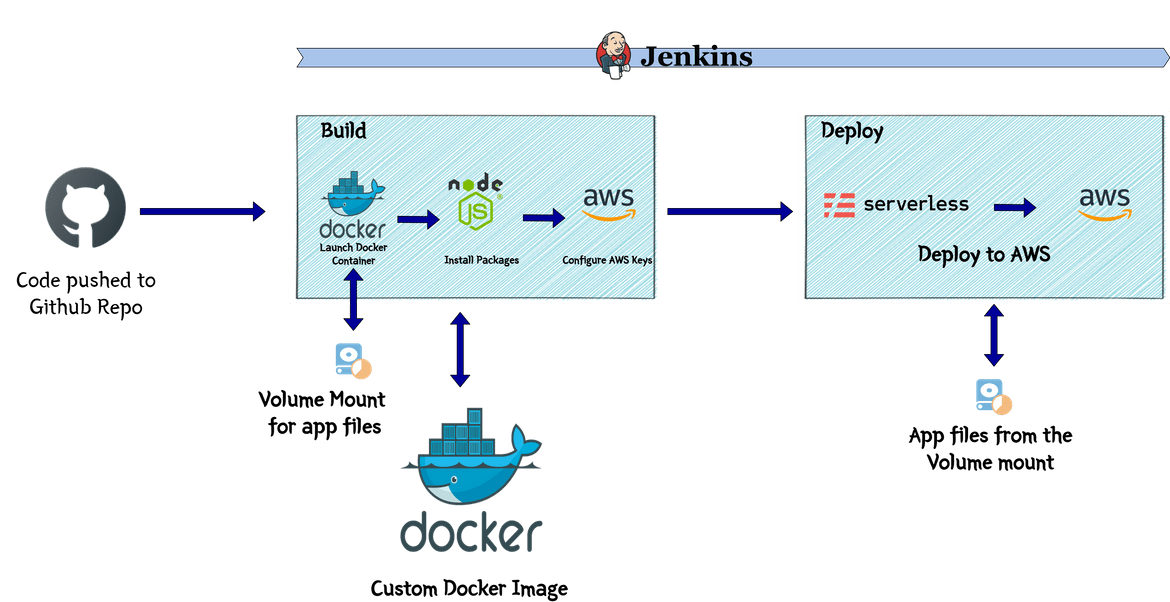
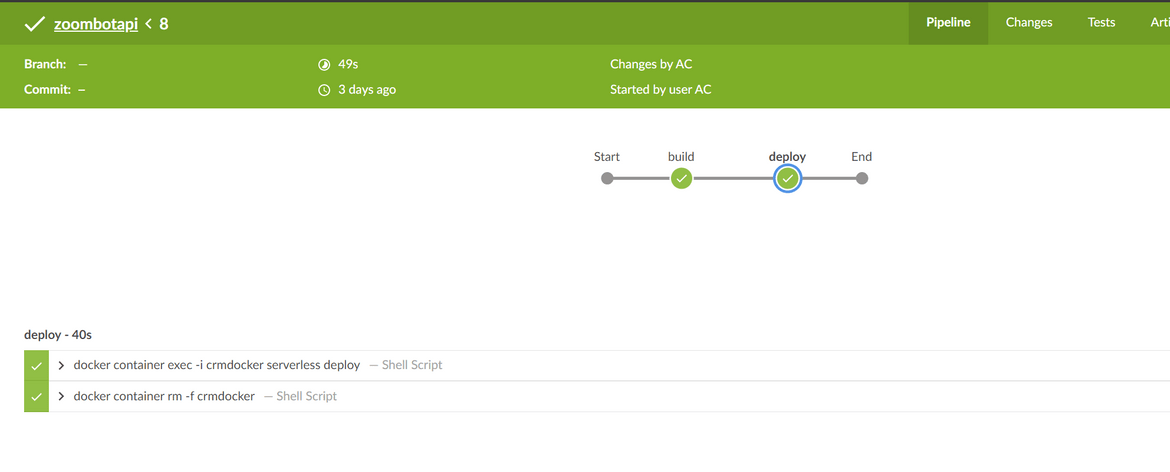
Below image shows overall steps involved in the pipeline to deploy the Bot API.
I have included a Jenkinsfile with the sample Bot API code in my repo. To deploy the Bot API just follow these steps:
- Create a separate GitHub repo for the Bot API code
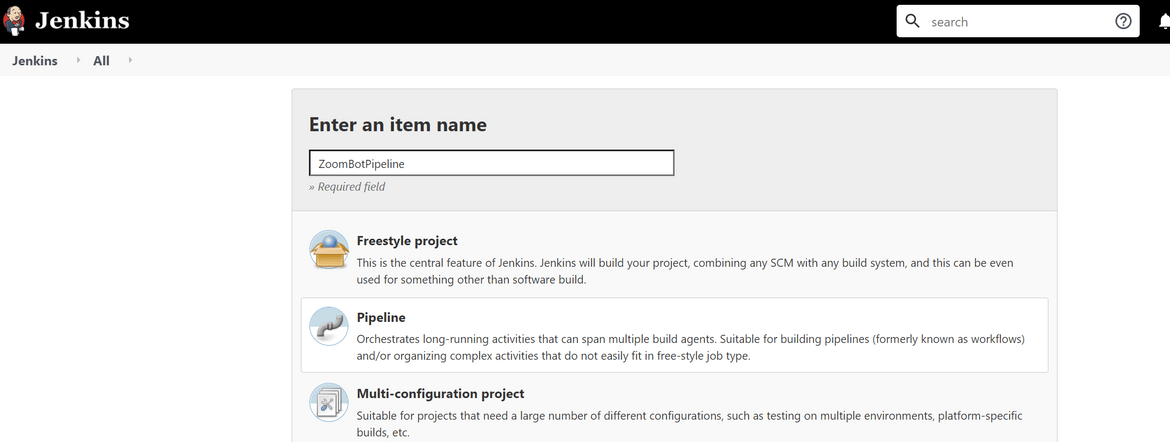
- Login to your Jenkins instance, and create a pipeline using this repo as source
- Make sure you have updated the environment variables as needed
-
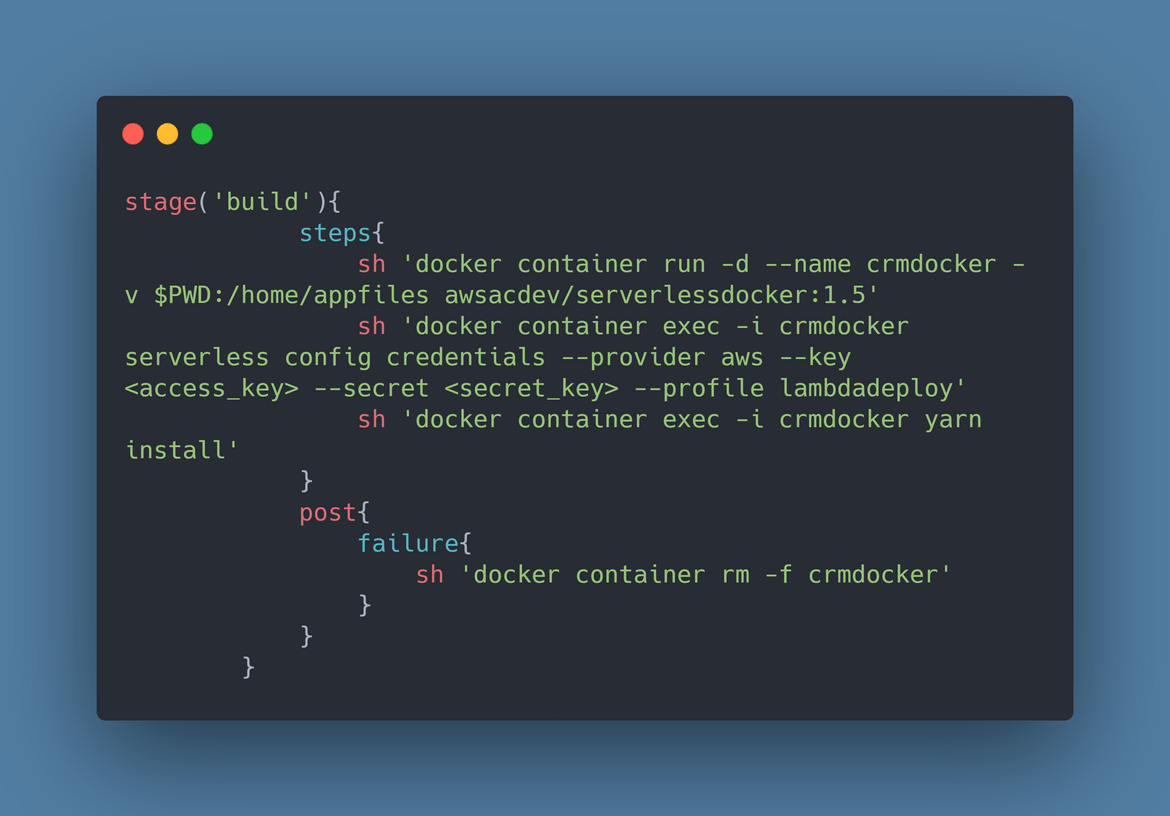
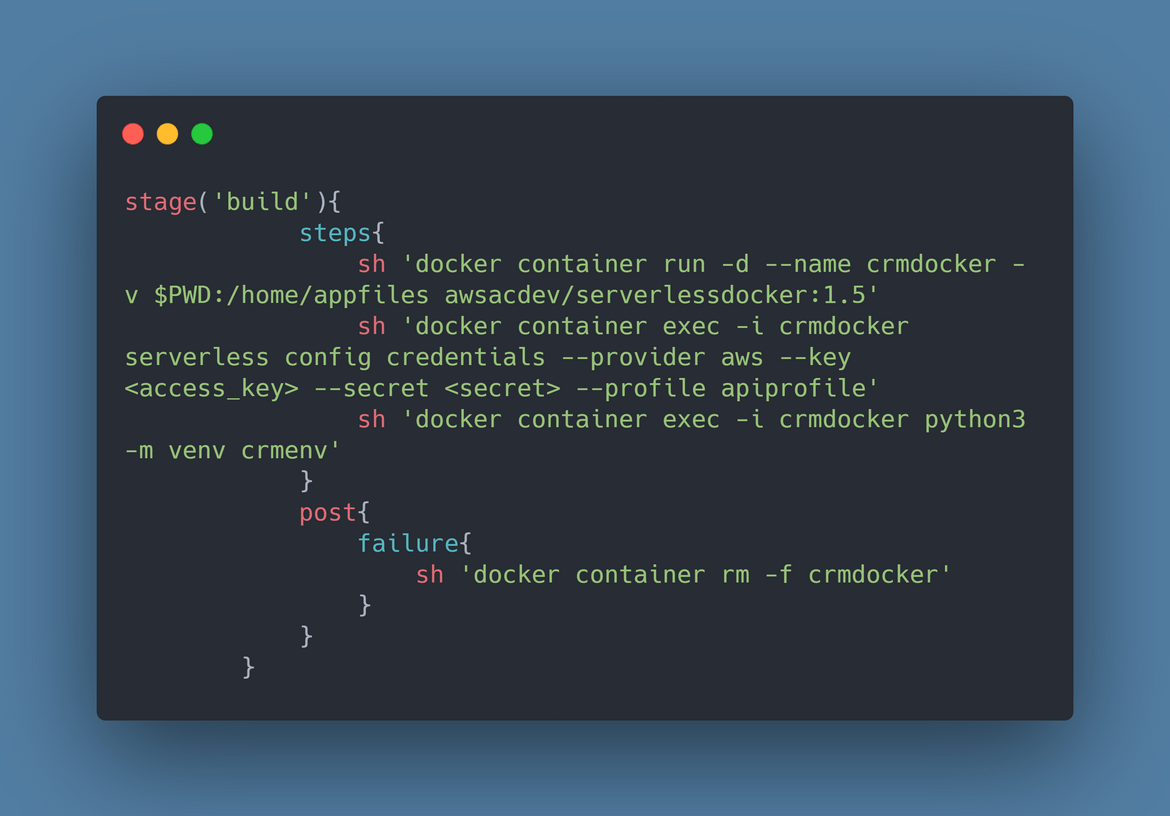
Update the Jenkinsfile to update your AWS IAM user details for the deployment
sh 'docker container exec -i crmdocker serverless config credentials --provider aws --key <update this> --secret <update this> --profile lambdadeploy' - Run the pipeline to deploy the Bot API to your AWS account
-
Build
In this step, the build Docker container is launched. The custom image is used to launch the Docker container. All the deployment steps will be performed in this Docker container. The code files are mapped to a folder inside the container using a volume mount. AWS credentials are also configured inside the Docker container so Serverless commands inside the container will use this default AWS profile for deployment. Since its a NodeJS app, all the required packages are installed from the package.json file in the container. The node_modules folder along with installed packages are bundled with the Lambda function by the Serverless framework.
-
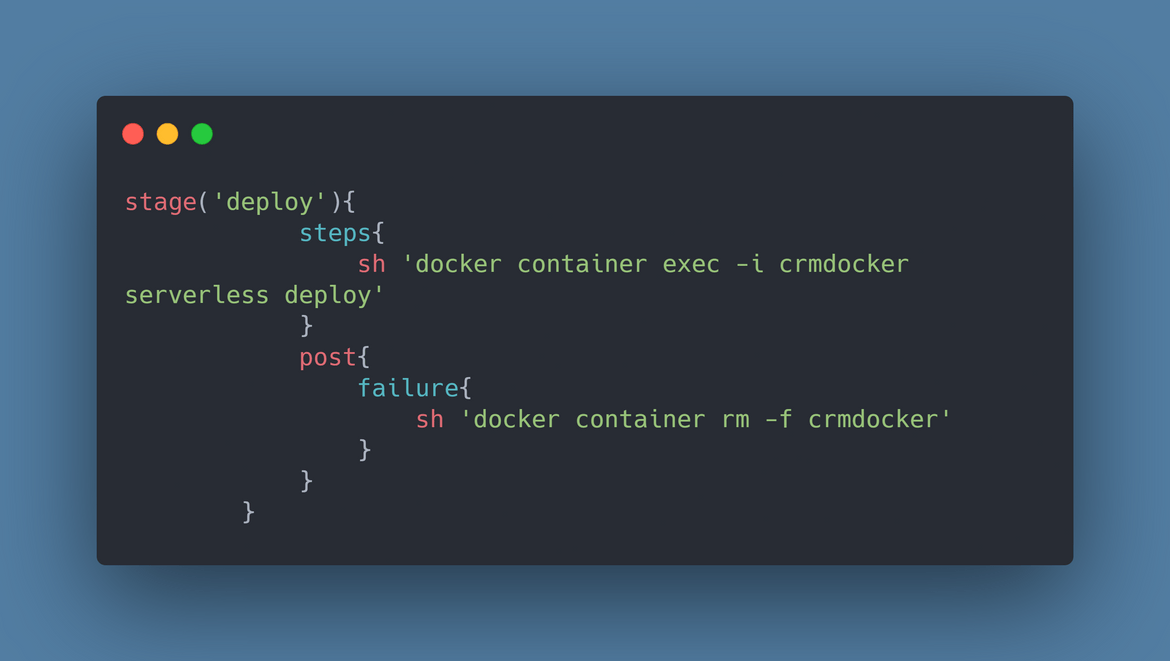
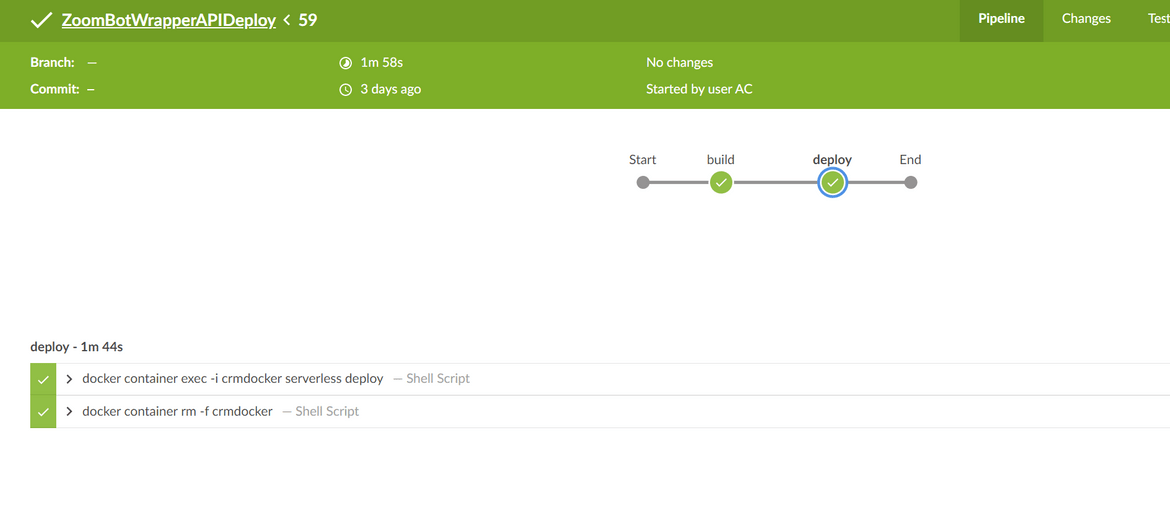
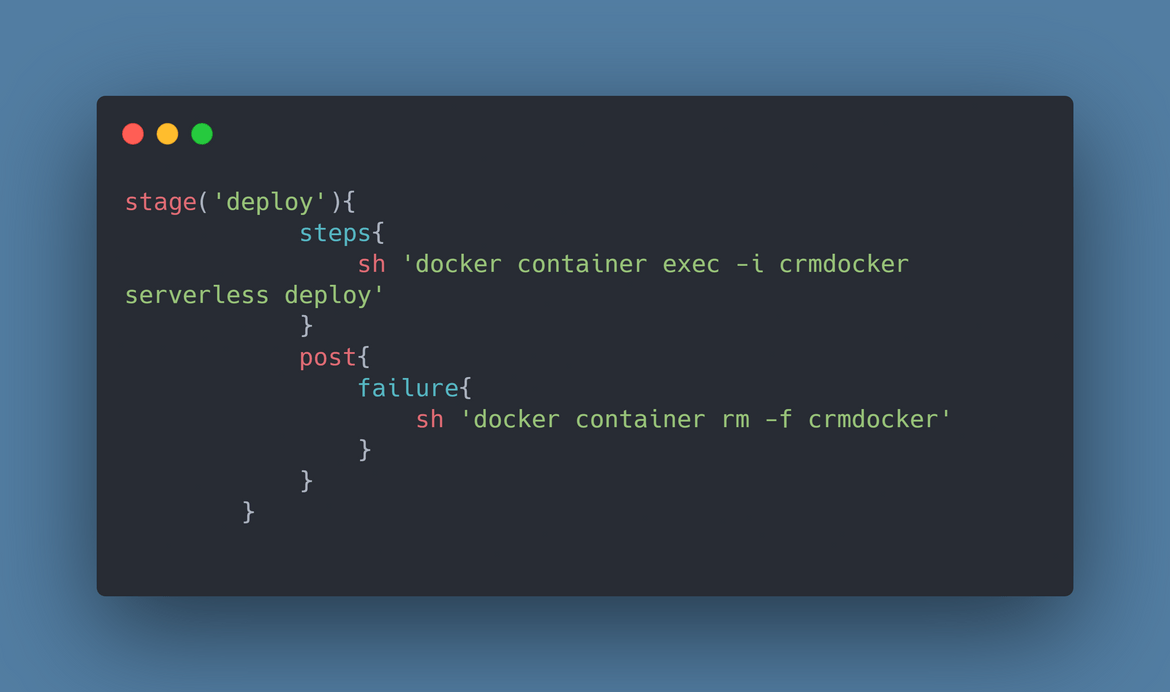
Deploy
Once we have all the packages installed inside the Docker container and in turn have the node_modules directory with all the packages, in this step we run the deploy command to deploy the Lambda function and create the API gateway. The serverless command is executed inside the docker container to perform the deployment.
Once deployed, the API URL should be shown on the Jenkins pipeline logs. Make sure to note down this URL as it will be needed in the bot registration.
The Pipeline for CRM Wrapper API
Below image shows the steps involved to deploy the CRM wrapper API as Lambda function.
I have included a Jenkinsfile with the sample Bot API code in my repo. To deploy the Bot API just follow these steps:
- Create a separate Git repo for the Bot API code
- Login to your Jenkins instance, and create a pipeline using this repo as source
- Make sure you have updated the environment variables as needed
-
Update the Jenkinsfile to update your AWS IAM user details for the deployment
sh 'docker container exec -i crmdocker serverless config credentials --provider aws --key <update this> --secret <update this> --profile lambdadeploy' - Run the pipeline to deploy the Bot API to your AWS account
-
Build
In this step, the build Docker container is launched. The custom image is used to launch the Docker container. All the deployment steps will be performed in this Docker container. The code files are mapped to a folder inside the container using a volume mount. AWS credentials are also configured inside the Docker container so Serverless commands inside the container will use this default AWS profile for deployment. A python virtual environment is also created in this step. This virtual environment is also bundled with the Lambda function by the Serverless framework.
-
Deploy
Once we have the virtual environment created in the Docker container, in this step we run the deploy command to deploy the Lambda function and create the API gateway. The serverless command is executed inside the docker container to perform the deployment. Once the Serverless command is executed by Jenkins, it installs all the required packages in the virtual environment and packages with the Lambda function.
The API endpoint can be found on the Jenkins pipeline logs. Get this endpoint and use as environment variable to the Bot API. Make sure to note down this URL as it will be needed in the bot registration.
Bot Registration process
Now that we have all the APIs deployed, lets register the Zoom bot and connect the APIs to the bot. Here I will go through a general bot registration process which can be used to register any Bot as an app on Zoom. You can build your own app and then follow this to register the bot. In my Git repo I have included a generic NodejS bot API code folder which you can use as a starting point.
- First place is create a free Zoom account on Zoom web site. This account will be used in further steps. Navigate Here to register a new Zoom marketplace account. Its free.
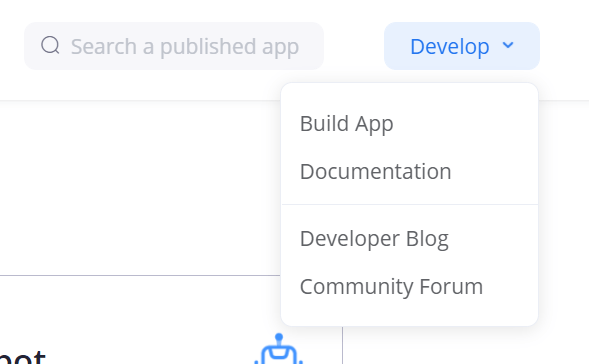
- Once registered log in to the marketplace account and click on Build App:
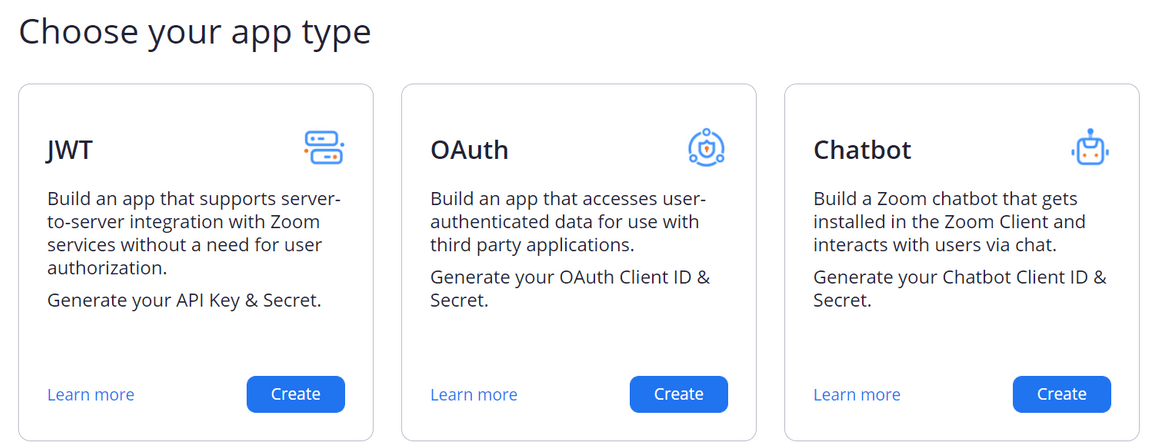
- On next screen select create on Chatbot option. It will prompt to provide a name for the bot. Provide the name and click create.
- Once created, it will land on the bot configure page. There are multiple screens to provide different config options for the bot. I will go through the important ones
-
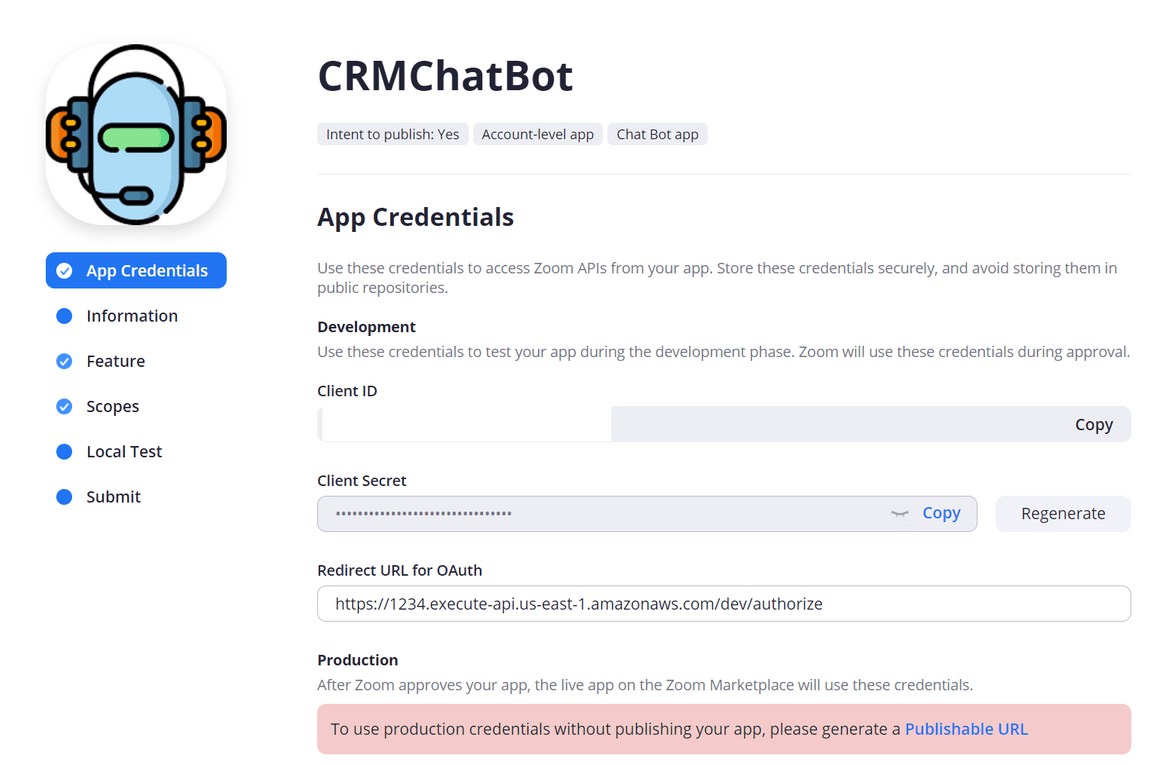
App Credentials tab
In this tab, you provide the Bot API URLs and get the Zoom Bot details. Note down the Client ID and Client Secret from this page. Provide these values to the Bot API as environment variables which I described above. Also you will have to provide the Bot API URLs on this screen.Redirect URL for OAuth: The format for this URL will be <botAPIURL>/authorize. This endpoint is already defined on the Bot API NodeJS code.
Whitelist URL: The format for this URL will be <botAPIURL>. Once done click Continue to go to the next step - Information Tab
In this tab provide bot information as needed. In this tab too, there are few URLs to be filled in. All the URL formats will be <botapiurl>/. The endpoint will be shown as example on the screen itself. Just replace the URL with the Bot API URL. to get the URLs.
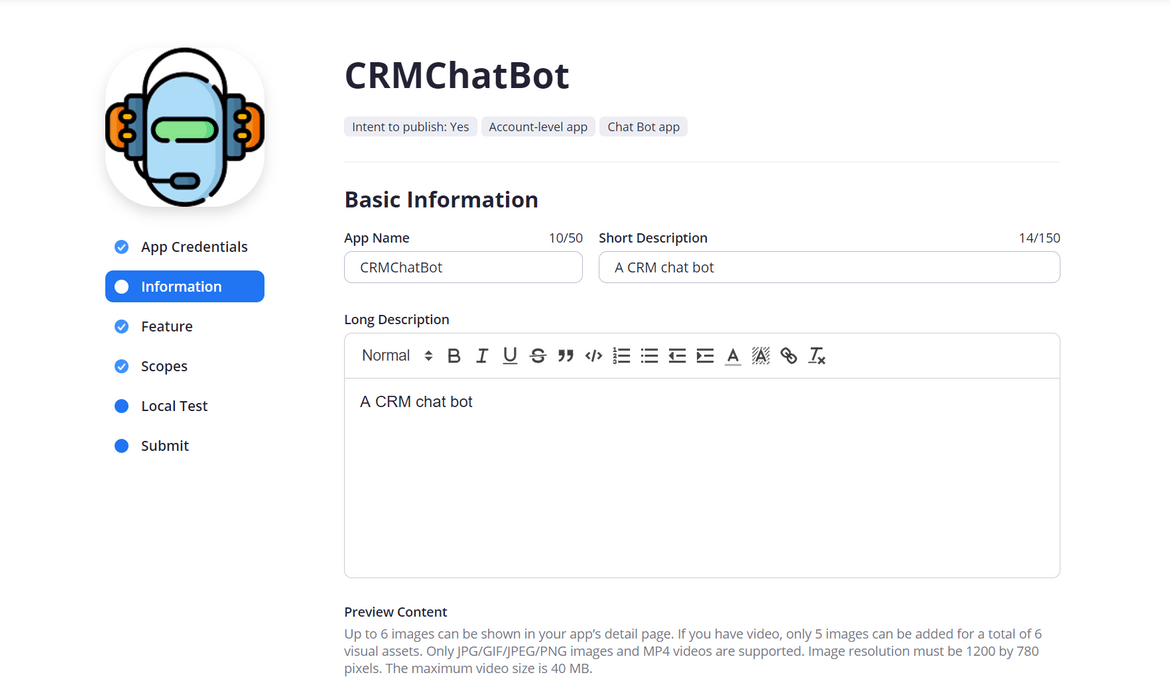
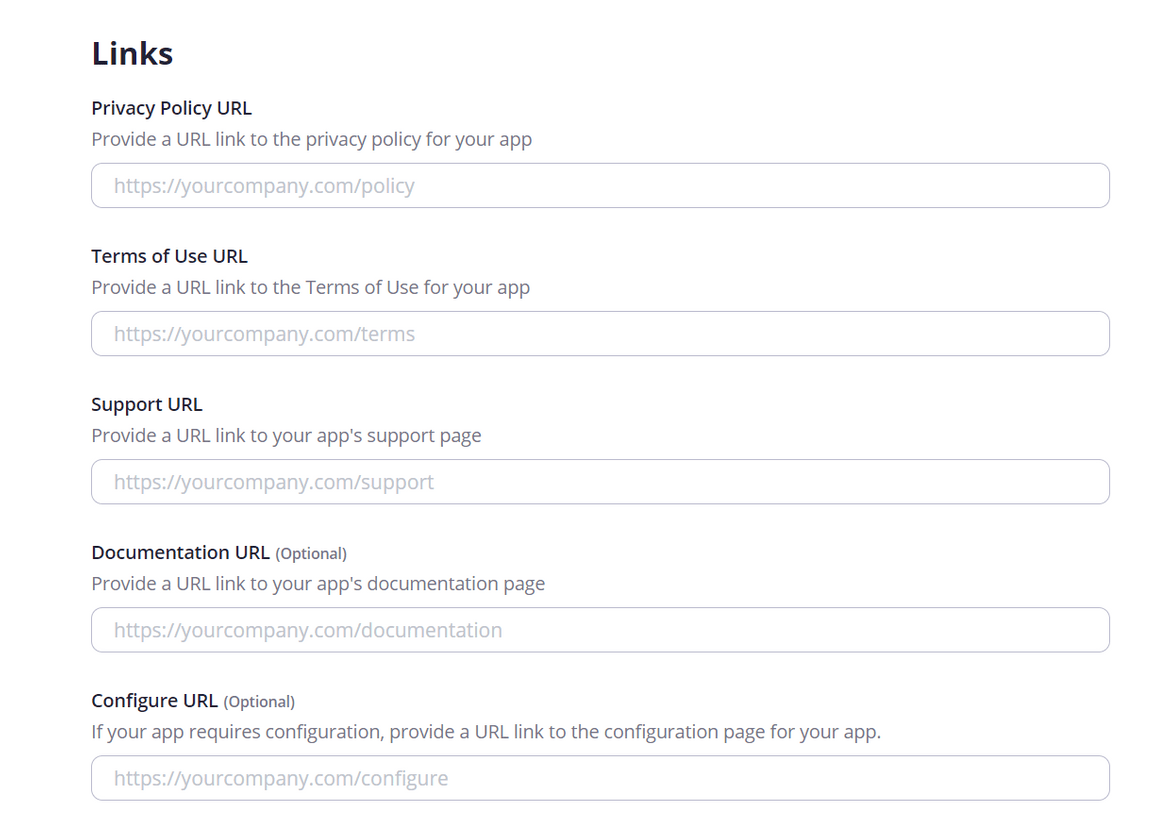
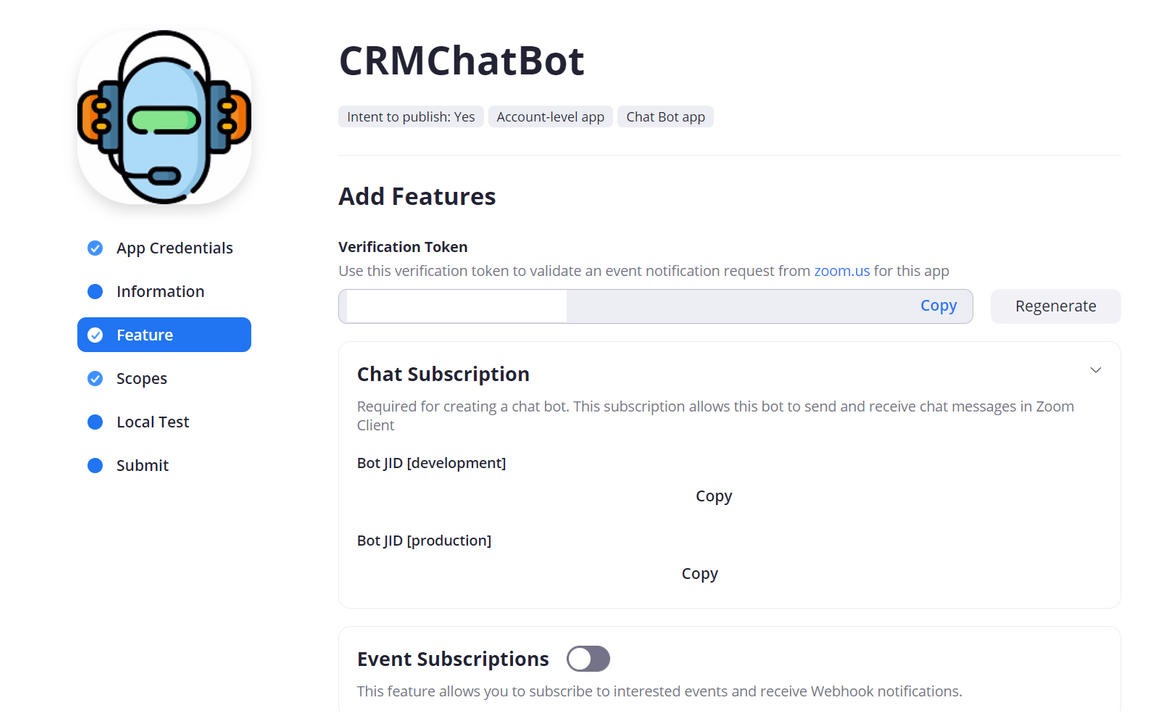
Once done filling in all the information, click on continue to go to next step. - Features Tab
In this tab, enter the Bot API endpoint URL. If you are using my basic codebase, the endpoint URL will be <botapiurl>/botcrm. There are some other optional settings like slash commands, welcome message etc. which you can configure if needed.
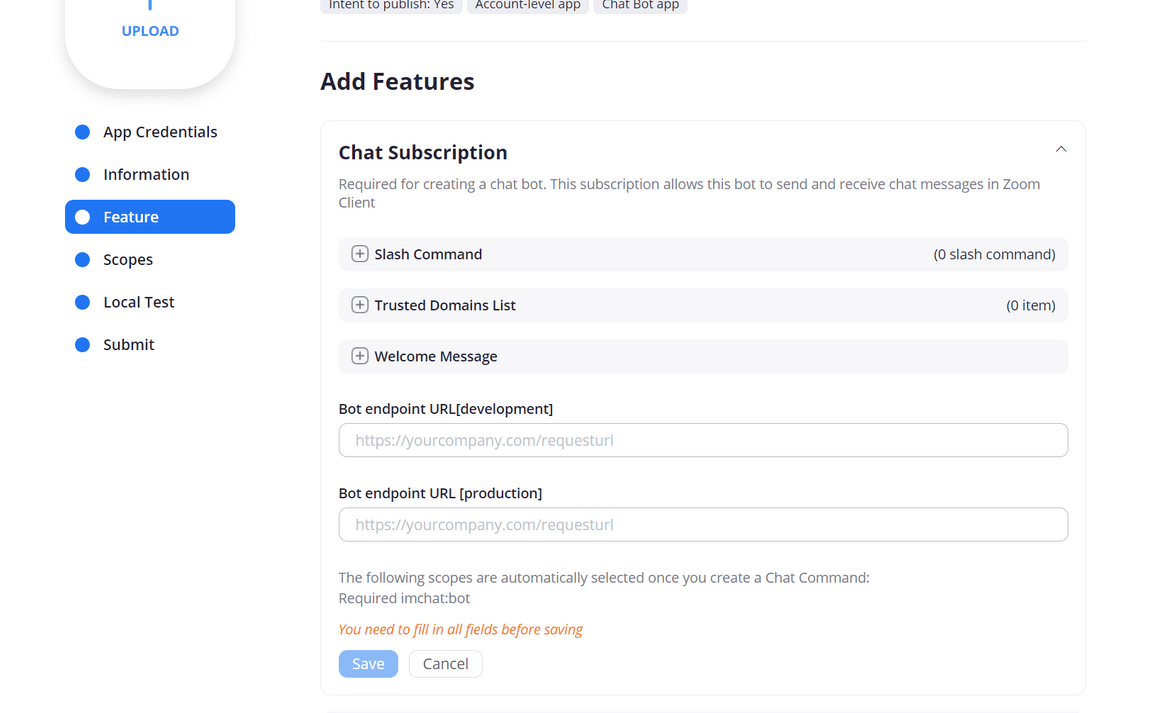
Once saved, it will generate a verification token and Bot JID. Both of these are needed in the NodeJS Bot API. Note down both of them, and update to the respective environment variables on the Bot API. In my codebase, there are two environment variables with the same name which needs to be changed. At this point, re-deploy the Bot API so the new environment variables take into effect on the API.
- Scopes Tab
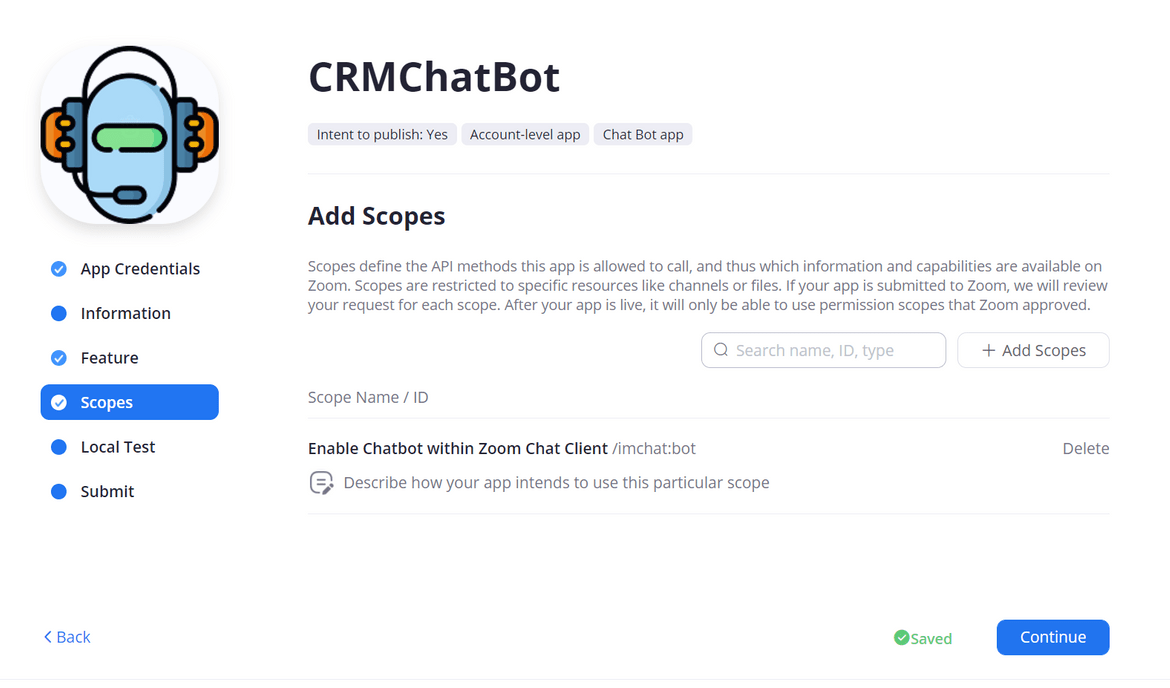
In this tab the permissions scope of the bot is specified. There is a default scope already added which is enough for this CRM bot. If you want to add other scopes based on your need, can be added from this screen. Once done, click on Continue.
- Local Test
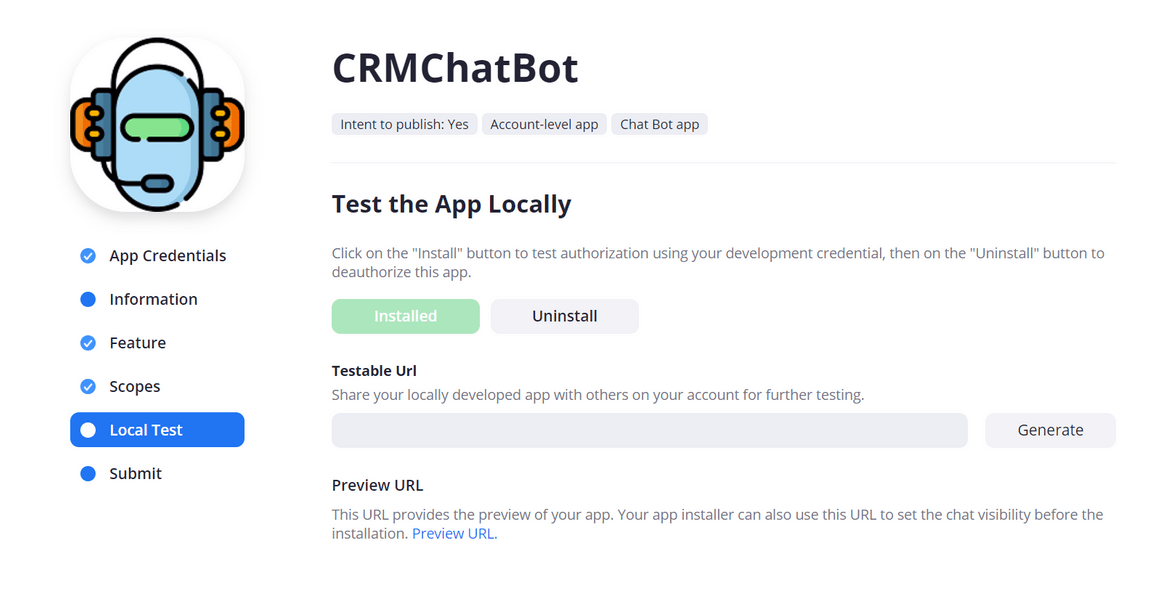
If you don’t want to publish the app for public use yet and just want to test locally on your system, this step enables you to do so. Click on the Install button which will open your local Zoom app and install the app. Before this make sure you have Zoom installed on your system and logged in to the same account as above.
- Submit Tab
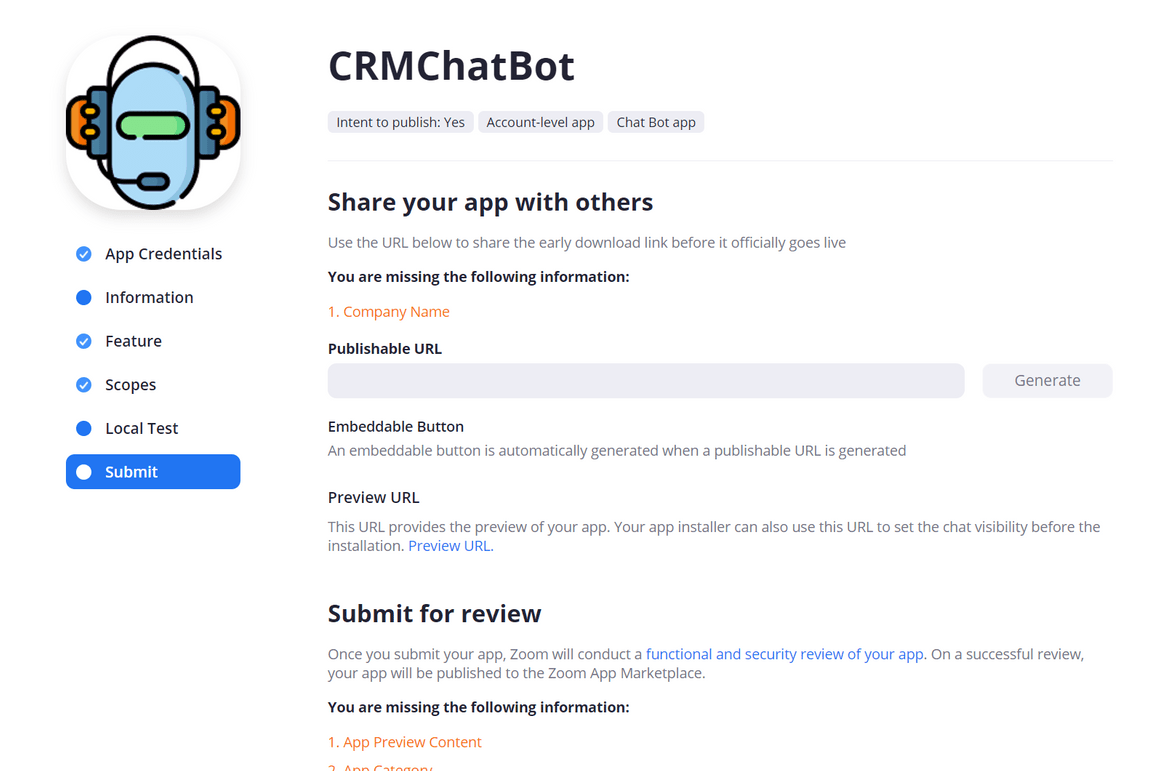
This is the final step once you have tested the Zoom bot locally and satisfied with its working. In this step, the bot is submitted to Zoom to be approved and exposed for public use. There are various details to be filled in this step. The details are self explanatory and are required to get the Bot approved. Enter all data and Submit to get the Bot approved and publish.
That should complete the process to get the Bot installed and made available on Zoom. Once added and installed, it will be available as a separate chat thread which can be used just as a chat with other zoom user. Just click on the Bot chat thread and start chatting using the commands.
Scope of improvements
The bot which I built, is able to perform some basic CRM tasks for now. I am still working to add more features so it can be used for more complex CRM activities. Some of the features which I am still working on:
- Get some analytics related data from the Zoom bot
- Get some sales process steps automated by the bot like updated Sales stage, update pricing etc
- Automate some daily CRM update tasks like update activities, convert Leads etc.
- Use Zoom as collaboration tool between other CRM users and seamlessly refer CRM data within Zoom without logging in to CRM
These are just few of them. There is a vast possibility to expand the CRM functionality when Zoom is added in the flow. I have added a basic Zoom bot API code in the repo which you can use to build on your own bot.
Conclusion
I hope I was able to explain overall about the Zoom bot I built. There is a lot of scope for improvement on the app and the way how its deployed. You can build on top of the sample bot from the repo and connect it to any CRM you like. The deployment pipeline still remains the same and can be re used. Seeing how Zoom has become popular recently, having it connected to a CRM will be hugely beneficial to any company. If you have any questions or face any issues in the process, reach out to me from the Contact page.


