Custom Search app using Yelp Data and NLP and deployed to AWS EKS (via Codepipeline) - Part 1
We all have searched for stuff on Yelp from time to time. While learning some Machine learning, I came up with this idea to better the search on Yelp based on those tons of reviews which get entered everyday on Yelp. This app really helped me learn the ML concepts and understand the complexities of deploying an ML model. Through this post I wanted to share what I have learnt so someone can use this in their path to learn.
Since its really a broad topic and the app includes so many moving components, I will be covering the app and its deployment in two posts. The series will consist of two parts:
- 1st Post( this one): Overview about the application and about its underlying logic. This will be more about how the app works and the overall architecture of the whole app ecosystem
- 2nd Post: In 2nd part I will be discussing how I deployed the app on AWS S3 and AWS EKS (Elastic Kubernetes Service) cluster using Codepipeline
For this post I don’t any GitHub repo ready yet. The repo will be part of my next post with all the deployment and code files. But a limited demo of the app can be found here: Here
Pre-Requisites
Before I start, if you want to follow along and understand this, here are few pre-requisites you need to take care of in terms of installation and understanding:
- An AWS Account
- Basics of Python and NLP (Natural Language Processing)
-
Few installations:
- AWS CLI
- Python and pip on local system
- Basic understanding of AWS and Kubernetes
What is NLP and how its implemented using Python
NLP or Natural Language Processing is a sub-field of Artificial Intelligence. It deals with interpreting the language between human and machine. Using NLP, simple text can be analyzed and interpreted by a computer. In simple words, using NLP, a computer program can interpret text and respond with a corresponding response.
There are multiple ways to implement NLP. Here I implemented NLP using Python. In Python NLP can be easily implemented using a library called Spacy. Its a free open source library which can be used to implement multiple use cases for NLP. To install spacy in your project, run this command. This assumes you already have pip installed:
pip install spacyI am using a specific use case for NLP using Spacy. I am using the ‘Sentiment Analysis’ use case and implement using Spacy. If you want to learn more about NLP, you can find it Here.
About the App
Let me first explain about my app. In below sections, I am going through the functionality of this app and technical components involved.
Functional Architecture
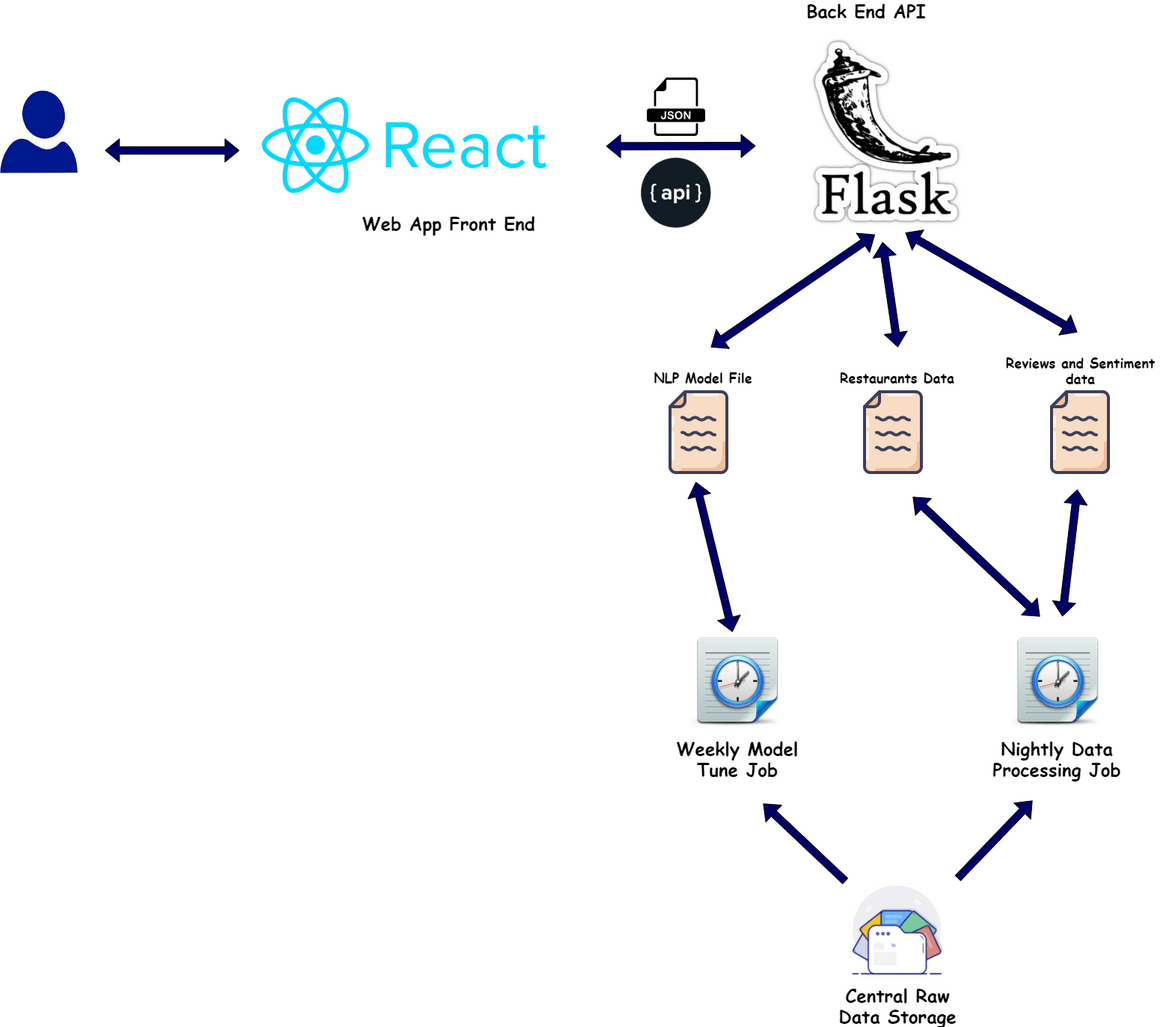
Below image shows high level functionality of the flow.
Using this app one can search best restaurants in a local area, based on top reviews on Yelp. The application takes in a keyword and based on that searches all local restaurants and then returns back top reviewed ones. At high level this is what you can do with the app:
- Open the Web app
- On the Search bar, enter the Search text to search for Restaurants. The Search text is in a specific format: <keywordtosearch> <zipcodeto_search>
- Once the Search button is hit, the app searches based on the search text entered above
- Once search completes, it opens up a page with the map for the zip code specified in the last step
- The map will point out 5 restaurants based on the keyword searched and top positive reviews on Yelp
- Clicking on the locations will show address details for the restaurants
Datasets
The app uses a specific Yelp dataset on which the NLP model is trained and runs to perform the searches. I am using the dataset which is provided by yelp. The data consist of two files:
- Restaurant data
- Reviews data
I am using the raw data provided by Yelp and by the data cron jobs, processing the files to output data containing the review sentiments. Below is the high level process I am following to manage the data:
- Get the initial data from Yelp datasets
- Use the initial dataset for start
- Run a data scraping job to get Reviews and Restaurants data from Yelp site and get raw data files
- Run a nightly data job to process these raw updated files and update datasets nightly
- Run a weekly job to tune the NLP model for review sentiment analysis. This will tune the model to include the new data accumulated during the week
Also the NLP model is converted to a file which is read by the API during processing of the search requests. This model gets updated and tuned by the weekly job.
Tech Details
Now that we have seen how the app works, let me explain a bit about the technology behind. There are three main parts of the application:
- Front End
- Backend (API)
-
Scheduled/Cron Jobs
Overall Architecture
-
Front End Web app:
This is the front end UI of the app which users will open and perform search. It is a React App which interacts with the API backend to fetch search results. I will go in detail below how it is deployed. Since the app directly calls the API to get the data, there is no stored at the client side apart from caching the static files like images, css files etc. Below is the high level tech flow which happens within the app:
- User enters keyword and hits Search
- The web app sends a POST request to the back end API along with the keyword details
- The API goes executes the NLP algorithm based on the keyword and responds back with the page name which will point out the locations for the top restaurants
- The web app renders the map on the UI and shows the user with the pinned locations
-
Back end API:
This is the main back end of the application. The front end web app connects to this to get the search results based on keyword. The backend is a Flask API built with Python. There is an API route defined which takes in the keyword and zip code as POST request inputs and responds back with the Restaurant location details. For now I have not implemented any authentication for this and the API route is public. Authentication is in my list of enhancements. Below is high level what goes on in the API when front end requests search results:
- Front end sends a POST request with the keyword and zipcode as body details
- The Flask API route parses the inputs and passes to the NLP search function
- The search function is a Python function which performs an NLP search based on the keyword and the zip code
- Search runs an NLP based search on data from two data files stored locally. The data files contain restaurant related data and the reviews related data along with the sentiment analyzed outcome data for each review
- The function returns top 5 restaurant details based on the outcome from above NLP algorithm execution
- Based on the location details returned above, an HTML page gets generated which embeds a map pinning out the locations. The HTML page gets stored in the templates folder to be served publicly
- API gets the HTML file name and responds back to the front end with the HTML file name
- Front end, renders the page which is served from the Templates folder
-
Scheduled/Cron Jobs:
For the NLP algorithm to run I will need proper data from Yelp which gives details about the Restaurants and the Reviews associated to them. Yelp provides a raw dataset which gives details of many restaurants and corresponding reviews. I am using that raw data as base and then transforming the data to add some more details useful for the NLP algorithm. To process the raw data there two scheduled jobs which run at different intervals and produce the transformed data files for the backend API:
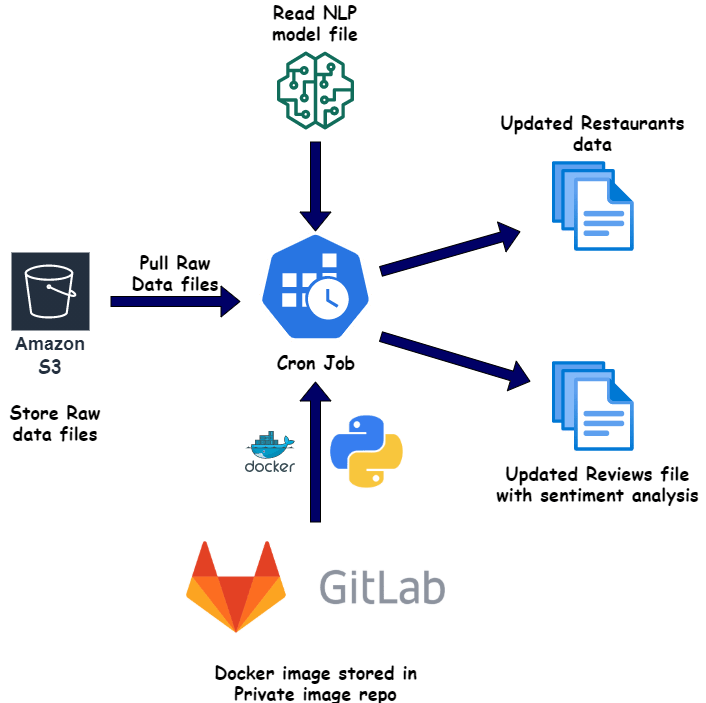
- Nightly File Processing: This Job runs nightly to fetch new reviews and restaurants data from raw data files stored in a central location. This job processes the files and runs an NLP model to output the review sentiment data in processed data files. The processed files are placed at the API folder location.
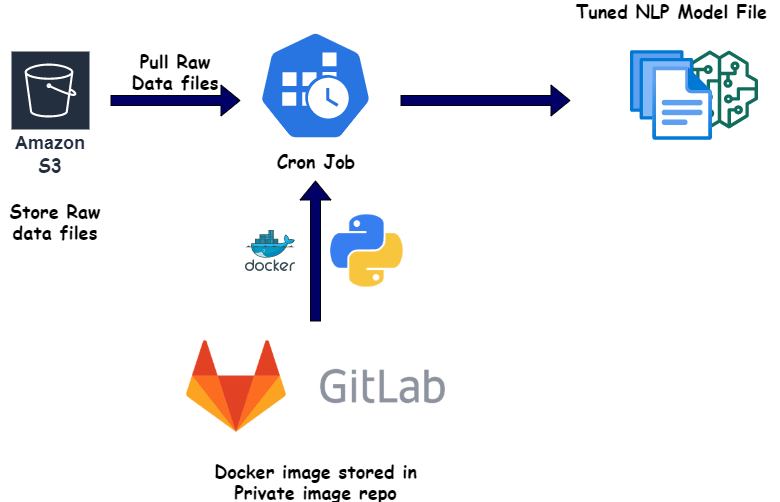
- Weekly Model Tune Job: This job runs weekly to tune the NLP model so that more accurate results are returned. Based on the new data acquired throughout the week, the model is tuned to learn based on more data and increase the prediction accuracy
App Components and Tech Architecture
All of the components for the app is deployed to AWS using various services. Below I will go through an overview of how each of the component is deployed to an AWS ecosystem. In my next part of the post, I will be going through the steps to actually deploy the app components. The whole app ecosystem can be divided into three parts:
- Front End Web app
- Backend API
- Backend data sync jobs/processes
Each layer is deployed separately on their own AWS services stacks. Let me go through each layer and describe what they comprise of.
Web App Components
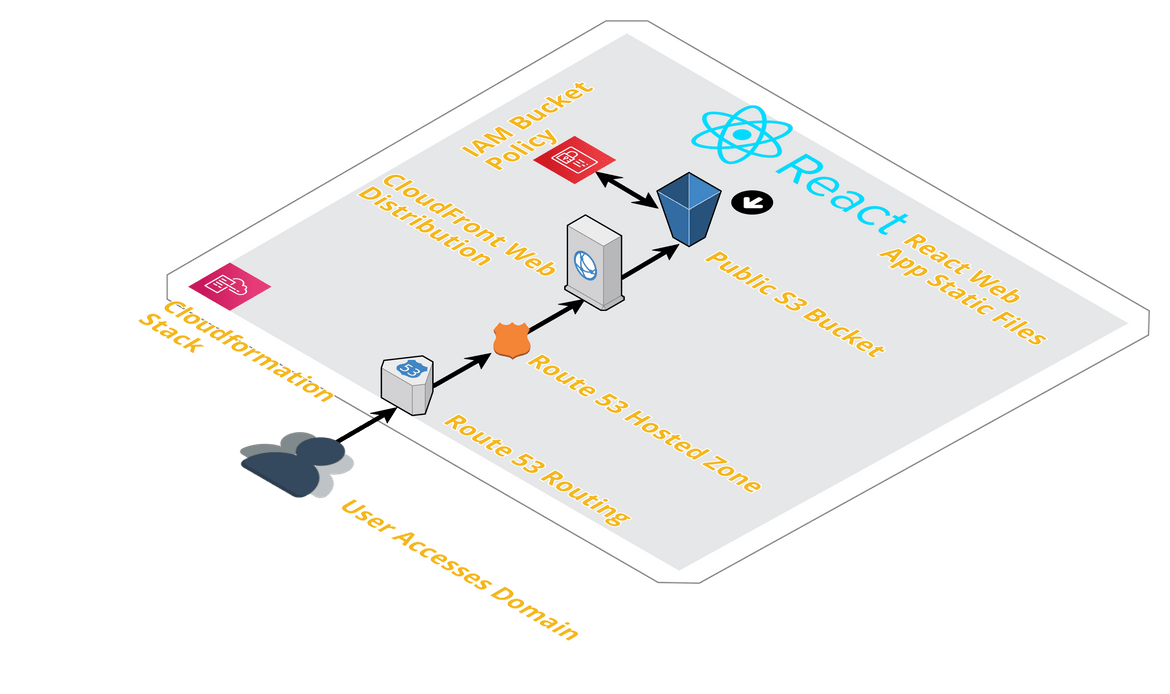
This is the Front end React app. This is deployed as static files which are built from the React app. Below image will show how the front end React app is deployed on AWS:
-
Route 53 and Custom Domain
This exposes the app to public. There is a custom domain which points to a Route 53 hosted zone. It routes the requests from the custom domain to the CloudFront endpoint behind. I am using simple routing for simplicity of this app. But according to different cases other routing policies can be used on Route 53
-
CloudFront Web distribution
This is the CDN which is deployed to increase the performance of loading of the static web app files across locations. The Cloudfront distribution will cache the static content and make app loading faster based on user locations. The distribution has an origin defined as an S3 bucket. The S3 bucket hosts the static web files generated from the build process of the React web app.
-
S3 bucket
The S3 bucket stores all the static files built from the React app. It contains all the HTML. JS and CSS files. The bucket is made public so it is accessible as an origin by the Cloudfront distribution. Few settings which are done on the bucket:
- Enable Static website hosting on the bucket
- Make the bucket public
- Apply bucket policy to make all objects within public
All these components are deployed as part of a Cloudformation stack which I will be going through in next post.
Backend API Components
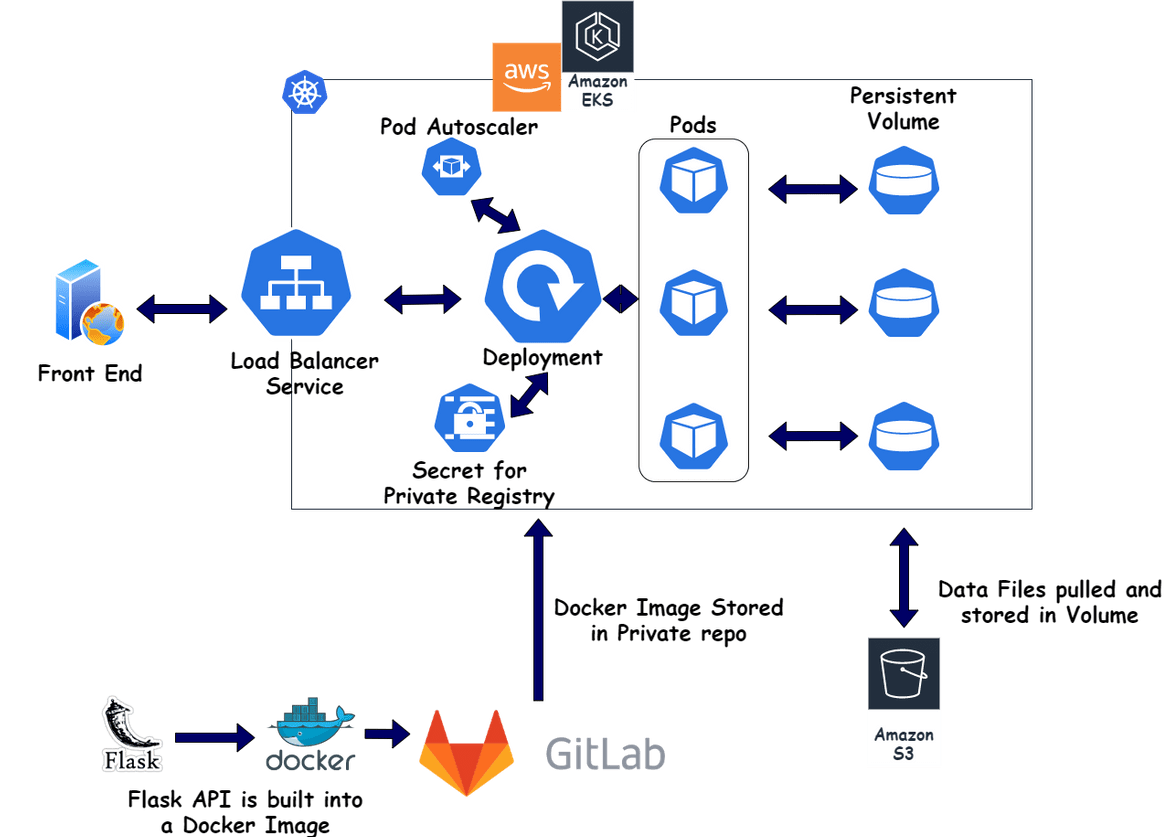
This is the main backend API which talks to the front end and performs all the functions. This is developed as a Flask API with Python. The API is deployed to a Kubernetes cluster. This shows how the backend API is deployed:
These are the different Kubernetes components which are deployed on the AWS EKS cluster.
-
Load Balancer
A Kubernetes Load balancer service which exposes the Kubernetes deployment for the API. This will create an Application Load balancer on AWS as part of the deployment. The load balancer endpoint is exposed to the front end to make the API calls.
-
Deployment
This is the Kubernetes deployment which spins up the pods based on the Docker image built for the Flask API. The Docker image is built and pushed to a private repository (GitLab). This deployment pulls the image from the repository and spins up the Pods for the API.
-
Persistent Volume
The data files needed for the NLP model in the API code, are stored in a Kubernetes volume. The scheduled/cron jobs run and place the data files in the volume. This volume is mounted on the Pods in the deployment above. This makes the files available to the API running in the pods. The file names are passed as environment variables to the pods.
-
Secret
There is a Kubernetes secret created to store the credentials for the private container registry. This stores the Docker image to be used by the Kubernetes deployment. The secret is passed to the deployment.
-
Pod Auto Scaler
This is an optional part which I have added. To have scalability, I added a horizontal pod auto scaler which will scale the pods based on cpu utilization. I have also added scalability to the nodes registered to the EKS cluster. So we can either have this scaling or use the other or both.
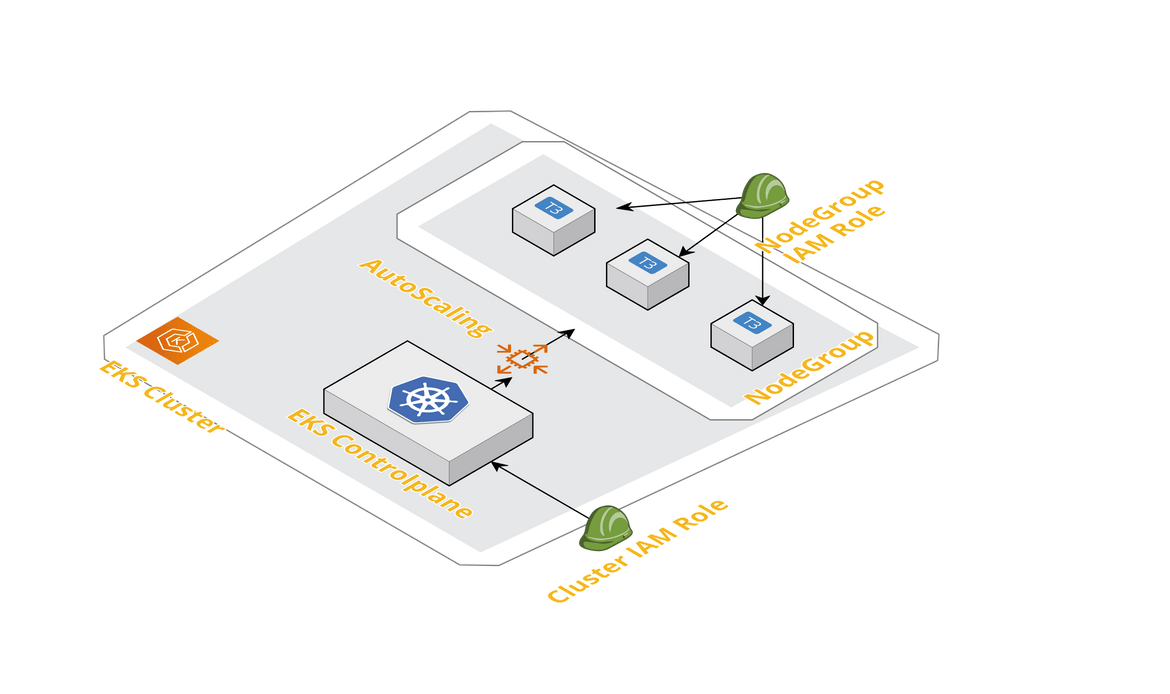
All of the components are deployed to an AWS EKS cluster. The cluster is also deployed as part of the deployment using Cloudformation templates. The EKS cluster consists of a managed Control plane which is managed by AWS. I have attached one node group to the cluster which scales out and in between 2 and 4 nodes. It launches EC2 instances based on the official EKS AMI.
Data Sync Components
Data is a central part of this app. All the searches use NLP algorithm and search on the Yelp specific data which are stored in two data files. Two data files which are involved in the algorithm execution are:
- Restaurants data: Metadata about restaurants like name, location etc.
- Reviews data: All reviews related data
To prepare the data files, there are two scheduled Cron Jobs which run weekly and nightly. The jobs are scheduled as Kubernetes Cron jobs. Let me go through high level what each job does:
-
Nighlty Data Processing Job
This job updates the data files used by the NLP algorithm, with new data nightly. This will help understand what this job does
New data which is scraped throughout the day from Yelp, is placed in a S3 bucket. This job reads the updated raw data files and process those files to convert to format acceptable by the Flask API code. This job ensures the Restaurants and Reviews data files are up to date with new data daily so that the app can return accurate and updated results.
-
Weekly Model Tune job
This job ensures the NLP model used in the API is tuned and updated with learning from the latest data collected throughout the week. This is what goes on in this job:
This job reads the latest data files from a S3 bucket and outputs the updated NLP model file to be used by the API.
These are the different components which overall make up the application ecosystem. Each of the components are deployed separately on different AWS services.
Upcoming Post
In the upcoming second part of this post series, I will be going through how each of the above components are deployed on AWS. These are upcoming on my next post:
- Cloudformation templates for each of the components and overview of each template
- Deploy the components to AWS using Code pipeline and the Cloudformation templates
- Deploy an EKS( Elastic Kubernetes Cluster) using Cloudformation and Codepipeline
- Deploy the backend components to EKS cluster using AWS Codepipeline
So stay tuned for the next post (hopefully soon).
Conclusion
In this post hope I was able to explain and provide an overview of the app I built and what components are involved in it. Getting in more details will make this very long so I provided overview of each and how they contribute towards working of the app. If you have questions please reach out to me via the Contacts page and I will be happy to answer questions. For now, stay tuned for the next part of this post and learn more about the deployment portion of it. Stay Tuned!!!!


