Deploy a Custom Resource using Cloudformation: A Conversational CRM (SFDC) using Amazon Connect and Lex & Deployed via Terraform and Cloudformation
I have been working on implementing CRM applications for most of my career. All the CRM applications which I have worked with have a common pattern for access where users login to the application and then look through stuff to find what they need to work on. So I thought why not streamline that process a little bit. With current boom in AI, why not add some AI flavor to the CRM application.
So I came up with this solution to have a Conversational interface for the CRM where one can get info from the CRM just like chatting with someone. Makes it interesting for the user to interact with the application too. In this post I am describing the solution which I built to give a conversational interface to Salesforce application. Also while at it, I cover steps about deploying Infrastructure using Terraform and Jenkins. Hope it will be a good learning for some of you.
A demo of this in action can be found below:
Also the GitHub repo for the deployment scripts can be found Here
What is CRM?
CRM (Customer Relationship Management) is an important part for any organization. Managing Customers and interactions with them is a critical part of any business process in an organization. To smoothen the process and to help business teams efficiently manage customers and their deals, there are many software solutions out there which handle the complexities of the process. For this solution I have used Salesforce (aka SFDC) as the CRM application backend.
To define CRM, its a process to manage all customers and interactions with those customers efficiently. A CRM application helps achieve those goals by simplifying the customer management so users can focus on managing customers. This is a very short definition of CRM. Its a vast topic to be learnt separately. For now lets dive into the interesting part of having a conversational interface for this CRM.
Pre-Requisites
If you want to follow along and deploy a similar solution, there are few pre-requisites which need to be taken care before we proceed:
- Basic knowledge of Python, AWS, Amazon Lex and Amazon Connect
-
A Jenkins instance to run the Jenkins pipelines. The Jenkins instance should have these installed:
- AWS CLI
- SAM (Serverless Application Model) CLI for Lambda deployment
- Terraform CLI
- To run locally, have all of the above installed locally too
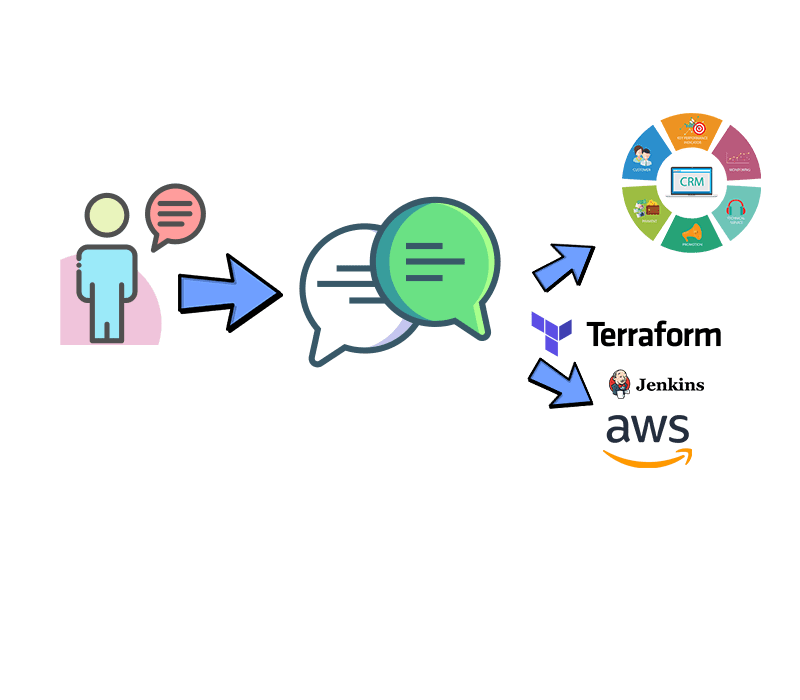
Overall Functionality
Lets get into describing what actually does this application do. Below image will explain an overall functional flow for the application.

Let me explain the flow of the functionality with an example command. In below example, user needs to get a lead to work on. So the user opens up the app and the process follows:
- Open up the app and login using CRM credentials. It is one time login which expires every 8 hours

- User is presented with a chat interface confirming login to CRM

- User types in ‘get a lead’ to get the needed info

- The chat interface interprets the chat text and accordingly communicates with the CRM application backend

This will present a simple interface to the user to interact with the CRM application. Lets move towards the technical details of this application.
Tech Architecture
Below image shows the overall tech stack build for the whole application. These are the two main core components which constitute the main “brain” of this:
- Amazon Connect for Chat flow
- Amazon Lex for processing chat texts

Let me go through each of the component:
Front End
Front end is the Chat UI which user interacts with and exchange messages with the Bot. Its a simple web page which exposes the Chat widget. I am using the Chat widget published by Amazon for an easy interface. You can find it Here.
The Front end consist of two components:
- Cloudfront: This is the CDN which serves the static web pages to end user.
- S3 Bucket: This serves as the source for Cloudfront. This houses the static HTML and JS files for the Chat UI
User accesses the Cloudfront endpoint to open the application and perform interactions.
Back end API
The back end API provides a public endpoint by which the Amazon connect call flow can be invoked. This API endpoint is being called by the front end web page to perform all the functions. These are the components in the Back end API:
- API Gateway: This exposes the API endpoint which when invoked executes the backend Lambda function.
- Lambda Function: This a NodeJS Lambda function which invokes the Amazon call flow and communicates with the same. It uses a Chat SDK provided by AWS which is created as a Lambda Layer dependency. More about the AWS provided Chat SDK and the related files can be found Here
Amazon Connect
Here the main Call flow is defined which orchestrates the whole Chat flow from user opening the chat to ending of the Chat. The call flow controls how the Chat progresses and what step to take at each request/response. It is a Contact flow containing steps to call Lex and Chat channel steps. At high level this what the Call flow follows:
- When the flow is triggered, provide a welcome message to the user
- Invoke a Lambda function to validate the login. Take the details from the input Contact attributes which is passed from the UI
- If login is success, store the session key in an external attribute. This will be used for further communications with the CRM application
- Provide user option asking what they want to do. Based on the input, invoke the respective Lex intent
- Get the output from the Lex invocation and show the output back on the chat interface


Amazon Lex
This is the main brain of the whole application. An Amazon Lex bot is deployed which communicates to both Amazon connect and the CRM application performing the necessary actions. Here is high level how the bot works:
- When user enters a chat text on UI that invokes the call flow
- The call flow invokes a Lex intent based on the text input
- The Lex intent performs the necessary function call ling a Lambda function which communicates with the CRM application. Responds back the response to Amazon connect which responds back to the user

Lambda for the Lex Bot
For the Lex bot to respond with the necessary info, it has to communicate with the CRM application. The communication is done via this Lambda function. Based on the intent triggered on the Lex bot, the Lambda function executes API calls to the CRM application and get the required function done. The Lambda function is built on Python and contains various Python function which handle the different CRM activities triggered by the Lex bot. The Lambda returns the information to Lex which parses the response and send back to Connect.
That completes all of the components of the architecture. Lets move on to deploying this whole setup.
Code Folder Structure
Before I move to the deployment, let me explain the folder structure I have for this. The code can be found on my GitHub repo if you want to deploy a similar solution.

At high level this is divided in two parts:
- lex-crm-deploy-repo: Contains sub folders to deploy various application components like Lambda, Amazon Connect call flow etc
- lex-crm-infra-repo: Contains sub folders to deploy the various infrastructure components needed to support the application components
There is one more folder called ‘resource_exports’ where I am storing the export file for the Lex bot from the development environment. This will be imported on the target environment for deployment.
lex-crm-infra-repo
- lex-chat-lambda-infra: Terraform config file to deploy infra for Lex backend Lambda
- connect-custom-resource-infra: Terraform config to deploy the infra needed for deploying the custom resource launching the Connect call flow
- connect-chat-ui-infra: Terraform config to deploy infra for Chat frontend UI
- connect-chat-backend-api-infra: Terraform config to deploy infra for chat backend API and Lambda
lex-crm-deploy-repo
- lex-chat-lambda: SAM template and code files for the Lex backend Lambda
- connect-custom-resource-deploy: Lambda code files to deploy the custom resource for the call flow. Also contains the CloudFormation template to deploy the custom resource
- connect-chat-ui: HTML and JS files to deploy the front end UI
- connect-chat-backend-api: CloudFormation template to deploy the backend API for front end to access the Amazon connect call flow
Deploy the Solution
Lets move on to deploying the whole architecture and its components. The deployment is divided in to two parts and each part has its own deployment pipeline using Jenkins:
- Deploy the Infrastructure components
- Deploy the app components
I will go through the steps for each of the above. I am using Terraform to manage the whole infrastructure. Infrastructure for each of the components is defined in a separate Terraform config file. State management for the Terraform states have been centralized using a remote backend of S3. These S3 buckets which store the Terraform states also get created as part of the initial pipeline run.
Deploy the Infrastructure
Let me go through the pipeline which will deploy the infrastructure components. The deployment pipeline is a Jenkins pipeline which is defined on the Jenkinsfile in the Infrastructure GIT repo. Below image shows the whole pipeline:

Lets go through each step:
Create Buckets for Terraform State
When the pipeline is ran the first time, Terraform need to access the S3 buckets to store the state. So in this step the state buckets get created where Terraform will be syncing the state from each of the infrastructure component config. Its a simple AWS CLI step to create the buckets.

Deploy Lex Chat Lambda Infrastructure
In this step we deploy the infrastructure need to deploy the Lambda which will be used by Lex to communicate with CRM. The components are defined in the Terraform config. Below are the components which are deployed in this step:
- S3 bucket for the Lambda code
- IAM Role for the Lambda to assume and perform necessary actions

To deploy this below steps are performed in this stage:- Validate the Terraform config
- Run terraform init to initialize
- Run Terraform plan and apply to deploy the components

Deploy Infrastructure for the Custom resource to create the Call flow on Amazon Connect
In this step the infrastructure needed to support the creation the Custom resource. This Custom resource will be deployed by CloudFormation to create the Amazon Connect call flow. These components are deployed in this step:
- S3 Bucket for the custom resource Lambda code
- IAM role for the Lambda

To deploy this below steps are performed in this stage:- Validate the Terraform config
- Run terraform init to initialize
- Run Terraform plan and apply to deploy the components

Deploy Infrastructure for the UI
This step deploys the infrastructure need to host the UI static web files. These are the resources which get deployed in this stage:
- S3 bucket to host the web files. Web hosting is enabled on this bucket so these files can be served as a web pages. Also policies are added to the bucket so Cloudfront can access these files
- A Cloudfront distribution to server the static files to end users. This will be the CDN which will provide the UI endpoint to efficiently deliver the static files.

The steps remain same for the deployment:- Validate the Terraform config
- Run terraform init to initialize
- Run Terraform plan and apply to deploy the components

Deploy Infrastructure for the Chat Backend API
In this step we will deploy the infrastructure needed by the Chat Backend API. This API will be accessed by the UI frontend to talk to the Amazon Connect call flow. These are the resources deployed as part of this stage:
- S3 bucket to store the code for the Backend Lambda code and the dependency layer files

The steps remain same for the deployment:- Validate the Terraform config
- Run terraform init to initialize
- Run Terraform plan and apply to deploy the components

That completes all of the steps for the Infrastructure deployment. Lets go ahead with the actual deployment of these components.
Steps to Deploy the Infrastructure
The deployment steps will be handled by a Jenkins pipeline. To run this deployment you should have a Jenkins instance setup with the Pre-requisites installed. Before starting the deployment, we need to setup the AWS credential keys on the Jenkins instance so that can be used by the pipeline to deploy to AWS. Follow these steps to add the Credentials:
- Get the credentials keys from the IAM user on AWS. This user will be used to perform all deployments on AWS. Provide necessary permissions

- Login to Jenkins and navigate to the Manage Credentials page: Manage Jenkins—>Manage Credentials

- Click on Add Credentials to open the new credentials page. Update the AWS access keys as two different credentials records and provide ID as needed. This ID will be referred in the Jenkinsfile

- Once done, update the Jenkinsfile to pass these credentials as environment variables


Now that we have the pre-reqs defined. Lets deploy the pipeline and deploy the infrastructure.
- Create a new Pipeline on Jenkins

- On the configure page select options as needed. For the source, select the GIT repo as the source for this pipeline. If needed select the needed credentials to connect

-
Once done, run the below commands inside the infra folder to push changes to the repo. This should start running the pipeline
git add . git commit -m "updated changes" git push -u origin main - Check on the Jenkins dashboard regarding the status of the pipeline run. It will take a while to complete the run. Once done all of the stages should be success

If there are any errors the logs will show them and accordingly can be resolved

- Once the pipeline is complete, the resources can be verified by logging in to the AWS console:


Now we have our infrastructure deployed and ready for the app components to be deployed. Lets move on to the step to deploy the app components.
Deploy the App Components
The app components are also deployed via a Jenkins pipeline. Let me first go through the release pipeline for the app deployment.

Lets go through each of the steps:
Deploy Lex Backend Lambda
In this step we will deploy the Lambda function which is the backend for the Lex bot. At high level these are the steps which are followed in this stage:
- Run Tests to validate changes
- Install Python dependencies at a local folder for the Lambda layer
- Run sam build function to build the Serverless application
- Run sam deploy to deploy the Serverless application and deploy the Lambda
- Add the resource policy to the Lambda to allow Lex to invoke the function

The Lambda is defined as a SAM template. The CRM details are passed as the environment variables to the Lambda function. The SAM template deploys the below items:- Lambda function
- Lambda layer for dependency

Deploy the Call Flow
This stage will deploy the Amazon connect call flow. Since call flow is not enabled via Cloudformation, I am deploying a custom resource via Cloudformation to launch and deploy the Call flow. This is the process followed to deploy the custom resource.

At high level these are the steps to deploy the Custom resource:
- A Lambda is developed (in Python) which when triggered creates the Amazon connect call flow via API calls
- Cloudformation triggers the Lambda to create the custom resource, which is the call flow here
- The Lambda function reads the existing call flow created in the development environment via API calls and creates the same flow in target environment via API. The source call flow details are passed as environment variables to the Lambda
- Lambda sends back the creation status to Cloudformation and accordingly the Stack status changes to failed or success

In the Jenkins stage both the Lambda and the Custom CF resource is deployed. Below steps are performed in this stage:- Run Tests to validate changes
- Install Python dependencies at a local folder for the Lambda layer
- Run sam build function to build the Serverless application
- Run sam deploy to deploy the Serverless application and deploy the Lambda
- Run the Cloudformation deploy command to trigger the above Lambda via Custom::DeployFlowLambda resource

Deploy Chat UI
This stage deploys the UI front end for the app. It will deploy the Chat UI which users will interact with. The UI consist of HTML and JS files which will be interacting with the backend API to perform the operations. The HTML and JS files are hosted in an S3 bucket which gets served by the Cloudfront. So this stage of Jenkins just copies the files to the target S3 bucket.
- Run validation tests
- Navigate to the folder and copy the JS and HTML files to the S3 bucket

Deploy Backend API
This stage will deploy the backend API and the API Gateway. This API will be communicating to the Amazon connect call flow to perform the chat functionalities. For the API I am using AWS supplied sample ChatSDK and sample Lambda. It is a NodeJS lambda function which will be the source for the API. Below steps are performed in this stage to deploy the components:
- Copy the JS file to the target S3 bucket which will act as source for the Lambda
- Using Cloudformation deploy the Lambda and the API Gateway to expose the API endpoints

Now that we understand each of the stages, lets move on to deploy the application.
Steps to Deploy the application
The app components will be deployed via another Jenkins pipeline. This pipeline will also use the same credentials for AWS which was setup during the infrastructure deployment. So we don’t need to setup the credentials again:

Also to start the deployment, some of the components are not part of the pipeline and need to be deployed manually. Let me go through those items:
-
Deploy the Lex Bot
First we need to deploy the Lex bot. We will take the bot which we already created during development and import on the target environment.

-
Create Amazon Connect Instance
If there is no Amazon Connect instance at the target environment, create a new instance where the call flow will be created.

-
Register Lex Bot
Once the instance is created, register the Lex bot on the instance so the call flows can trigger the Lex intents


Before we can start the app deployment there are some parameters which needs to be updated in the app deployment templates to specify the infrastructure details which were deployed earlier:
- As part of the infrastructure, different IAM roles were created for the Lambda functions. These Lambda Role ARNs are updated in the app Lambda deployment templates

- For the Custom resource deployment, the source/development call flow details need to be updated. The custom resource Lambda will read the call flow from this source.


Once these details are updated we are ready to deploy the Jenkins pipeline. Follow these steps to deploy the pipeline:
- Create a new pipeline in Jenkins

- On the configure page select options as needed. For the source, select the GIT repo as the source for this pipeline. If needed select the needed credentials to connect
-
Once done, run the below commands inside the infra folder to push changes to the repo. This should start running the pipeline
git add . git commit -m "updated changes" git push -u origin main - Check on the Jenkins dashboard regarding the status of the pipeline run. It will take a while to complete the run. Once done all of the stages should be success

If there are any errors the logs will show them and accordingly can be resolved - Once the pipeline is complete, the resources can be verified by logging in to the AWS console:


Now that all the app components are deployed. There is one last step to connect the front end to the backend API. Update the variables on the front end JS file to point to the API gateway which was deployed above as part of the pipeline.

Once updated and pushed, the pipeline will run again updating the UI files. At this point the fully functional application should be ready. Navigate to the Cloudfront endpoint and it should open the chat interface login page. Pass the CRM credentials to login and open the chat UI:


That completes the whole deployment and the app is now live. Hope that provided a good description of the Conversational CRM using Lex.
Improvements
The example which I show here is just the basic version of the app. There are lots of improvements which I am working on to make the application more user friendly. Some of the ones to note here:
- Make the login more seamless. User shouldn’t have to login every time. Once logged in it should stay logged in for a configurable amount of time. Also enable SSO if CRM has SSO
- Add more CRM functionalities to extend the CRM activities handled by the Bot
- Improve the deployment pipelines to make it more automated and eliminate the manual steps like updating the Lambda role ARNs
- Add more monitoring options for all the Lambda functions and monitor for failures
- Automate deployment of Lex bot via the pipeline
Conclusion
Well that completes this post. Hope I was able to describe my little project and you were able to have some learning from it. If you are trying this solution out, go ahead and start the practice. CRM applications have been very popular in recent times. With recent boom of AI if the same flavor can be added to a CRM application, it will a very useful step up on the user experience. You can contact me if you have questions or find any issues.