A Jenkins Pipeline to Launch Personal EC2 Instances on AWS and Bootstrap using CHEF
A Jenkins Pipeline to Launch Personal EC2 Instances on AWS and Bootstrap using CHEF
Prelude
Many times we feel a need to quickly spin up instances for some of our developement projects. Normally we go ahead and manually launch the intances, install required packages or softwares and then perform whatever tasks we were planning. This becomes difficult if we need instances frequently.
In this post I will discuss a way to quickly launch an instance on AWS and then prepare the instance with required packages, all in an automated way. Whenever we need an instance, we just need to run the pipeline with needed options and rest will be taken care of by the pipeline.
The full codebase is available in below Github repo:
https://github.com/amlana21/ec2-jenkins-pipeline-publish
Pre-Requisites
To be able to execute the pipeline, there are some pre-requisites which are needed both on your system(or where you will run the pipeline) and some cloud accounts.
Workstation Requirements
- CHEF
- AWS CLI
- Jenkins
For Cloud
- AWS Account
- Free CHEF Manage account
About the Pipeline
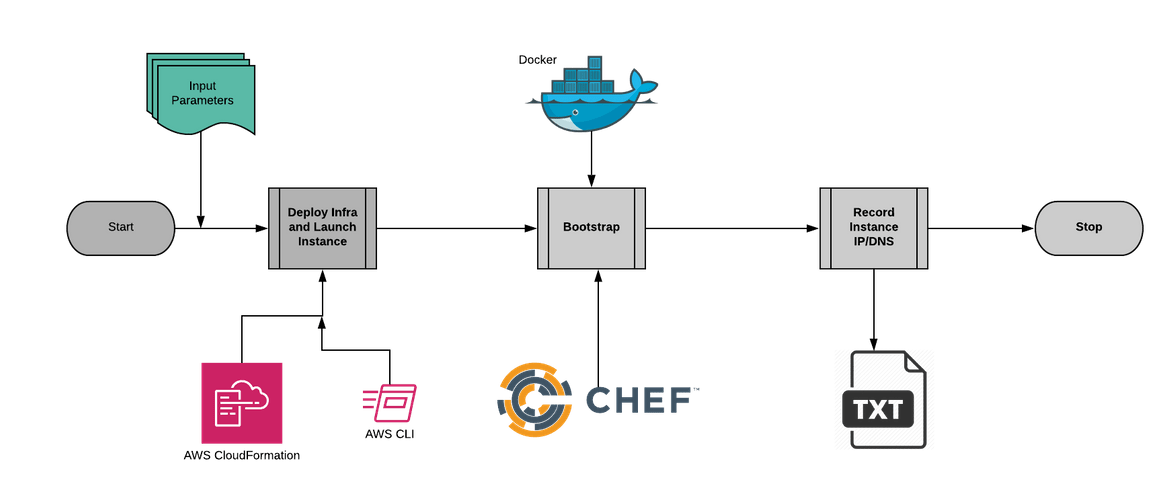
Let me first give some overview about the pipeline and what tasks will it perform.Below is a high level end to end flow diagram of different components of the pipeline.
Below are high level descriptions for each phase:
- Deploy Infra and Launch Instance: This phase will launch an EC2 instance on AWS. It uses a Cloudformation stack to deploy a whole network infrastructure and then launch the instnce in the same network.The stack is deployed via AWS CLI commands and then outputs the Instance Public DNS in an environment variable for further stages.
-
Bootstrap: Once the instance is launched, this stage will prepare the instance by installing packages which are needed.For example if you need to test in an Nginx server, this step will install Nginx and start the server.
The bootstrap is done using CHEF. Based on what needs to be installed on the instance, respective CHEF recipe/role will be executed. Environment type is asked as a parameter on start of the pipeline and accordingly it runs.The required SSH keys are downloaded from a pre-defined S3 location.
Below are steps which are performed by the CHEF recipe on the instance:- Installs Docker
- Starts Docker service
- Based on the input parameter, starts the respective container(as an example in this post I am starting Nginx container)
- Record Instance IP/DNS: This is the final phase of the pipeline. This step outputs the Instance Public DNS name in a text file and archives the same as an artifact.The DNS name can be fetched from the text file and used for further activities.
Walkthrough
Now lets walk through the process of setting up and running the pipeline. Below is the pipeline which we will be setting up now.

Initial Preparations
There are some one time setups needed before moving on to setting up the pipeline.These are needed so that the pipeline is able to run the commands and perform the needed tasks.This is just needed once and then using this setup pipeline can be executed multiple times just with a click.
- AWS Account: If already not done, create an AWS account to use the free tier features.
- IAM User: Login to the AWS Account and create an IAM user with Programatic access and admin access so it can launch needed resources. Note down the login keys
- Key Pair: Create or import a key pair from the EC2 service page. Download and keep the SSH key in a secure place
- S3 Bucket: Create a S3 bucket to store the SSH Keys. Note down the name. Also upload the Key from the last step to this bucket
- AWS CLI Installation and Config: It is required to install CLI on your workstation or wherever Jenkins will run
- Install CHEF DK: Install CHEF DK on the system where Jenkins will run. For instructions check: https://chef.readthedocs.io/en/latest/install_workstation.html
- Create an account on Hosted CHEF Manage: Create a free account on the hosted CHEF manage (https://manage.chef.io/). This is needed for the bootstrap process.
- CHEF Manage Config: Create a CHEF manage Org specific for this purpose.Also generate the user key and the Knife file. Download both of the files.For details of stpes please check: https://learn.chef.io/modules/manage-a-node-chef-server/ubuntu/hosted/set-up-your-chef-server#/
- Upload Keys: Upload both of the downloaded keys from last step to the S3 bucket which was created earlier.
- Install Jenkins: Last but not the least, install Jenkins on the local system.Also if possible install the Blue Ocean plugin. For details: https://jenkins.io/doc/book/installing/
Setup and Run the pipeline
Once the setups are done, we can now move on to setting up and running the pipeline.
Setup Pipeline
- Login to Jenkins
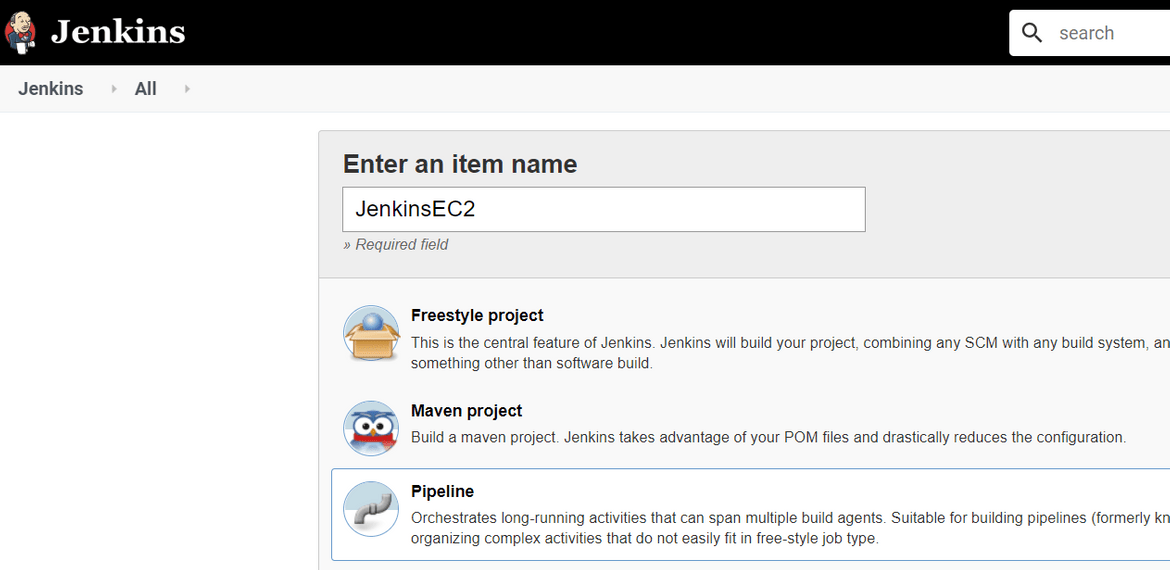
- Create a new Pipeline Project

- In the next screen you can keep all other settings default
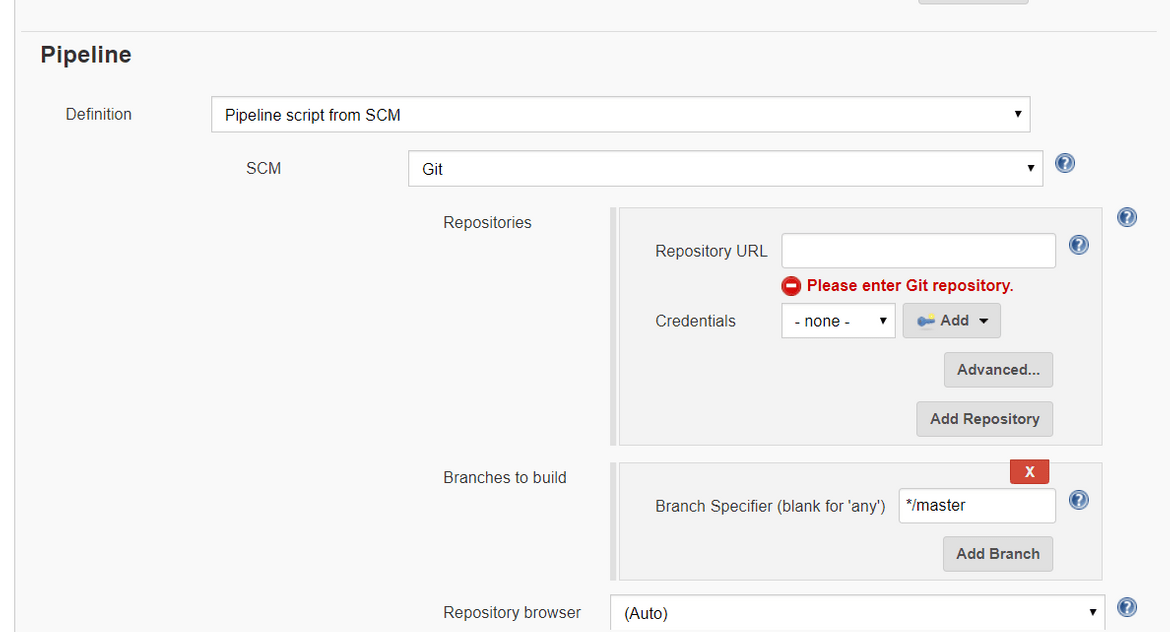
- In the pipeline section provide the Github repo URL. Keep other settings default. Save the pipeline and you are ready to run the pipeline.

- Click on the Blue Oceans link on the pipeline detail page to navigate to the Blue Ocean view
Run the pipeline
- From the Blue Ocean view of the Pipeline, click on run to trigger the pipeline
- This will pop up a screen to provide different parameters

Below are the parameters needed: - Select the Environment Type: This will control which package will be installed on the instance and which Recipe will be executed
- S3 Bucket for keys: This is the bucket name which was created previously
- Key name for EC2 login: Key name which was created in AWS for EC2 login and was uploaded to S3
- AWSACCESSKEYID,AWSSECRETACCESSKEY: The Credential keys for the IAM user which was created earlier
- AWSDEFAULTREGION: Region where you want to launch the instance
- Once the parameters are entered, click on run
- The pipeline will take sometime to finish. Meanwhile the progress can be tracked on the console view
- Once the pipeline finishes, it will generate a text file as artifact. This text file will contain the public DNS name of the instance launched(instanceDNS.txt)

Check output and Test
From the output text file, copy the DNS name and paste in any browser. This should bring up this page showing that the launch was successful:

Scope for extension
Now that we have seen how to run the pipeline, this example is only deploying an Nginx container. If other packages are needed on the instance, the CHEF recipe can be added accordingly and the initial parameter should be specified with the respective environment name. This keeps a wider scope open for this pipeline and the related files to be modified and customized according to needs.
This example uses a custom Nginx image which I have created and pushed to Docker hub. If other custom images are needed, you can go ahead and create and push to Docker hub. Then the CHEF recipe need to be modified to use the new image so that it can launch the specific container.
Conclusion
In this post I have explained a process to setup a Jenkins pipeline which will automate the launch of instance on EC2 and bootstrap the same.This will be useful for some of you who need a way to quickly get an instance up and running for personal projects. With proper changes and customizations, this can also be used in proper project scenarios.There is a wide scope to customize this and support more environment types like NodeJS, Tomcat etc with more DOcker images and CHEF recipes.
For any issues or questions, please reach out to me at amlanc@achakladar.com.
