 A Cloudy Affair
Building a voice layer on your private knowledgebase using Alexa and a Local LLM based Agentic workflow
Most of us maintain our own private knowledge — internal notes, private technical references, personal research. It becomes very useful to be able to get answers from that knowledge easily without navigating thorugh the documents.Large language models have made it genuinely useful to ask questions in plain language and get intelligent answers back from such knowledgebases.
What if you could just walk up to your Alexa device, ask a question out loud, and get an answer pulled from your own private documents — all through a local LLM-based agentic workflow?
That is exactly what we will build here. The voice layer lives on Alexa, but everything else — the document store, the embeddings, the language model, the agentic retrieval workflow — runs entirely on your local machine. No cloud LLM subscription required. No documents sent to an external API. Just a voice interface sitting on top of a fully local, agentic RAG pipeline.
In this post I will walk you through the architecture, the key technical pieces, and a complete step-by-step guide to deploying this yourself.
The full code for this solution is available on my Github Repo Here
Prerequisites
To follow along and build this yourself, you will need:
-
An Alexa device and an Amazon Developer account — sign up for free at developer.amazon.com. Your device must be logged in with the same Amazon account to test skills in development mode.
-
Ollama installed and running locally. Install from ollama.com, then pull the two models used in this solution:
ollama pull nomic-embed-text ollama pull llama3.2:3b -
Docker and Docker Compose — the retrieval service runs in a container.
-
ngrok — to expose the local retrieval service over HTTPS without opening router ports. Sign up at ngrok.com for a free account, then install and authenticate. Install method depends on your OS:
- macOS:
brew install ngrok - Windows:
winget install ngrokor download the installer from ngrok.com/download - Linux:
snap install ngrokor download the binary directly
Then authenticate:
ngrok config add-authtoken <your-token> - macOS:
-
Python with conda and uv — for running the ingestion pipeline. The solution uses Python 3.12 inside a conda environment.
-
Basic familiarity with Alexa Developer Console — you will paste an interaction model JSON and deploy Node.js code through the console UI.
What We Are Building
At its core, this is a voice-powered question answering system over your own private documents. You speak a question to your Alexa device, and a few seconds later Alexa speaks back an answer that was generated entirely on your local machine — no cloud LLM, no third-party API processing your content.
The solution is made up of two distinct worlds that work together. On the Amazon side, an Alexa Hosted Skill listens for your voice, figures out what you are asking, and handles all the back-and-forth with the Alexa platform. On your local machine, a retrieval service does the real work — it takes the question, searches a vector store built from your documents, feeds the relevant context to a locally running language model, and hands back a short, spoken-friendly answer.
The two worlds are connected through an ngrok tunnel, which gives the Alexa skill a public HTTPS address to reach your local machine without you having to open any router ports or set up a domain. The connection is protected with Basic Auth so only your skill can talk to your retrieval service.
Here is the end-to-end request flow:
You
  → Alexa device
  → Alexa cloud
  → Alexa Hosted Skill (Node.js, running on Amazon infrastructure)
      → POST /query via ngrok tunnel (Basic Auth)
      → Local retrieval-service (FastAPI, port 8001)
          → LanceDB vector search
          → Ollama (llama3.2:3b on localhost:11434)
          → {"answer": "..."}
  → Alexa speaks the answer
When you say “Alexa, open <skill-name> and ask about the AWS Well-Architected pillars”, the Alexa skill picks up your question and forwards it over the tunnel to the retrieval service on your machine. The service embeds your question, finds the most relevant chunks from your document store, passes them along with the question to a locally running Ollama model, and returns a concise answer. The skill receives that answer and Alexa speaks it back to you — the whole round trip in a few seconds.
Your documents stay on your machine. Your model runs on your hardware. Alexa is just the voice.
Architecture
Below is the high level architecture of the whole solution.
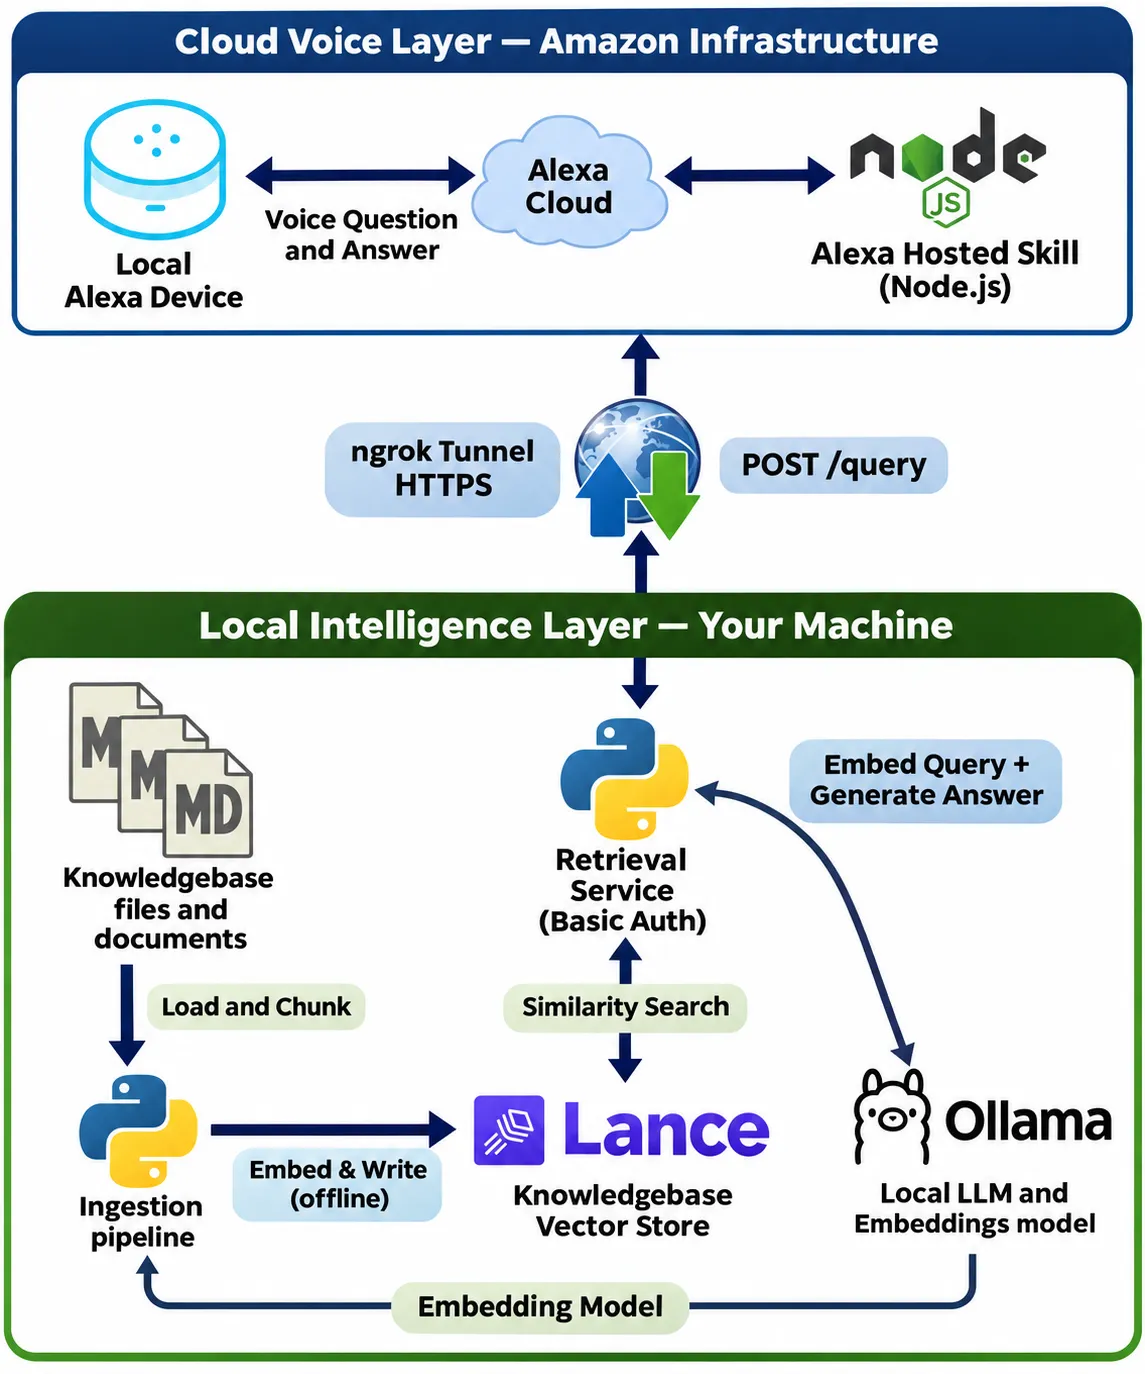
The architecture is deliberately split into two layers — a cloud voice layer and a local intelligence layer — with a secure tunnel bridging the two.
The cloud voice layer is handled entirely by an Alexa Hosted Skill running on Amazon’s infrastructure. This is a free hosting option Amazon provides for custom skills. It takes care of everything Alexa-specific: receiving the voice request, identifying the intent, extracting what the user asked, and formatting the final spoken response. It knows nothing about RAG or language models — its only job is to act as a well-behaved Alexa skill and forward questions to the local layer.
The local intelligence layer is where all the actual work happens. It consists of a FastAPI retrieval service, a LanceDB vector store holding your document chunks, and Ollama running the embedding and generation models — all on your own machine. This layer never needs to know anything about Alexa. It just receives a question over HTTP and returns an answer.
The ngrok tunnel connects the two. It gives the Alexa skill a stable public HTTPS endpoint that routes directly to your local retrieval service, with no router configuration or domain needed. Basic Auth on the tunnel ensures only your skill can reach it.
Here is a breakdown of each component and its role:
| Component | Technology | Role |
|---|---|---|
| Voice interface | Alexa device | Captures voice input and speaks the response |
| Alexa Hosted Skill | Node.js / ASK SDK v2 | Handles intents, calls retrieval service, returns Alexa JSON |
| Public tunnel | ngrok | Exposes local retrieval-service over HTTPS without opening router ports |
| Retrieval service | FastAPI (Python) | Receives query, runs RAG pipeline, returns answer |
| Vector store | LanceDB | Stores embedded document chunks for similarity search |
| Embeddings | Ollama nomic-embed-text | Generates embeddings for ingestion and at query time |
| Language model | Ollama llama3.2:3b | Generates the final spoken answer from retrieved context |
| Knowledge base | Markdown / text files | Your private documents, stored locally |
One thing worth calling out is the choice of Alexa Hosted Skills over a self-hosted webhook approach. With a self-hosted webhook, you would need to stand up your own HTTPS endpoint and handle Alexa request validation yourself. With an Alexa Hosted Skill, Amazon handles all of that — you just write the Node.js handler code. This keeps the cloud side simple and free, and lets the local side stay focused purely on answering questions.
Technical Details of the Solution
Ingestion Pipeline
Before Alexa can answer anything, you need to build the knowledge base — loading your documents, breaking them into searchable pieces, and storing them in a vector store. This is the ingestion pipeline, and it lives in ingestion/ingest.py. You run it once when setting things up, and again whenever your documents change.
Loading documents
The pipeline starts by scanning the knowledgebase/docs/ folder for any .md or .txt files and loading them using LangChain’s TextLoader. This is your private knowledge — internal notes, reference documents, write-ups, anything you want Alexa to be able to answer questions about. You can add as many files as you like to this folder. For this blog post, I added a single aws.md file with notes about AWS Well-Architected Framework and this example only handles text files. In a real implementation, you could easily extend this to support PDFs, Word docs, or even HTML pages by using the appropriate LangChain loaders.
Chunking
A language model cannot process an entire document in one shot during retrieval — it needs focused, relevant pieces of text. So the pipeline splits each document into overlapping chunks using LangChain’s RecursiveCharacterTextSplitter. The overlap between chunks is important: it ensures that a sentence or idea that spans a chunk boundary does not get cut off and lost, which would lead to incomplete or inaccurate answers.
splitter = RecursiveCharacterTextSplitter(
    chunk_size=CHUNK_SIZE, chunk_overlap=CHUNK_OVERLAP
)
chunks = splitter.split_documents(documents)
Chunk size and overlap are both configurable via environment variables, so you can tune them based on the nature of your documents without touching the code.
Embedding and storing
Each chunk is then converted into a vector embedding — a numerical representation that captures the semantic meaning of the text. At query time, the user’s question gets embedded the same way, and the vector store finds the chunks whose embeddings are closest to the question’s embedding. That is how semantically relevant content is retrieved even when the exact words do not match.
The embeddings are generated by nomic-embed-text, a lightweight embedding model running locally inside Ollama on localhost:11434. The embedded chunks are written to a LanceDB table stored on disk in knowledgebase/vectors/. LanceDB is a local, file-based vector database — no server to run, no cloud service to connect to. It just stores vectors on your filesystem and supports fast similarity search out of the box.
embeddings = OllamaEmbeddings(model=OLLAMA_EMBED_MODEL, base_url=OLLAMA_BASE_URL)
LanceDB.from_documents(
    documents=chunks,
    embedding=embeddings,
    connection=db,
    table_name=LANCEDB_TABLE,
)
The table is dropped and recreated on every run, making the ingestion fully idempotent. If you add or update documents, just re-run the pipeline and the vector store reflects the latest state of your knowledge base.
Agentic RAG: The Retrieval Service
The retrieval service is a FastAPI app running locally on port 8001. It exposes a single /query endpoint — protected by Basic Auth — that receives a plain text question and returns a plain text answer. All the RAG logic lives here, hidden from the Alexa skill entirely.
Why agentic RAG?
A naive RAG pipeline follows a fixed sequence: embed the question, retrieve the top-k chunks, stuff them into a prompt, call the LLM, return the result. That works but it is rigid. If the retrieved chunks are not quite right, there is no way to course-correct — the pipeline just moves forward with whatever it got.
An agentic approach puts the LLM in control of the retrieval loop. The agent decides when to call the retrieval tool, what query to use, and whether the results are good enough to answer with. If the first retrieval does not produce sufficient context, the agent can refine the search query and try again. It also makes the pipeline naturally extensible — adding a new tool (a calculator, a date lookup, a second knowledge source) is just a matter of registering it with the agent, without restructuring the core flow.
The retrieval tool
The retrieval tool is defined using LangChain’s @tool decorator with response_format="content_and_artifact". This specific response format is important — it tells the agent that the tool returns two things: a serialized text representation of the results (which goes into the agent’s context window) and a structured artifact (the raw list of document chunks). This is the correct pattern for retrieval tools in LangChain’s current agentic framework and avoids deprecation warnings from the older langchain-community vector store wrappers.
Inside the tool, the question is embedded using nomic-embed-text, a similarity search is run against the LanceDB table, and the top-k matching chunks are returned along with their source file metadata.
@tool(response_format="content_and_artifact")
def retrieve_context(query: str):
    """Search the knowledge base and retrieve relevant context for a query."""
    table = _get_table()
    query_vector = _get_embeddings().embed_query(query)
    results = table.search(query_vector).limit(RETRIEVAL_TOP_K).to_list()
    docs = []
    for row in results:
        docs.append({
            "page_content": row["text"],
            "metadata": {"source": row.get("metadata", {}).get("source", "")}
        })
    serialized = "\n\n".join(
        f"Source: {d['metadata']['source']}\nContent: {d['page_content']}"
        for d in docs
    )
    return serialized, docs
The agent and the system prompt
The agent is built with create_agent from langchain.agents, wired to ChatOllama. The system prompt is critical here — it sets the persona, tells the agent to always use the retrieval tool before answering, enforces short spoken-friendly responses of two to three sentences maximum, and explicitly instructs it never to make up facts. For a voice interface, hallucinations and long-winded answers are both equally damaging to the experience.
def _get_agent():
    global _agent
    if _agent is None:
        model = ChatOllama(model=OLLAMA_LLM_MODEL, base_url=OLLAMA_BASE_URL)
        _agent = create_agent(model, [retrieve_context], system_prompt=SYSTEM_PROMPT)
    return _agent

def run_query(question: str) -> str:
    agent = _get_agent()
    final_message = None
    for step in agent.stream(
        {"messages": [{"role": "user", "content": question}]},
        stream_mode="values",
    ):
        final_message = step["messages"][-1]
    if final_message is None:
        return "I was unable to find an answer."
    return final_message.content
Model choice and the 8-second constraint
Alexa enforces a hard 8-second response limit. If the skill does not respond in time, Alexa drops the session and tells the user there was a problem. This is a real constraint that shapes every model choice in this pipeline.
I initially used gemma4:26b which produced excellent answers but took around 62 seconds end-to-end. That is completely unusable with Alexa. Switching to llama3.2:3b brought the response time down to around 3.3 seconds — well within the limit, with enough headroom to absorb the occasional slow retrieval. The answer quality is slightly lower, but for a voice interface where responses need to be short and punchy anyway, it is the right trade-off.
Alexa Hosted Skill
The Alexa Hosted Skill is the voice-facing half of this solution. It is a Node.js Lambda function that Amazon hosts for free as part of the Alexa Hosted Skills program. You write the handler code, paste it into the Alexa Developer Console, hit deploy, and Amazon takes care of running it. No AWS account, no Lambda configuration, no IAM roles to set up.
Interaction model
Every Alexa skill starts with an interaction model — a definition of what the skill can understand. For this solution, the model defines one custom intent called QueryIntent, which has a single slot of type AMAZON.SearchQuery. This slot type is specifically designed to capture open-ended natural language queries, which is exactly what we need — the user should be able to ask anything about their knowledge base in their own words, not pick from a fixed list of phrases.
Alongside QueryIntent, the model includes the standard built-in intents: AMAZON.HelpIntent, AMAZON.StopIntent, AMAZON.CancelIntent, and AMAZON.FallbackIntent. These are required for a well-behaved Alexa skill and handle common user interactions like asking for help or stopping the session gracefully.
Handling the query intent
When the user asks a question, Alexa identifies the QueryIntent, extracts the question text from the slot, and passes it to the QueryIntentHandler. The handler calls the local retrieval service and speaks the answer back. If the retrieval service fails for any reason, it falls back to a polite error message rather than crashing the session.
const QueryIntentHandler = {
    canHandle(handlerInput) {
        return Alexa.getRequestType(handlerInput.requestEnvelope) === 'IntentRequest'
            && Alexa.getIntentName(handlerInput.requestEnvelope) === 'QueryIntent';
    },
    async handle(handlerInput) {
        const query = Alexa.getSlotValue(handlerInput.requestEnvelope, 'query') || '';
        let answer;
        try {
            answer = await callRetrievalService(query);
        } catch (err) {
            console.error('Retrieval service error:', err.message);
            answer = ERROR_MESSAGE;
        }
        return handlerInput.responseBuilder
            .speak(answer)
            .reprompt('Is there anything else you would like to know?')
            .getResponse();
    }
};
Calling the retrieval service
The callRetrievalService function handles the HTTP call to the local retrieval service over the ngrok tunnel. It constructs a Basic Auth header from the configured credentials, sends the question as a JSON POST body, and parses the answer out of the response. A 5-second timeout is enforced on the request — this leaves a 3-second buffer before Alexa’s hard 8-second cutoff, accounting for any network overhead through the tunnel.
function callRetrievalService(query) {
    return new Promise((resolve, reject) => {
        const targetUrl = new URL(`${RETRIEVAL_SERVICE_URL}/query`);
        const body = JSON.stringify({ query });
        const auth = Buffer.from(`${RETRIEVAL_AUTH_USER}:${RETRIEVAL_AUTH_PASS}`).toString('base64');

        const options = {
            hostname: targetUrl.hostname,
            port: targetUrl.port || (targetUrl.protocol === 'https:' ? 443 : 80),
            path: targetUrl.pathname,
            method: 'POST',
            headers: {
                'Content-Type': 'application/json',
                'Content-Length': Buffer.byteLength(body),
                'Authorization': `Basic ${auth}`
            }
        };

        const client = targetUrl.protocol === 'https:' ? https : http;
        const req = client.request(options, (res) => {
            let data = '';
            res.on('data', chunk => { data += chunk; });
            res.on('end', () => {
                try {
                    const parsed = JSON.parse(data);
                    resolve(parsed.answer || ERROR_MESSAGE);
                } catch (e) { reject(e); }
            });
        });

        // Alexa requires a response within ~8s — cap retrieval at 5s
        req.setTimeout(5000, () => {
            req.destroy(new Error('Retrieval service timed out'));
        });

        req.on('error', reject);
        req.write(body);
        req.end();
    });
}
Credentials and configuration
The skill needs three secrets — RETRIEVAL_SERVICE_URL, RETRIEVAL_AUTH_USER, and RETRIEVAL_AUTH_PASS. Rather than hardcode them, they live in a small config.js file that sits next to index.js and simply exports the three values. The handler reads them with an environment-variable-first fallback — a value present in the hosted environment wins, and config.js fills in anything that isn’t set:
let localConfig = {};
try { localConfig = require('./config'); } catch (e) { /* no local config */ }

const RETRIEVAL_SERVICE_URL = process.env.RETRIEVAL_SERVICE_URL || localConfig.RETRIEVAL_SERVICE_URL;
const RETRIEVAL_AUTH_USER  = process.env.RETRIEVAL_AUTH_USER  || localConfig.RETRIEVAL_AUTH_USER;
const RETRIEVAL_AUTH_PASS  = process.env.RETRIEVAL_AUTH_PASS  || localConfig.RETRIEVAL_AUTH_PASS;
config.js is gitignored, so real credentials never get committed — the repo ships only a .env.example for reference. To deploy, you upload the skill files — index.js, package.json, and config.js — directly into the Alexa Developer Console Code tab and hit Deploy; Amazon builds and runs them from there. When the ngrok URL changes — which it does on every tunnel restart on the free tier — you update RETRIEVAL_SERVICE_URL in config.js in the Code tab and redeploy. No handler code changes required.
Let’s Deploy It
Here is a complete walkthrough to get the full solution running.
Pre-requisites
Before starting, make sure you have the following in place:
- Ollama installed and running locally. Pull the required models:
ollama pull nomic-embed-text ollama pull llama3.2:3b - Docker and Docker Compose installed
- ngrok installed and authenticated. Sign up at ngrok.com, then:
brew install ngrok ngrok config add-authtoken <your-token> - An Alexa Developer account at developer.amazon.com
- Python with conda and uv installed (for running ingestion locally if needed)
Step 1: Add your documents
Put your .md or .txt files into knowledgebase/docs/. These are the files the knowledge base will be built from.
Step 2: Run ingestion
Activate the conda environment and run the ingestion pipeline to chunk, embed, and store your documents in LanceDB:
conda activate pi-venv
make ingest-run
You should see output like:
Loading documents...
  loaded: aws.md (1 doc(s))
Chunking...
  21 chunk(s)
Embedding and writing to table 'knowledge'...
  21 vector(s) written
Done.
The vectors are written to knowledgebase/vectors/ on your local machine.
Step 3: Configure the retrieval service
Copy the example env file and fill in your credentials:
cp retrieval-service/.env.example retrieval-service/.envEdit retrieval-service/.env and set at minimum:
BASIC_AUTH_USER=your_username
BASIC_AUTH_PASS=your_password
OLLAMA_BASE_URL=http://host.docker.internal:11434
OLLAMA_LLM_MODEL=llama3.2:3b
OLLAMA_EMBED_MODEL=nomic-embed-text
VECTOR_DB_PATH=/knowledgebase/vectors
LANCEDB_TABLE=knowledge
RETRIEVAL_TOP_K=4
Step 4: Build and start the retrieval service
make rs-build
make rs-up
Verify it is running:
make rs-health
# should return {"status":"ok","service":"PI Retrieval"}
Step 5: Start the ngrok tunnel
make rs-tunnelngrok will print an HTTPS URL like https://abc123.ngrok-free.app. Copy this URL — you will need it in the next step.
Step 6: Create the Alexa Hosted Skill
- Go to developer.amazon.com and sign in
- Click Create Skill
- Name the skill whatever you like — this name is what you’ll speak to invoke it. Throughout this walkthrough I use
<skill-name>as a placeholder; substitute your own name wherever you see it. Select the Custom model and Alexa-hosted (Node.js) as the hosting method - Once the skill is created, navigate to the Interaction Model tab
- Open the JSON Editor and paste in the interaction model from
alexa-skill/skill-package/interactionModels/custom/en-US.json. Change theinvocationNamefield to your chosen name (lowercase — e.g."invocationName": "<skill-name>"), then click Save and Build Model
Step 7: Deploy the skill code
- In the Alexa Developer Console, go to the Code tab
- Replace the contents of
index.jswith the code fromalexa-skill/lambda/index.js, and make surepackage.jsonmatchesalexa-skill/lambda/package.json. The spoken greeting is hardcoded near the top ofindex.js(theLAUNCH_MESSAGEconstant reads"Hello, I'm PI...") — update it to your own name so the greeting matches your invocation word - Create a
config.jsfile in the Code tab (same folder asindex.js) and add your credentials — this is the file the handler reads them from:module.exports = { RETRIEVAL_SERVICE_URL: 'https://abc123.ngrok-free.app', // your ngrok HTTPS URL RETRIEVAL_AUTH_USER: 'your_username', // must match BASIC_AUTH_USER in the retrieval service .env RETRIEVAL_AUTH_PASS: 'your_password' // must match BASIC_AUTH_PASS in the retrieval service .env }; - Click Save and Deploy
Step 8: Test with the Alexa Simulator
- Go to the Test tab in the Alexa Developer Console
- Set the skill stage to Development
- Type or say:
open <skill-name> - You should hear: “Hello, I’m <skill-name>. You can ask me questions about the knowledge base. What would you like to know?”
- Ask a question about your documents, for example:
ask about the AWS Well-Architected pillars - Within a few seconds you should get a spoken answer drawn from your local knowledge base
Step 9: Test on a real Alexa device
If your Alexa device is logged in with the same Amazon account as your developer account, the skill is automatically available in development mode. Just say:
Alexa, open <skill-name>Then ask your question. The answer will be spoken back to you directly from your local knowledge base.
Note: The ngrok URL changes every time you restart the tunnel on the free tier. When that happens, update
RETRIEVAL_SERVICE_URLinconfig.jsin the Alexa Developer Console Code tab and redeploy.
Demo
Here is the skill in action on a real Alexa device. I said “Alexa, open <skill-name>” to launch the skill, then asked about the AWS Well-Architected Framework.
While we ask the question, we can check the ngrok logs for the query calls
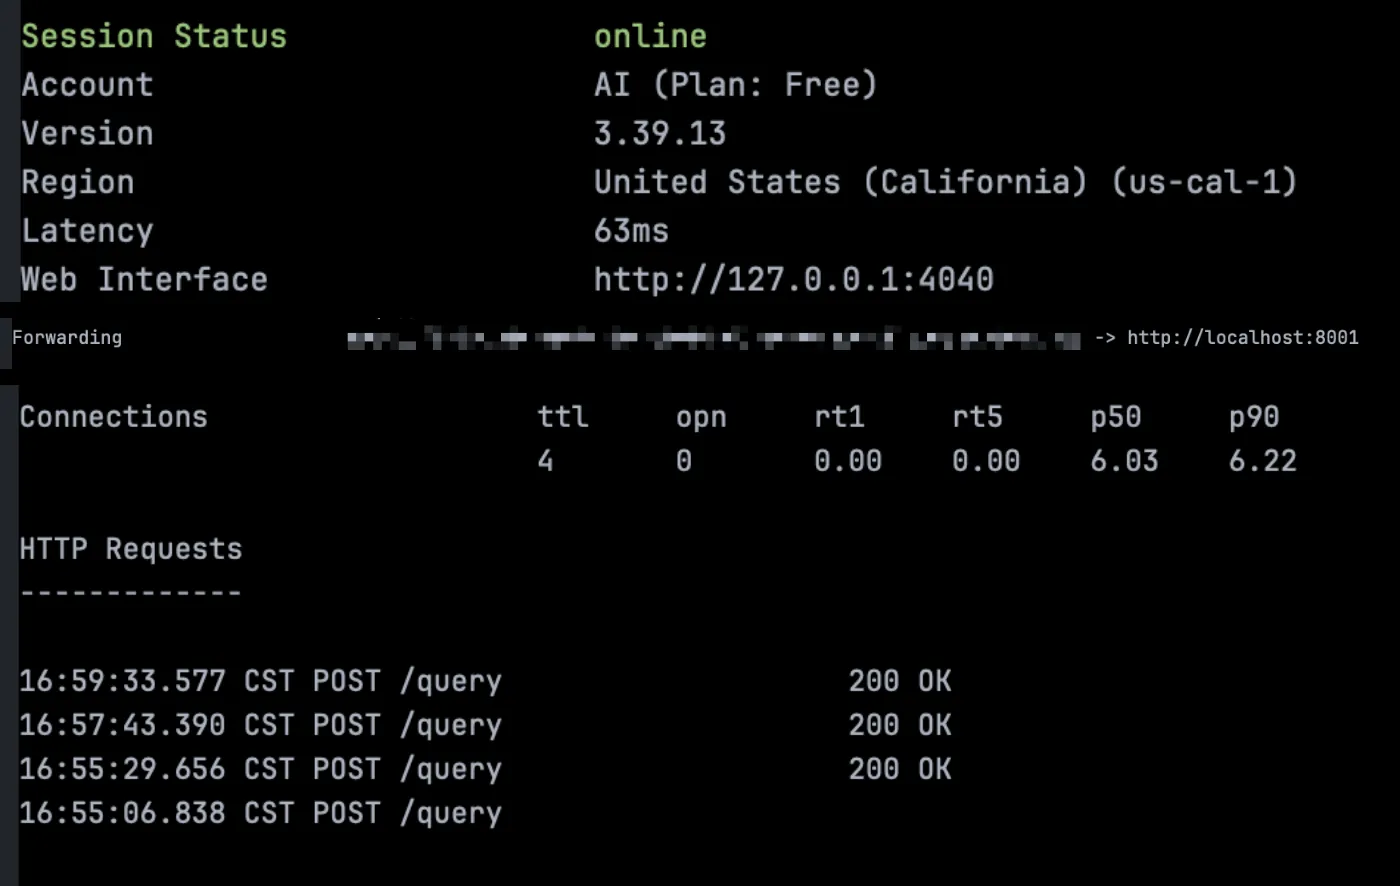
The retrieval service logs on the local machine confirmed the full RAG pipeline ran: the question was embedded, the top matching chunks were pulled from LanceDB, and llama3.2:3b generated the answer in approximately 3.3 seconds — well within Alexa’s 8-second response limit.
Conclusion
What I built here is a voice-powered knowledge base where the intelligence stays local. Your documents never leave your machine, and the embeddings and the language model both run on your own hardware. It is not a fully local system — the Alexa skill itself runs on Amazon’s cloud, since that is what captures your voice and speaks the answer back. But the part that matters for privacy is local: your data and your model stay with you, and only the question and the final answer cross the tunnel.
Getting there takes a few moving parts working together — Ollama for local embeddings and generation, LanceDB for vector search, a FastAPI retrieval service in Docker, an ngrok tunnel, and an Alexa Hosted Skill wired to all of it. None of the pieces are individually hard, but there is real setup involved, and constraints like Alexa’s 8-second response limit shape some of the choices along the way (the switch to a smaller model being the clearest example).
There are obvious next steps if you want to harden this for longer-term use: replacing ngrok with a stable tunnel like Cloudflare Tunnel, adding more documents to the knowledge base, and adding retry and timeout handling around the Ollama calls, hardening the auth and security on the retrieval service. But even in this form it is a working, usable system that I have been using on my own Alexa device.
If you have any questions or want to share what you built with this setup, feel free to reach out from the contacts page. Thanks for reading!
