How to Develop and Deploy an AWS metrics Slack bot using Bedrock Agents and Terraform
As cloud environments grow more complex, real-time observability becomes crucial. Developers and DevOps teams rely heavily on timely metrics to monitor system performance, troubleshoot issues, and ensure uptime. But jumping into dashboards or digging through CloudWatch logs every time an alert fires can be time consuming. That’s where a conversational interface—like a Slack bot—comes in.
In this blog post, you’ll learn how to build a Slack bot that can fetch and respond with AWS metrics on demand. We’ll leverage Amazon Bedrock Agents to provide intelligent, natural language responses powered by foundation models, and use Terraform to provision and manage the infrastructure. By the end, you’ll have a smart, Slack bot that understands questions like “What the highest CPU usage for my EC2 instance?”—and can answer in plain English with live AWS data.
Whether you’re looking to streamline DevOps workflows, build an internal assistant, or simply explore the power of Bedrock and Slack bots together, this guide is for you.
The whole code for this solution is available on Github Here. If you want to follow along, this can be used to stand up your own infrastructure.
By the end of this guide, you will have a fully functional Slack bot running on AWS, leveraging the power of Bedrock agents and foundation models. Let’s get started! 🚀
Pre Requisites
Before I start the walkthrough, there are some some pre-requisites which are good to have if you want to follow along or want to try this on your own:
- Basic AWS knowledge
- An AWS account
- AWS CLI installed and configured
- Terraform installed
- Basic knowledge of Terraform
- Basic knowledge of Slack and how to create a Slack app
- Basic LLM concepts
- Make installed
With that out of the way, lets dive into the details.
What is a Slack bot?
A Slack bot is a programmable user inside your Slack workspace that can interact with users, respond to commands, post messages, and automate tasks. It acts like a virtual assistant, capable of listening to events (like messages or mentions) and responding with useful information or actions.
Under the hood, a Slack bot is typically a backend service—often a serverless function or web server—that communicates with Slack through its Web API and Events API. Bots can be triggered by direct mentions, slash commands (like /metrics), or specific keywords, and they can post rich, interactive messages back to channels or users.
In this blog, the Slack bot serves as the interface between your team and AWS, allowing users to ask natural language questions and receive real-time insights—powered by Amazon Bedrock Agents and AWS APIs.
What are Bedrock Agents?
Amazon Bedrock Agents are a managed service that lets you build intelligent, goal-oriented AI assistants powered by foundation models like Claude, Titan, or Jurassic. These agents can plan, reason, and interact with external systems (like APIs or databases) to complete multi-step tasks based on natural language input. Unlike simple prompt-based responses, Bedrock Agents can:
- Understand user intent
- Select the right tools (called functions or actions) to fulfill a request
- Manage memory and context across interactions
- Call APIs securely using pre-defined schemas In this blog, we use a Bedrock Agent to interpret user queries like “What’s the highest CPU usage on my EC2 instances?” and orchestrate the necessary steps to retrieve metrics from AWS APIs. By offloading the orchestration logic to the agent, we can keep the bot logic lightweight while delivering powerful, context-aware responses.
Solution Overview
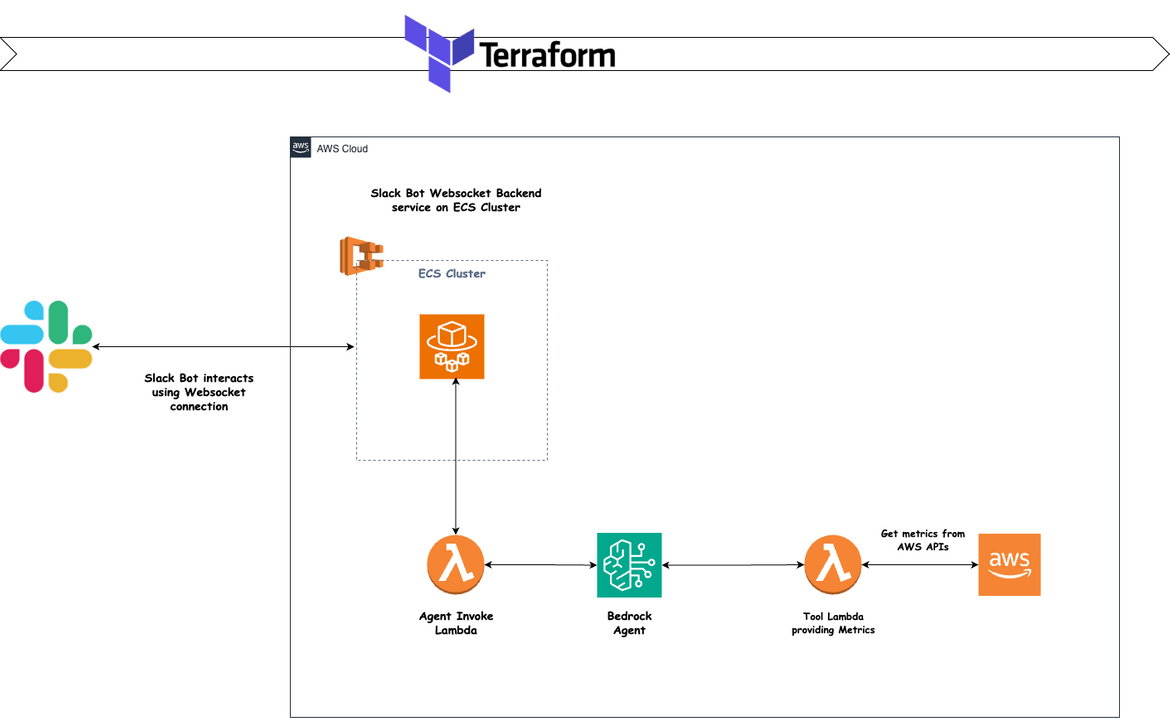
Below image shows a high level view of how the solution works
- User sends a message in Slack asking for any AWS metrics. The message is sent to a specific channel on Slack
- A Slack bot interacts with an AI agent which performs the task of gathering the necessary metrics asked by the user
- The AI agent processes the request, retrieves the necessary data from AWS APIs, and formulates a response.
- The response is sent back to the Slack bot, which then posts it in the Slack channel.
Slack acts as a frontend for interacting with the AI agent that is responsible for gathering and processing the AWS metrics.
Slack Bot Technology Stack
Now lets see the technology stack used to build the Slack bot and the backend services. Below image shows the key components involved in the architecture:
Slack Bot App
The Slack Bot App is the core component that interacts with users in the Slack workspace. It listens for messages, processes commands, and communicates with the AI agent to fulfill user requests. This is created as an App on the Slack console. The Bot has been created and added to a channel on Slack. We will go through the process below

Networking
As part of this, different networking components are deployed on AWS to handle different data flows and communications. Some of the components which get deployed are:
- VPC
- Subnets
- Security Groups
- Route Tables
- Internet Gateway
- NAT Gateway
These are defined in the Terraform scripts.
resource "aws_vpc" "appvpc" {
  cidr_block           = "10.1.0.0/16"
  enable_dns_hostnames = true

  tags = {
    Name = "appvpc"
  }
}

resource "aws_internet_gateway" "app_gw" {
  vpc_id = resource.aws_vpc.appvpc.id

  tags = {
    Name = "app_gw"
  }

}


resource "aws_route_table" "app_rt_public" {
  vpc_id = resource.aws_vpc.appvpc.id

  route {
    cidr_block = "0.0.0.0/0"
    gateway_id = resource.aws_internet_gateway.app_gw.id
  }

  tags = {
    Name = "app_rt_public"
  }
}

resource "aws_subnet" "app_public" {
  count                   = 2
  cidr_block              = cidrsubnet(aws_vpc.appvpc.cidr_block, 8, 2 + count.index)
  availability_zone       = data.aws_availability_zones.available_zones.names[count.index]
  vpc_id                  = aws_vpc.appvpc.id
  map_public_ip_on_launch = true
  tags = {
    Name = "app_public_subnet"
  }
}
ECS Cluster
The ECS Cluster is where the containerized application runs. Here it houses the Websocket service that connects the Slack Bot to the backend AI agents. It is defined in the Terraform scripts as follows:
resource "aws_ecs_cluster" "app_cluster" {
  name = "app-cluster"
  setting {
    name  = "containerInsights"
    value = "enabled"
  }
}
Bot Server Websocket Service
This service opens a websocket connection with the Slack Bot API and handles all the communications with Slack. The bot communicates with this service to get responses. This service also connects to the backend AI agent to get the answer to the questions. The service is deployed as a Fargate service on the ECS cluster. This is also defined in the Terraform. Below is a snippet of the service
resource "aws_ecs_task_definition" "app_task_def" {
  family                   = "app-task-def"
  network_mode             = "awsvpc"
  execution_role_arn       = var.task_role_arn
  task_role_arn            = var.task_role_arn
  requires_compatibilities = ["FARGATE"]
  cpu                      = 2048
  memory                   = 4096

  container_definitions = <<DEFINITION
[
  {
    "image": "${data.aws_caller_identity.current.account_id}.dkr.ecr.us-east-1.amazonaws.com/app-repo:bot-server",
    "cpu": 2048,
    "memory": 4096,
    "name": "app-task-container",
    "networkMode": "awsvpc",
    "portMappings": [
      {
        "containerPort": 3000,
        "hostPort": 3000
      },
      {
        "containerPort": 443,
        "hostPort": 443
      }
    ],
Agent Invoke Lambda
This Lambda function is responsible for invoking the Bedrock agent to perform all the heavy lifting for the bot. It takes the user query from the Slack Bot via the Websocket service, processes it, and sends it to the Bedrock agent for a response. The response is then sent back to the websocket service for delivery to the user. This Lambda is invoked by the Bot server service every time a user sends a message to the Slack Bot. The Lambda gets deployed from a Container image and defined in the Terraform module. The Bedrock agent details are defined as the environment variables on the function.
resource "aws_lambda_function" "agent_invoke_lambda" {
  function_name = "agent-invoke-lambda"
  role          = var.tool_lambda_role_arn
  memory_size = 1024
  timeout       = 300
  image_uri     = "${data.aws_caller_identity.current.account_id}.dkr.ecr.${var.region}.amazonaws.com/${var.app_ecr_repo_name}@${data.aws_ecr_image.agent_invoke_lambda_image.id}"
  package_type  = "Image"
  environment {
    variables = {
      AGENT_ID = var.agent_id
      AGENT_ALIAS = var.agent_alias
      AWS_REGION_NAME = var.region
      RUN_MODE = "remote"
    }
  }
  tags = {
    Name = "agent-tool-lambda"
    # Environment = var.environment_val
    # Application = "reminder-svc"
  }
}
The code for this is developed in Python. The code simply takes the input message and invokes the Bedrock agent with it as input. The response is sent back as response from the Lambda.The code is then dockerized to be deployed as Lambda.
def lambda_handler(event, context):
    logger.debug(f"Payload: {event}")
    print(f"Payload: {event}")
    payload_body=json.loads(event.get('body', '{}'))
    input_text = payload_body.get('inputText', 'Hello from Lambda!')
    session_id = payload_body.get('sessionId', str(uuid.uuid4()))
    logger.info(f"Input Text: {input_text}")
    logger.info(f"Session ID: {session_id}")
    try:
        response = client.invoke_agent(
            agentId=agent_id,
            agentAliasId=agentalias,
            inputText=input_text,
            sessionId=session_id
        )
        logger.info(f"Response: {response}")
        completion = ""
        for completion_event in response.get("completion", []):
            chunk = completion_event.get("chunk", {})
            if "bytes" in chunk:
                completion += chunk["bytes"].decode()
FROM public.ecr.aws/lambda/python:3.11.2025.06.19.12-x86_64
RUN yum update -y && \
yum install -y python3 python3-dev python3-pip gcc && \
rm -Rf /var/cache/yum
COPY requirements.txt ./
COPY lambda_app.py ./
CMD ["lambda_app.lambda_handler"]Bedrock Agent
The Bedrock Agent is a crucial component of this architecture. It is responsible for processing the user queries received from the Slack Bot and generating appropriate responses. The agent is developed to use an external tool as an API, which will assist in fetching the AWS metrics. The agent is defined using a LLM model from AWS bedrock. I am using the Anthropic Claude Sonnet 3.5 model for the agent I am configuring. The agent defined here has access to the tool in form of a Lambda.
resource "aws_bedrockagent_agent" "metrics_agent" {
  agent_name                  = "metrics-agent"
  agent_resource_role_arn     = var.agent_role_arn
  idle_session_ttl_in_seconds = 500
  foundation_model            = "anthropic.claude-3-5-sonnet-20240620-v1:0"
  instruction = var.agent_instructions
  prepare_agent = true
  skip_resource_in_use_check = true
}
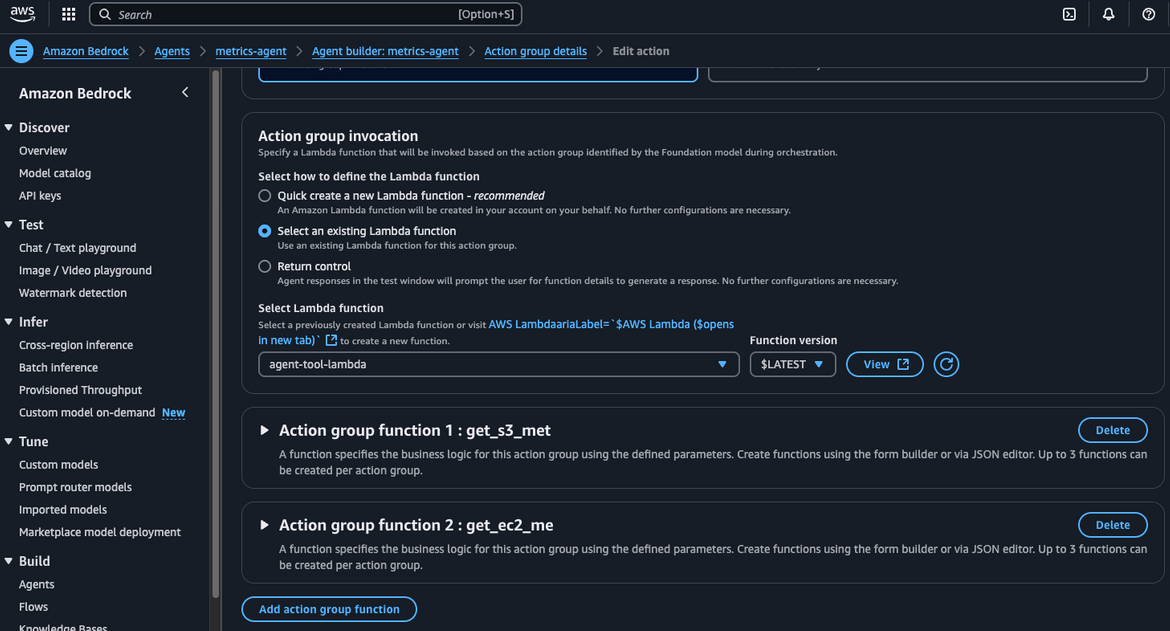
Tools added to the Agent action group
Tool Lambda for metrics
This lambda function is responsible for interacting with AWS API and fetch the needed metrics. This Lambda is provided to the Bedrock agent as a tool for it to get the AWS metrics. This Lambda is defined as a set of Python functions which perform the different actions. The name of the functions and the needed parameters are defined in the Bedrock agent to let the agent know the structure of this tool. For a Lambda to be added as a tool, there needs to be some specific format in the response. You can find that in the code repo. Here is a snippet from the Lambda
def lambda_handler(event, context):
    # get the action group used during the invocation of the lambda function
    actionGroup = event.get('actionGroup', '')

    # name of the function that should be invoked
    function = event.get('function', '')

    # parameters to invoke function with
    parameters = event.get('parameters', [])
    input_param= get_named_parameter(event, 'metric_type')

    try:

        if function == 'get_s3_metrics':
            response = str(get_s3_metrics())
            responseBody = {'TEXT': {'body': json.dumps(response)}}
        elif function == 'get_ec2_metrics':
            response = str(get_ec2_metrics())
            responseBody = {'TEXT': {'body': json.dumps(response)}}
        else:
            responseBody = {'TEXT': {'body': 'Invalid function'}}

        action_response = {
            'actionGroup': actionGroup,
            'function': function,
            'functionResponse': {
                'responseBody': responseBody
            }
        }

        function_response = {'response': action_response, 'messageVersion': event['messageVersion']}
        print("Response: {}".format(function_response))
The lambda is deployed as container. It is defined in the Terraform to be deployed from a container image. This lambda gets invoked by the agent every time a relevant question is asked.
resource "aws_lambda_function" "agent_tool_lambda" {
  function_name = "agent-tool-lambda"
  role          = var.tool_lambda_role_arn
  memory_size = 1024
  timeout       = 300
  image_uri     = "${data.aws_caller_identity.current.account_id}.dkr.ecr.${var.region}.amazonaws.com/${var.app_ecr_repo_name}@${data.aws_ecr_image.agent_tool_lambda_image.id}"
  package_type  = "Image"
  tags = {
    Name = "agent-tool-lambda"
  }
}
It uses the AWS SDK for Python (Boto3) to interact with various AWS services and fetch the required metrics. The Lambda function is designed to be lightweight and efficient, ensuring quick responses to the Bedrock agent’s requests. The containerized deployment allows for easy scaling and management of the Lambda function, making it a robust solution for integrating AWS metrics into the Slack bot.
That covers all the components involved in the solution. Now lets see how can we deploy this.
Deploy the stack
Before we start deploying, lets understand the folder structure in my repo if you are following along. Below is the folder structure of the repo
- codes - This folder contains all the code for the different components of the solution. The code for the agent tools,the bot websocket server for Slack communication and the Agent invoke Lambda are all present here. Each component has its own subfolder.
- infrastructure - This folder contains all the Terraform code to deploy the different AWS resources needed for the solution. The resources are divided into logical modules. Each module has its own subfolder.
- Makefile - This file contains all the commands to build and deploy the different components. This is used to simplify the deployment process.
Pre-requisites
Before we start the deployment, there are some pre-requisites which are good to have if you want to follow along or want to try this on your own:
- An AWS account with necessary permissions to create resources like VPC, ECS, Lambda, IAM roles, Bedrock agents etc.
- AWS CLI installed and configured with necessary permissions
- Terraform installed
- Docker installed to build container images
- Make installed to use the Makefile for deployment
- Register for an account on Slack and create a workspace if you don’t have one already.
- Configure an AWS profile in local CLI
Since we are using a model from Bedrock, make sure the AWS account has access to the specific model. You can check that from the Bedrock console. If you don’t see any models, you will need to request access from AWS support. I am using Claude Sonnet 3.5 model from Anthropic in this blog. Click Here for the steps to request access for models in Bedrock.
Create a Slack App
First we will need to create a Slack app which will be used as the bot in our Slack workspace. Follow the below steps to create a Slack app:
- Go to the Slack API page: https://api.slack.com/apps. If needed login to your Slack account.
- Click on “Create New App”.
- Choose “From scratch”.
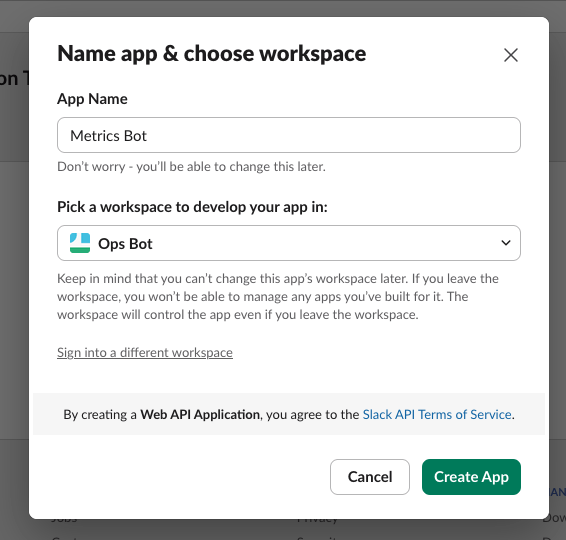
- Enter an App Name (e.g., “AWS Metrics Bot”) and select the workspace
- Click “Create App”. The app will be created. You will be redirected to the app settings page.
- In the left sidebar, click on “OAuth & Permissions”.
- Under “Scopes”, add the following Bot Token Scopes. You can add more as needed by your use case:
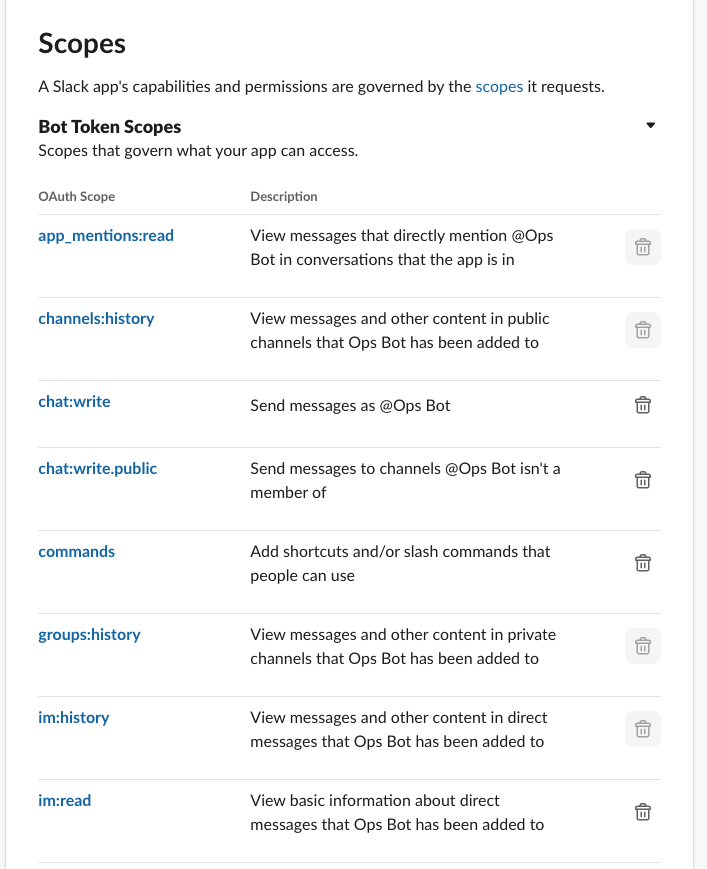
- Click “Save Changes”.
- In the left sidebar, click on “Install App”.
- Click “Install to Workspace” and authorize the app tou your workspace. You will need to be an admin of the workspace to do this.
- After installation, you will see a “Bot User OAuth Token”. Copy this token as you will need it later.
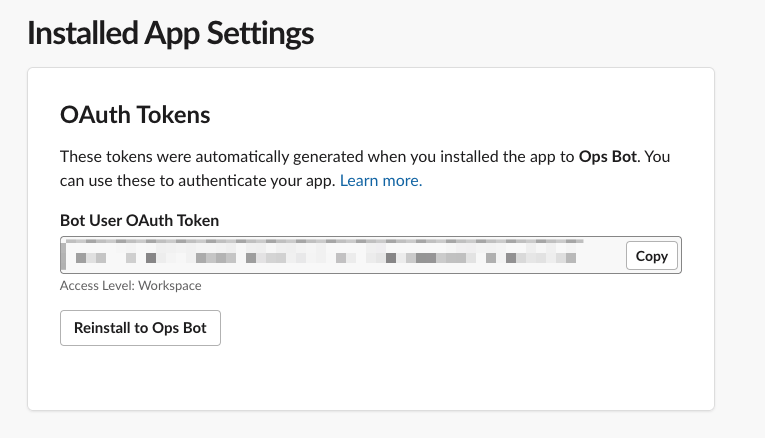
- In the left sidebar, click on “App Home”.
- Enable “Show Tabs” for “Messages Tab”
- Click on “Socket Mode” in the left sidebar.
- Enable “Enable Socket Mode”.
- In the left sidebar, click on “Event Subscriptions”.
- Enable “Enable Events”.
- Under “Subscribe to Bot Events”, add the following events:
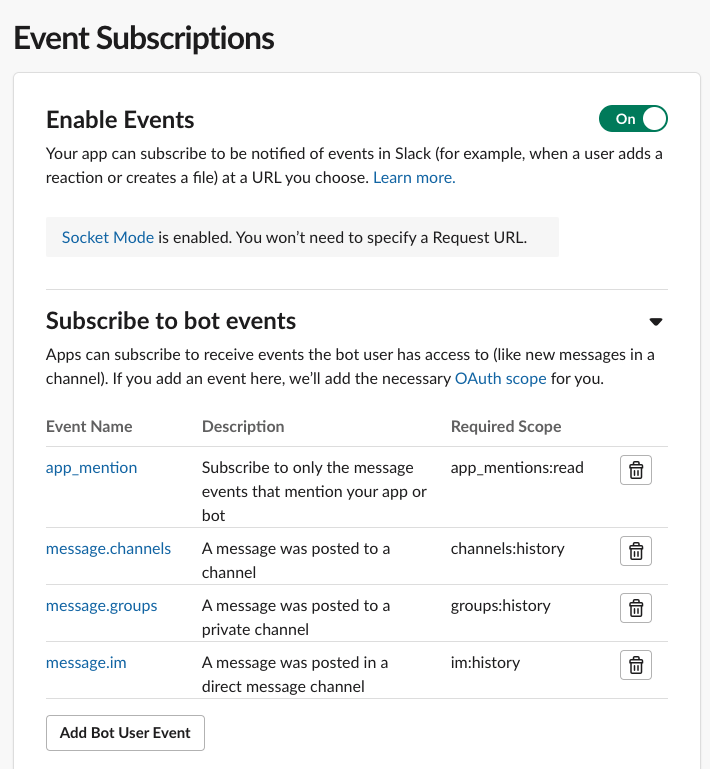
- Click “Save Changes”.
- In the left sidebar, click on “Basic Information”.
- Note down the “Signing Secret” as you will need it later.
- Scroll down to the App-Level Tokens section and click “Generate Token and Scopes”. Add the scope
connections:write,authorizations:readand generate the token. Note down this token as well.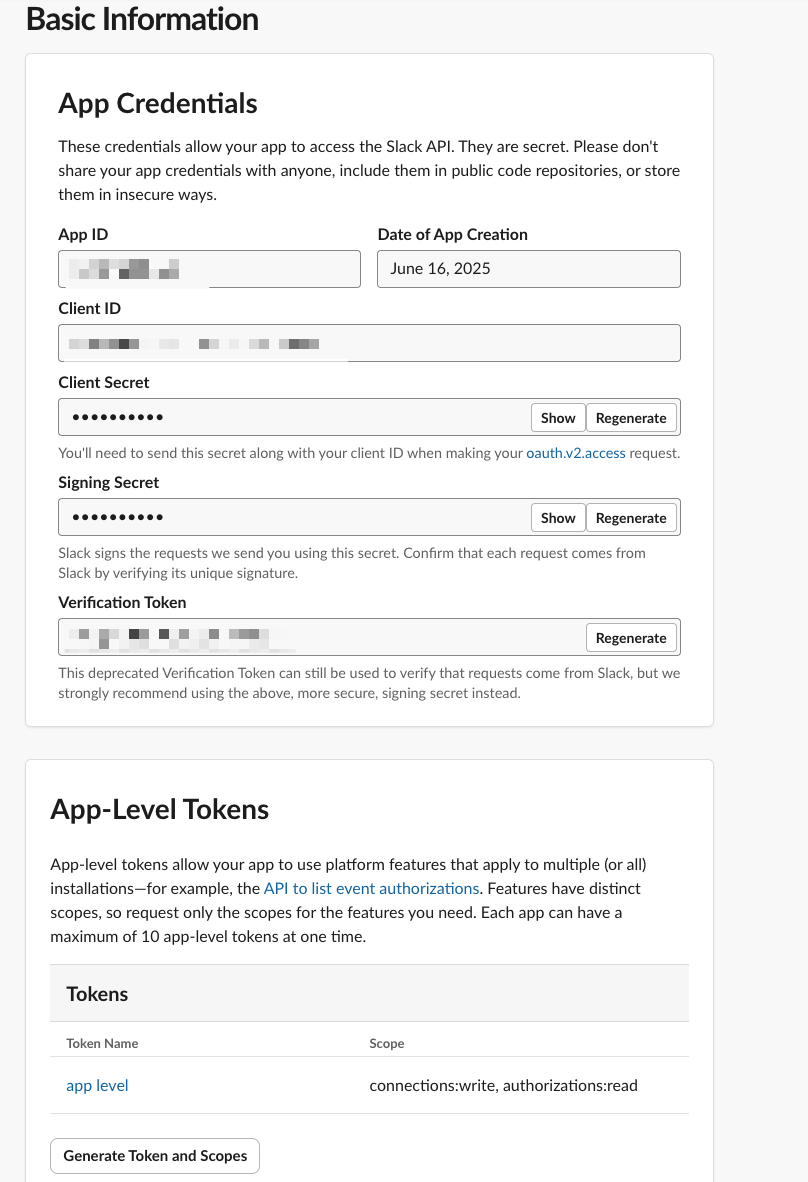
- Finally, invite the bot to a channel in your Slack workspace where you want it to operate. You can do this by typing
/invite @YourBotNamein the desired channel.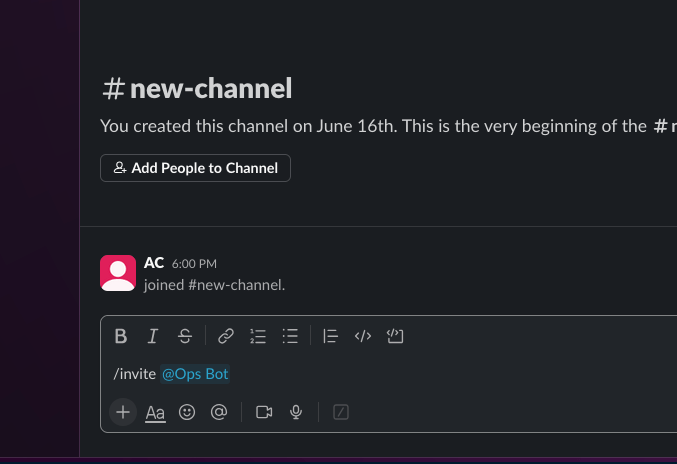
Your bot is now set up and ready to be integrated with the backend services. You will need the Bot User OAuth Token, Signing Secret, and App-Level Token for the deployment process. Keep these handy as we will use them in the next steps.
Run the deployment
To run the deployment, I have added a Makefile to the repo. The Makefile contains the commands to run different parts of the deployment. Follow this sequence of commands to complete the deployment. Lets understand the Make commands first
-
create-app-repo - This command creates an ECR repository to store the container images for the different components.
create-app-repo: @echo "Creating ECR repository for Slack Agent..." @aws ecr describe-repositories --repository-names app-repo --profile $(AWS_PROFILE) || \ aws ecr create-repository --repository-name app-repo --profile $(AWS_PROFILE) -
build-push-bot-server - This command builds the Docker image for the bot server and pushes it to the ECR repository.
build-push-bot-server: @echo "Building Slack Agent Docker image..." @cd codes/slack-ops-bot-server && docker build -t slack-bot-server:latest . @echo "Pushing Docker image to ECR..." @aws ecr get-login-password --region $(AWS_DEFAULT_REGION) --profile $(AWS_PROFILE) | \ docker login --username AWS --password-stdin $(AWS_ACCOUNT).dkr.ecr.$(AWS_DEFAULT_REGION).amazonaws.com @docker tag slack-bot-server:latest $(AWS_ACCOUNT).dkr.ecr.$(AWS_DEFAULT_REGION).amazonaws.com/app-repo:bot-server @docker push $(AWS_ACCOUNT).dkr.ecr.$(AWS_DEFAULT_REGION).amazonaws.com/app-repo:bot-server -
build-push-agent-tool - This command builds the Docker image for the agent tool and pushes it to the ECR repository.
build-push-agent-tool: @echo "Building Slack Agent Lambda Tool Docker image..." @cd codes/agent_tools && docker build -t slack-agent-lambda-tool:latest . @echo "Pushing Docker image to ECR..." @aws ecr get-login-password --region $(AWS_DEFAULT_REGION) --profile $(AWS_PROFILE) | \ docker login --username AWS --password-stdin $(AWS_ACCOUNT).dkr.ecr.$(AWS_DEFAULT_REGION).amazonaws.com @docker tag slack-agent-lambda-tool:latest $(AWS_ACCOUNT).dkr.ecr.$(AWS_DEFAULT_REGION).amazonaws.com/app-repo:agent-tool @docker push $(AWS_ACCOUNT).dkr.ecr.$(AWS_DEFAULT_REGION).amazonaws.com/app-repo:agent-tool -
build-push-agent-invoke - This command builds the Docker image for the agent invoke and pushes it to the ECR repository.
build-push-agent-invoke: @echo "Building Slack Agent Lambda Invoke Docker image..." @cd codes/agent_invoke && docker build -t slack-agent-lambda-invoke:latest . @echo "Pushing Docker image to ECR..." @aws ecr get-login-password --region $(AWS_DEFAULT_REGION) --profile $(AWS_PROFILE) | \ docker login --username AWS --password-stdin $(AWS_ACCOUNT).dkr.ecr.$(AWS_DEFAULT_REGION).amazonaws.com @docker tag slack-agent-lambda-invoke:latest $(AWS_ACCOUNT).dkr.ecr.$(AWS_DEFAULT_REGION).amazonaws.com/app-repo:agent-invoke @docker push $(AWS_ACCOUNT).dkr.ecr.$(AWS_DEFAULT_REGION).amazonaws.com/app-repo:agent-invoke -
1-prep-app - This command runs the above 4 commands in sequence to create the ECR repo and build and push all the container images.
1-prep-app: @echo "Preparing Slack Agent application..." @$(MAKE) create-app-repo @$(MAKE) build-push-bot-server @$(MAKE) build-push-agent-tool @$(MAKE) build-push-agent-invoke -
2-run-terraform-plan - This command runs the Terraform plan to create the necessary infrastructure.
2-run-terraform-plan: @echo "Running Terraform plan..." @cd infrastructure && terraform init && \ terraform plan -
3-deploy-infrastructure - This command applies the Terraform plan to create the infrastructure.
3-deploy-infrastructure:
@echo "Deploying infrastructure using Terraform..."
@cd infrastructure && terraform init && \
terraform apply --auto-approve
Now lets start the deployment commands. Before starting, make sure to update these variables in the Makefile
export AWS_PROFILE ?= <your-aws-profile>
export AWS_DEFAULT_REGION ?= <your-aws-region>
export AWS_ACCOUNT ?= <your-aws-account-id>
Now run this command which will execute the above commands in sequence to prep the app and deploy the infrastructure.
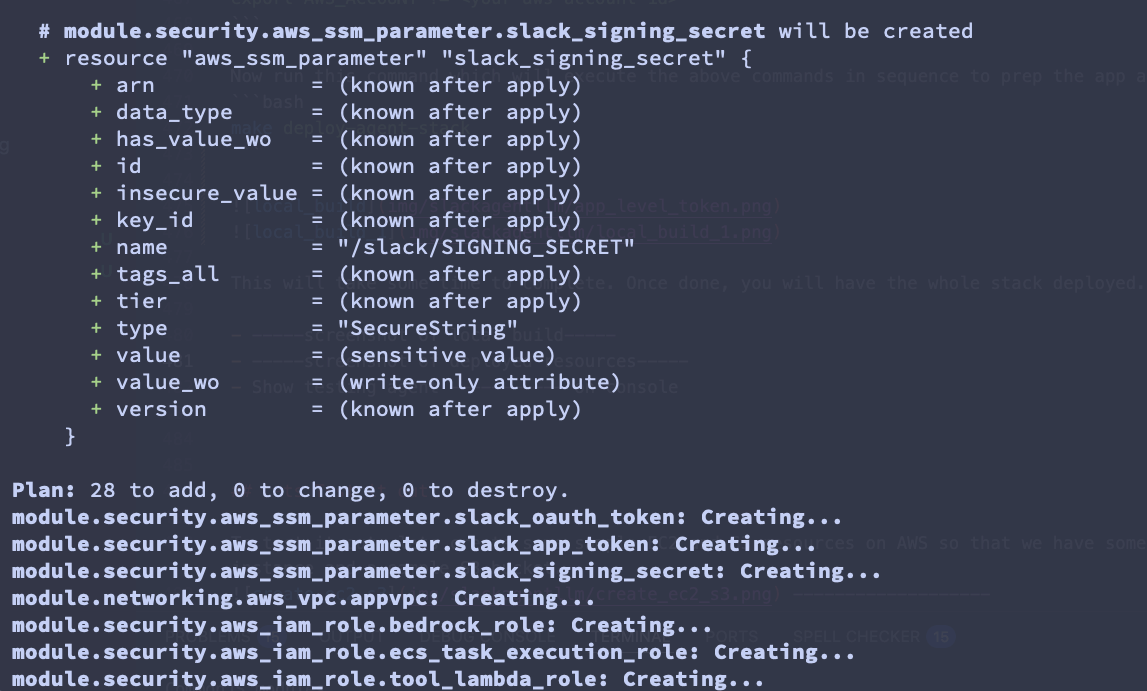
make deploy-agent-stackThis will take some time to complete. Once done, you will have the whole stack deployed. You can verify the different components in the AWS console. Lets see some of the resources on console:
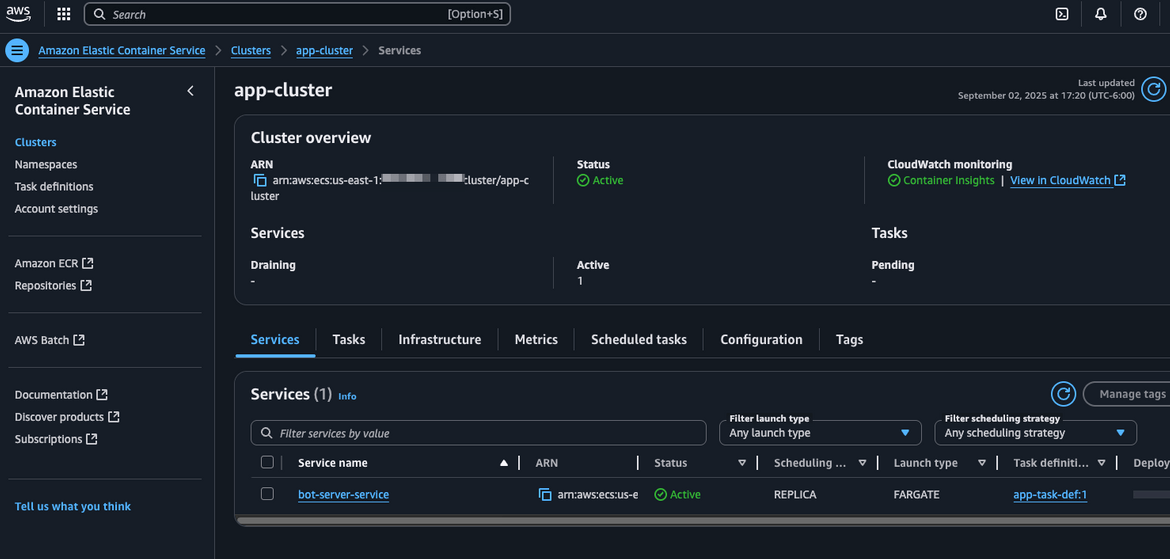
ECS Cluster and service
Agent Lambda Functions
Networking components
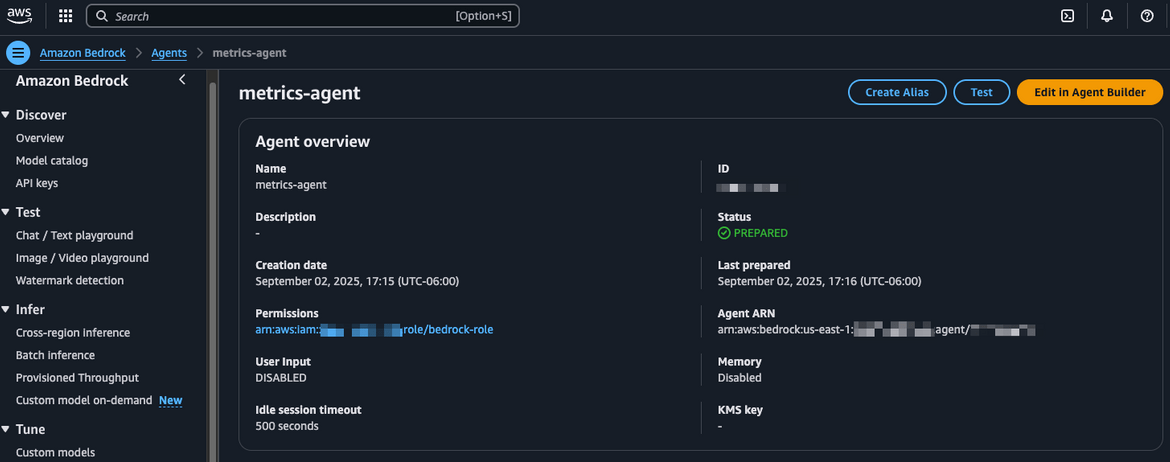
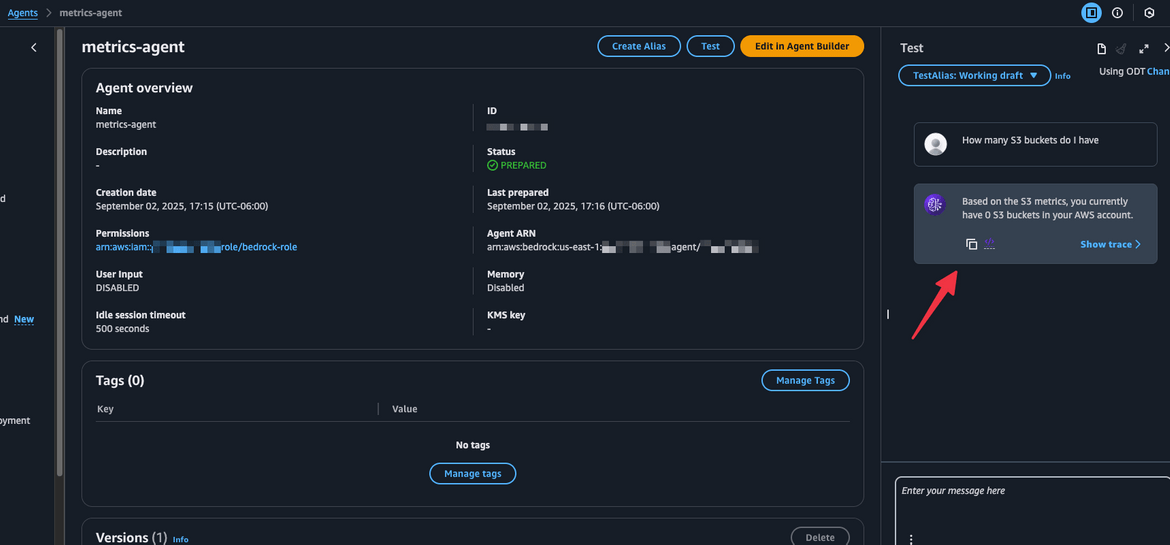
We also have the Bedrock agent created. Lets test the agent from the console to verify it is working fine. Navigate to Bedrock console and go to Agents. Select the agent created. You will get a screen like this. On the right side you will have a chat window to test out the agent. Lets type a test message and see how it behaves. At this point I dont have anything in my AWS account so it should return empty results.
As you can see the agent answered the question querying the AWS API via the tools. Lets see some logs from the tools Lambda. The log shows that the Lambda was triggered to get the S3 API metrics which returned the count of 0 S3 buckets.

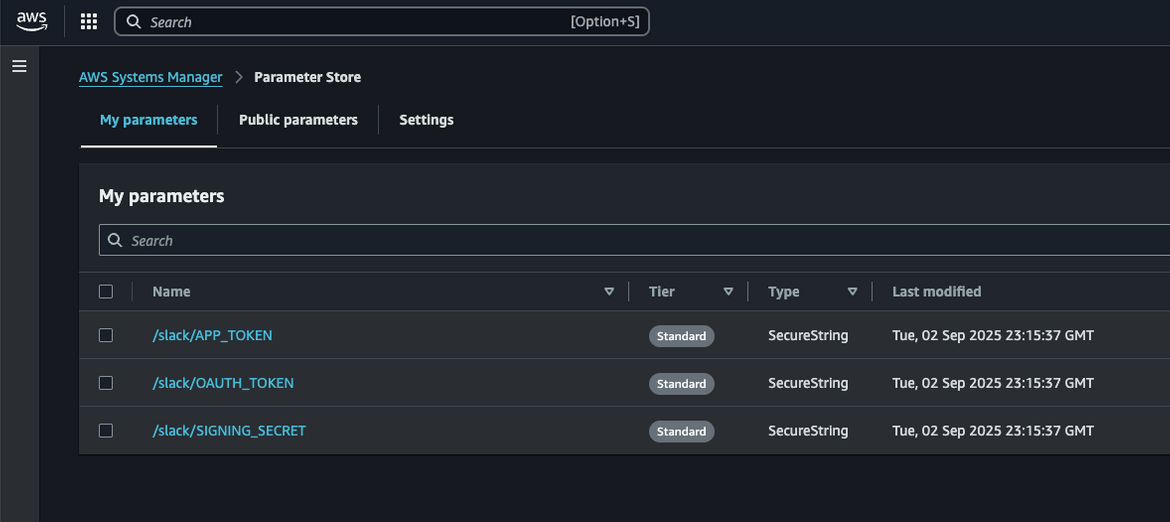
Great! The agent is working fine. Now we are ready to test the whole stack from Slack. Before that we will need to scale up the Bot server service because the Terraform deploys with a count of 0. To scale the service, we will need to first update the SSM parameters passing the Slack bot details. To do that, navigate to the SSM console and then Parameter store. Update these parameters with the respective values copied earlier while creating the Slack bot app.
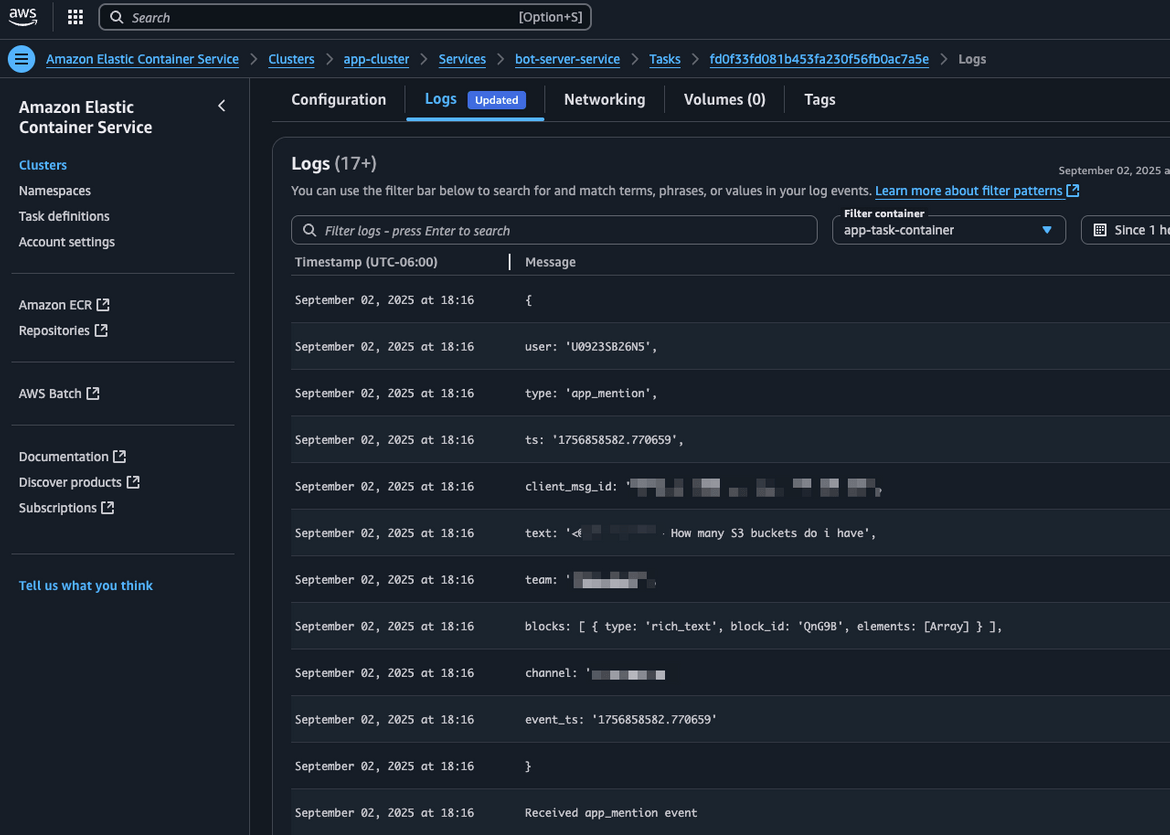
Now go ahead and scale up the service. Navigate to the ECS service and update the desired tasks to 1. It will start spinning up a new task. Wait for the task to be in running state. If there was no error you should see the success message in the logs of the task.
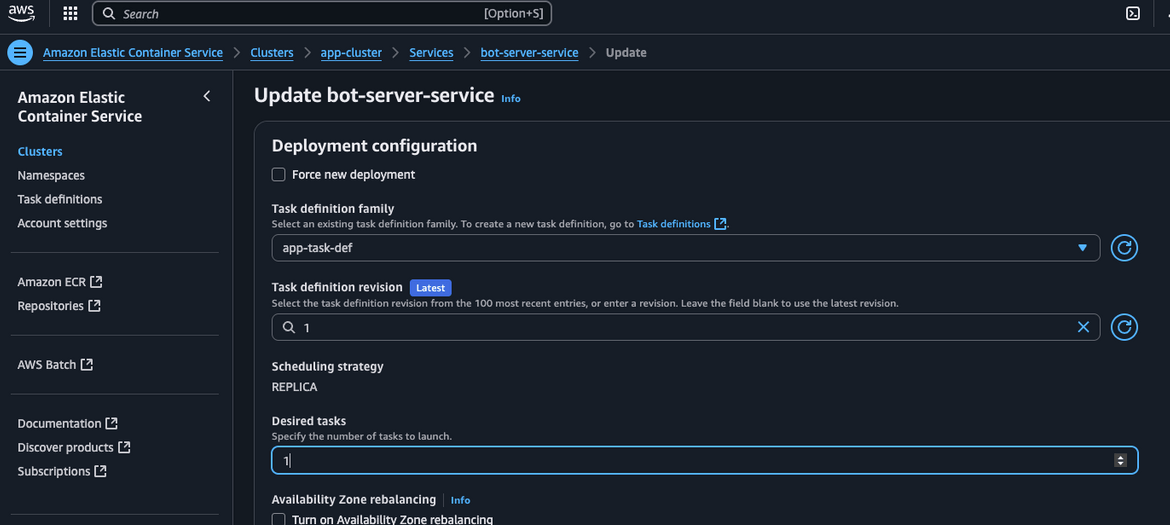
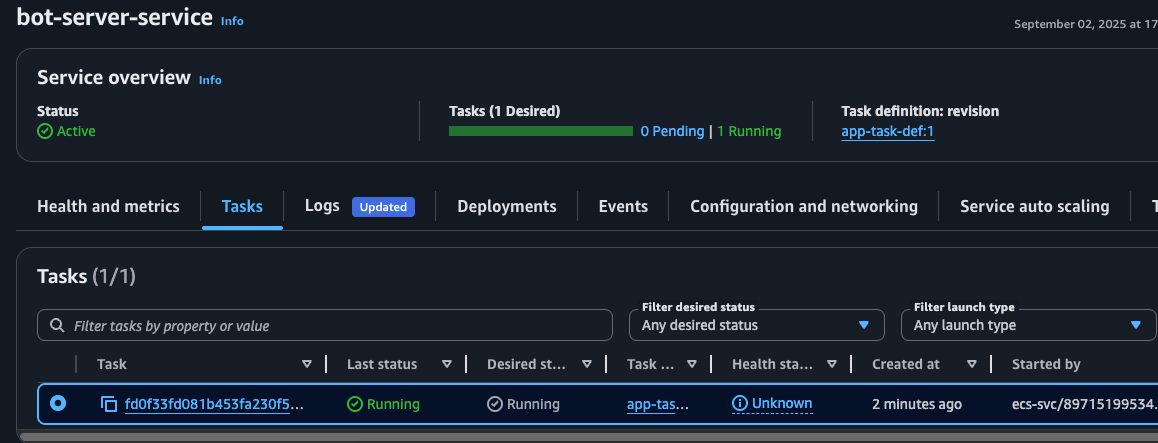
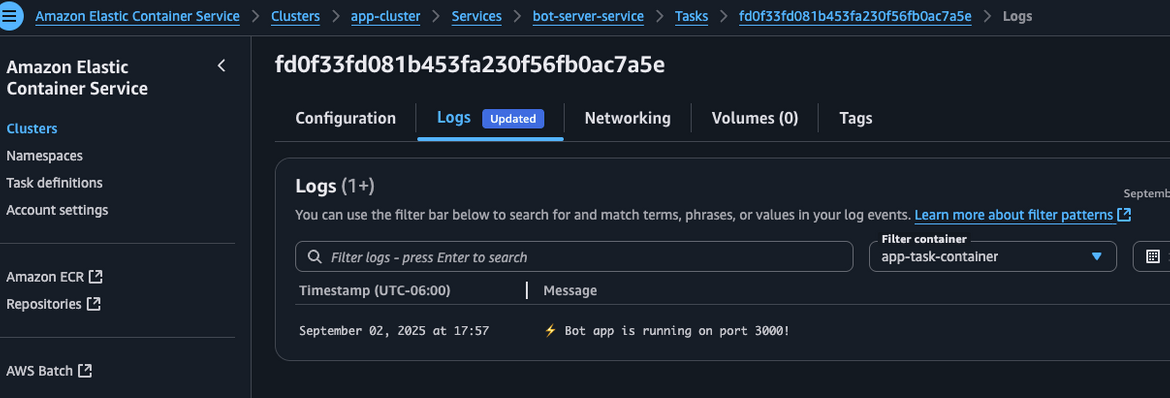
Now the bot server is up and running. We are ready to test the bot from Slack.
Lets Test it out!
To test it out, lets create some sample EC2 and S3 resources on AWS so that we have some metrics to fetch. You can create any resources of your choice. I have created a sample EC2 instance and a sample S3 bucket.
Now go to the Slack workspace where you added the bot. In the channel where the bot is added, type a message asking for some AWS metrics. Question can be asked by tagging the bot like this:
@YourBotName your question. Here are some sample questions I have asked:
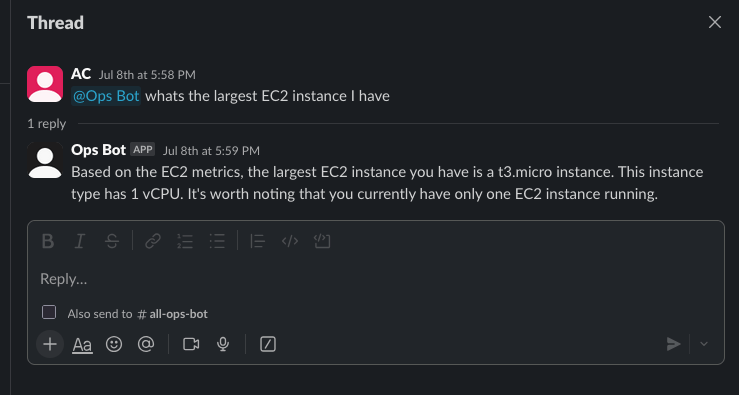
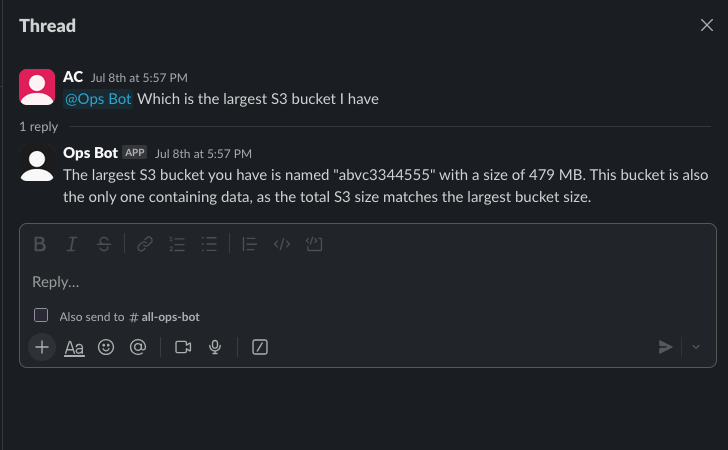
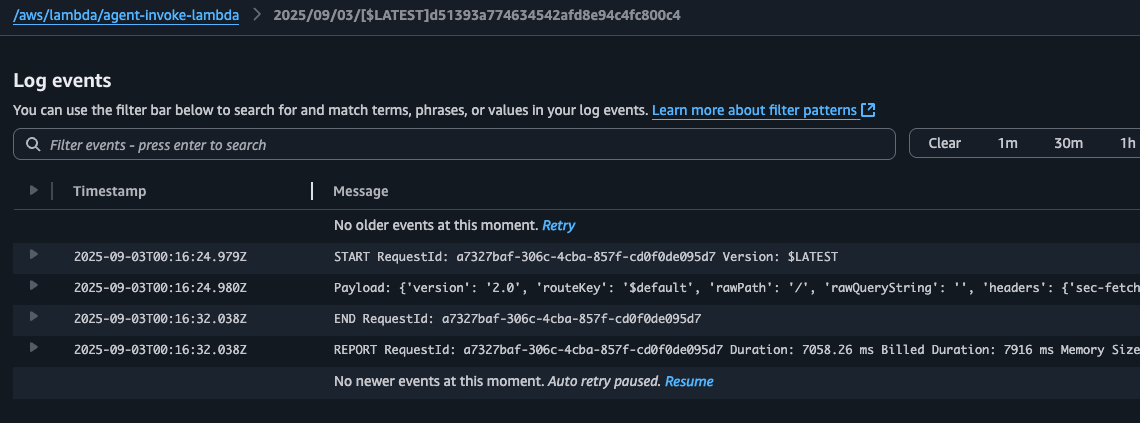
We can see that the bot is able to understand the questions and fetch the relevant metrics from AWS. The bot is able to answer in plain English which makes it easy to understand. You can ask any questions related to AWS metrics and the bot will try to fetch the relevant data. Lets see some of the logs on AWS to view how the different components are interacting.
Logs from the Bot server task
Logs from the Agent Invoke Lambda
Great! The whole stack is working fine. You can now ask any AWS metrics related questions to the bot and it will fetch the relevant data from AWS. This can be extended by adding other tools to the Lambda to extend its capabilities.
Destroy the stack
If you are following along just for learning purposes, you can destroy the stack to avoid any unwanted costs. To destroy the stack, run this command from the Makefile. This will destroy all the resources created by Terraform.
make destroy-infrastructureConclusion
In this blog, we built a Slack bot that uses Amazon Bedrock Agents and deployed using Terraform to provide natural language access to AWS metrics. This solution makes it easy for teams to monitor cloud resources directly from Slack—no need to dig through dashboards or remember metric names. By automating the setup with Terraform, the entire stack is repeatable and scalable. You can easily expand it to include more metrics, cost reports, or alerting features. This is a practical example of how AI and infrastructure as code can simplify cloud operations and boost team efficiency. Hope you enjoyed this blog and found it useful.If any issues or any queries, feel free to reach out to me from the Contact page.

