Using AWS Route 53 Application Recovery Controller for Disaster recovery between regions
When we are running applications in Production on AWS, the availability and reliability of applications and services become very critical to run the applications smoothly.Whether you’re running a global e-commerce platform or a local file-sharing service, a single point of failure can lead to substantial financial loss and erode customer trust. Recently we have seen many instances of entire AWS region being affected which in turn affects the applications. That’s where disaster recovery strategies come into play, ensuring that your applications remain available and functional even in the face of catastrophic events like hardware failures, data corruption, or even natural disasters.
AWS provides multiple options to help with such disaster recovery. One of the options is to deploy the application in multiple regions and use Route 53 to route traffic to the healthy region. This is a very common pattern used for disaster recovery. In this post I will explain how to use AWS Route 53 ARC controller to automate the failover between regions in case of failures where the entire region can go down. This will help in automating the failover process and make it easier to manage.
The GitHub repo for this post can be found Here. If you want to follow along, the repo can be cloned and the code files can be used to stand up your own infrastructure.
Pre Requisites
Before I start the walkthrough, there are some some pre-requisites which are good to have if you want to follow along or want to try this on your own:
- Basic AWS knowledge
- Github account to follow along with Github actions
- An AWS account
- AWS CLI installed and configured
- Basic Terraform knowledge
With that out of the way, lets dive into the details.
Why Disaster Recovery is Crucial?
In recent times, he concept of “uptime” has evolved from a technical jargon term to a key performance indicator for businesses of all sizes. While any amount of downtime can be frustrating, in extreme cases it can spell catastrophe for a business. We have recently seen many instances of entire AWS regions going down. That causes a very disruptive effect on businesses and can cause huge amounts of loss. That’s where disaster recovery comes into play. Some of the important impact points to be considered are:
- Loss of revenue
- Loss of customer trust
- Loss of data
- Loss of productivity
Sometimes these impacts can be huge and can cause a lot of damage to the business. That’s why it is very important to have a disaster recovery strategy in place. With disaster recovery, you can ensure that your applications remain available and functional even in the face of catastrophic events like hardware failures, data corruption, or even natural disasters. You can ensure that the downtime caused by such events is minimal and the business impact is minimal. So a robust disaster recovery plan is not just an IT requirement but a critical business strategy.
What is AWS Route 53 ARC Controller?
As we are talking about disaster recovery, there are many tools and solutions available to have an efficient disaster recovery strategy. AWS Route 53 ARC offers a comprehensive and effective solution for building such a plan, ensuring that when disaster strikes, you’re prepared to maintain business as usual—or get back to it as quickly as possible. It is a service offered by AWS to automate the failover process between regions. It is a fully managed service and is very easy to use. It is a very cost effective solution as well. It is a managed service and you only pay for the resources you use.
Before we understand the ARC controller, we need to understand what is Route 53. It is a highly scalable and reliable Domain Name System (DNS) web service. But Route 53 is more than just a DNS solution; it has evolved to offer a range of features aimed at enhancing application performance and availability. One of the features of Route 53 in the Application Recovery Controller (ARC). It helps with setting up failover between regions in scenarios where the entire region goes down. Some high level capabilities of ARC can be listed as below:
- Automate failover between regions (or same region): Route 53 ARC allows you to orchestrate cross-region failovers, increasing your application’s resilience to region-specific outages.
- High Availability and Scalability: Route 53 ARC is designed to operate at high availability, ensuring that your applications remain accessible even under the most challenging conditions. It’s also built to scale with your needs, making it suitable for both small businesses and large enterprises.
- Routing Controls: These are the building blocks of your recovery strategy, allowing you to define the rules for rerouting traffic. With these controls in place, you can automate failover processes and reduce the time it takes to recover from a disruption.
To read more about ARC controller, you can refer to the AWS documentation.
Overall Tech infrastructure for this post
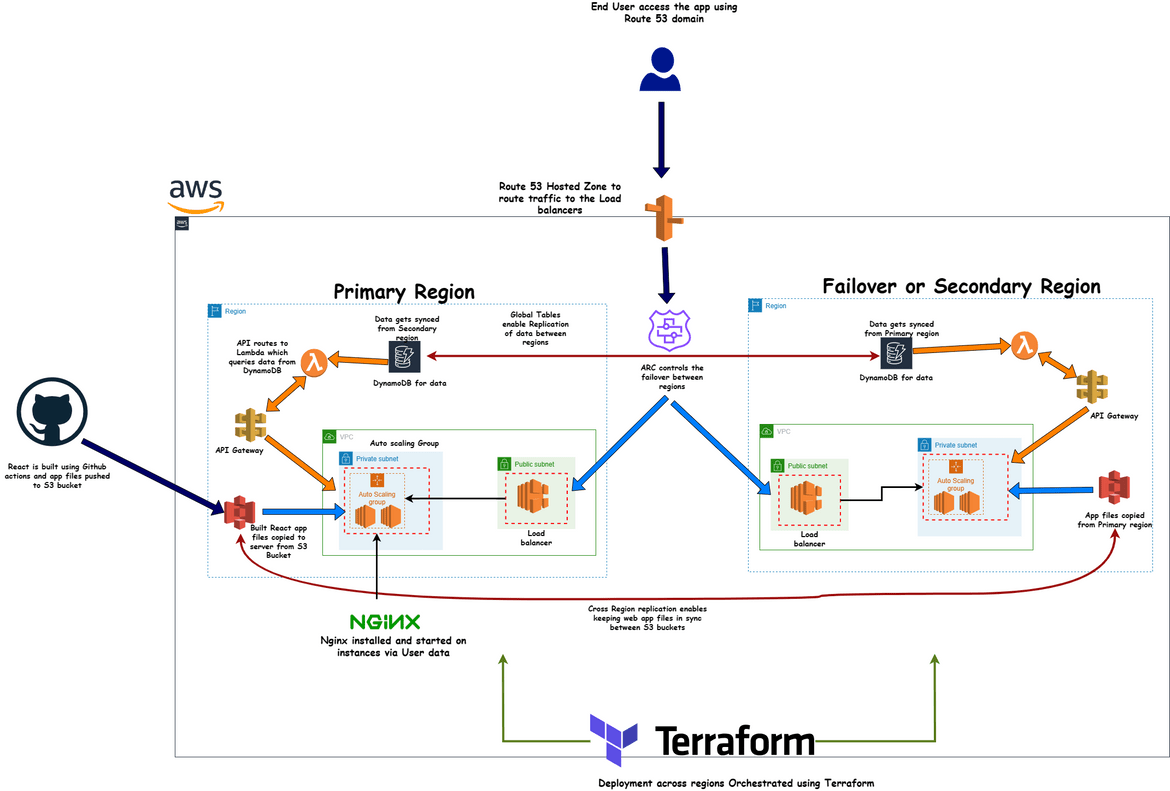
Lets see the example architecture which we will be spinning up in this port to demonstrate the disaster recovery process. The architecture is shown below:
We have the whole setup for the application running in two regions:
- Primary Region: This is the main region for the application
- Failover Region: This is the failover region for the application. In case of a issues in the primary region, the traffic will failover to the components in this region
Lets go through all the components which are involved in this.
- The React App: The sample app which I use here is a simple web app built in React. The app queries a backend API for all data (here its user records). The API returns data from a DynamoDB table the the records are displayed in the UI. To help use see which region is serving the app, it also displays the region from which the app is getting served.

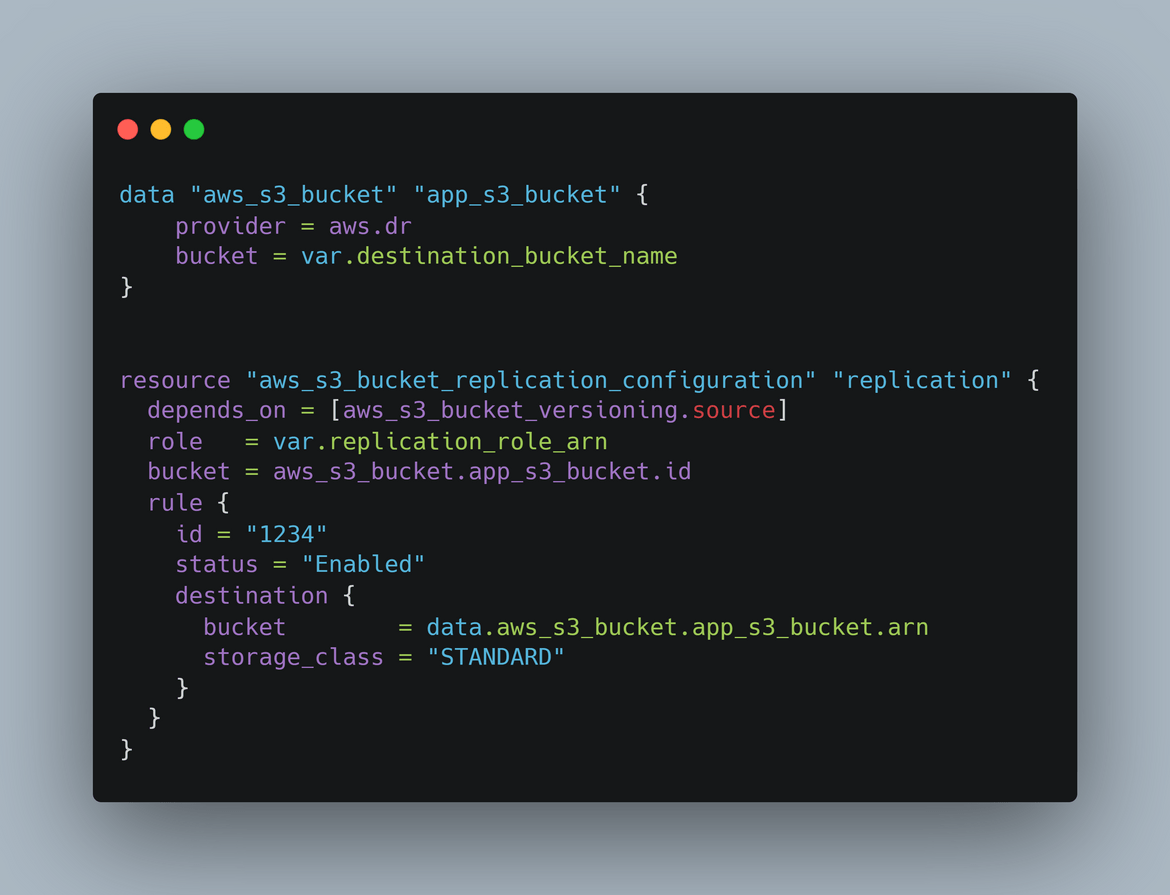
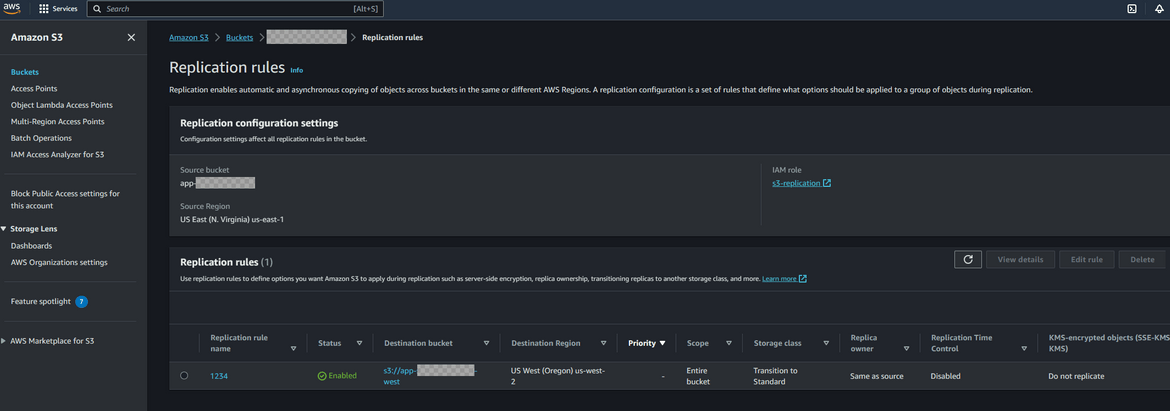
- S3 Bucket for app files: The React app is built and the static files which get generated are uploaded to an S3 bucket. We are not using the website hosting feature of S3 here as I wanted to showcase the failover over EC2. The React build step is being handled by a Github actions workflow which builds the files and uploads them to the S3 bucket. The S3 bucket is created in both primary and secondary regions. To keep the app files in sync, cross region replication is enabled on the S3 bucket in primary region. This enables copying of of files from the primary region S3 bucket to the secondary region S3 bucket. This is enabled in the Terraform module to create the S3 bucket.
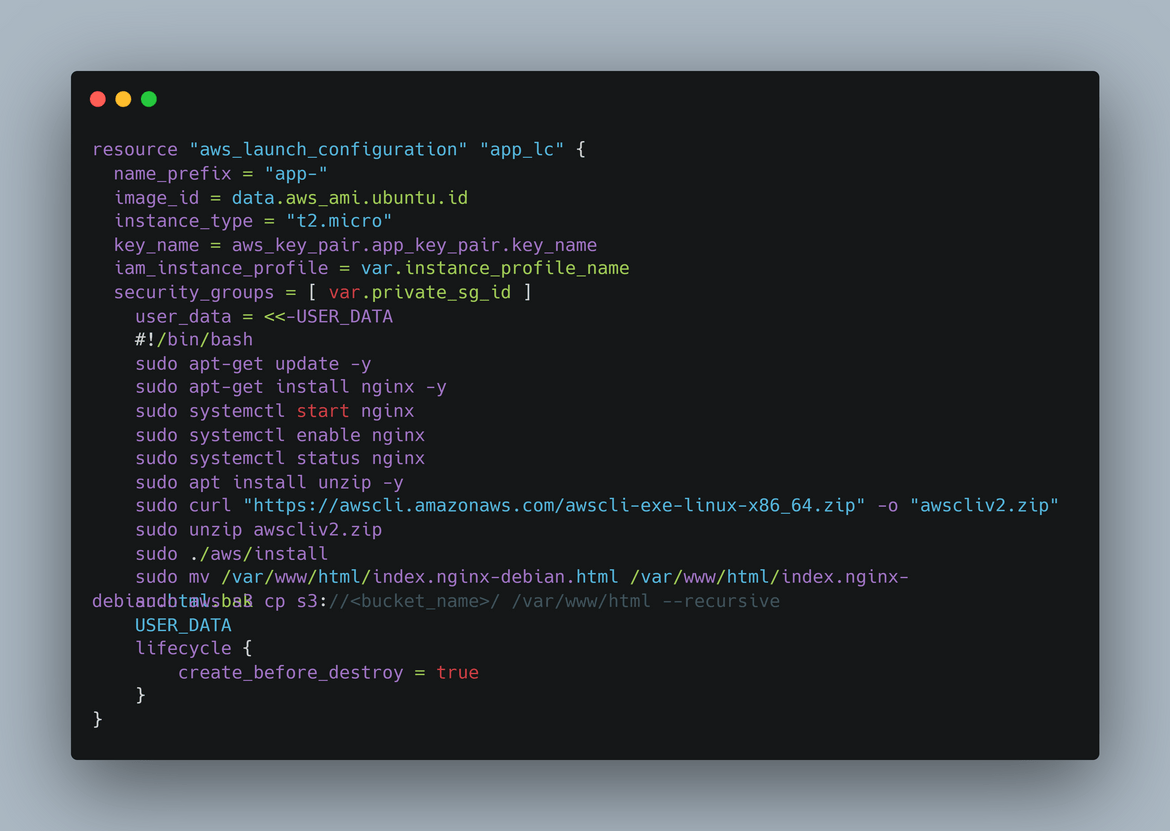
- Auto Scaling Group: The web app gets served from a web server on EC2 instance. I am launching EC2 instances as part of an auto scaling group to have that scalability in the app. Similar Auto scaling groups are launched in both primary and secondary regions. The EC2 instances are launched using a launch template. The launch template is created using Terraform. The launch template also has a user data script which installs the nginx as a service on the instance and starts the server. The user data script also downloads the app files from the S3 bucket and copies to a folder from which Nginx serves the files. The instances get launched in a private subnet as the instances don’t need to get exposed directly to internet because we will have a load balancer exposing the traffic.
- Application Load Balancer: The traffic to the web app is routed through an application load balancer. The load balancer is created in both primary and secondary regions. The load balancer is created in a public subnet as it needs to be exposed to the internet. The load balancer is configured to route traffic to the auto scaling group. Each region will have its own endpoint from the load balancer created in the respective region.
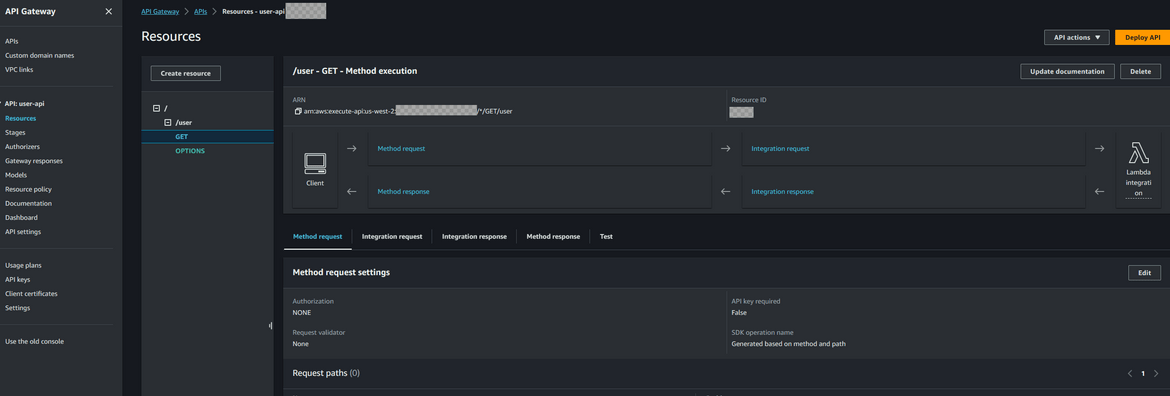
- API Gateway:The API gateway is created in both primary and secondary regions. The API gateway is configured to route traffic to a Lambda function. The app from the EC2 instance calls to this API endpoint to get the data. For this example the API only contains one endpoint which queries all the records.
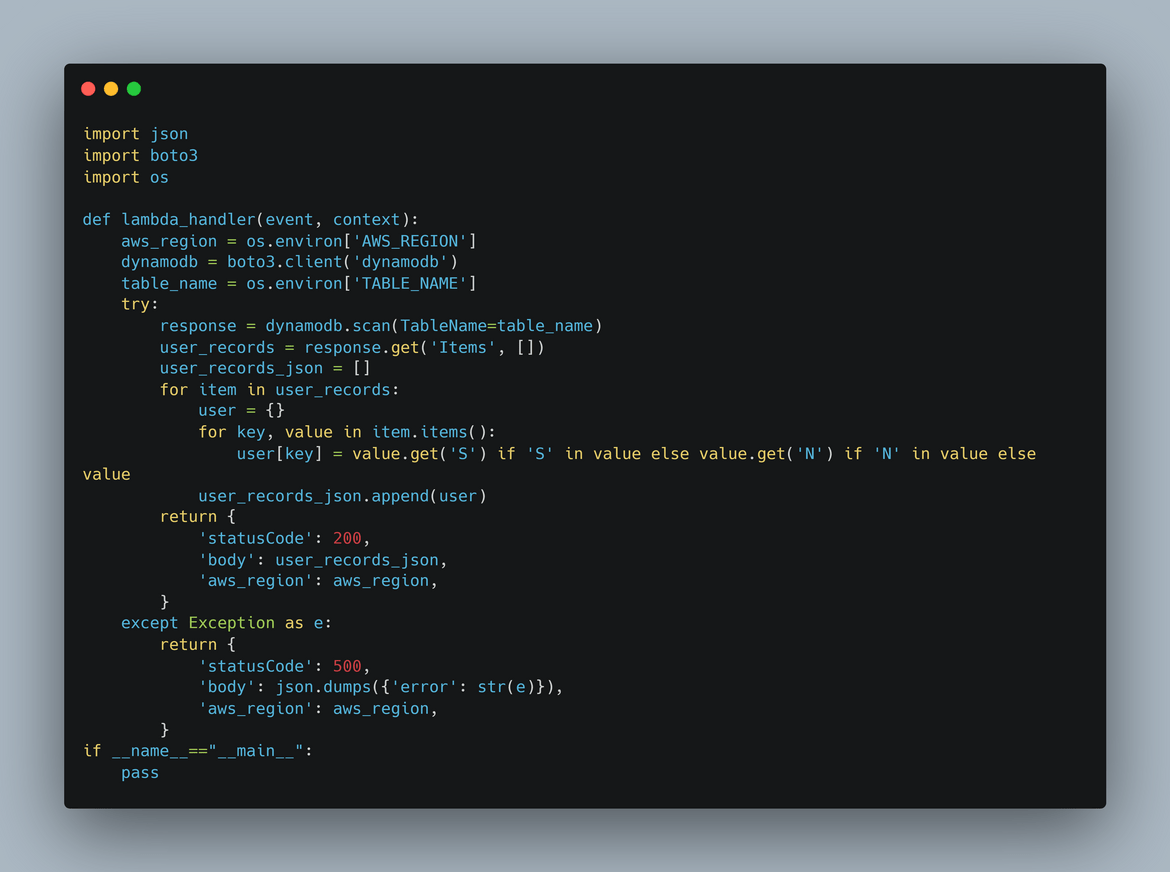
- Lambda Function:The Lambda function is created in both primary and secondary regions. The Lambda function queries the DynamoDB table and returns the data to the API gateway. The Lambda is a Python code which queries the DynamoDB table and returns the data.
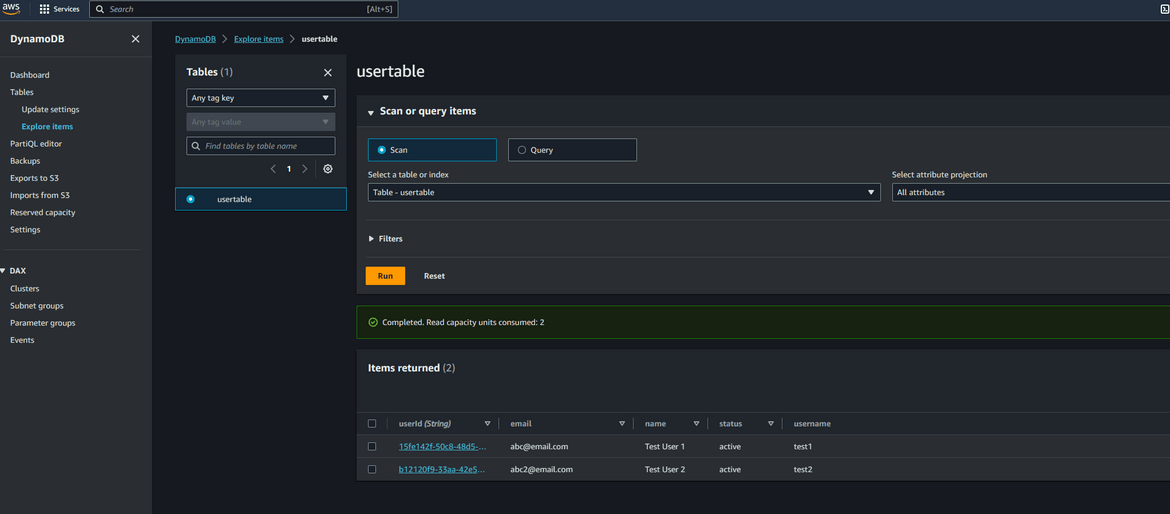
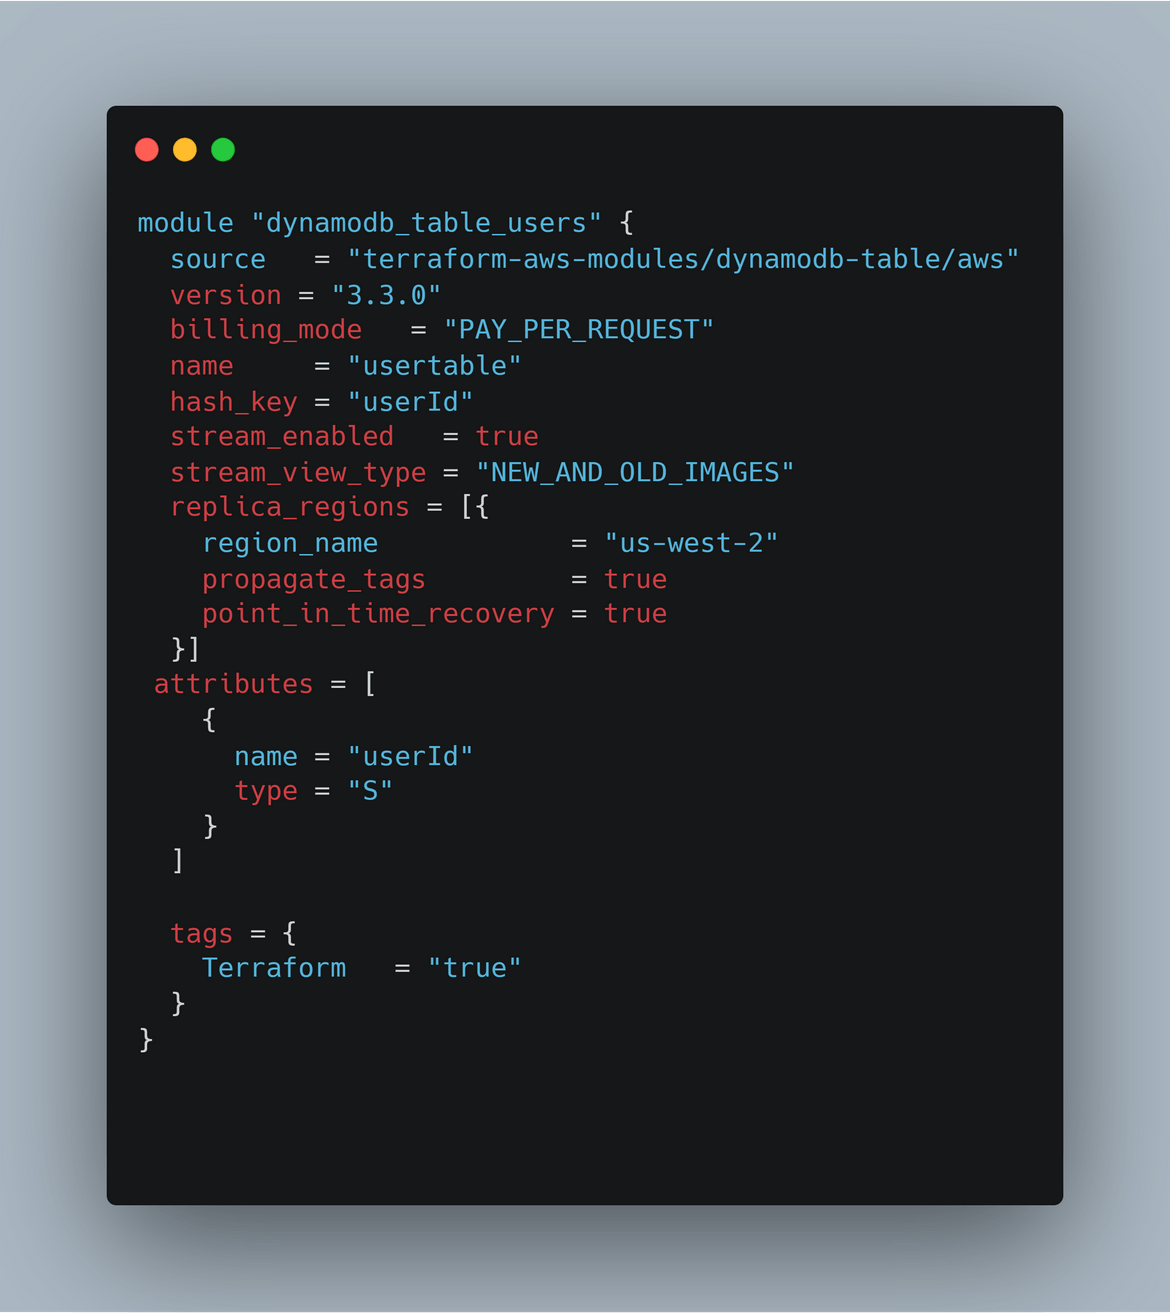
- DynamoDB Table: The DynamoDB table is created in both primary and secondary regions. The table contains the user records which are returned by the API. The Lambda queries this table and returns all the records from it. Since the table is created in both regions, the data has to be replicated between the two regions. So I am enabling Global table on the table in primary region with the table in secondary region as the replica region. This enables replication of data between the regions and keeps data in sync. That way if we have a failover happening to secondary region, the data will be available in the table in secondary region.

-
Route 53 Hosted Zone: To have a single endpoint for the application (regardless of region) I have created a hosted zone on Route 53. For this example I have a custom domain registered for the hosted zone. You can have your own domain setup if you want to follow along. To route traffic to the app components, I have created A records with Alias enabled. There are separate A records created with destination as:
- Primary region load balancer endpoint
- Secondary region load balancer endpoint
- Primary region API gateway endpoint
- Secondary region API gateway endpoint
I will get into details for each of these records when we are deploying the ARC controller.
- Route 53 Application Recovery Controller: An ARC cluster is created to handle the failover between regions. This controls the failover based on the healthchecks from the components. We will see in more detail how the failover works using this.
That covers all of the components of the primary and the secondary stacks for this scenario. Lets go ahead and deploy the infrastructure to both regions. Here I am deploying to us-east-1 and us-west-2. You can choose any regions you want.
Deploy the infrastructure
To deploy the infrastructure, I am using Github actions workflow. If you are following along, you can either use the same workflow otr manually deploy the infrastructure using Terraform. Will cover both. Let ,e first explain the folder structure of the repo.
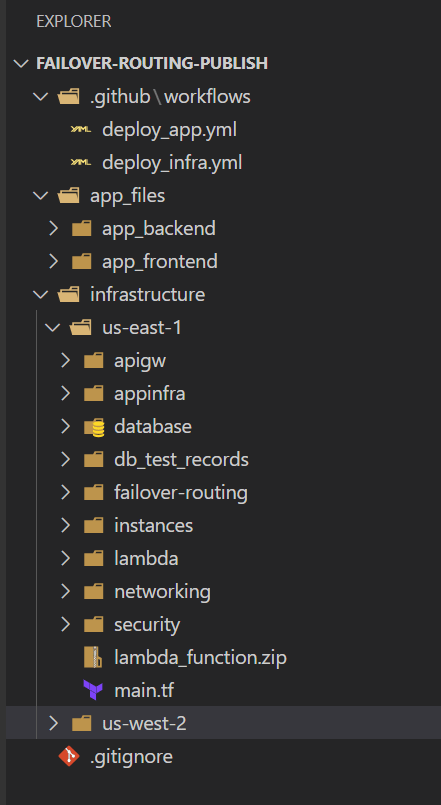
Folder Structure
- .github: This folder contains the Github actions workflow files. There are two files to deploy infrastructure and then to build and deploy the app
- app_files: This folder contains the codes for the sample app. There are two folders depicting the frontend and the backend for the app. The frontend is a React app and the backend is a Python Lambda function.
- infrastructure: This folder contains the Terraform code to deploy the infrastructure. There are two folders for primary and secondary regions. Each folder contains the Terraform code to deploy the infrastructure in the respective regions
Terraform structure and setup
The whole infrastructure for both regions, are handled by Terraform. I have separated out the us-east-1 and us-west-2 region Terraform code in separate folders. The Terraform code is structured in a modular way. The modules are:
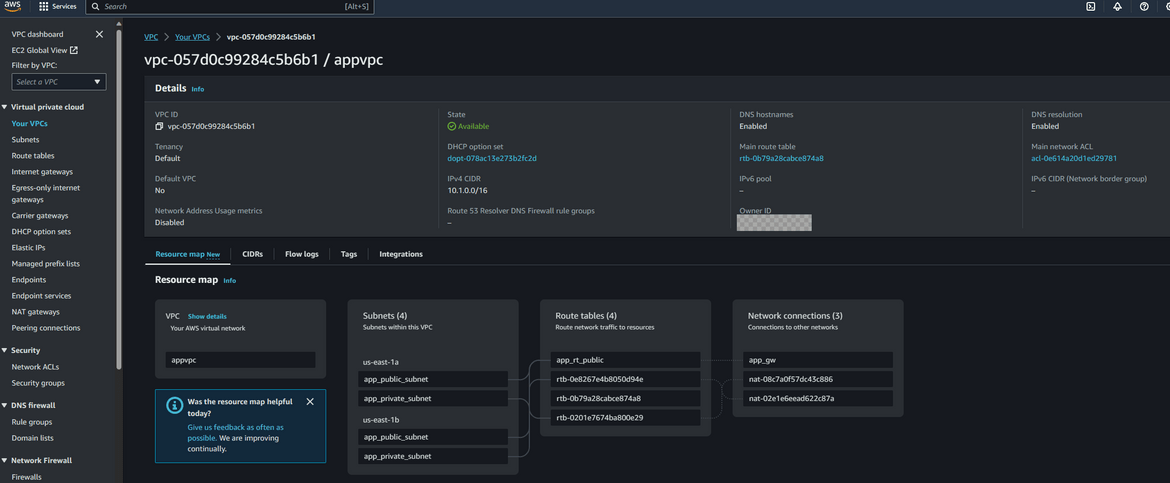
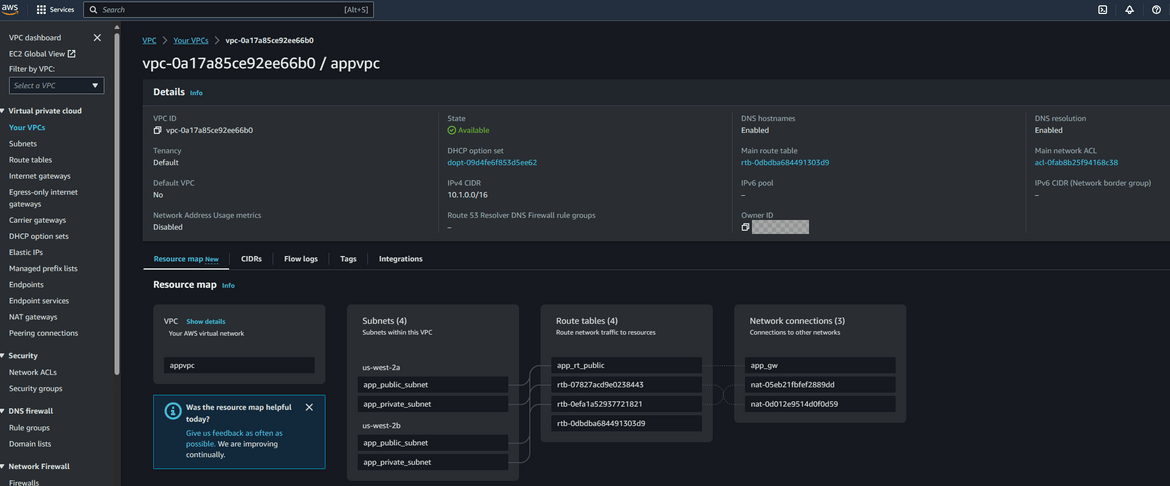
- networking: This module handles the network infrastructure. It creates the VPC, subnets, route tables, internet gateway, NAT gateway, etc.
- security: This module handles the security infrastructure. It creates the IAM roles, policies etc
- apigw: This module deploys the api gateway for the API endpoint
- lambda: This module deploys the Lambda function for the backend part of the application
- appinfra: This deploys the infra needed to host the app. This includes the S3 buckets which holds the React app files after build
- database: This module deploys the DynamoDB table for the app
- dbtestrecords: For the ease of testing, I have included a module which creates some test records in the DynamoDB table.
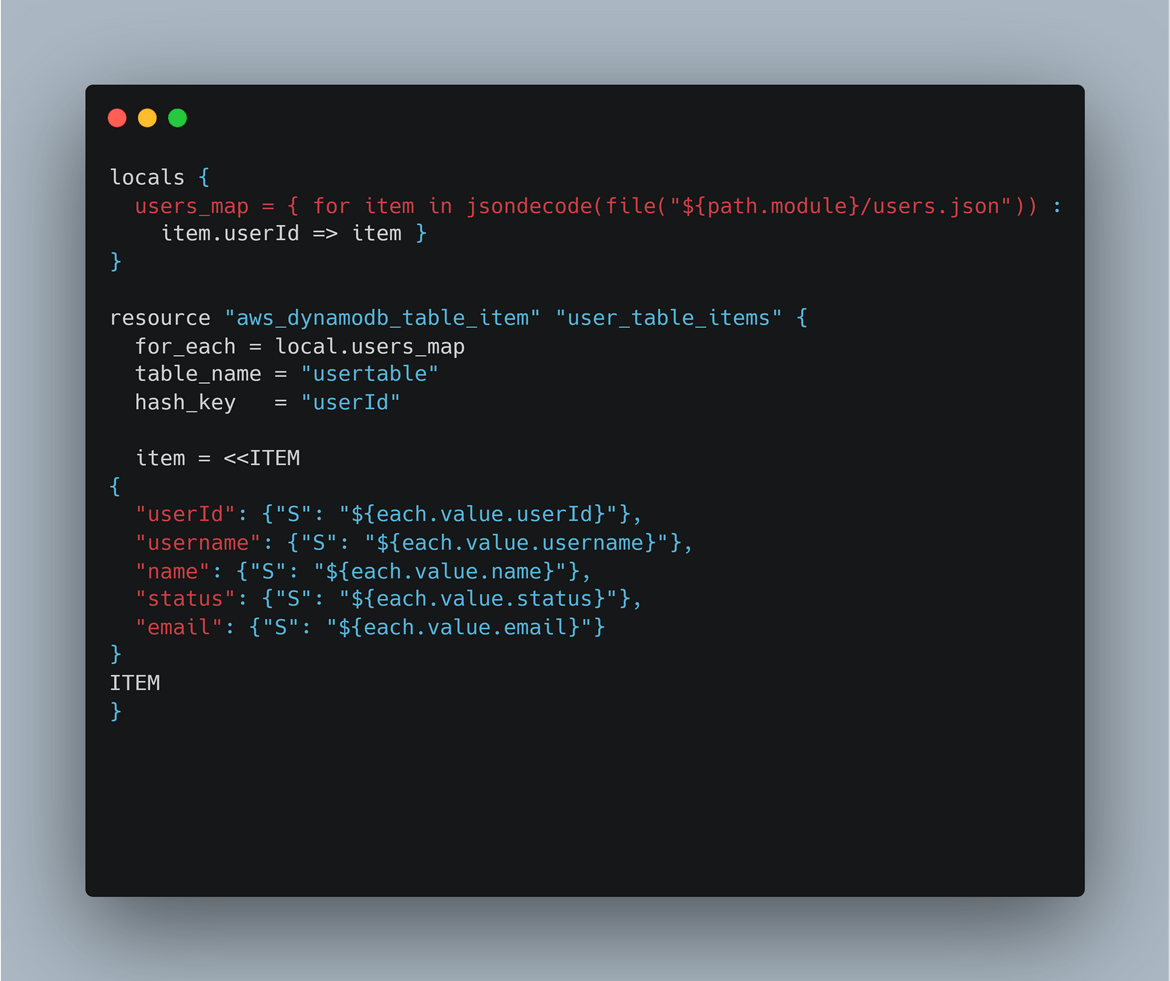
- instances: This module deploys the Autoscaling group and the load balancer needed to serve the app
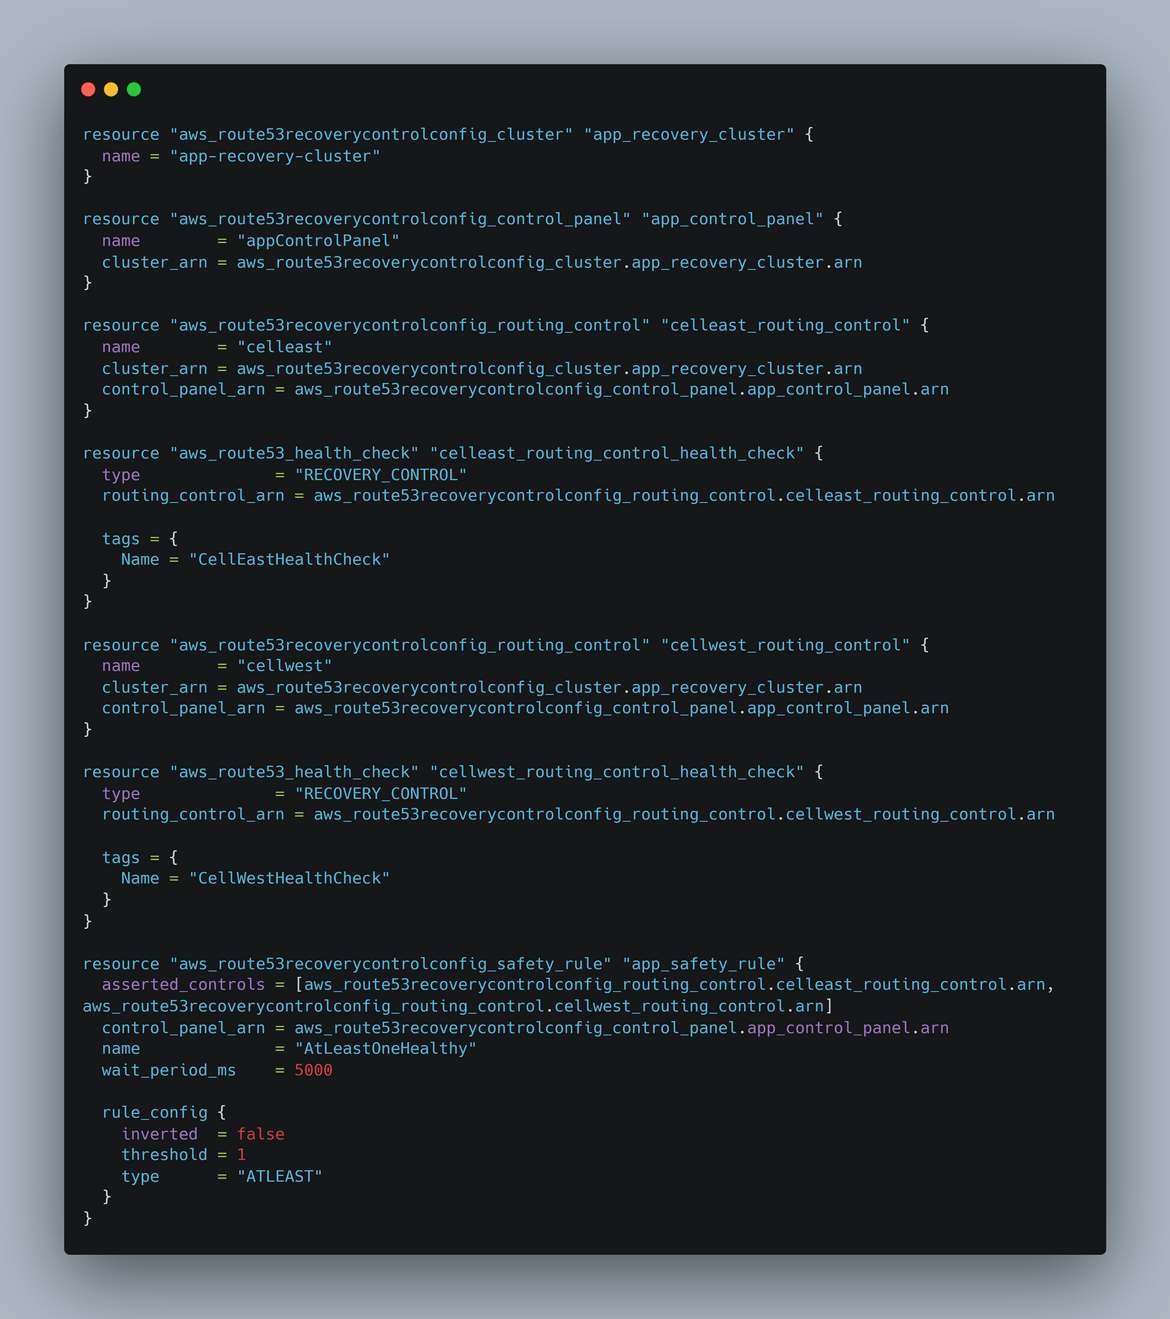
- failover-routing: This is an optional module I added. This creates the ARC cluster and the checks needed for the failover. Since I will be covering the steps to create this later, this module is optional. Still if you want to create the cluster and the checks using Terraform, you can use this module.
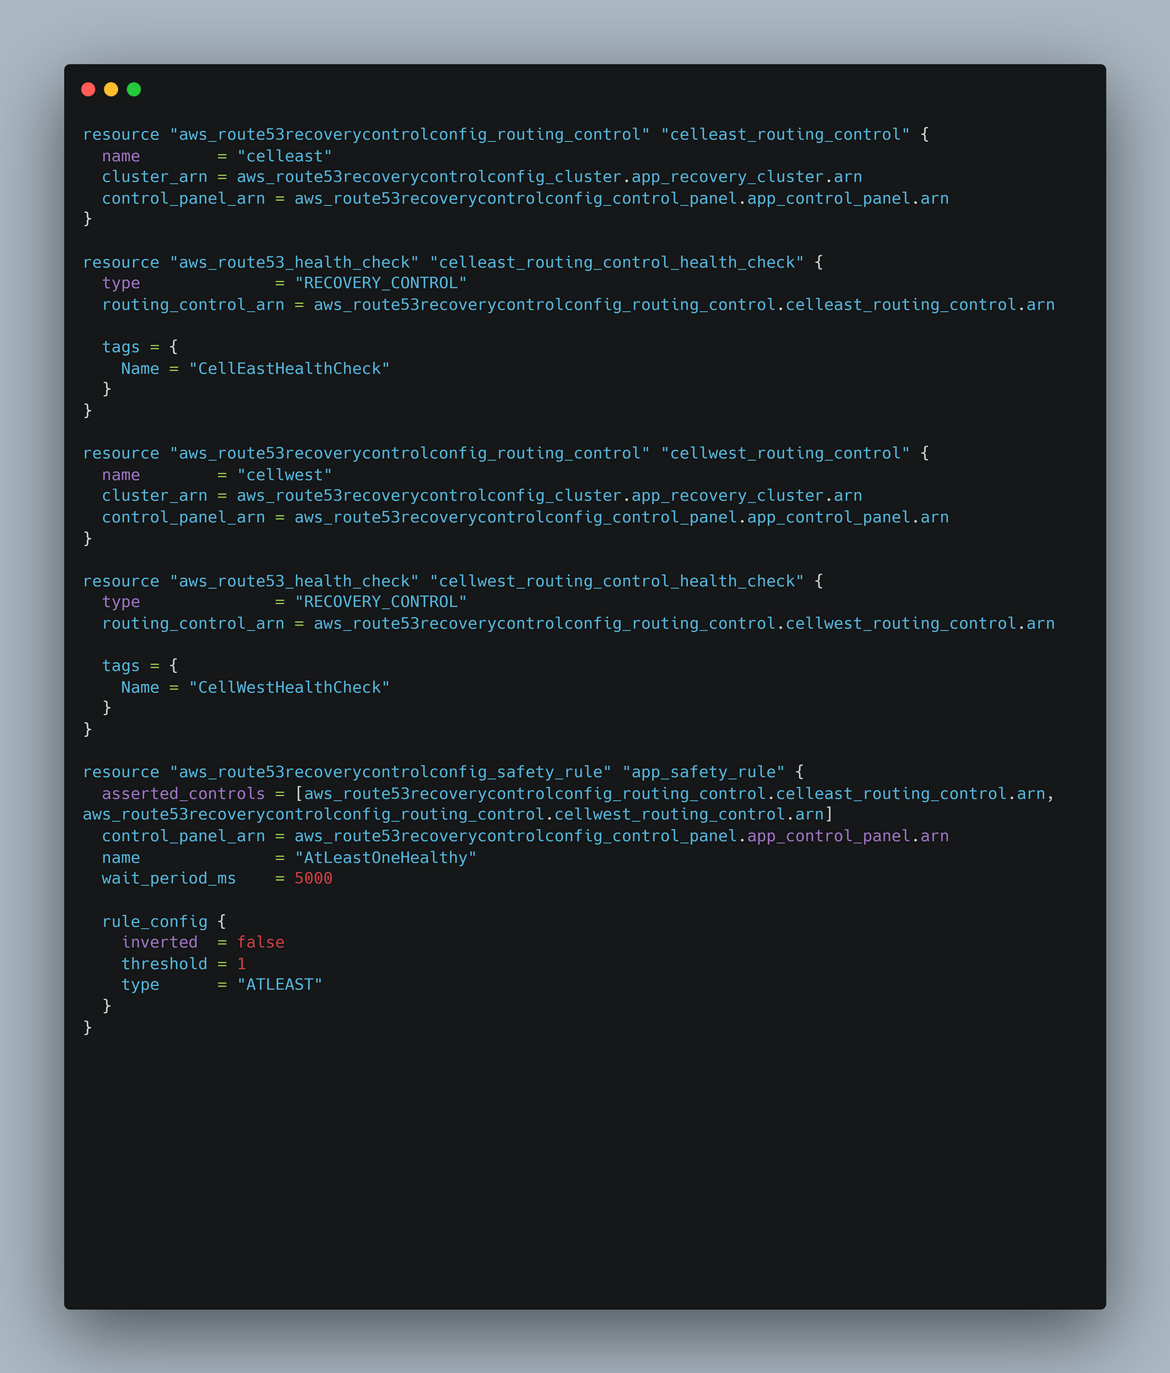
To deploy using Terraform and for State management, for this example I am using Terraform cloud. You can use other state storage like S3. To use Terraform cloud, you need to create an account and create a workspace. Once the workspace is created, you need to add the environment variables for the workspace. The variables needed are:
- AWSACCESSKEY_ID
- AWSSECRETACCESS_KEY
- AWSDEFAULTREGION
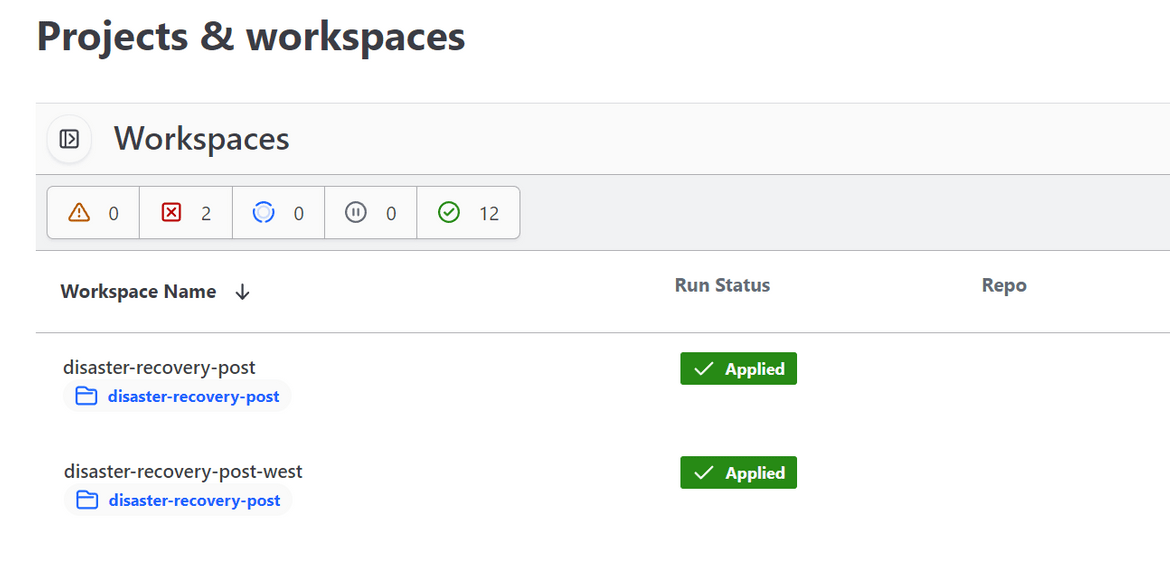
Here I created two workspaces for the two regions.
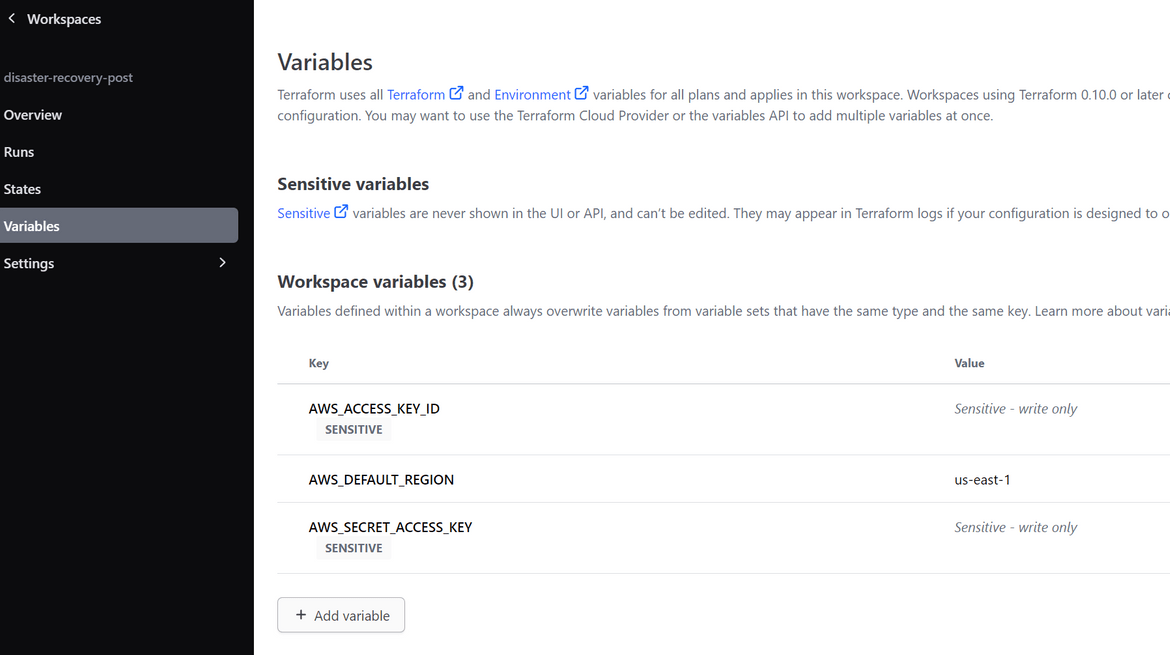
The AWS keys have been configured as environment variables on the workspaces.
Github actions workflow and setup
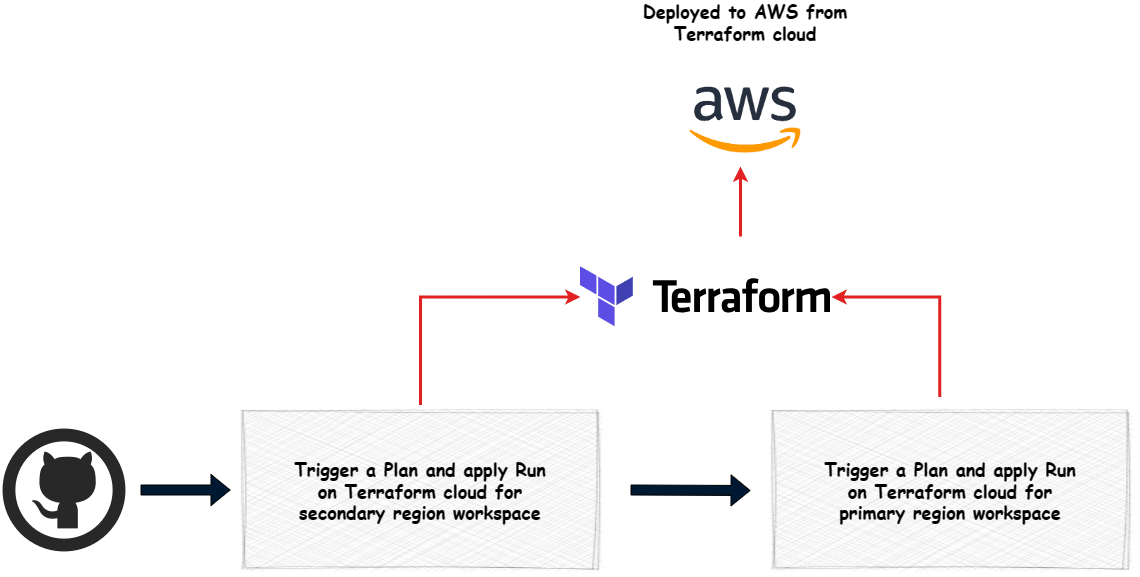
To deploy the infrastructure, I am using Github actions workflow. The workflow is configured to be triggered manually. There are two workflows here:
- Deploy the infrastructure
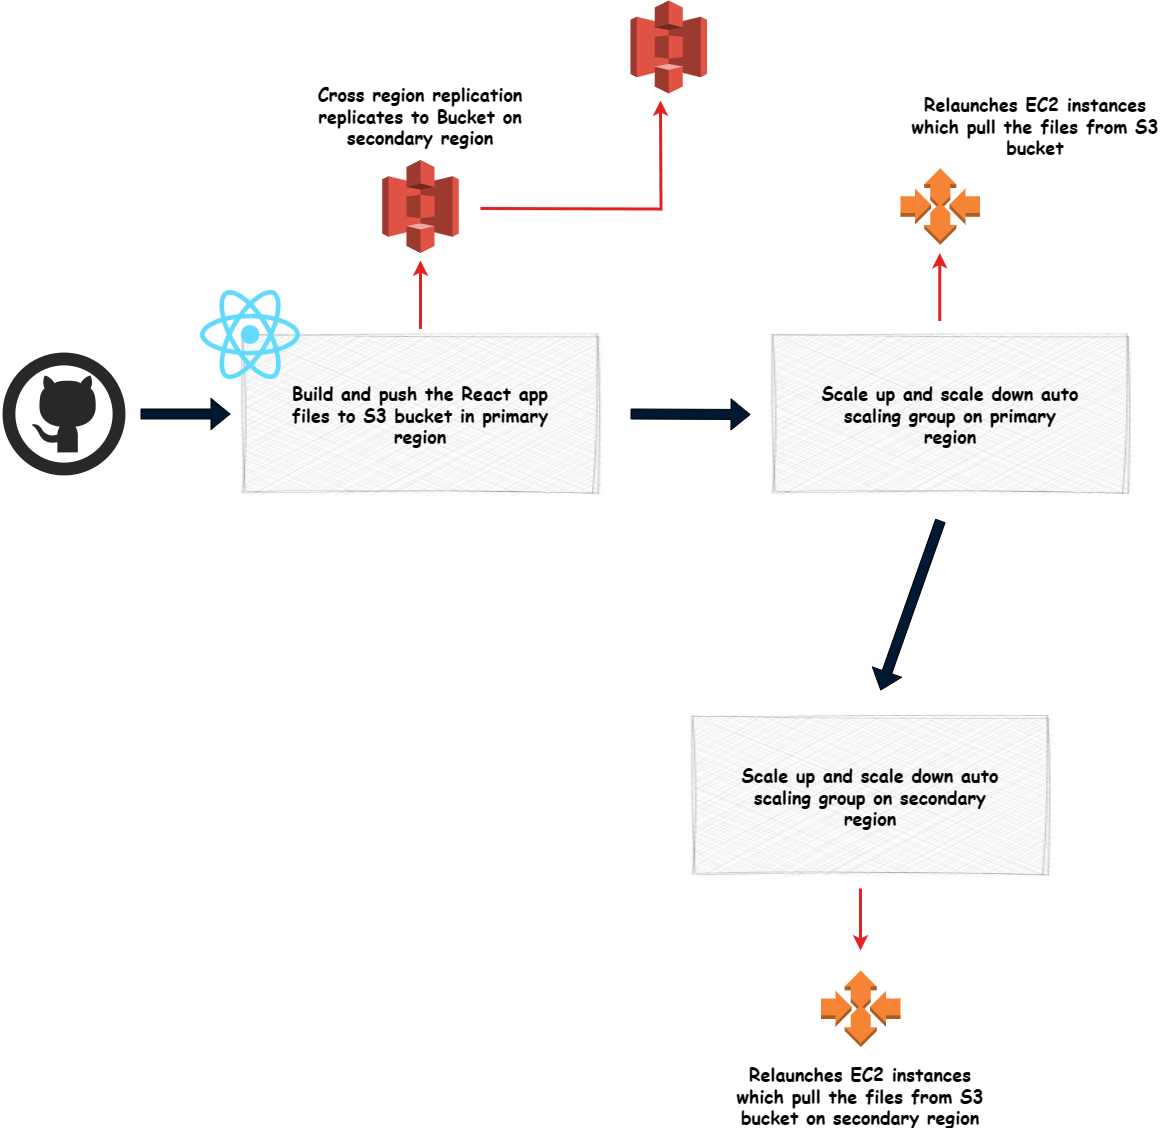
- Build and deploy the app
Lets see the flow for each
-
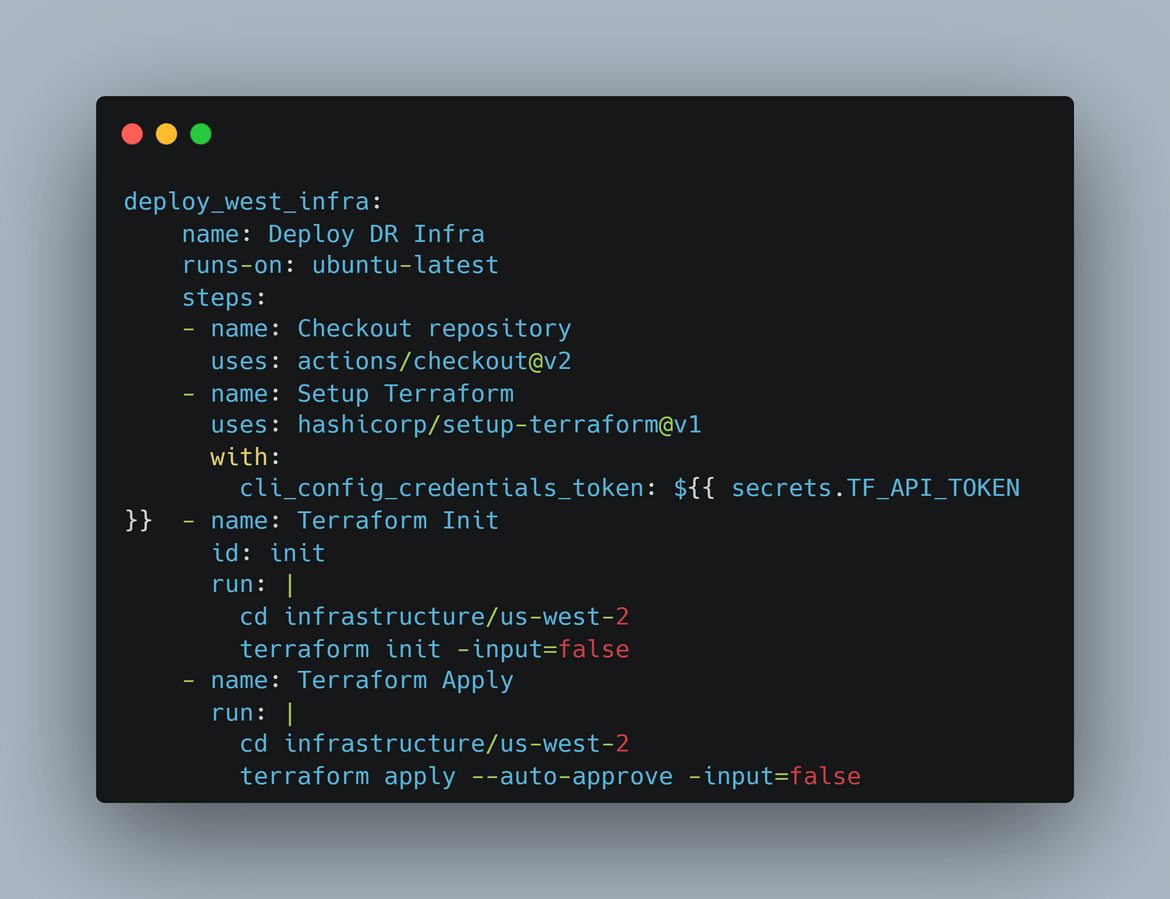
Trigger a Plan and apply Run on Terraform cloud for secondary region workspace
This step triggers a plan and apply run on the Terraform cloud workspace for the secondary region. This deploys the infrastructure in the secondary region. The token for Terraform cloud is passed as secret which is needed to trigger the run on Terraform cloud.
-
Trigger a Plan and apply Run on Terraform cloud for primary region workspace
This step triggers a plan and apply run on the Terraform cloud workspace for the primary region. This deploys the infrastructure in the primary region. The token for Terraform cloud is passed as secret which is needed to trigger the run on Terraform cloud.
-
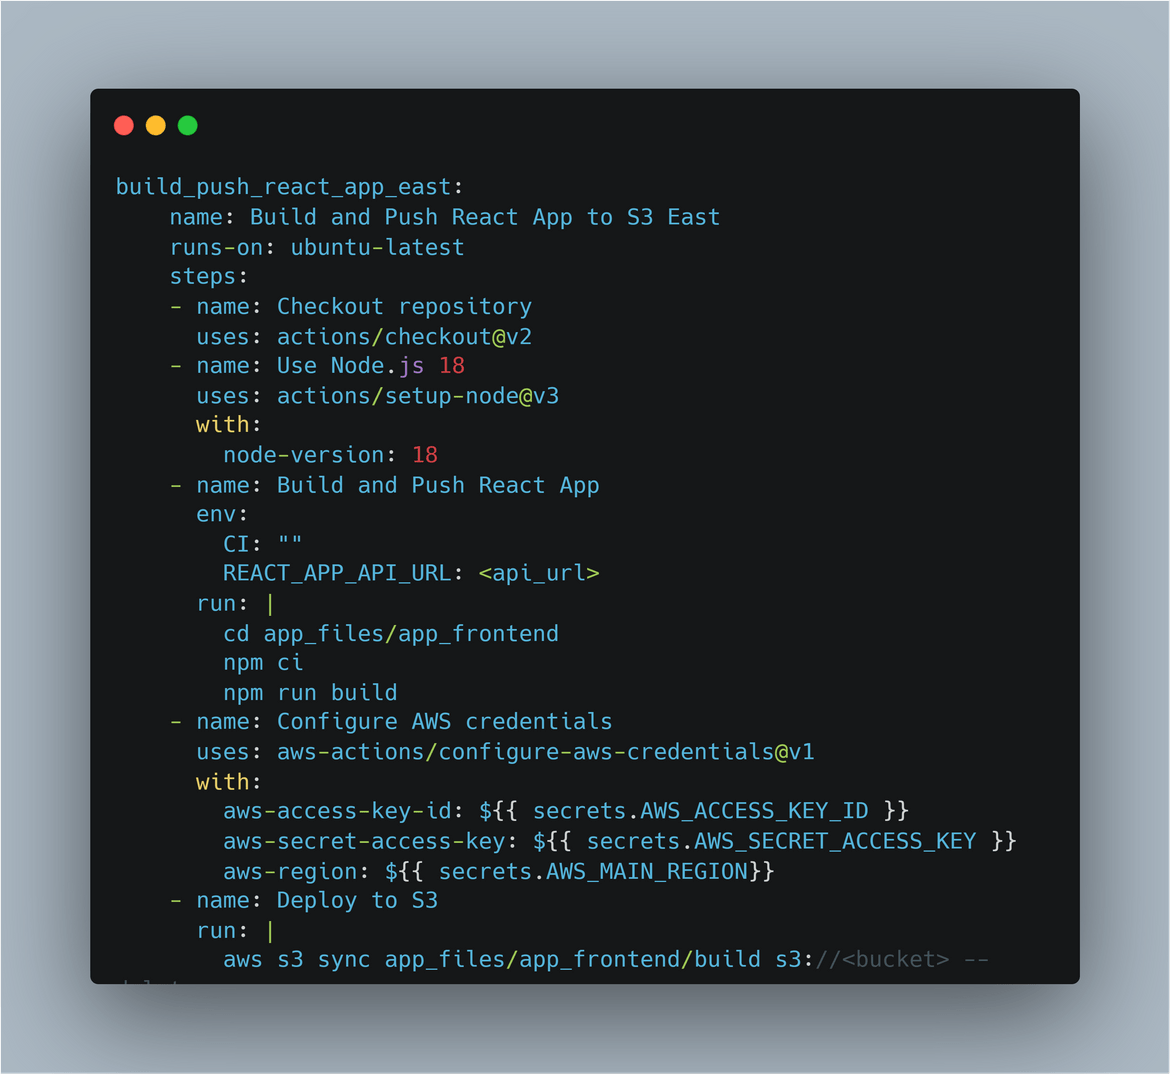
Build and push the React app files to S3 bucket in primary region
This step builds the React app and pushes the files to the S3 bucket in primary region. Since we have cross region replication enabled, we wont have to separately push the files to the secondary region. During the build, env variables are passed for the API endpoint. The endpoint is the route 53 sub domain for the API gateway record.
-
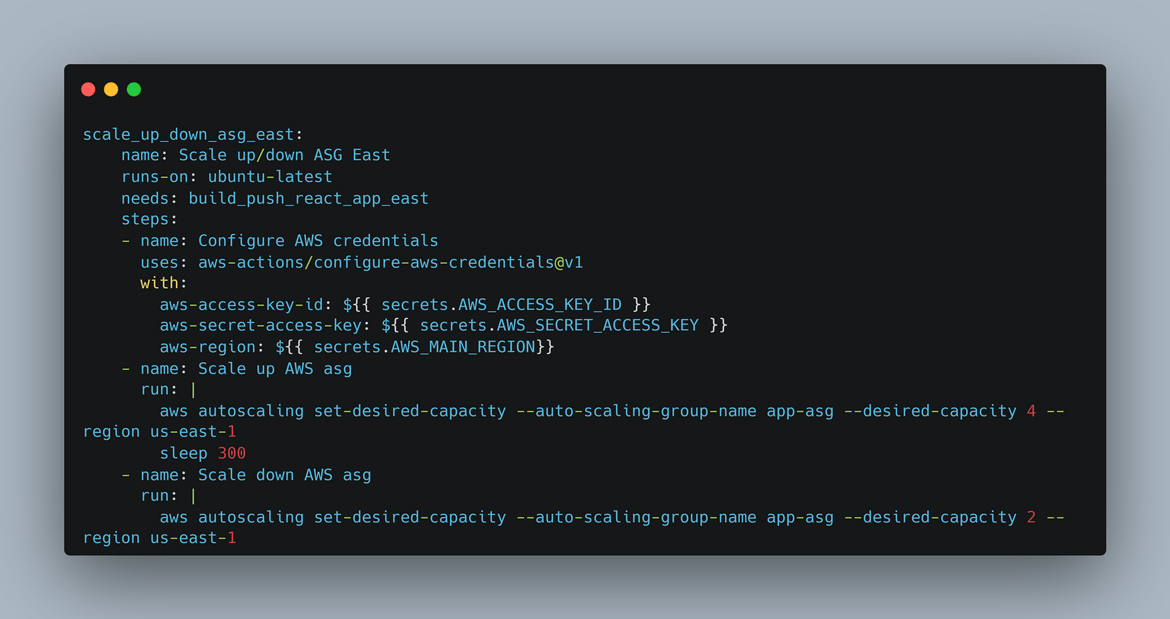
Scale Up and scale down the Auto scaling group
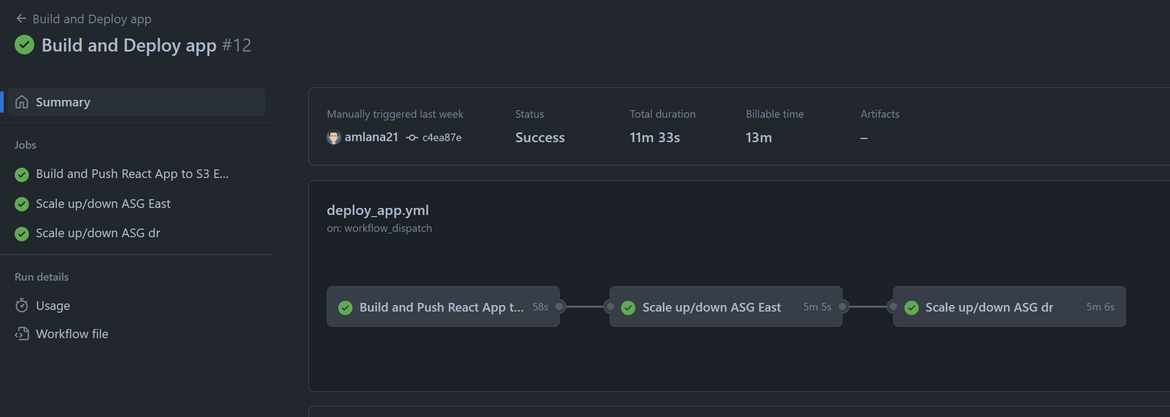
Since we have new files pushed to the bucket, in this step I am scaling up and scaling down the auto scaling group. This is to ensure that the new instances which are launched pull the files from S3 and serve the new files. This step is repeated for both primary and secondary regions.
Now lets deploy the infrastructure and the app. To deploy the infrastructure, you can run the workflow manually. But before we can run the workflow, we will need to setup some secrets on the Actions repo. If you are using Terraform cloud, create an API token and copy the value.
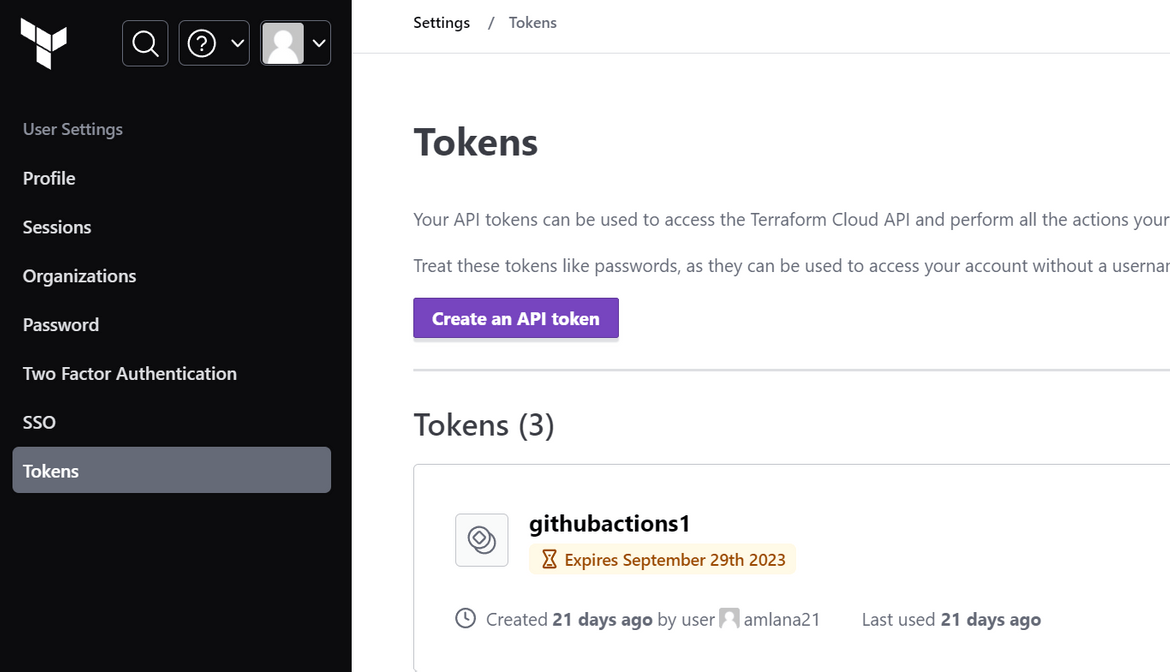
This token need to be created as secret on the Github repository. Create a secret with this value on the Github repo. Also create other secrets to pass the AWS access keys to the actions workflow. I am passing the Primary and Secondary region names as a secret and to be passed as environment variables to the workflow. The region values will be used to handle the auto scaling group scaling up and down in respective regions.

Now we have all the setups done. Lets run the workflow. Navigate to the Actions tab of Github and trigger the ‘Deploy app and infra’ workflow. Let it finish. It will trigger runs on the Terraform cloud
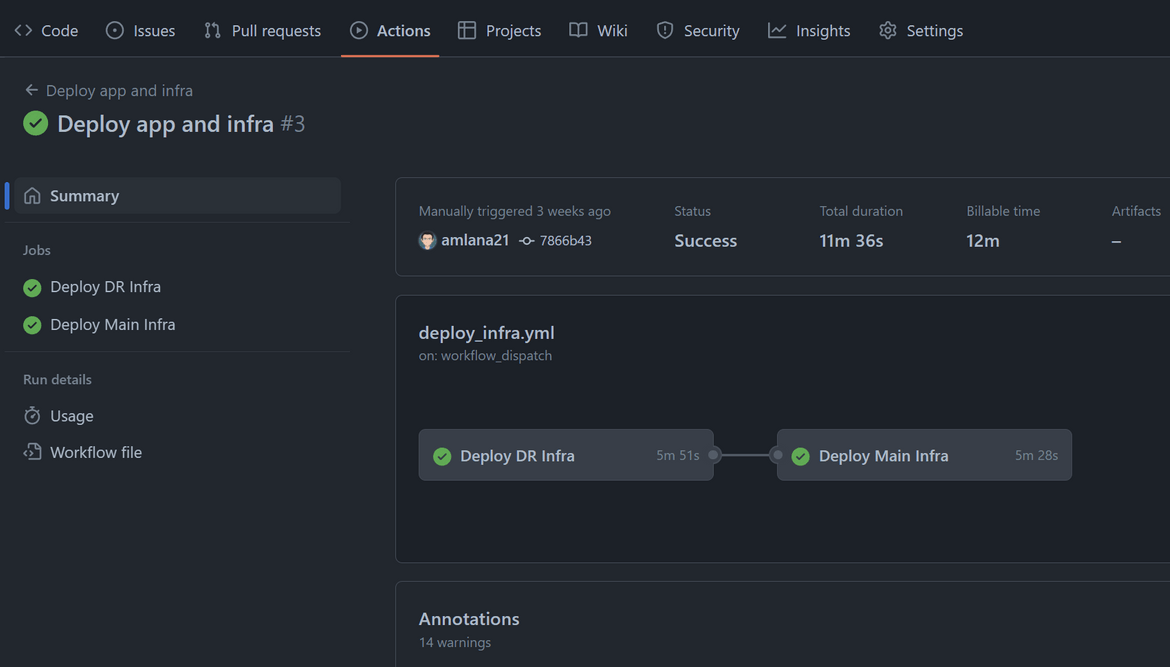
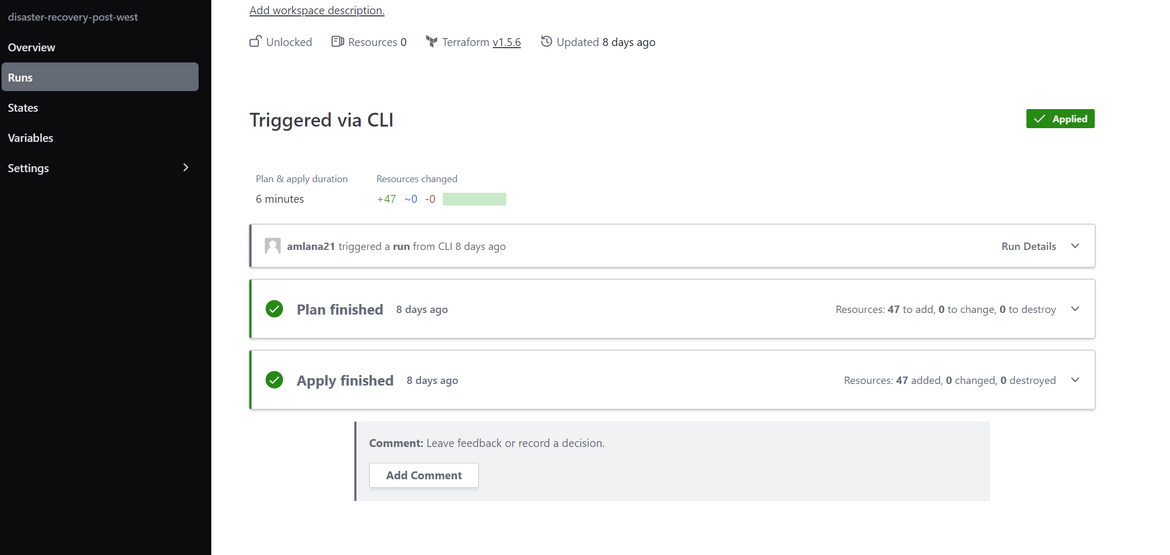
Once the workflow finishes, we will have the infrastructure deployed in both regions. Lets login to AWS and check some of the components.
Resources get deployed to both primary and secondary region and ready to serve traffic.
Now lets deploy the app. Run the workflow ‘Build and Deploy app’. One thing to make sure is to update the env variable which provides the API endpoint. Update this to your API sub domain if you are using Route 53 domain. This will be passed as API endpoint to the React app.
 - name: Build and Push React App
   env:
      CI: ""
      REACT_APP_API_URL: <update this>
It will take while to finish. Once its deployed, we will have the app running in both regions.
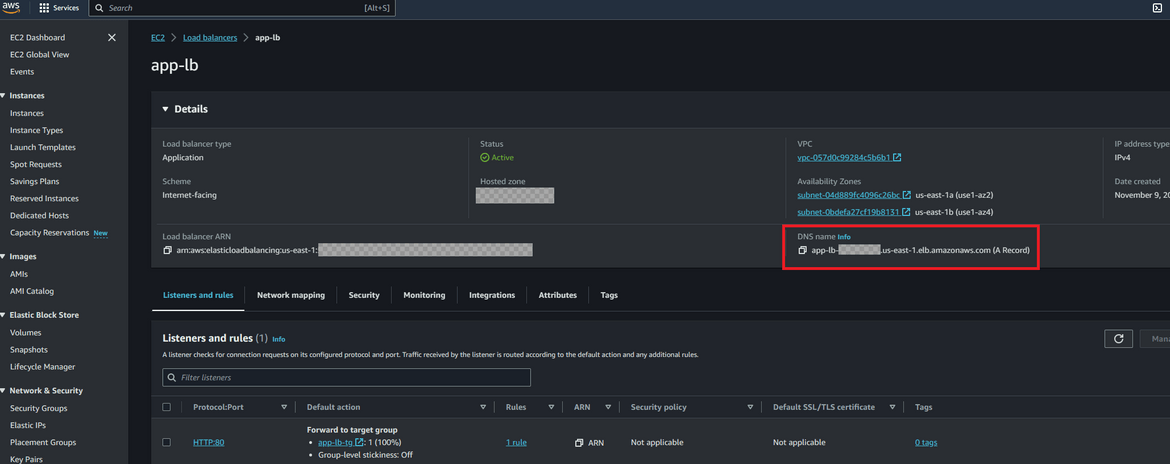
Lets test the app. Since we don’t have the Route 53 domain yet, we will have to use the load balancer endpoint to access the app. The load balancer endpoint can be found from the EC2 console. Copy the endpoint and paste it in the browser. You should see the app running.
Add Disaster Recovery using Route 53 ARC Controller
Now that we have the infrastructure and the app deployed, lets add the disaster recovery using Route 53 ARC controller. The ARC controller is a managed service from AWS. So we don’t have to deploy any infrastructure for this. We just need to create a cluster and add the components to it. Lets see the steps to do this. To follow along you will need a domain and a hosted zone created on Route53. I already have a domain registered. If you are doing this just for learning, you can get cheap domains at Namecheap. Once you have the domain, create a hosted zone on Route 53. I have a hosted zone created for my domain. After getting the domain, follow these steps to create a hosted zone on Route 53 which receives traffic from the domain endpoint.
- Create a hosted zone on Route 53: Navigate to Route 53 console and create a new hosted zone. Give the domain name as your domain name.
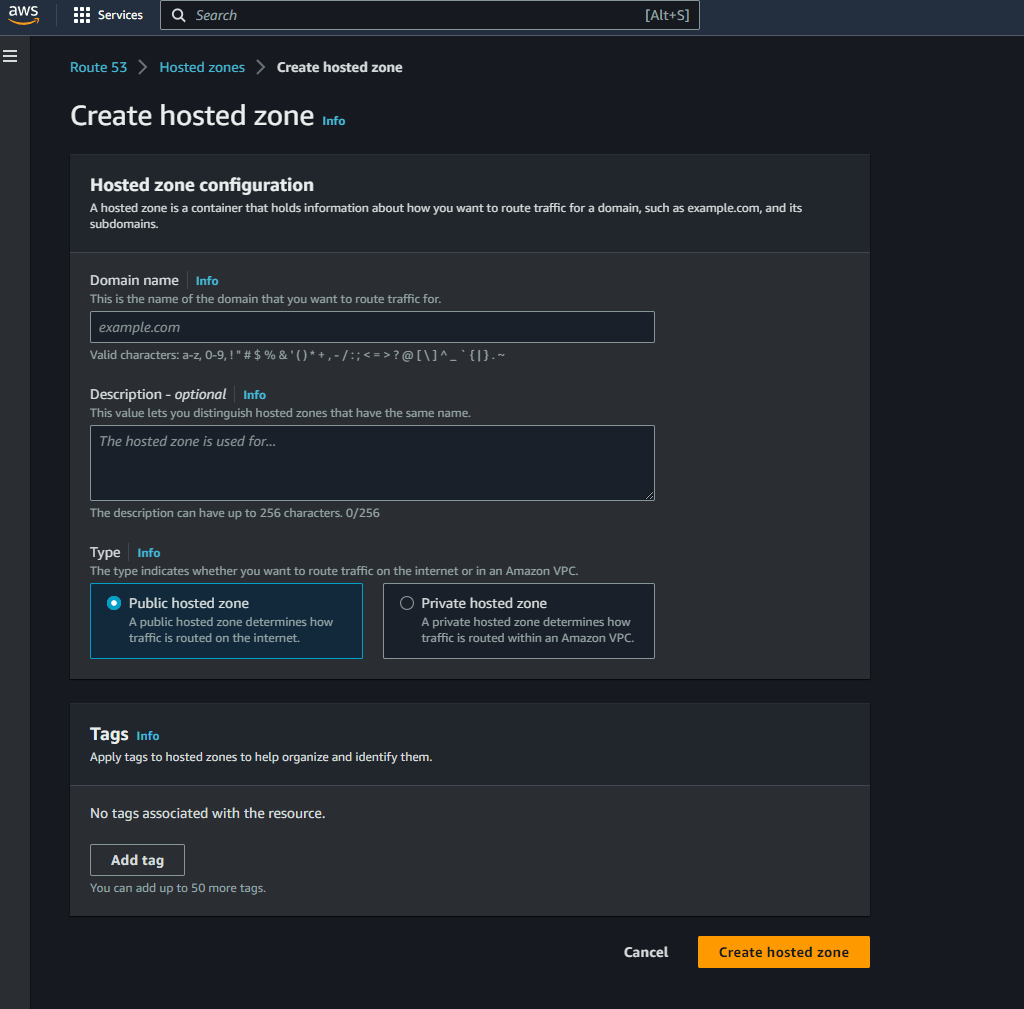
- Update the NS records on the domain registrar: Once the hosted zone is created, it will give you the NS records for the hosted zone. Copy the NS records and update the NS records on the domain registrar. This will make sure that the domain traffic is routed to the hosted zone on Route 53.
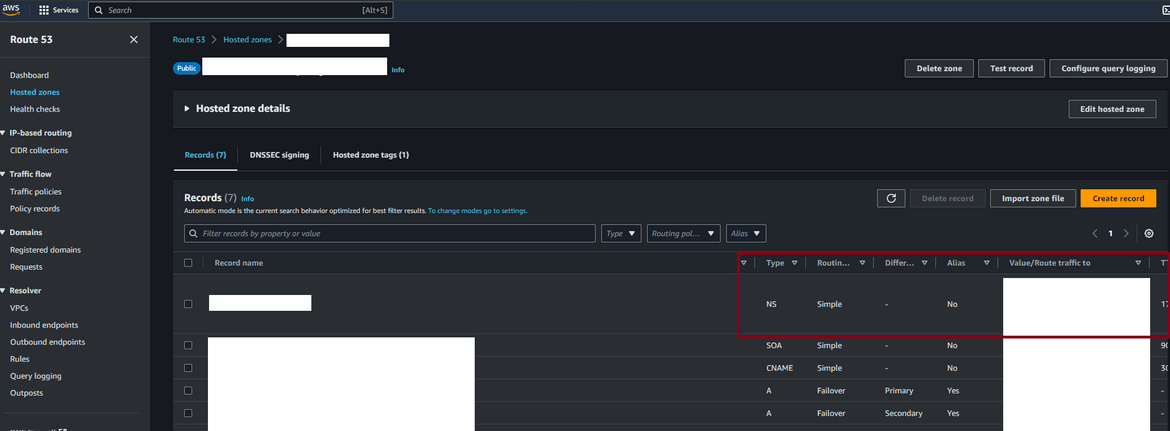
Now when we hit the domain it will route traffic to this Route 53 hosted zone. Here I am going through the steps manually but the Terraform scripts in my repo contains the Terraform module to deploy this programmatically.
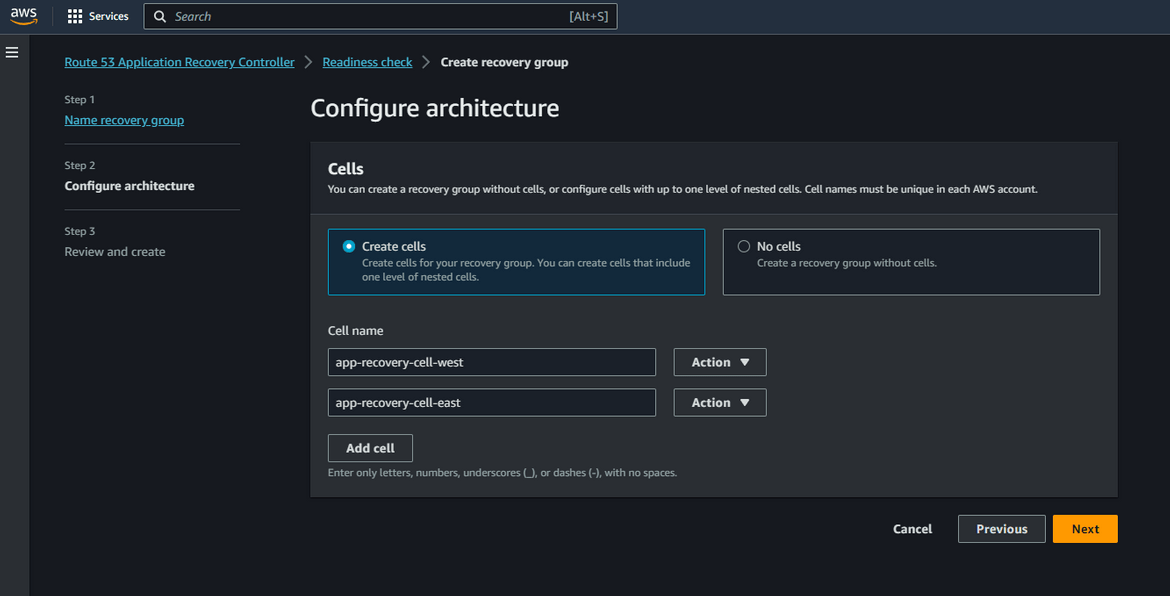
- Create Recovery Group: Navigate to Route 53 Application Recovery Controller service page on AWS console. Click on Readiness check and then click on Create Recovery Group. Give a name to the recovery group. On the next step, its asking to create the cells which this group will control. Since our resources are in east and west regions, lets create two cells, one for each region
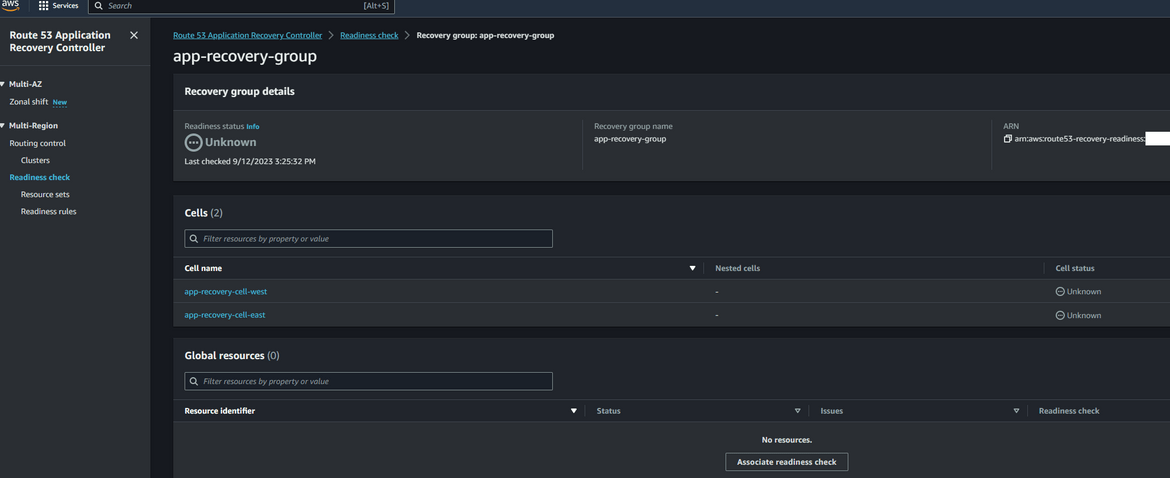
Once its created, initially it will be in a not healthy state.
- Create Health Checks: To check the health of frontend , we will create 2 healthchecks. For the frontend, we will check the health of the load balancer and check if the frontend webpage is returning success. There will be 2 healthcheck, with 1 healthcheck for each region. To create the healthchecks, navigate to Route 53 page and click on Health checks. Click on Create Health Check. On next page provide the details as shown. For the domain name, it will be the dns of the load balancer. Now the port will depend on your application but for my example I am using 80. Rest can be edited as needed or kept default. This needs to be repeated to create another healthcheck for the secondary region load balancer.
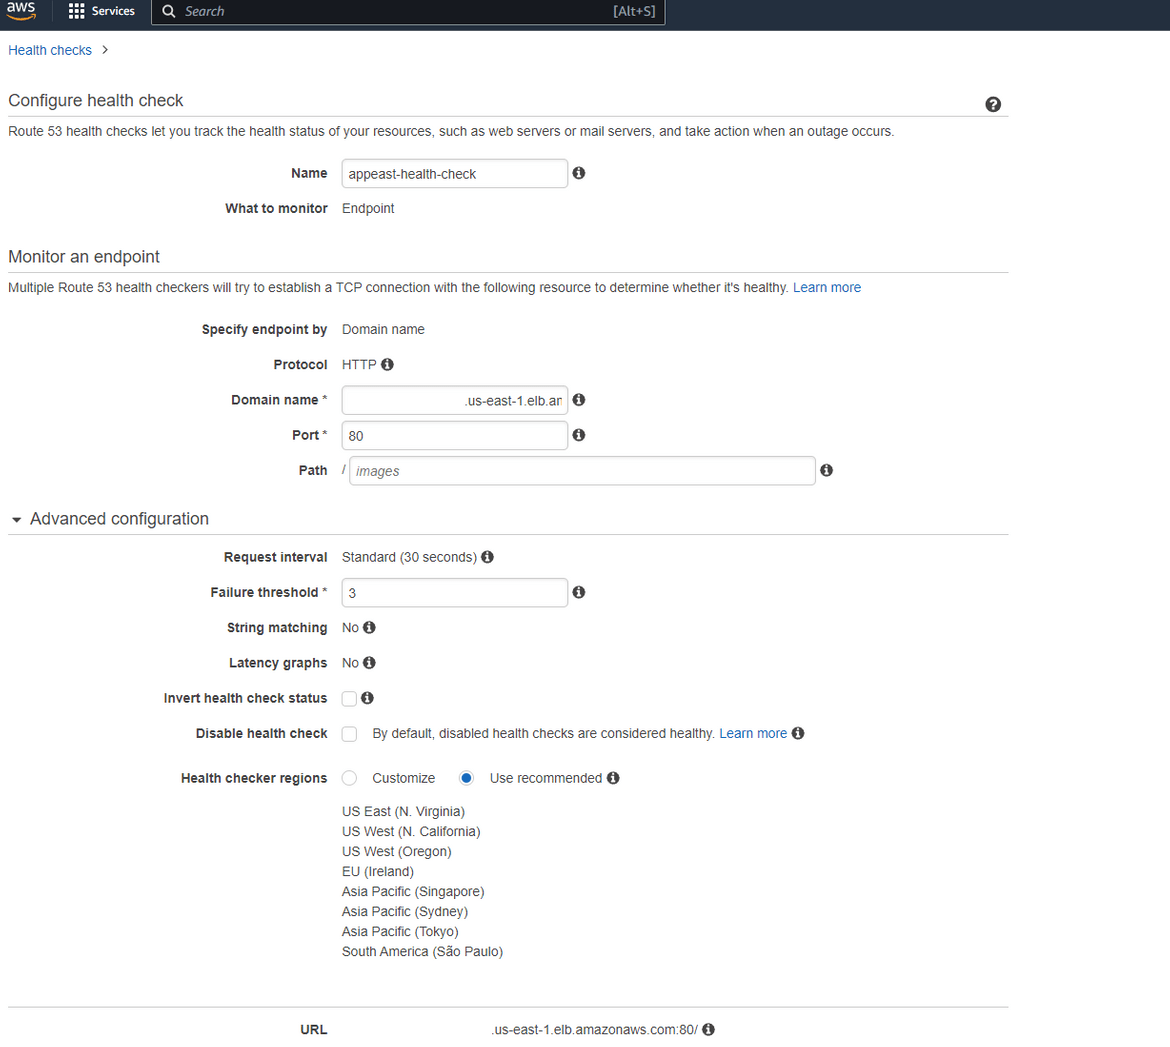
With this you will have 2 healthchecks monitoring the two region endpoints for the application.

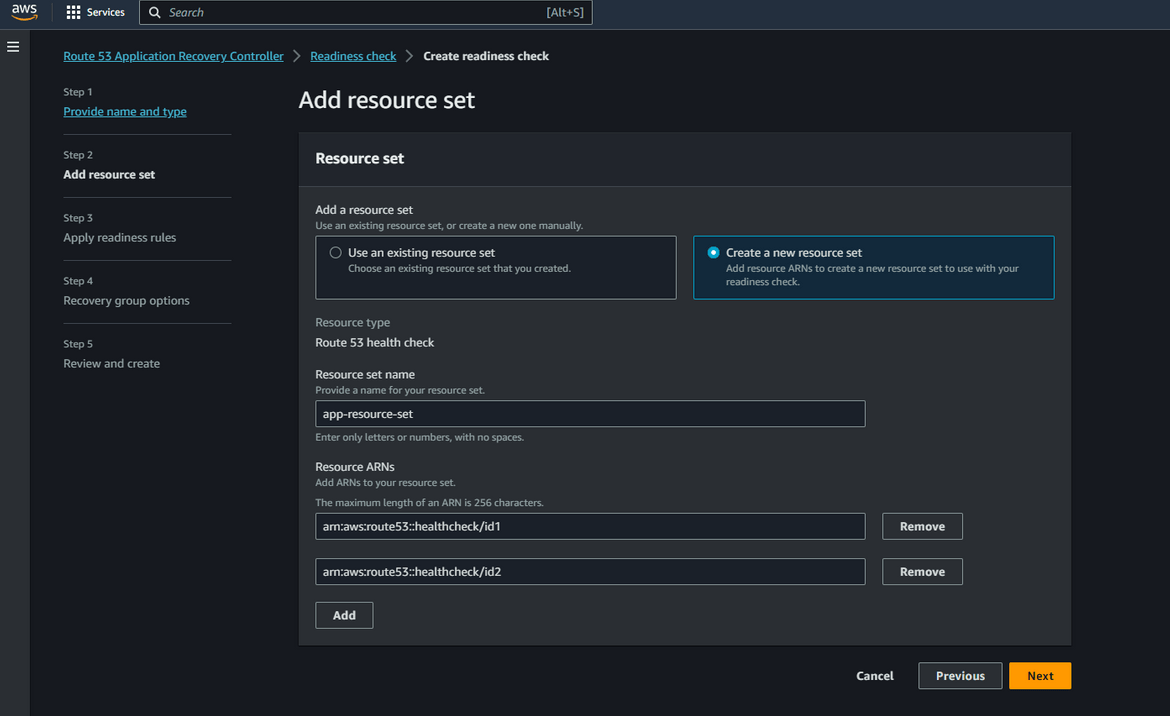
- Create Readiness Checks: Now come back to the ARC console page. Click on Readiness Check and click on Create Readiness check. Provide a name for the check and select the Resource type as Route53 Health Check. On the next step, we will create a new Resource set. Give a name for the new resource set. Below on the Resource ARNs section, add the ARNs for the two healthchecks which we created earlier. This will add the healthchecks to the resource set.
On next step select the existing Recovery which we created earlier. Map the cells to respective healthchecks. The cell for east will be mapped to healthcheck for east and cell for west will be mapped to healthcheck for west.
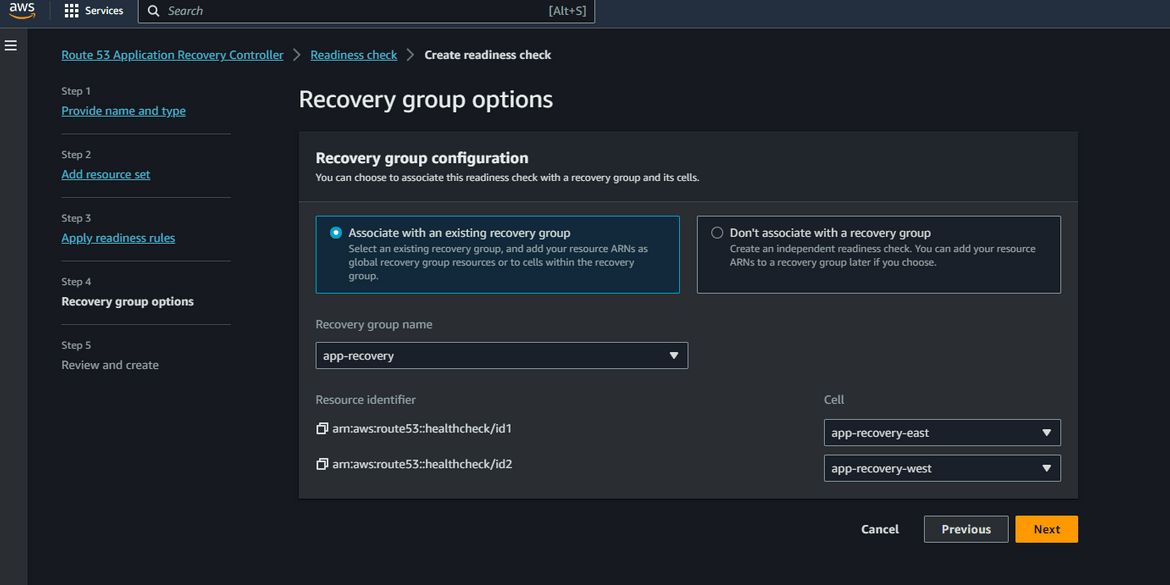
Click create to finish creating the readiness check. Now you will have a readiness check and a new resource set created for the same. The readiness check wont show healthy immediately. Wait for it to become healthy.
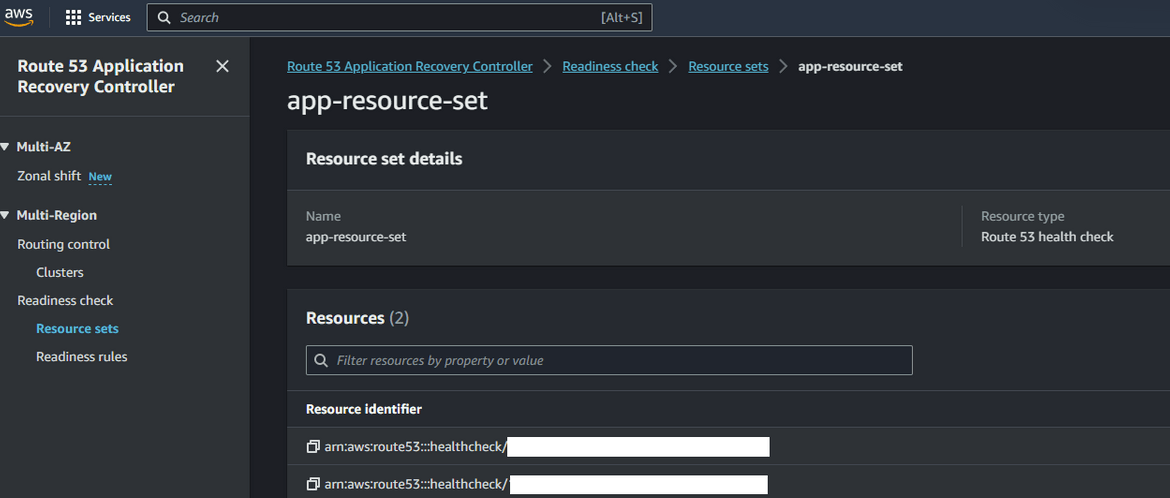
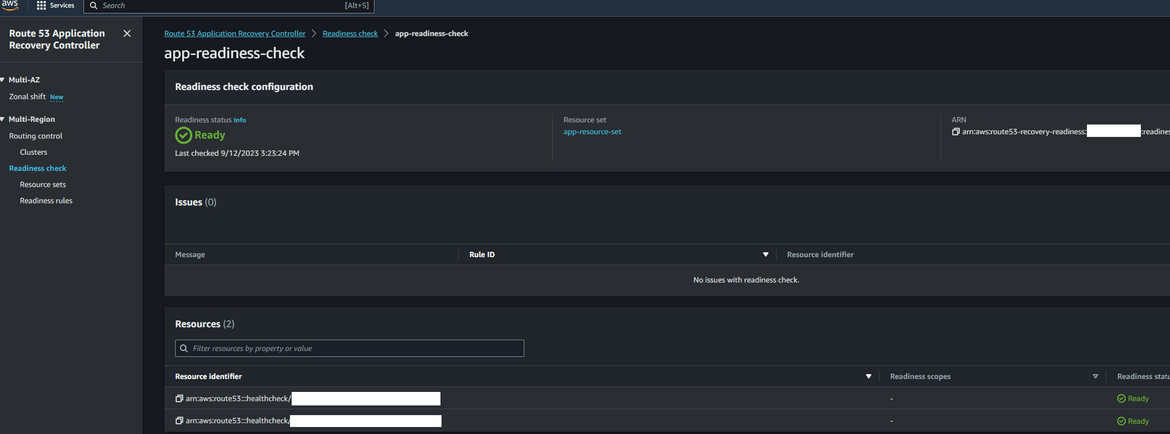
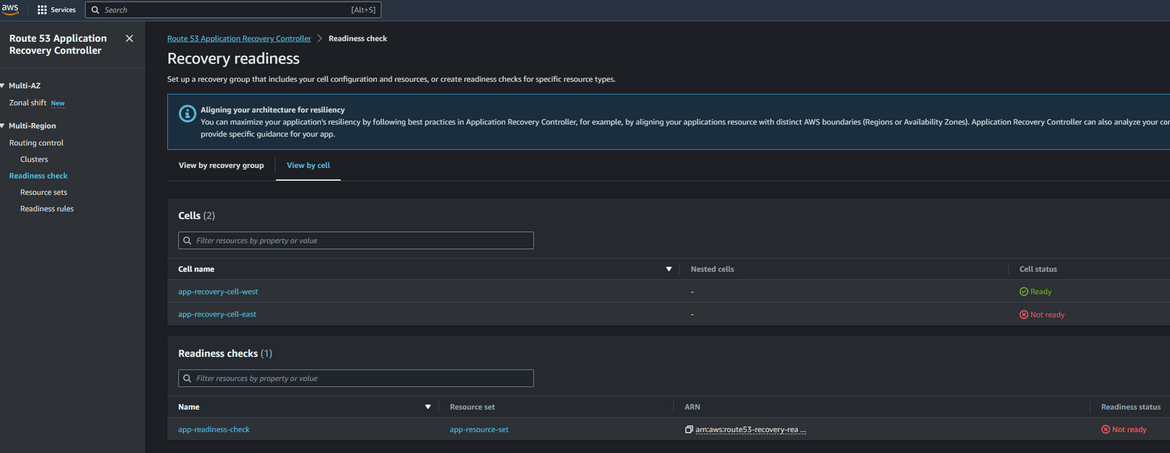
- Check readiness: Now you have the recovery groups and the readiness checks created. The recovery group should show all healthy since the app is up and running.
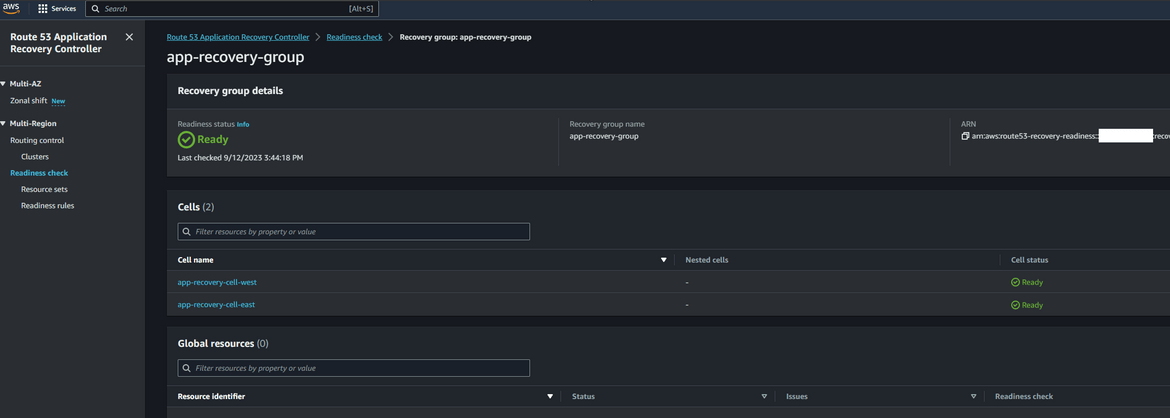
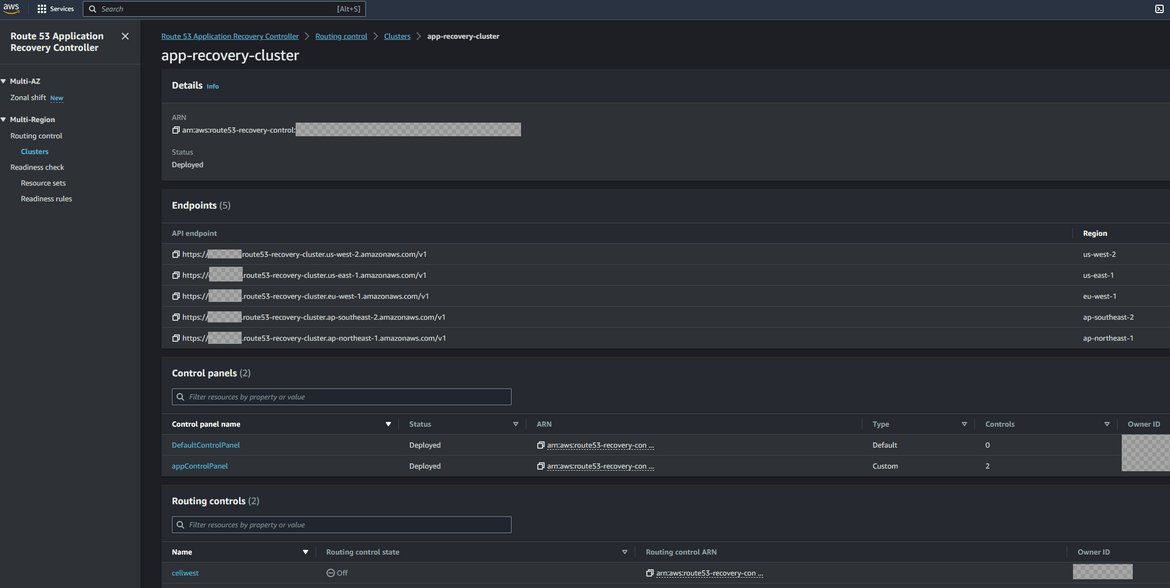
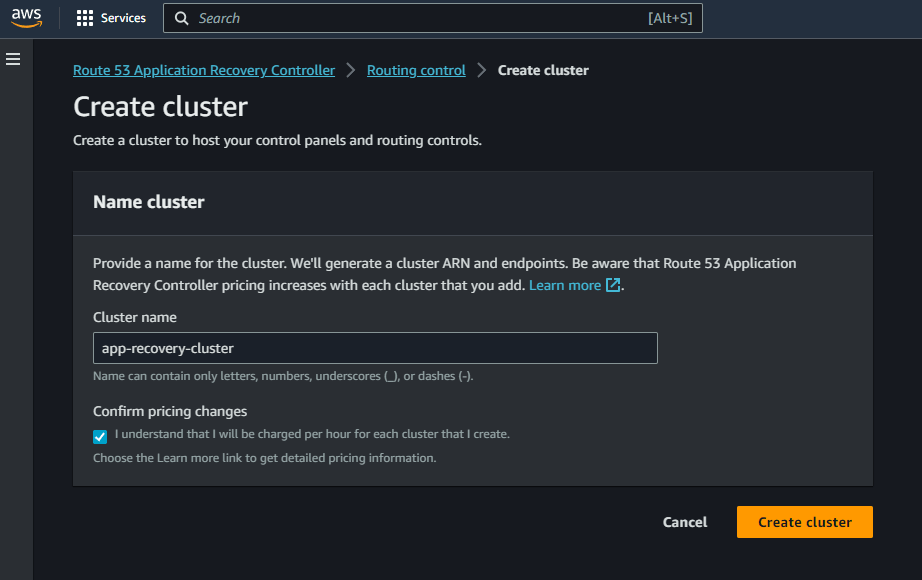
- Create Cluster: Now we will create the cluster. Navigate to Clusters under Routing control. Click on Create. On the create page provide a name and click create. Please note here that the cluster is billed hourly. So I will suggest to remember deleting the cluster if you are doing this for learning.
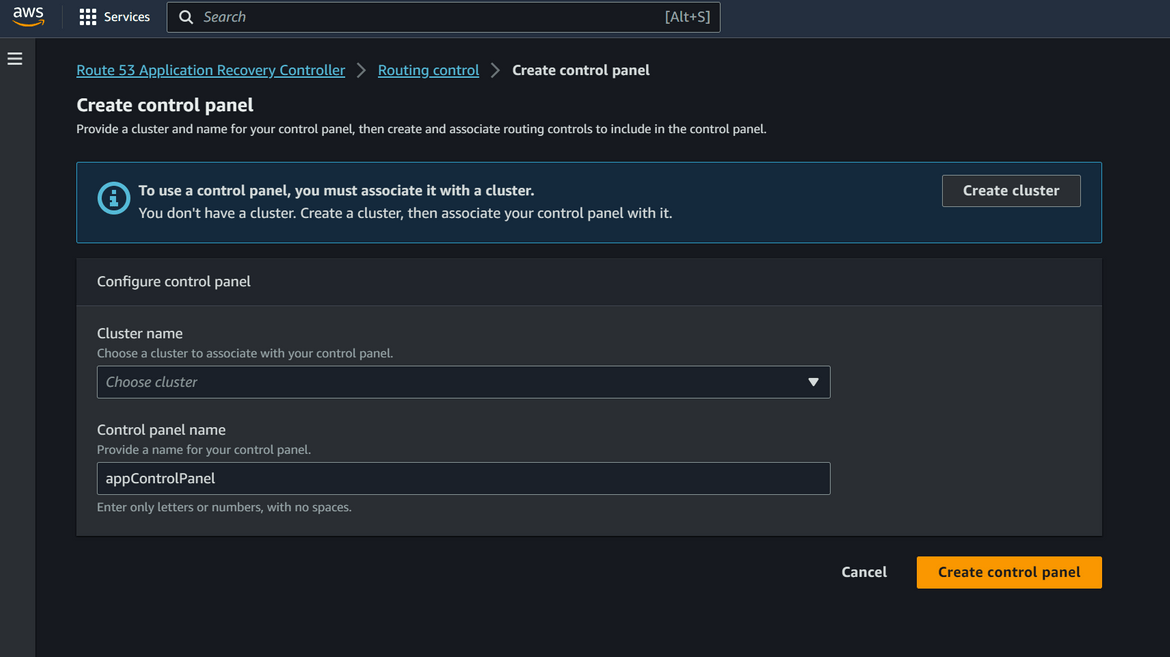
- Create Control Panel: After the cluster is created, we will create a new control panel under the cluster. All routing controls will be under this new control panel. To create a new panel, click on Routing Control and then Create button. From the dropdown select Control Panel. On the next page, select the cluster which was created earlier and provide the panel name

- Add Routing Controls: Now we will add routing controls to the control panel. These will direct traffic to the respective Cells or in our case regions. Since we have two regions here, one for primary and one for secondary, we will create two routing controls. To create the control, click on the created control panel name and click on Add Routing control. Provide the routing control name as needed. Click on the Create button. Repeat this to create the controls as needed. Here we create 2 controls

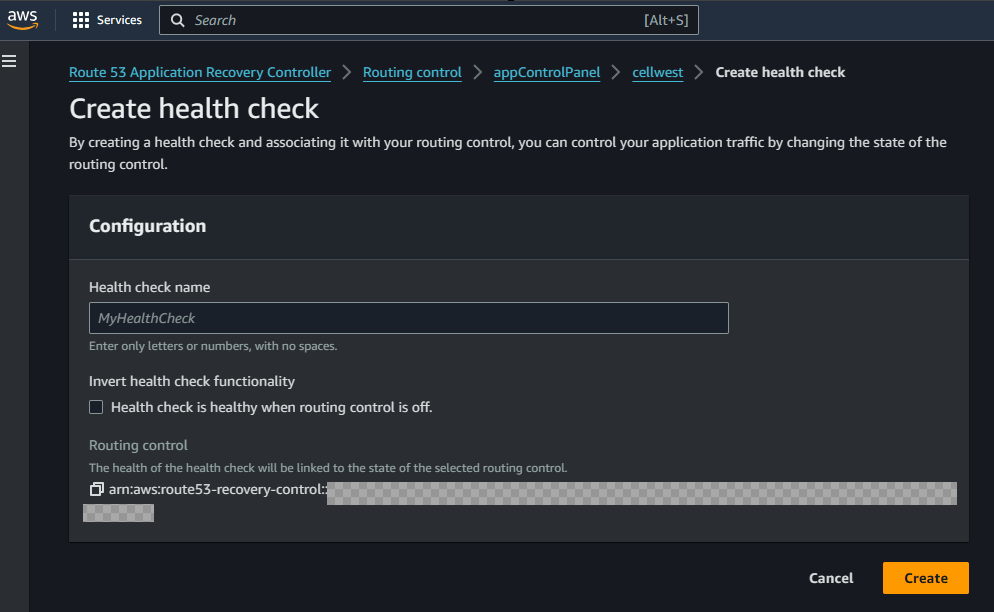
- Add Control Health Checks: The Routing controls route traffic using health checks. We will create one health check for each control. Click on the control name and then click Create Health Check. This will create health check for the control. Repeat for all the controls. The health checks can be checked by navigating to Route53 Health checks page.

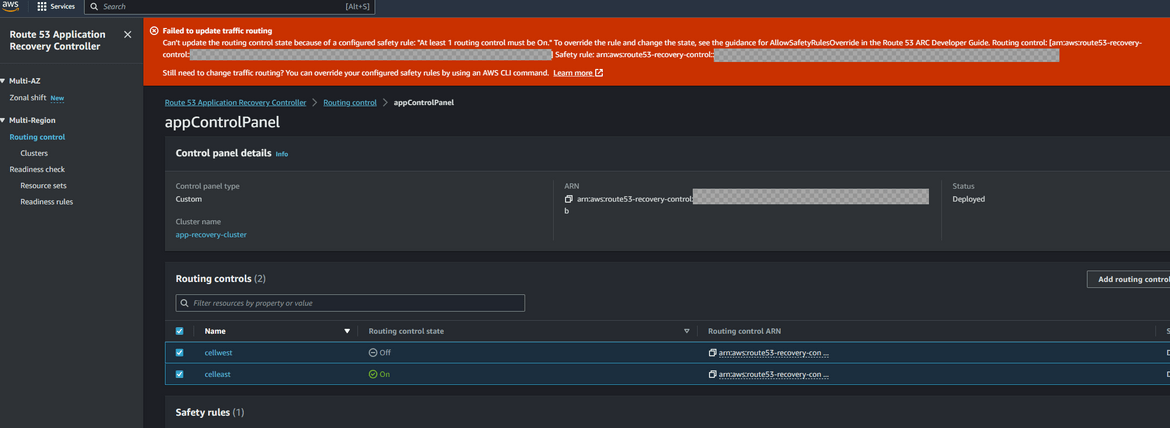
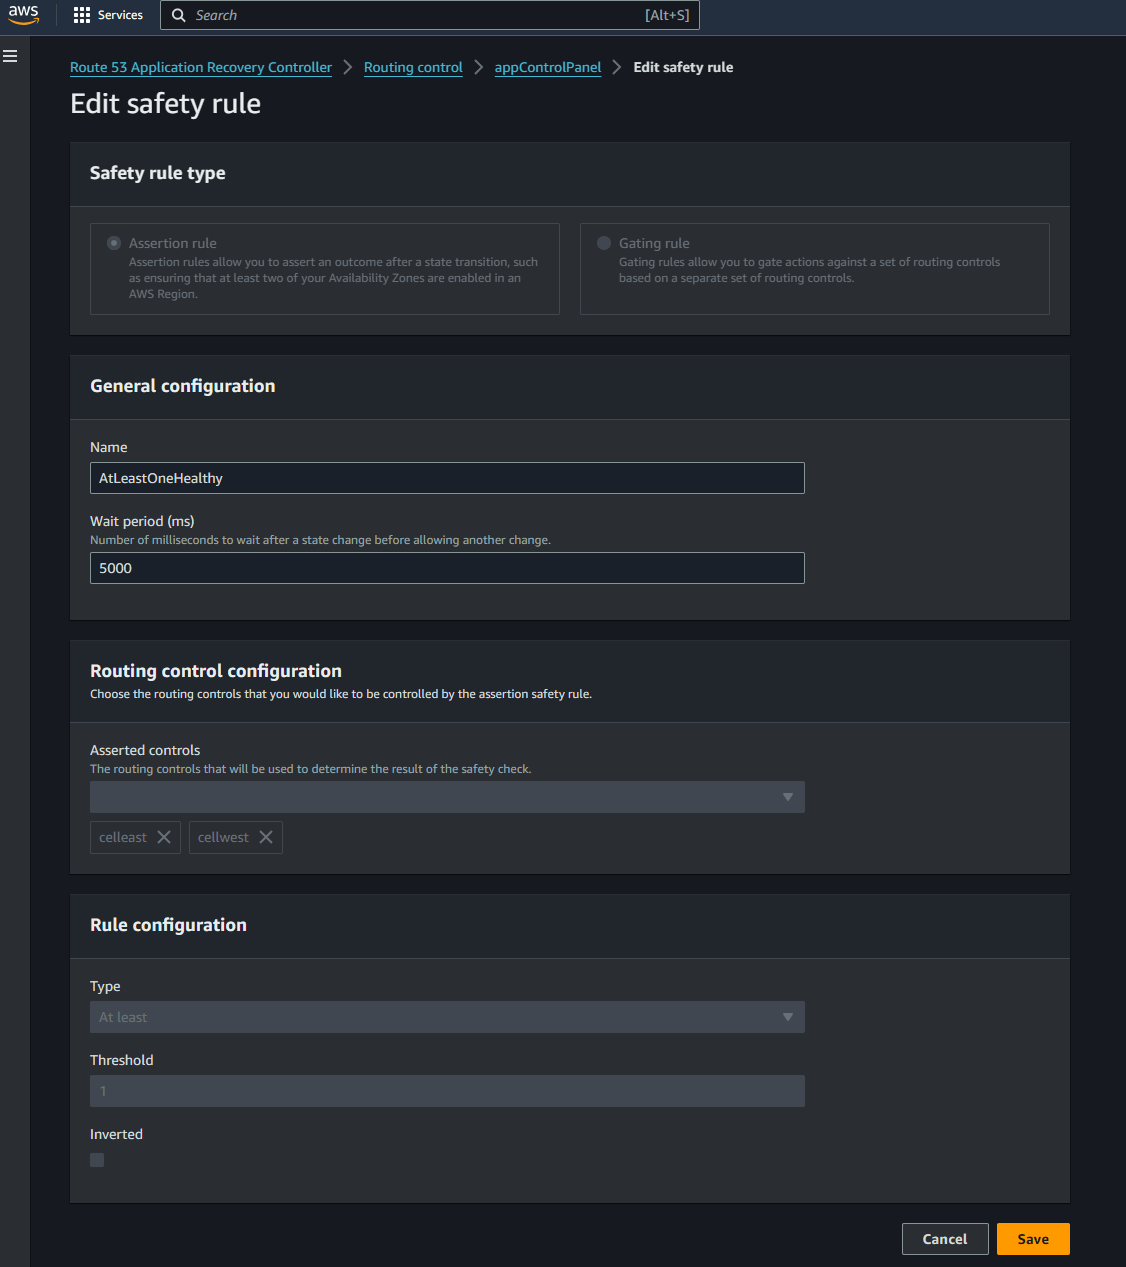
- Create Safety Rules: Even though the cluster can handle failovers automatically, its still a good idea to create some safeguards to prevent scenarios like both controls are turned off or trying to route before a control is reported healthy. Here we will create a safety rule to ensure at least one of the routing control is turned on and both cant be turned off simultaneously. To create the safety rule, navigate to the control panel which was create earlier. Navigate to the Safety rules section and click Create. Select Assertion Rule and provide a meaningful name. Select the routing controls needed from the list. Provide the rule in the config section. Here I am specifying that at least one of those controls need to be activated and routing traffic.
We have now completed adding the routing controls and the arc config. Next we will need to configure the Route 53 hosted zone, so it routes traffic to these controls. Lets start configuring the hosted zone.
Configure hosted zone for frontend:
- Navigate to the hosted zone which was created earlier. Create a new record and select the Record type as A record. Select Alias as Yes and select the primary app load balancer as the Alias target. The record name will be a sub domain where the app will be served from. Since we are following a failover strategy to a secondary region, select the Routing policy as Failover. This is the primary record which will be used to route traffic to the primary region. To determine the health of the record, select the health check which was created earlier as part of the Routing control. This health check will determine if a failover is needed to the secondary region.
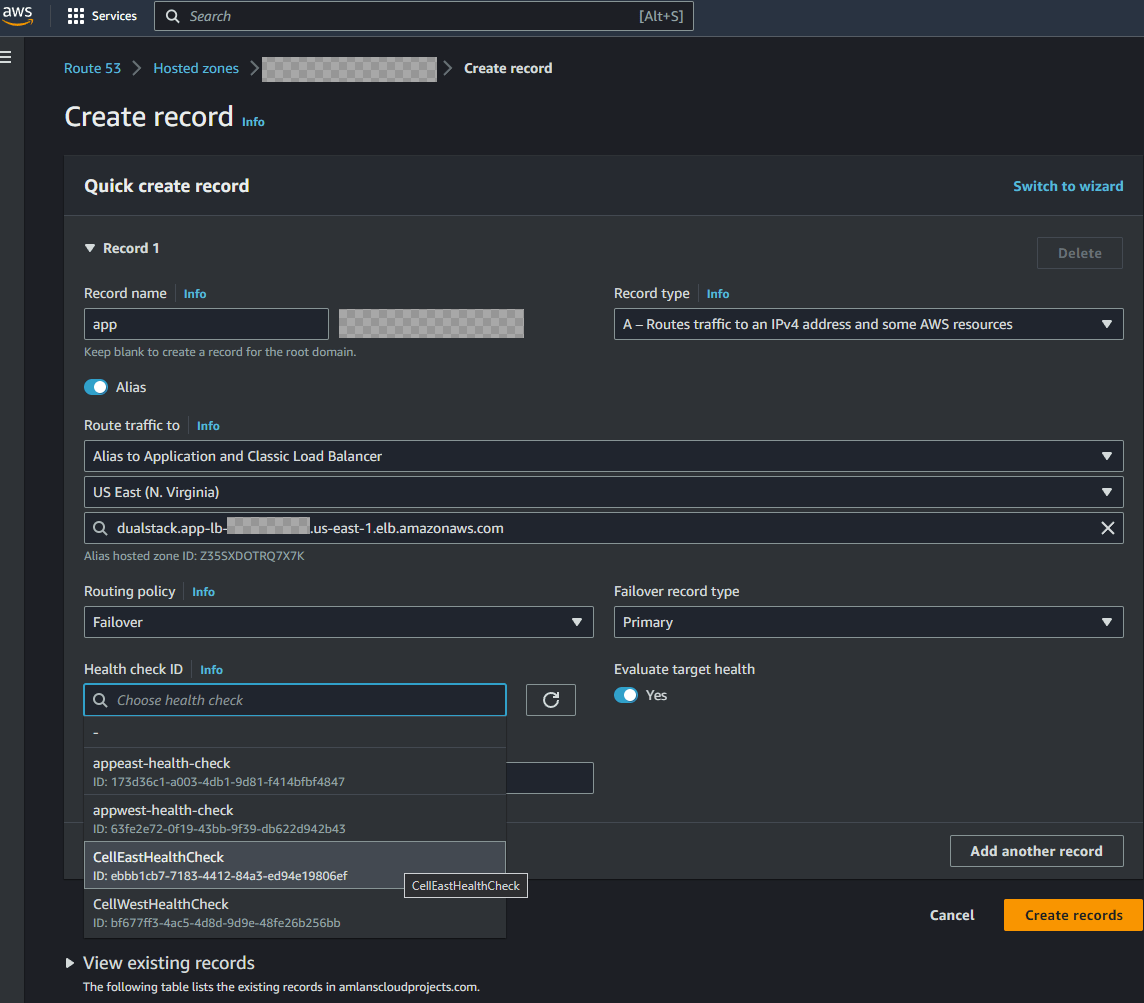
- Repeat the same steps, but this time select the secondary region load balancer and the secondary region routing control health check. This will be the failover secondary record where the app will fall back to if the primary region fails.
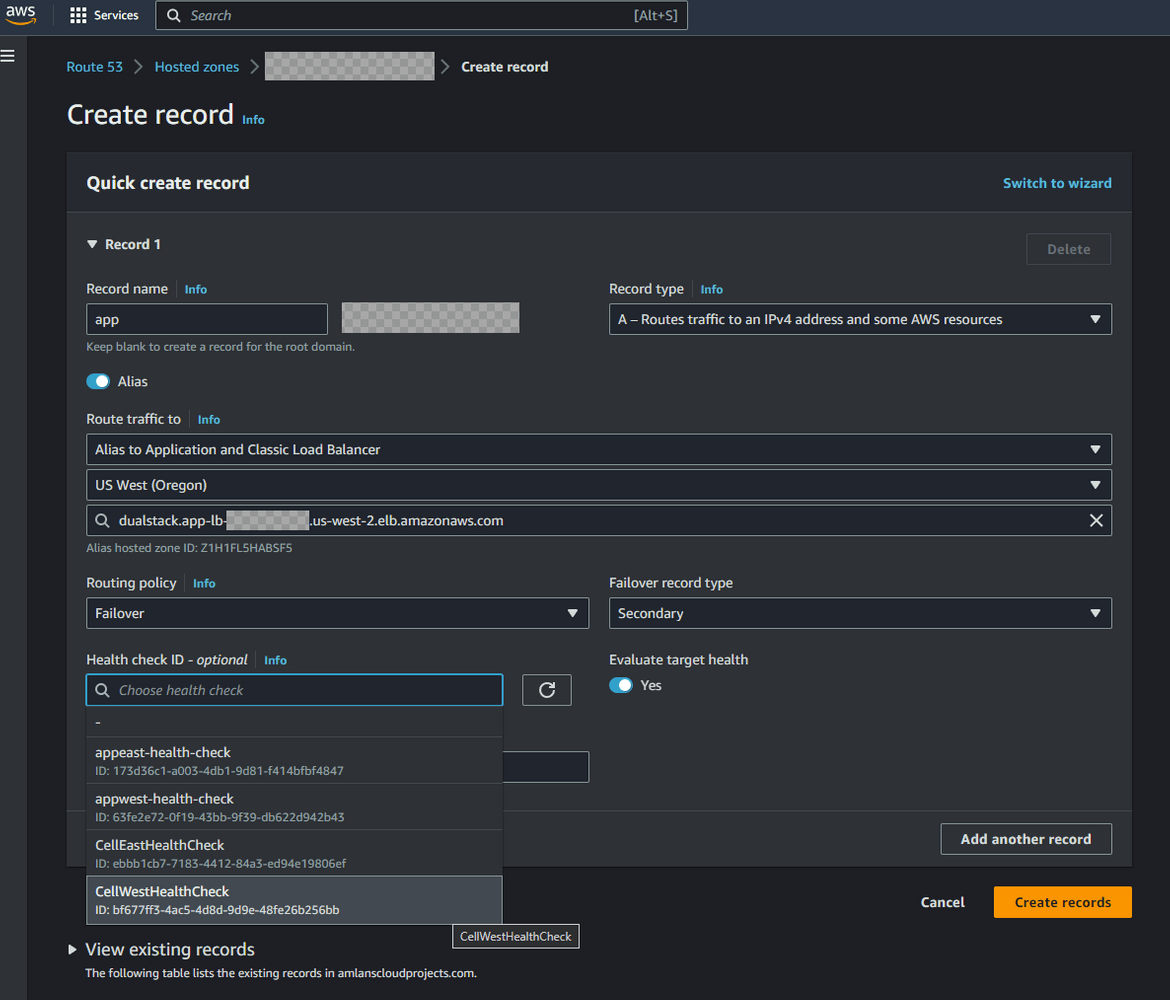
Configure hosted zone for API endpoint:
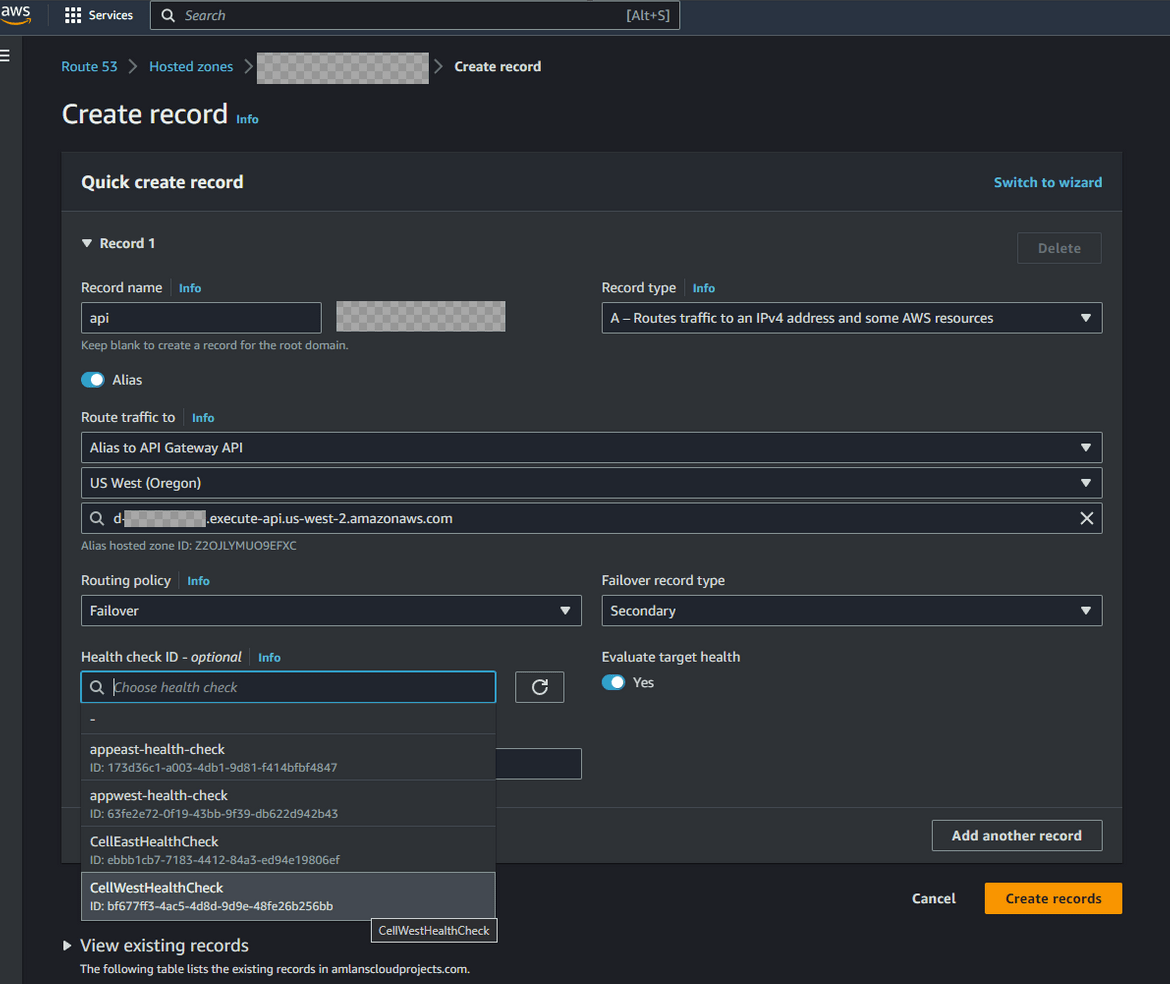
We also have an API gateway defined that needs to follow the failover strategy. Similar to the frontend, we configure hosted zone to have a primary and secondary record for API endpoint failovers. Navigate to the hosted zone and create a new A record. This time select the API gateway as the target. Select the primary API gateway for the primary record and the secondary region for the secondary record. Select the routing control health checks for the respective regions.
After configuring above steps, the hosted zone should look like below along with the records for app front end and API

There 2 records each for the app frontend and the API. So the app can be accessed at app.<domainname> and the api can be accessed at api.<domainname>
Enable Traffic Routing:
We have the hosted zone records configured. Now we need to start routing traffic to the primary region via the routing controls we created earlier. Follow these steps to enable the routing
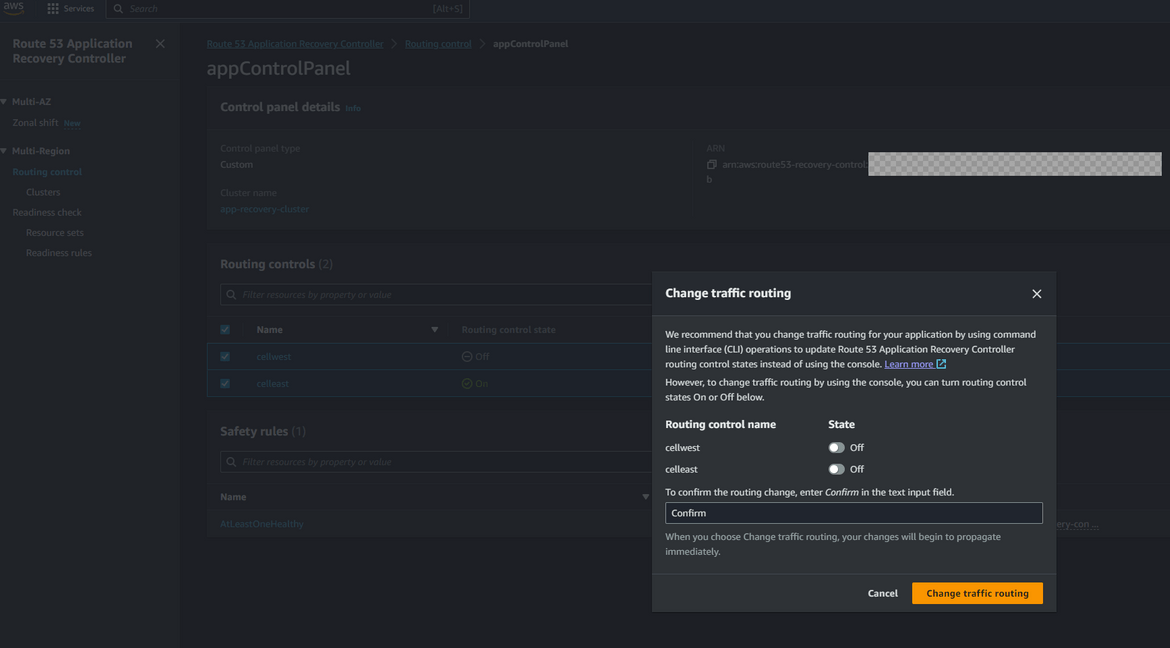
- Navigate to ARC page and navigate to the control panel which was created earlier. Select the 2 routing controls (for east and west) and click Change routing control states. Select the cell for the primary or in this case the east region. The control to be selected depends on specific use cases. But for my example I am enabling the east region cell first.

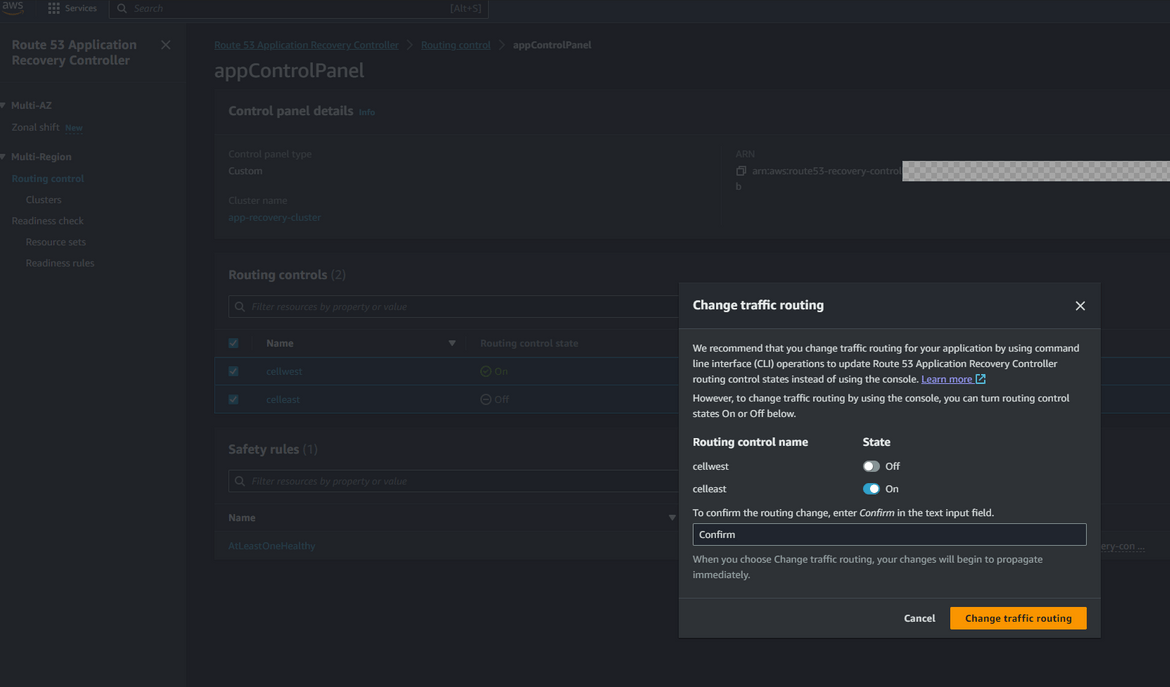
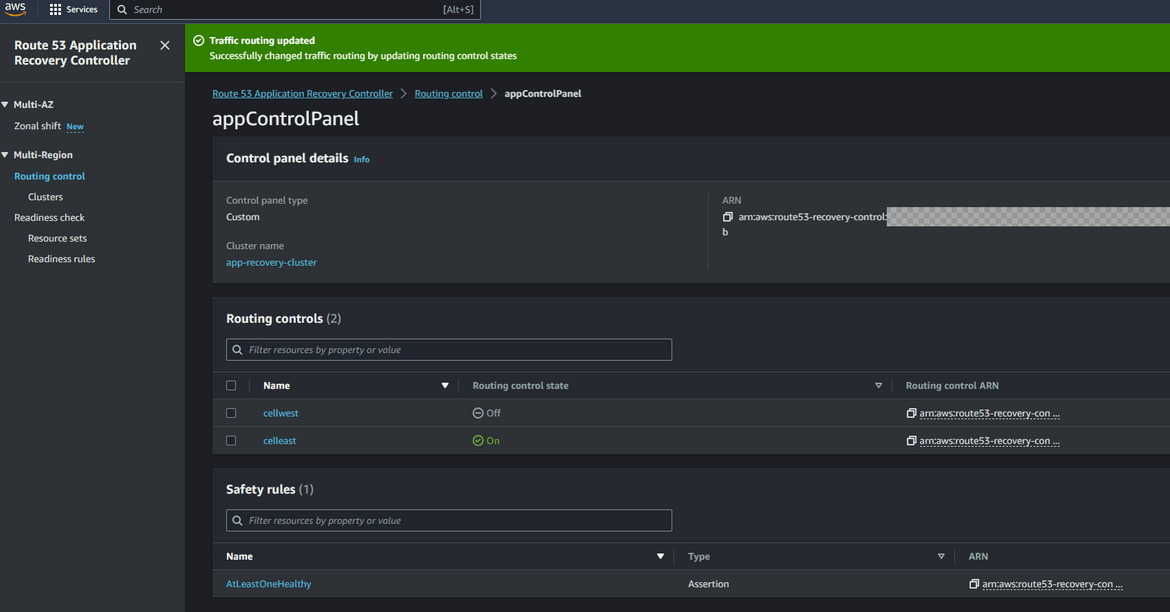
With this changed, the traffic should start flowing to the components in east or primary region. So any requests to the app domain will now open the application and API from the east region. Lets try it out. Go ahead and open the app url on a browser. You should have your own domain which you can use. Use the subdomain for app which was configured in the hosted zone. Here I am opening my app url
In my example app I have added a footer which shows the region from which the app is served. Here we can see the app is served from us-east-1. With this our app is now serving traffic from the east or primary region. Lets now trigger a failover to see how the app fails over to the secondary region.
Before we move on, I wanted to show the effect of the safety rules we added before. We added a safety rule that at least one routing control need to be active. So lets try to deactivate both controls. Follow the same steps above and try to deselect both controls. You will get an error saying that at least one control need to be active.
Test the failover
To test the failover, I will block public traffic access to the frontend. The frontend app is being served from the EC2 which is in a VPC. Lets cut off the public access for that subnet in which the EC2 instance resides. Navigate to the NACL which was created when the app stack was deployed. The NACLS can be found in the VPC service under Network ACLs. In that NACL I am adding a rule to block all incoming traffic from the internet.
When the rule is added, now the app should become unreachable. If you hit the app url, it will thrown an error. So it simulates our app being down in the primary region. Navigate to the ARC service page and open the readiness check. It will show that the east region cell is not ready
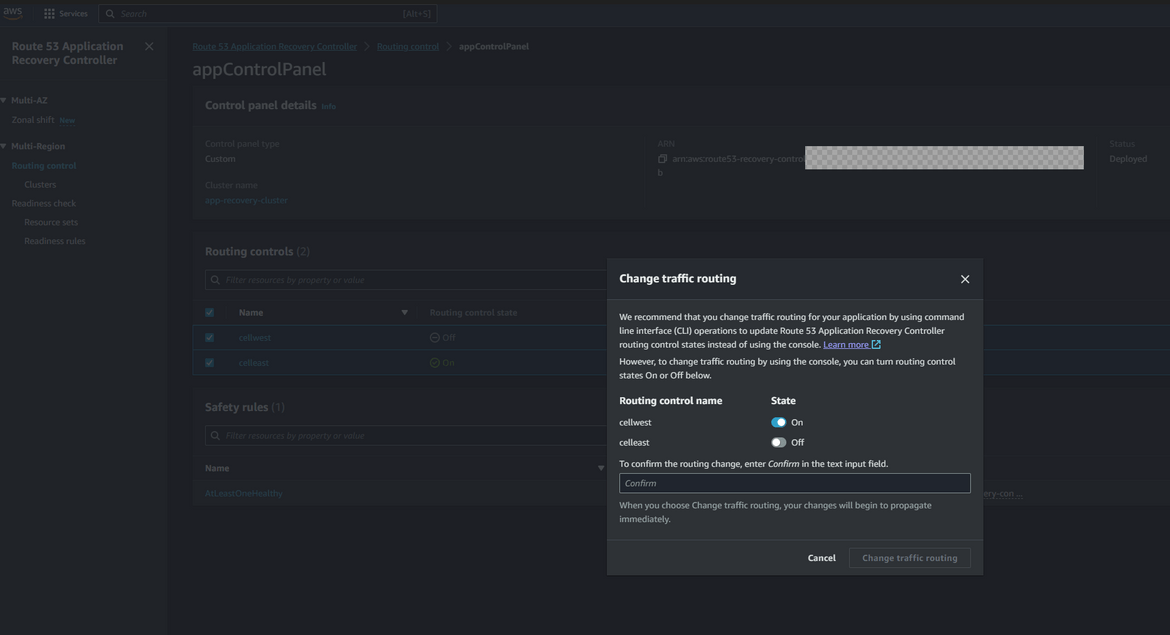
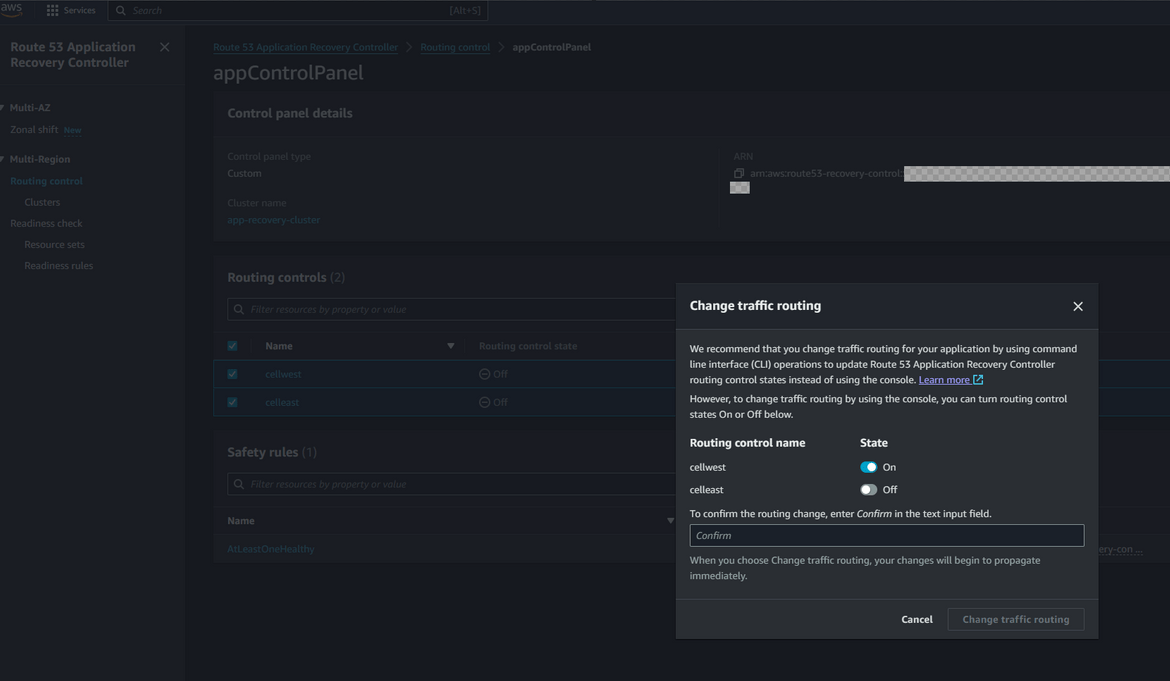
Now we have to do a failover to the secondary region. The failover can be automated but for the example to have a better understanding, we will do the failover manually. Navigate to the control panel and select the routing controls. Click on change routing control states. From the pop up, now deselect the east cell and select the west cell. This will now make the traffic flow to west region instead of east region (remember east region is down!!)
Once the control is activated, lets hit the app now. Open the app url same as before. Now the app should be served from the west region. The footer now shows that the app is served from west region instead of east
Great!! Our failover is working fine and the app now failed over to a healthy region when the primary region went down. Now when the primary region is fixed and everything is up and running, the routing control state can be updated to changed back to primary cell so the traffic goes back to east region.
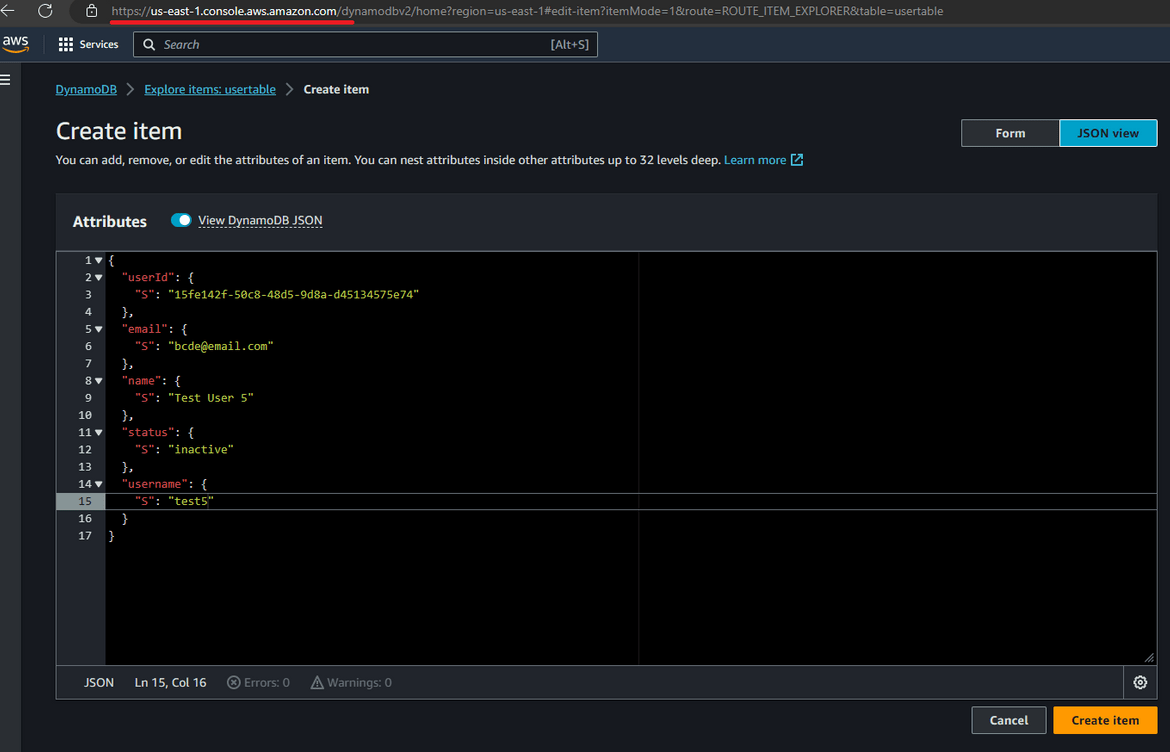
For the data in DynamoDB, since we enabled global tables, the updates in one region will get replicated to other region automatically so theres always updated data in the secondary region after failover. Lets test this. Create a record in the DynamoDB table in the primary region.
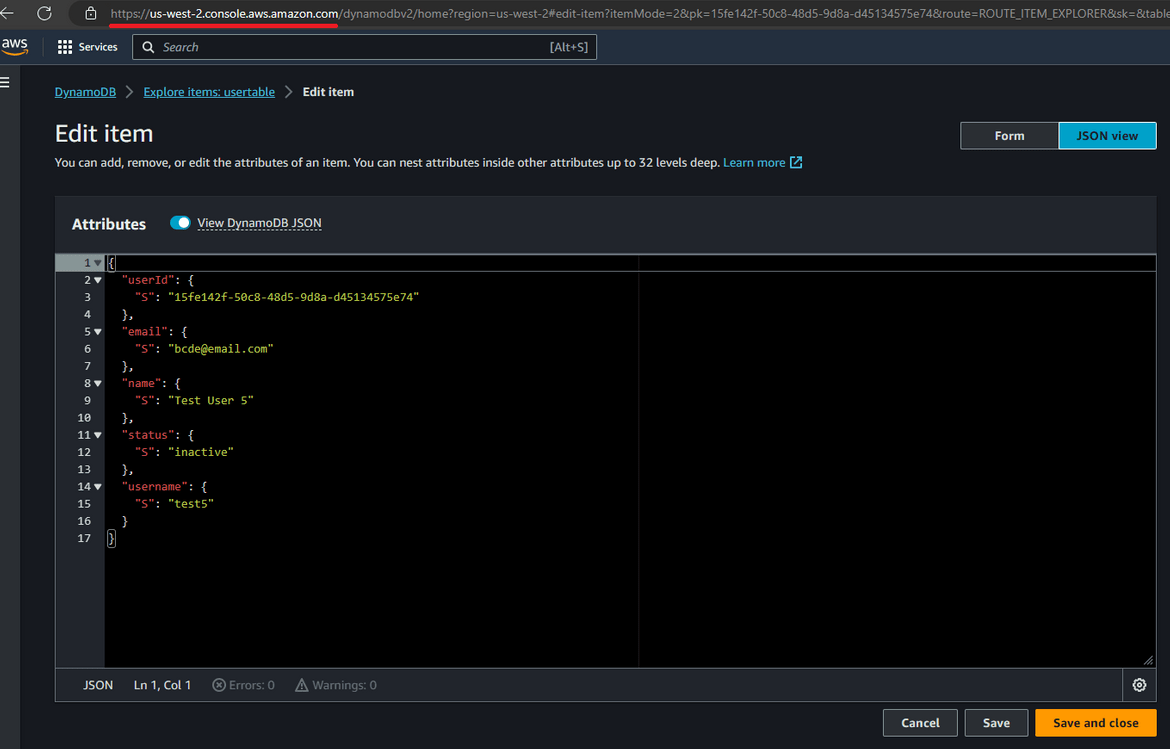
Now lets navigate to the DynamoDB table on secondary region. Change the region on AWS and navigate to that DynamoDB table. Check the same record exists
With this replication, the data is also up to date in secondary region. Whenever failover happens, the same updated data will be served from the secondary region too.
Conclusion
We went through a long process of setting up a disaster recovery infrastructure using AWS Route 53 ARC controller. This process becomes very crucial when running Production workloads. Every application should have a failover strategy planned for instances when whole region or app components go down. The process I explained here is a very straightforward scenario to show the use of ARC controller. In real life scenarios the use cases can be more complex. But this should provide with you with a base level understanding of how to use ARC controller. Any questions or issues reach out to me from the contact page.
