Four Ways to deploy your Lambda Function from local to AWS - Serverless, SAM, Docker & Terraform
Recently I have been involved in developing a lot of AWS Lambda functions. Now if you don’t know about Lambda functions, don’t worry I will get to it later. So when I started learning Lambda functions and developing some of my own, one thing I always struggled with at the start was, how do I work on them locally. It was very tough to work on the editor within the AWS console and it was tougher if you had to install packages with the function. That’s when I started learning these different ways of working on the Lambda functions locally and deploying them to AWS.
So this post is where I try to explain what I learnt about the various ways to deploy Lambda functions. Hopefully this will help someone else who is starting to learn the wonderful Lambda functions. On a high level these are the ways which I will go through here and I found easier to deploy a Lambda function:
- Using Serverless Framework
- Deploy Lambda functions from Docker images
- Using SAM (Serverless Application Model) templates and Lambda Layers
- Using Terraform
As always the whole code base is available on my GitHub Repo Here. The sample code for each of the ways are included in the repo.
Pre-Requisites
Before I start, if you want to follow along and deploy your own Lambda, here are few pre-requisites you need to take care of in terms of installation and understanding:
- An AWS Account
- Basic understanding of at least one coding language. Here I will follow Python
-
Few installations. I will go through the installations in later sections:
- Serverless Framework
- SAM CLI
- AWS CLI
- Terraform
- Docker
- Basic understanding of Docker and building Docker images
What is a Lambda Function
Lambda is the Serverless computing platform service provided on AWS. Using a Lambda function you can run or execute your application code without actually provisioning any App servers. You provide the code as a Lambda function and once its executed, Lambda takes care of provisioning the required infra on the backend. As a developer using Lambda, you only have to worry about (at the least):
- Your code
- How much memory the code execution may use up
- Any timeout/execution timings
Lambda supports multiple languages and frameworks which can be used to write a whole application using a Lambda Function. It is very useful to build application backends where the Lambda function will act as an API backend fronted by an API gateway.
To get a simple Lambda function running, your typical steps will be:
- Write the Lambda code in a choice language of yours
- Package the code in zip format
- Upload the package and create the Lambda function from AWS console
- Execute the function
These are some generic steps to create a Lambda function. But in this post I will go through steps to deploy a full Lambda function app using some common methods which can automate the Lambda deployment.
The Sample App and Architecture
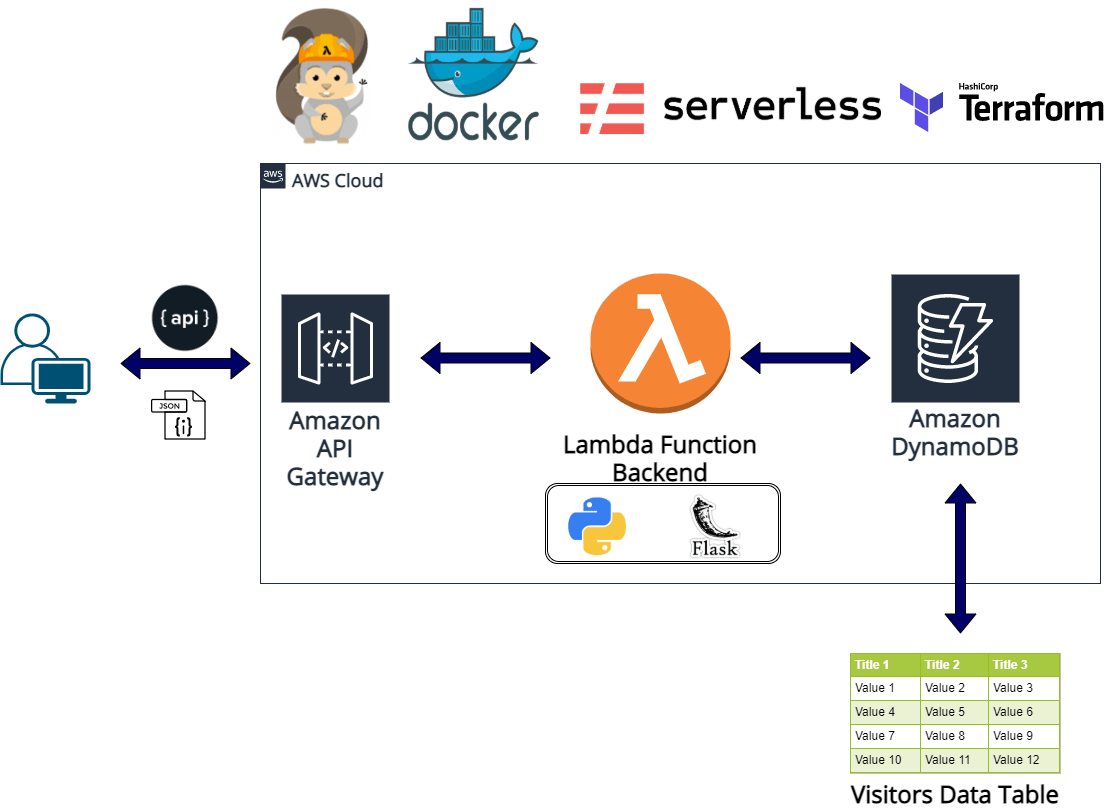
To demonstrate the Lambda deployment methods in this post, I have developed a simple app which I will be deploying. The app is basically a Flask API built using Python. Below image shows an overall architecture of the API and its different components.
- API Gateway
This exposes the API endpoint to the internet. This is like a gate to the backend Lambda function. This handles the routing the API requests for different API routes to the specific Lambda function. I am using a really simple version of the Gateway. In a real scenario there are lot of functionalities which get activated within the API Gateway like Authentication, rate limiting rules, API keys etc. I wont be getting into details of those as those are separate topics in itself. For this sample project I am using a basic API Gateway without any authentication. The API endpoint is accessible publicly for this demo API. But you should always have some kind of authentication added to your APIs. You can handle the API authentication either in your Lambda code itself or offload the auth to the API Gateway using custom authorizers. -
Dynamo DB
This is the backend database which the API will call to get the data. This is a NoSQL database provided by AWS. The Lambda function calls the Dynamo DB endpoint to get the data and return as a response. This is high level structure of the DB:- Table Name: Visitors
- Primary Key: Visitorid
I will create the DB with some default options and wont be customizing much.
-
Lambda Function
This is the actual backend for the API. The API Gateway is pointed to this Lambda function and routes all API requests to this function. This is a Lambda function developed in Python. Its basically a Flask API which exposes one API endpoint. Here is high level what the API returns:- /getcount: returns the count of records in the table. So in this scenario this is returning the Visitorcount counting the visitor records in the table.
The function returns the API response in JSON format. I am using few python packages in the function which is specified in the requirements file: - boto3
- /getcount: returns the count of records in the table. So in this scenario this is returning the Visitorcount counting the visitor records in the table.
One more point to note here is that we will need an IAM user which will used throughout the process to perform the deployments to AWS. Before starting with any of the deployment steps, go ahead and create an IAM user and note down the credentials:
- Login to AWS console
- Navigate to IAM and create a new user. Provide permissions as needed.
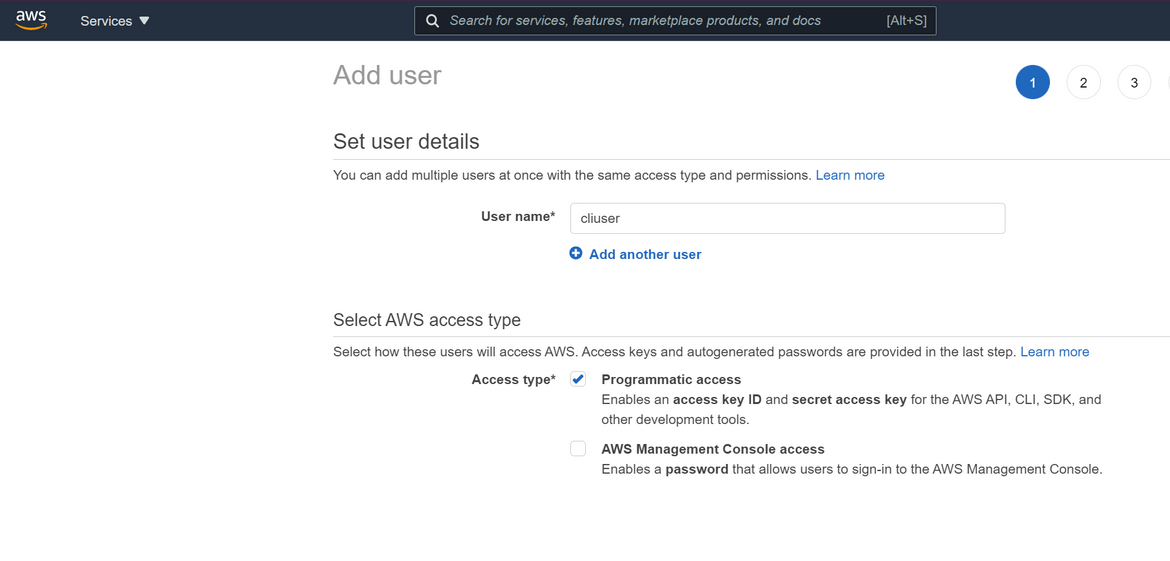
- Note down the credentials from the creation confirmation page. These will be needed in below deployment methods
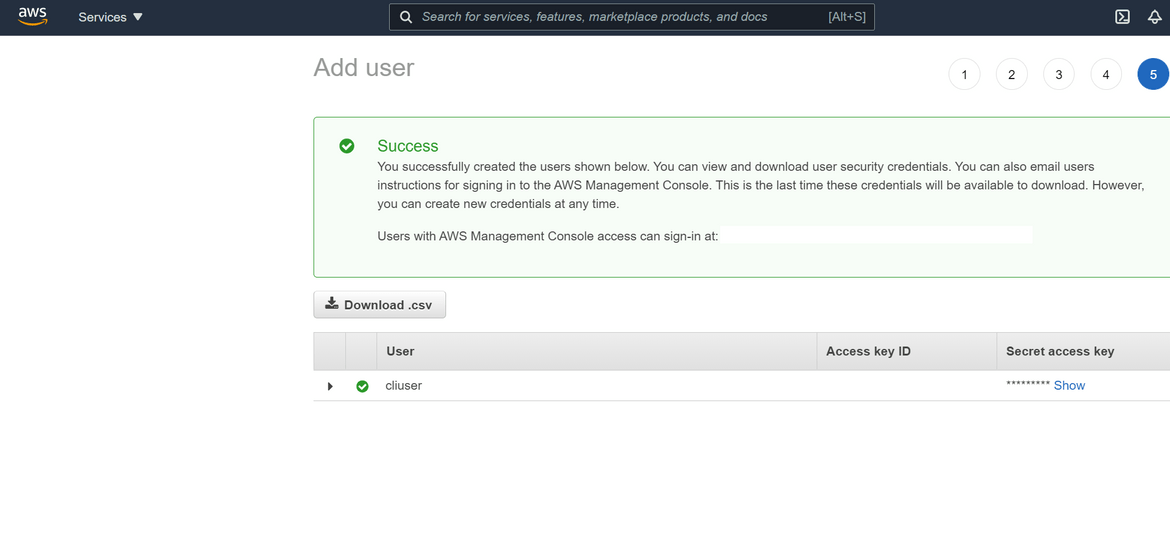
Lets go through the deployment methods to deploy the app described above.
Deployment Methods
Below I will be walking through three different ways of deploying the different components of the architecture I described above. I will be explaining step by step along with the installation instructions. You can follow along the steps on your own too and with your own code.
Use Serverless Framework
The first method I will be using to deploy the components is using the Serverless framework. Serverless is an open source and free framework which can be used to build and deploy AWS Lambda functions. Its a framework developed using NodeJS and can be easily used to deploy a Lambda function from your local machine to AWS using a CLI. It can also take care of provisioning the API Gateway and the DynamoDB. Lets see how it works.
-
Installation:
First we need to install it on the local system so we can use a local CLI to interact and provision AWS resources. Before we can install Serverless, you need to make sure NodeJS and NPM is installed in the system. You can follow the instructions from Here to install NodeJS and NPM on Linux. For Windows the installer can be found Here.
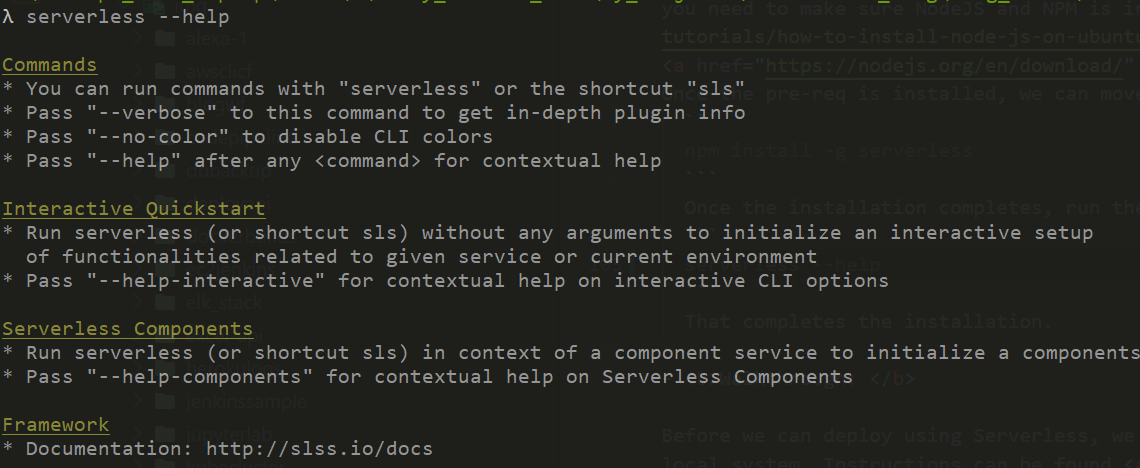
Once the pre-req is installed, we can move on to install Serverless. Run the below command on a command prompt or CLI to install Serverless:npm install -g serverlessOnce the installation completes, run the below command to test if its installed properly:
serverless --help
That completes the installation.
- Walkthrough:
Before we can deploy using Serverless, we need to configure AWS credentials on local system. If not already done, go ahead and install AWS CLI on your local system. Instructions can be found Here. Once installed run below command and provide the asked details to configure the AWS CLI with ‘apiprofile’ profile.
aws configure --profile apiprofile
![]()
Once the AWS CLI is configured lets start deploying the API components. I have included the sample code in my repo. For this step the code will be in the Serverless folder. Let me go trough some important parts in the code and files which need to be done in any other Serverless framework deployments too.
- Changes in code
Overall the code is a general Python Flask API. You can write a Flask application just as you write in general and prepare the final code folder. The sample app file can be found in the serverless folder of my repo. -
Serverless config file
To specify the details of the components which the framework will deploy, a config file has to be created in the same folder of the code. I have added the serverless.yml file in the code folder. This file will specify the details for the:- Lambda Function
- API Gateway resources
- DynamoDB details
Let me go through some important sections from the YAML file:
-
provider: In this section I have defined AWS related details which will be used by the Serverless framework to create the Lambda function. Most of the parts are self explanatory as shown below
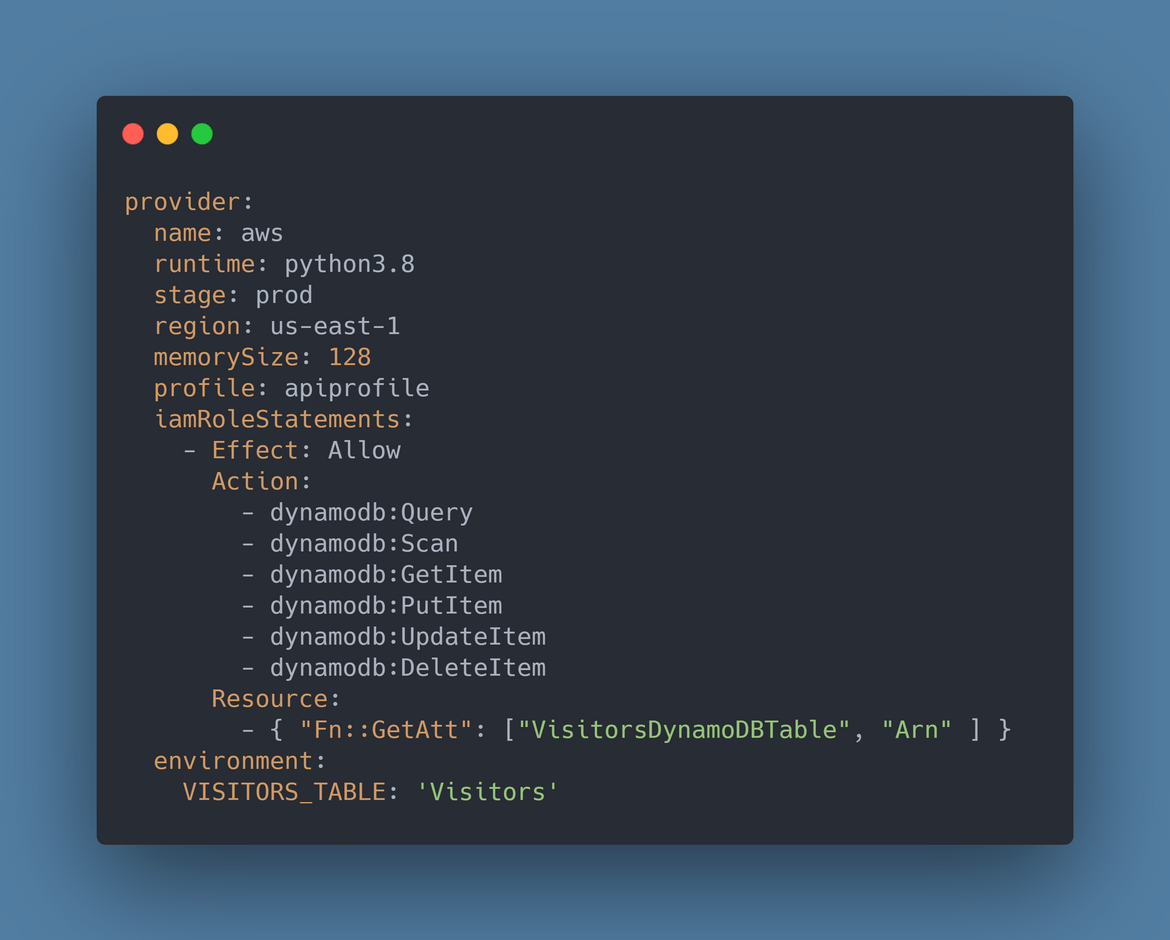
Some of the important ones are:- iamRoleStatements: Define the permissions which will be allowed to the Lambda function. Serverless will create a role accordingly and assign to the Lambda function.
- profile: The local AWS profile which will be used to connect to AWS
- environment: Environment variables to be passed to the function
-
plugins: These are the Serverless framework plugins which will help deploy the local Flask API as a Lambda function. There are two plugins used here which will handle the serving of the function as an API and handling of installation of packages from the requirements file.
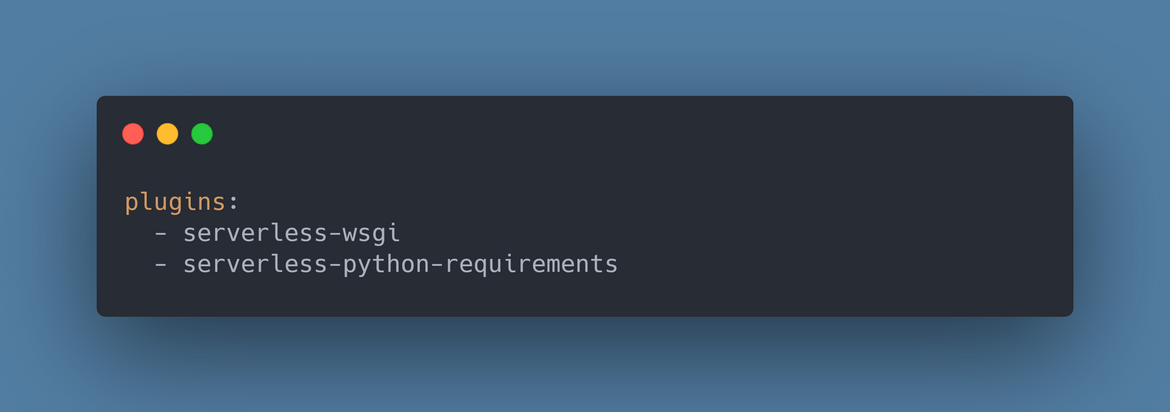
To use the plugins, they need to be installed first. Run the below commands inside the code root folder to install the pluginsserverless plugin install -n serverless-wsgi serverless plugin install -n serverless-python-requirements -
functions: This is the section specifying the Lambda function specs. This defines which is the main handler of the function. The function gets created based on these.
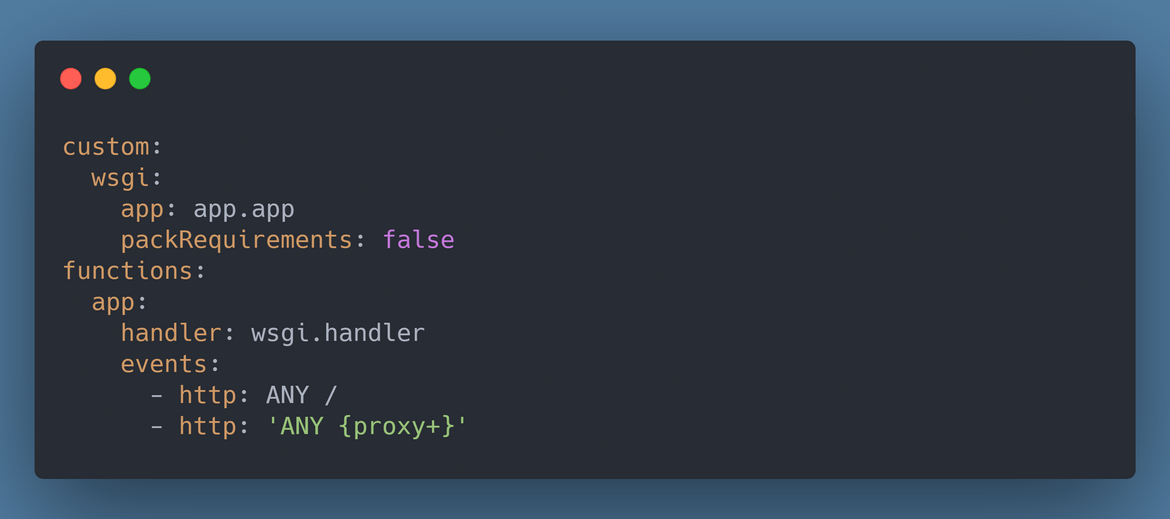
Below are the details:handler: The actual function which gets executed whenever the Lambda is executed
events: These are the events which the Lambda function will handle. Based on this an API Gateway gets inherently created by the Serverless framework. Here I have specified the route as ‘ANY’ which denotes that all the API routes specified in the Flask App will be available through the API gateway. Since I am not using any authentication for the API, there are no other details needed for the APi gateway. - resources: Here we can describe any additional resources which need to be provisioned by the framework. For this example, I am provisioning the Dynamo DB table. The details are specified in this section similar to a format used in Cloudformation templates. The statements are self explanatory.
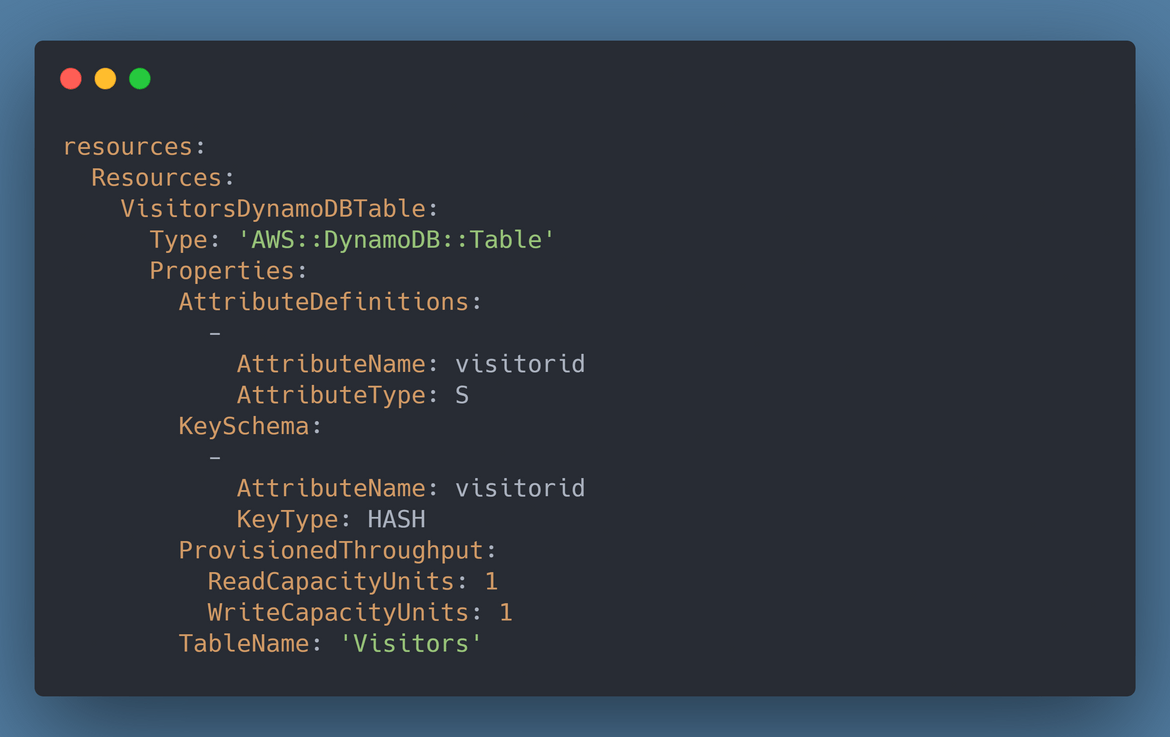
Once these changes are done, we are ready to deploy the API components to AWS. Since we already configured AWS CLI with the profile above, we can now run the Serverless command to deploy the API. If you are working on this from my repo, run these commands after navigating into the repo folder to deploy the API:
cd serverless
serverless deploy
This will start the deployment and you can see the details on the CLI. Once the deployment completes, you should be able to get the API Gateway endpoints from the CLI itself.
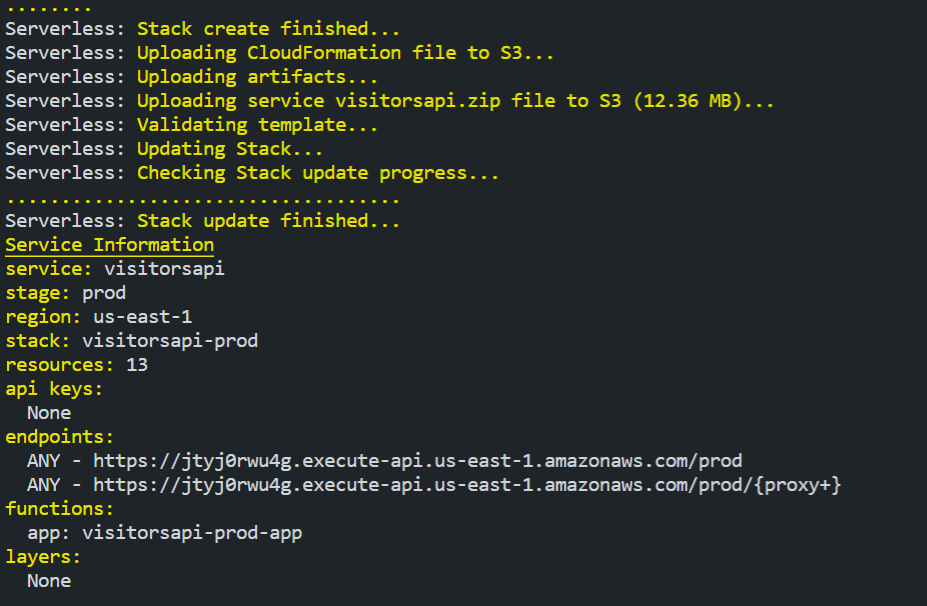
Once you get the endpoint as above, open up below URL on a browser to confirm the API deployment was successful:
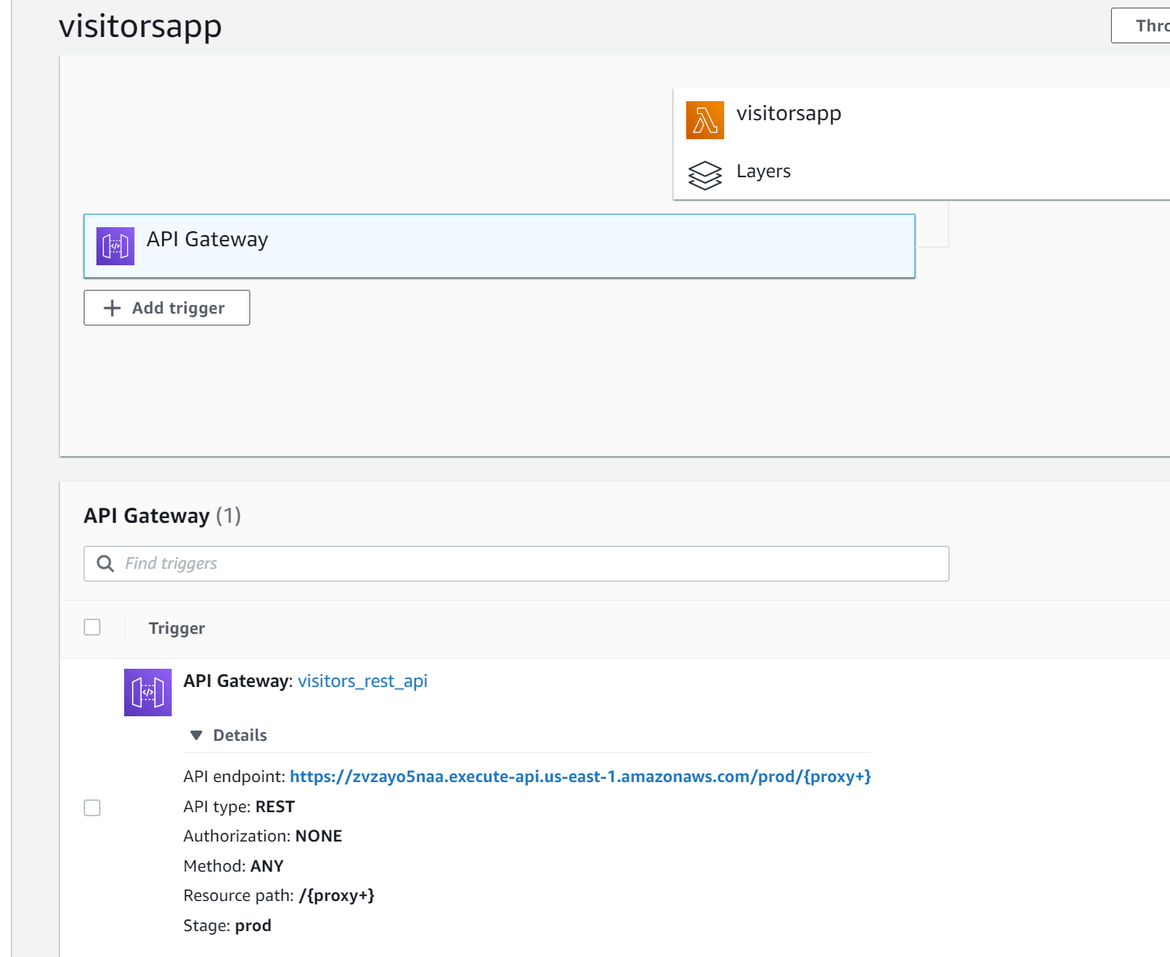
<api_gateway_endpoint>/mainpage You can also also login to the AWS console and navigate to the Lambda service to check your function created:
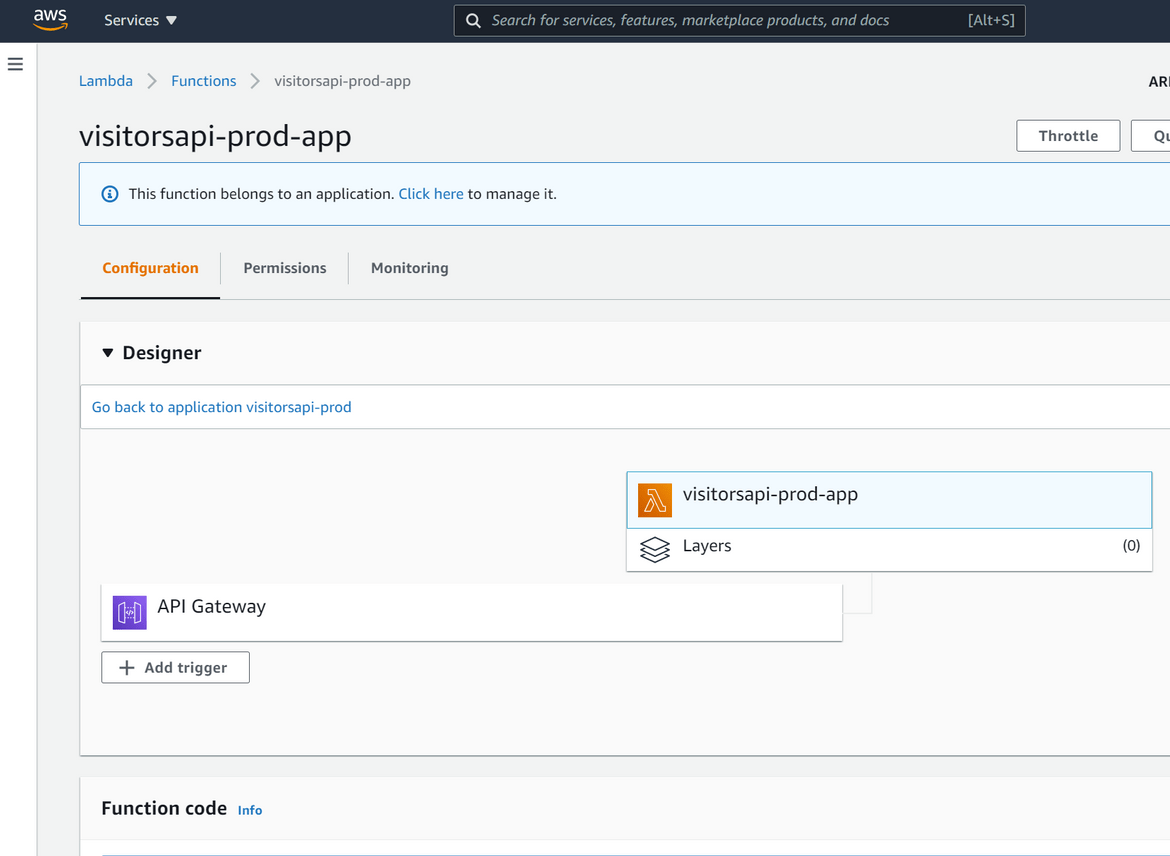
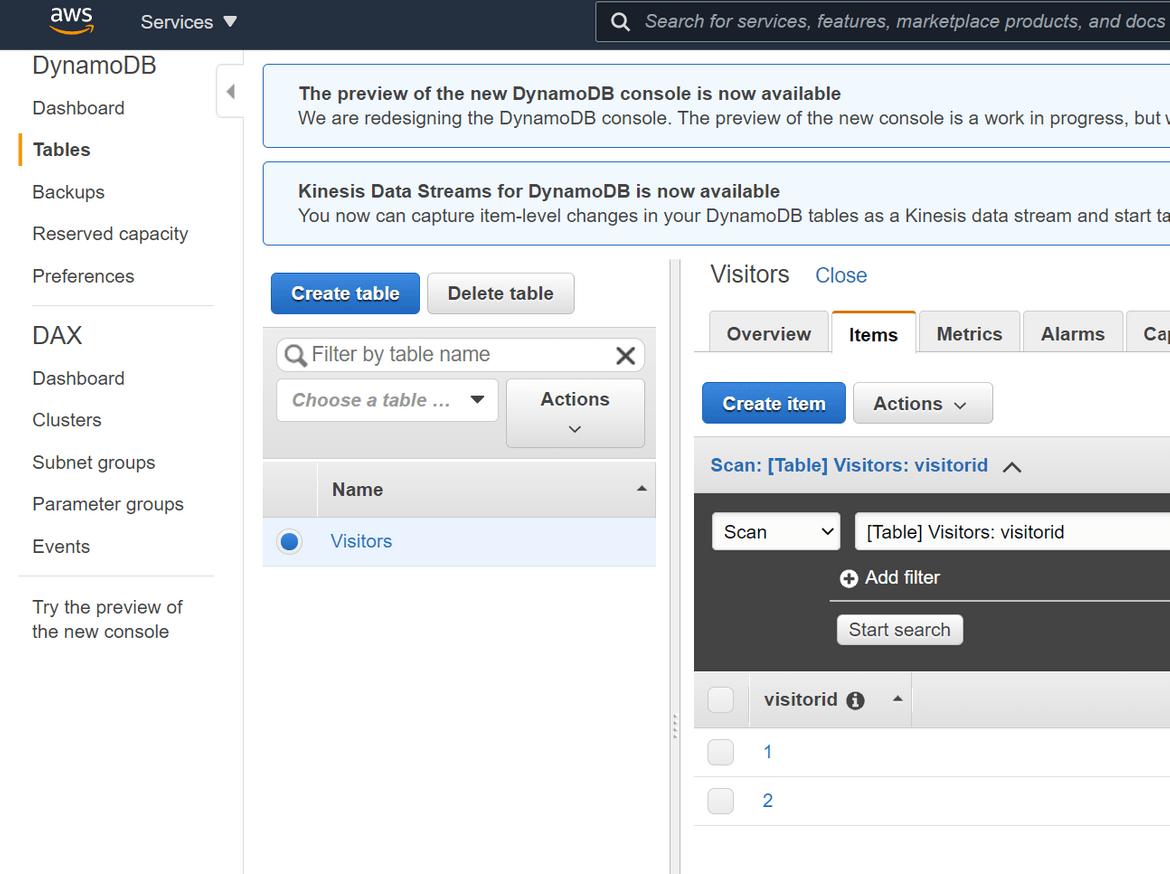
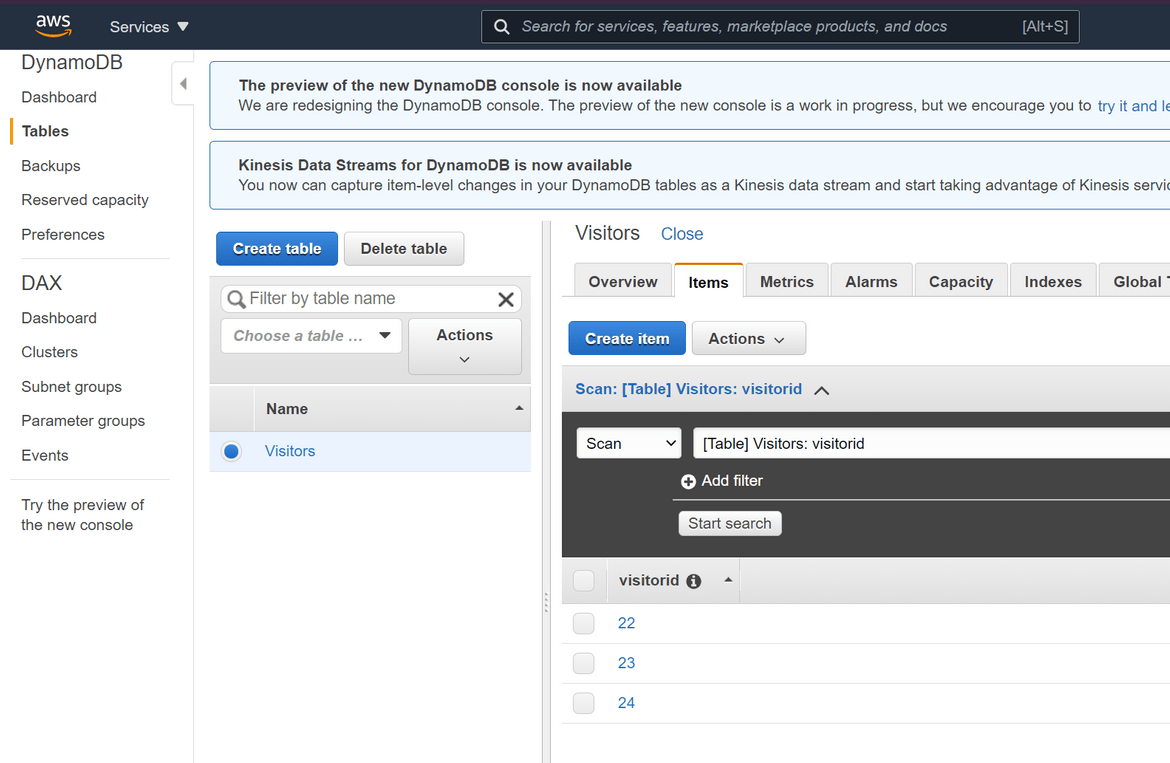
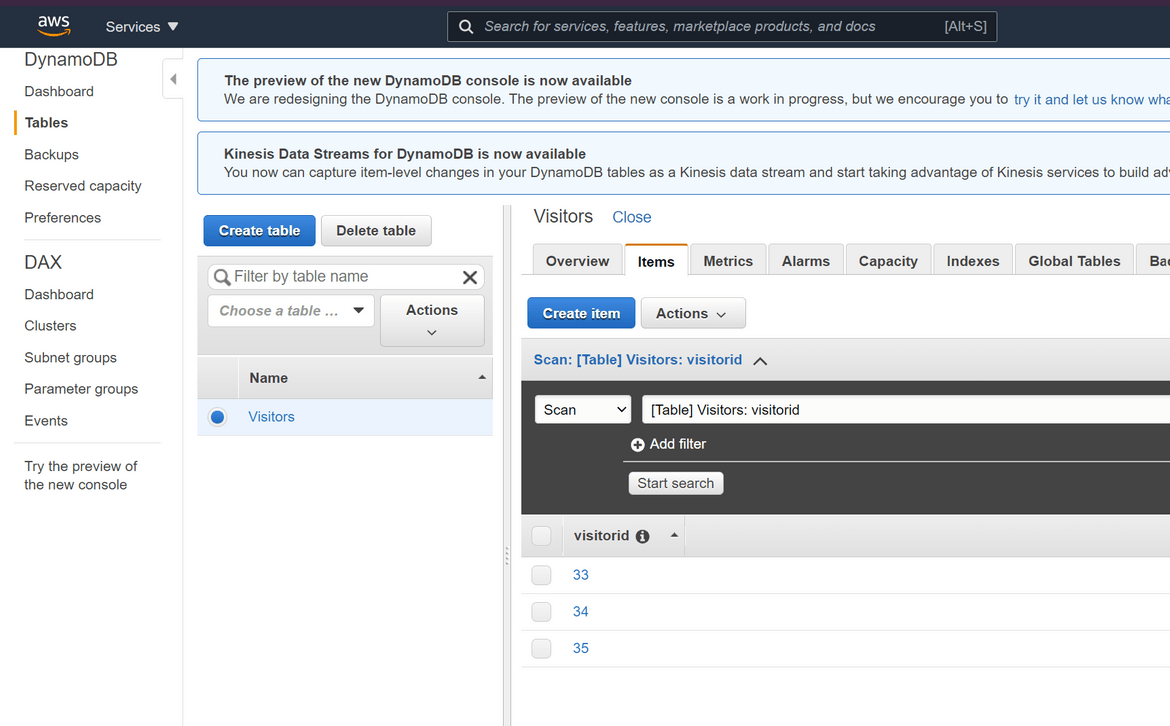
Lets test the API and see if returns proper count. Before testing, navigate to DynamoDB service on AWS console and add sample record as below. This should be enough for sample test.
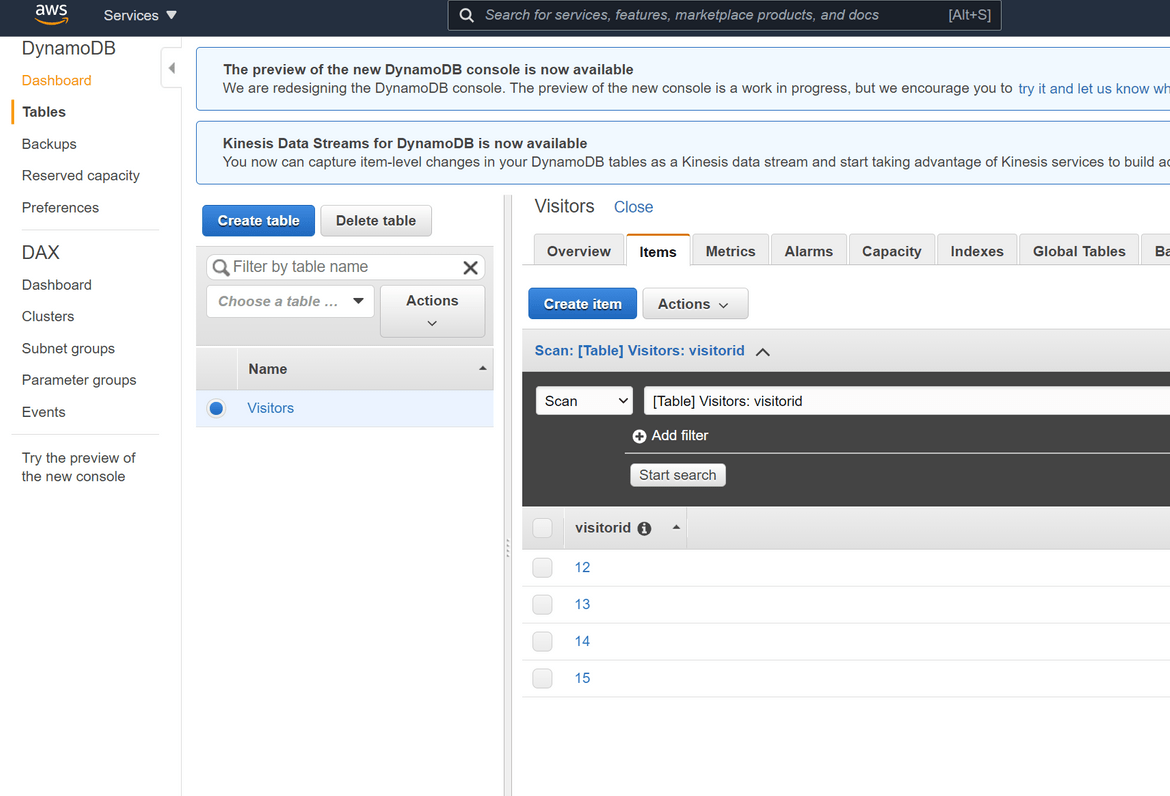
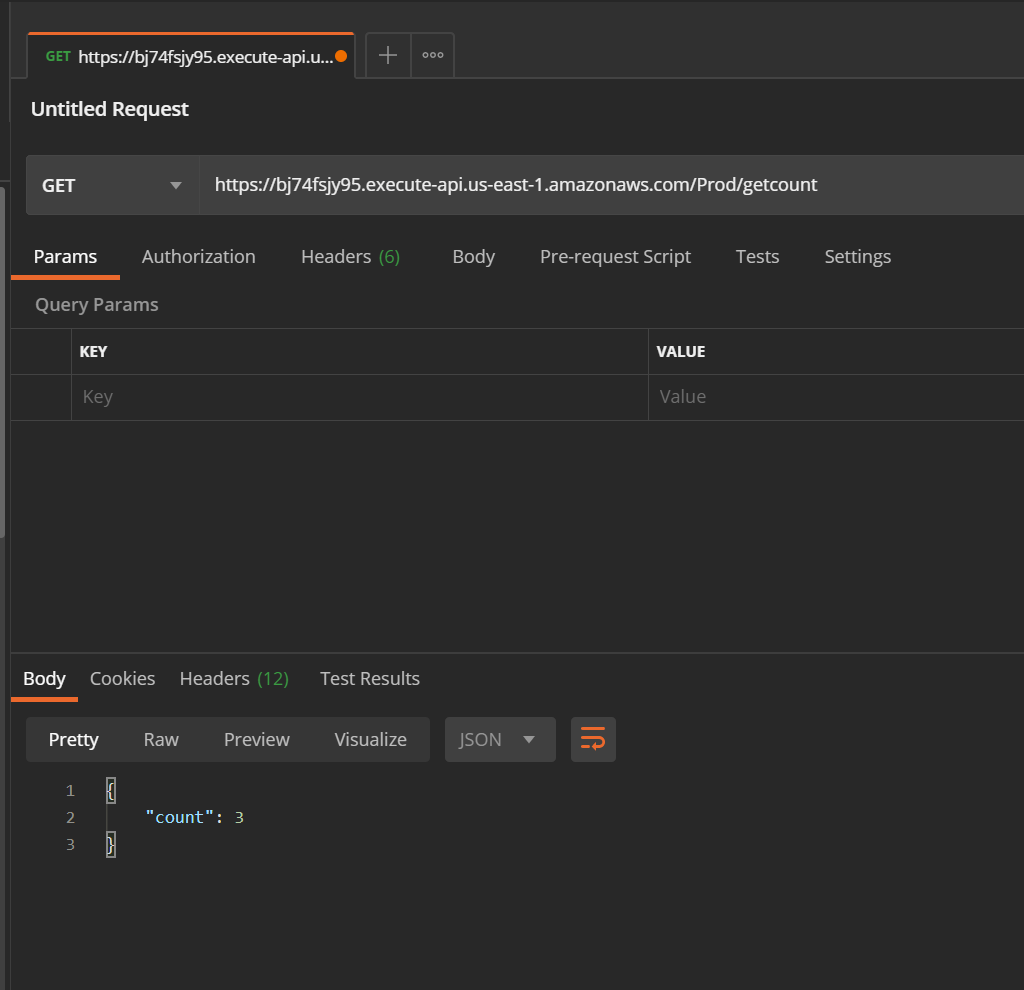
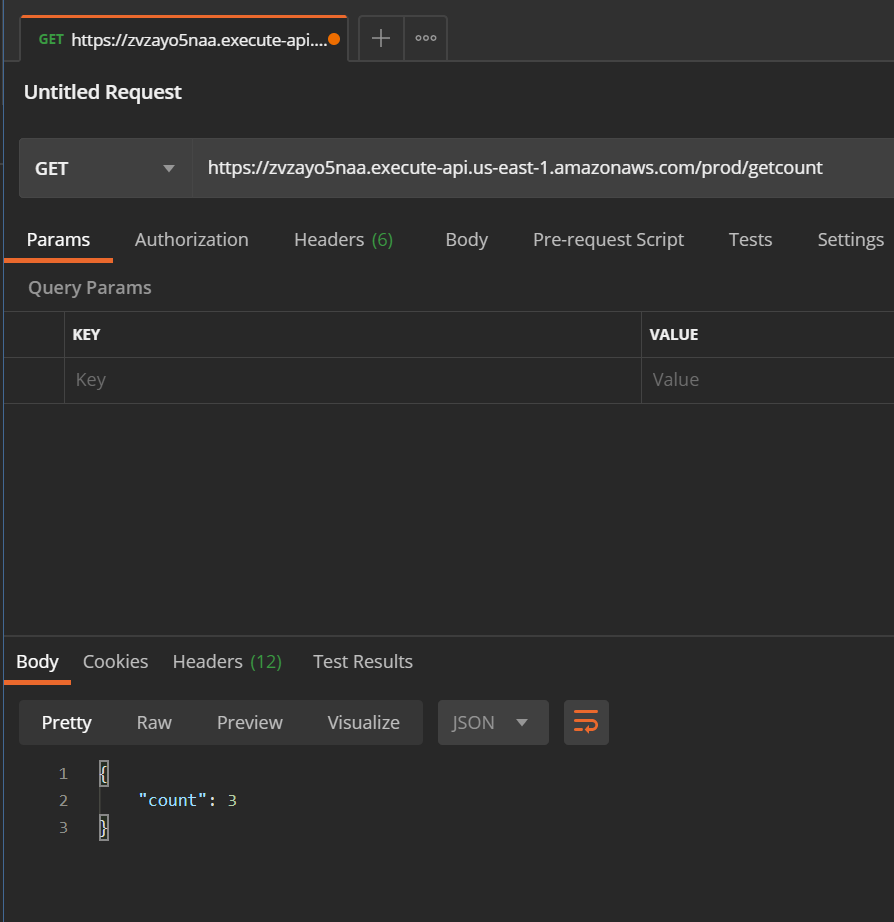
Lets hit the API endpoint to see if we are getting proper count from the DynamoDB. We will be using Postman to test the API. If you don’t have Postman, you can directly hit the endpoint from browser too. I will go through the Postman example. Open Postman and provide the endpoint as below. Once you click send, the response should return proper count.
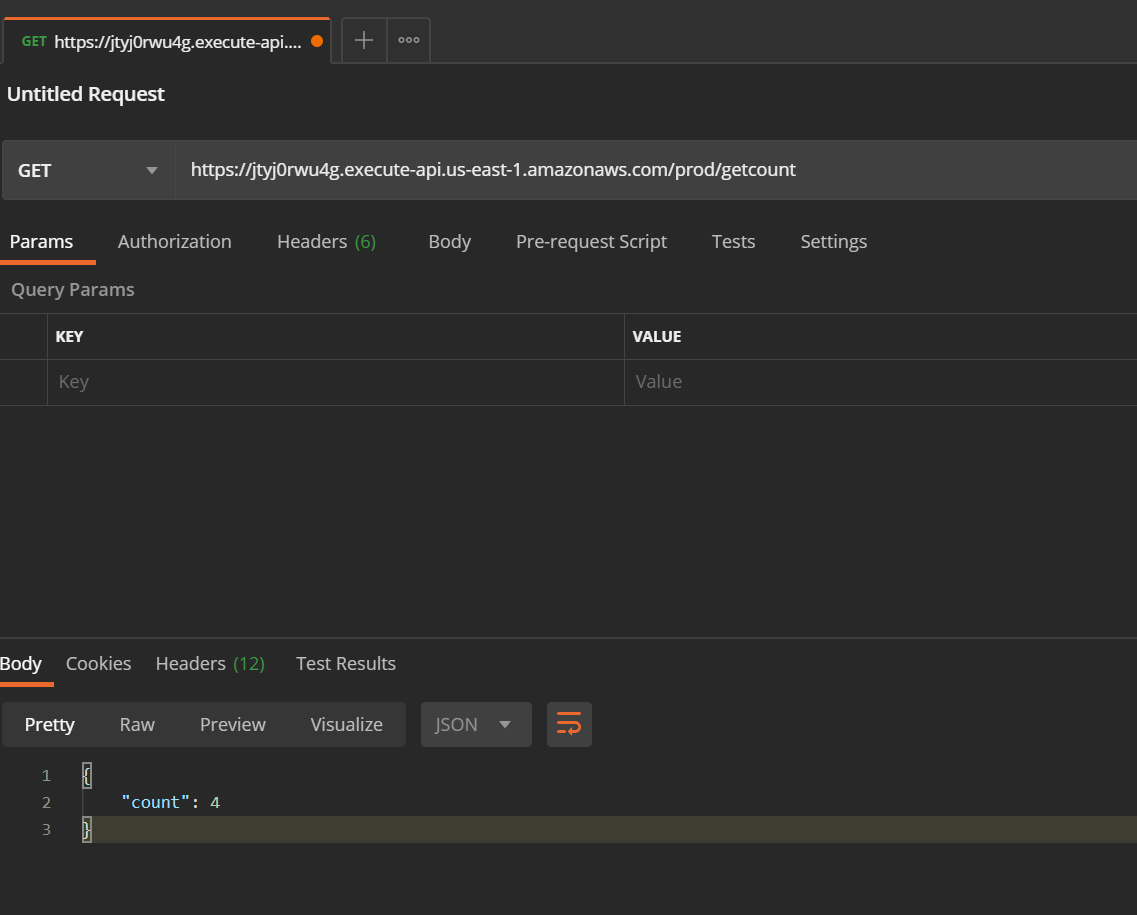
That concludes my deployment of a Lambda function using Serverless framework. Lets move on to the next method.
Use SAM Templates
In this method I will be using SAM (Serverless Application Model) templates to deploy the Lambda function. SAM is anothe open source framework which can be used to build and deploy Lambda functions on AWS. Below high level architecture should help understand the ecosystem of SAM and how it interacts with AWS.
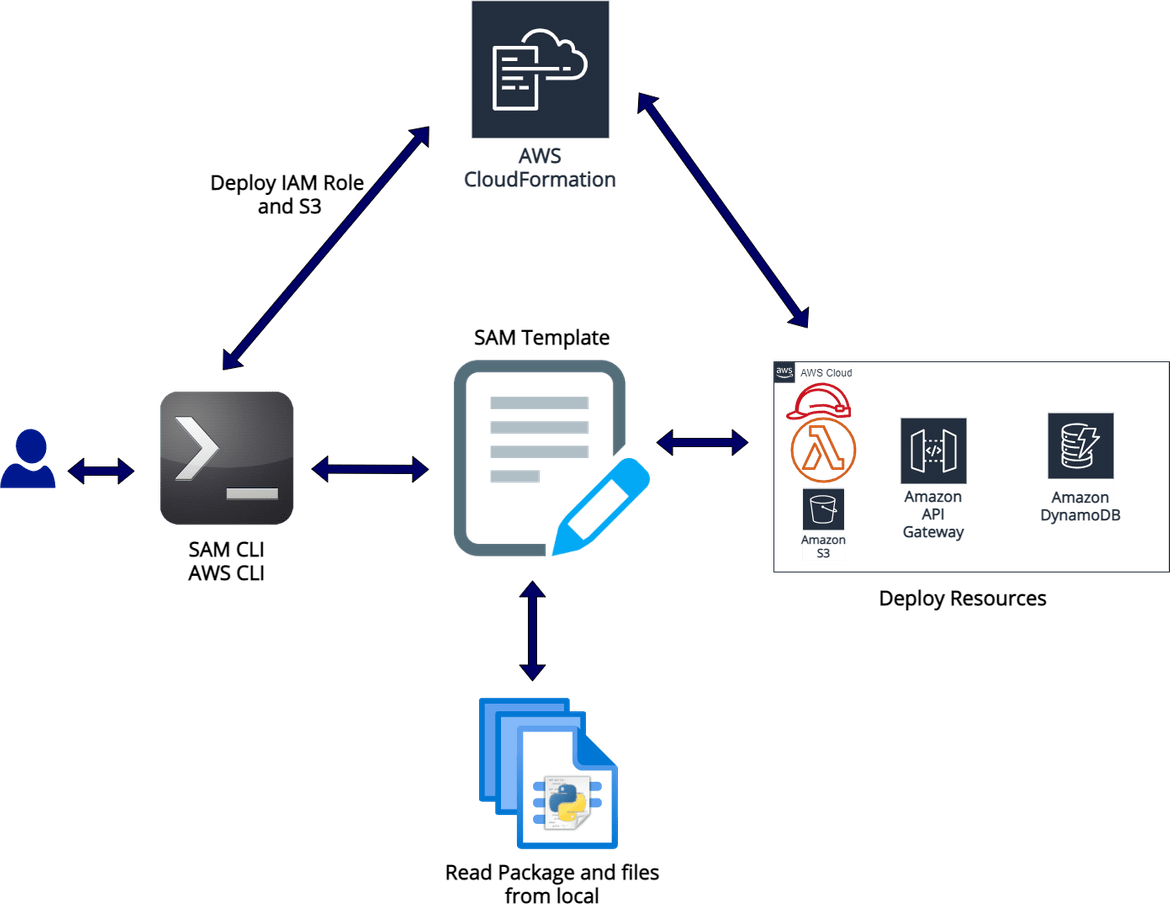
Overall there are two main components when using SAM to deploy Serverless components:
- AWS SAM template specification:This is nothing but a CloudFormation template where you define the resource specifications to deploy to AWS. SAM templates are built as a wrapper around CloudFormation template providing some extra options to easily declare Serverless components.
- SAM CLI: This is the tool used to build and deploy the resources defined in the template defined above. There are various commands which can be used on SAM CLI to handle and automate the Lambda deployment.
Thats enough theory lets get on with the process. - Installation:
As always the first step is to install the SAM CLI on your local machine so you can execute the respective commands and communicate with AWS. There are various ways to get this installed on your system and based on your OS the steps will differ. So I wont go into details for all those steps. Detailed steps can be found Here. To have a proper setup make sure to install these from the steps mentioned in the doc: - AWS SAM CLI
- Docker
-
Homebrew (needed for AWS SAM CLI install)
Once you have this installed, test the installation by running below command:sam --versionIt should show the SAM CLI version:

Now that we have the CLI installed, lets move on to deploying our code. -
Walkthrough:
As usual for this step too the pre-req is to configure the AWS CLI. Follow the steps from above to configure AWS CLI with the profile on your local system. Once the CLI is configured, we can move on to the steps needed to deploy the function. I will be going through the tasks you need to perform before you can deploy the API components. The sample files can be found in the samtemplates folder of my repo.-
A Sample Code
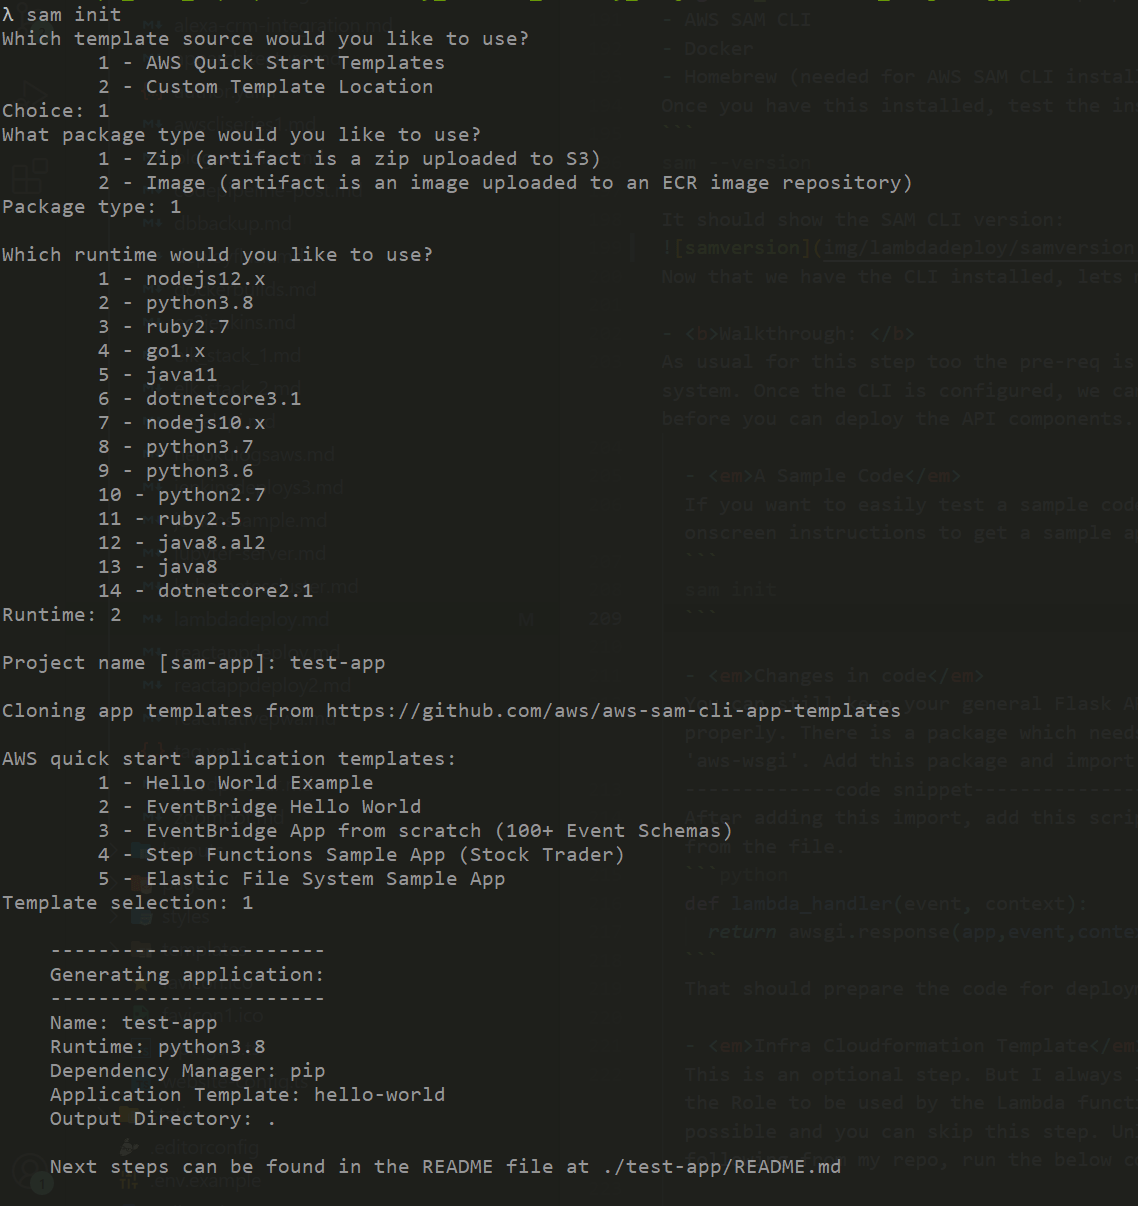
If you want to easily test a sample code and deploy the function, you can use any of the AWS supplied samples. Just run below command and follow onscreen instructions to get a sample app from the SAM repositorysam init -
Changes in code
You can still keep your general Flask API code in this. But there are few changes need to the main file so the SAM CLI can deploy the function properly. There is a package which needs to be installed and imported in your main file. I have added it to my requirements file too. The package is ‘aws-wsgi’. Add this package and import in the code.import awsgiAfter adding this import, add this script to the main file so SAM CLI can identify the main Lambda handler. You can remove the normal app.run line from the file.
def lambda_handler(event, context):
return awsgi.response(app,event,context)
That should prepare the code for deployment as Lambda function. In my repo the app code is in the src folder.
- Infra Cloudformation Template
This is an optional step. But I always like control on the resources which I am deploying so I built this Cloudformation template which will deploy the Role to be used by the Lambda function and an S3 bucket to be used for the packaged Lambda files. If you want SAM to handle this, totally possible and you can skip this step. Unless other specified, SAM will create the role and an S3 bucket inherently for the deployment. But if you are following from my repo, run the below command from samtemplates folder:
aws cloudformation create-stack --stack-name AppInfraStack --template-body file://infraCF.yml --capabilities CAPABILITY_IAM CAPABILITY_NAMED_IAM --profile <profile-name>
That should create the stack and provision the required resources.- SAM Template
This is the main Serverless template which provides the specifications for all the Serverless components. In my repo this template.yaml can be found in samtemplates folder. The specifications are similar to CloudForamtion so if you know CloudFormation its tough to understand a SAM template. Let me go through some important sections from my sample template. Based on your scenario you may have more resources defined in the template. I wont go through explaining all the sections as its just a typical CF template. But I will point out few important ones:
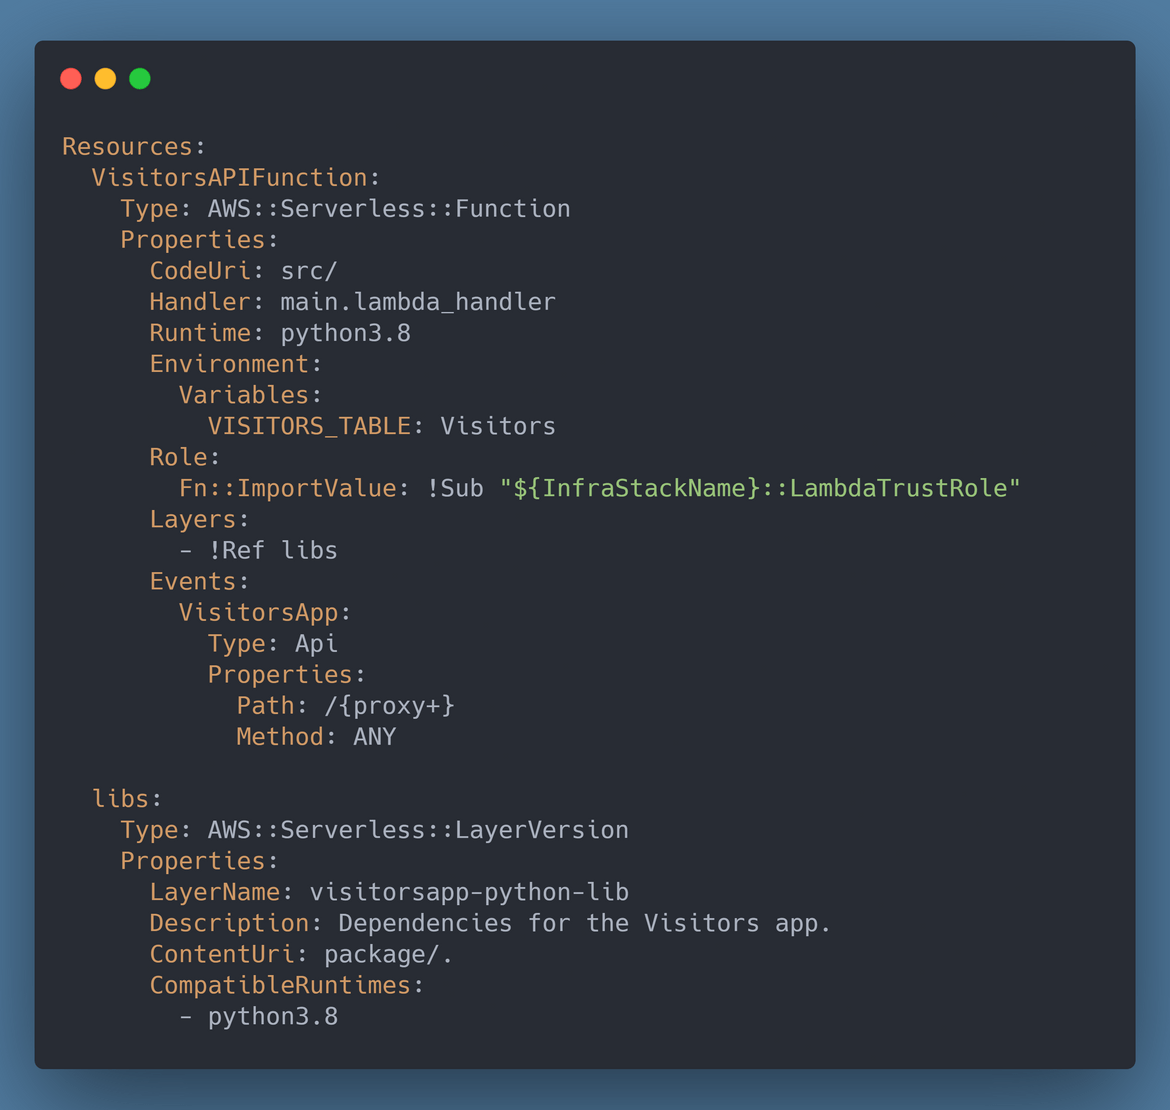
- libs: I am using Lambda Layers to offload the python packages. This resources section specifies the details for the Lambda layers which will get created. I am specifying the local folder where the packages can be found. The packages get bundled in the Lambda layers. This layers is used in the function specifications
- Events: Here I am defining the routes for the API. This will be used by SAM to inherently create an API gateway. Since I am using ANY route, all the Lambda routes pass through the API gateway. If you need more customized API Gateway a separate resource section can be specified with the details for API Gateway just as a Cloudformation template.
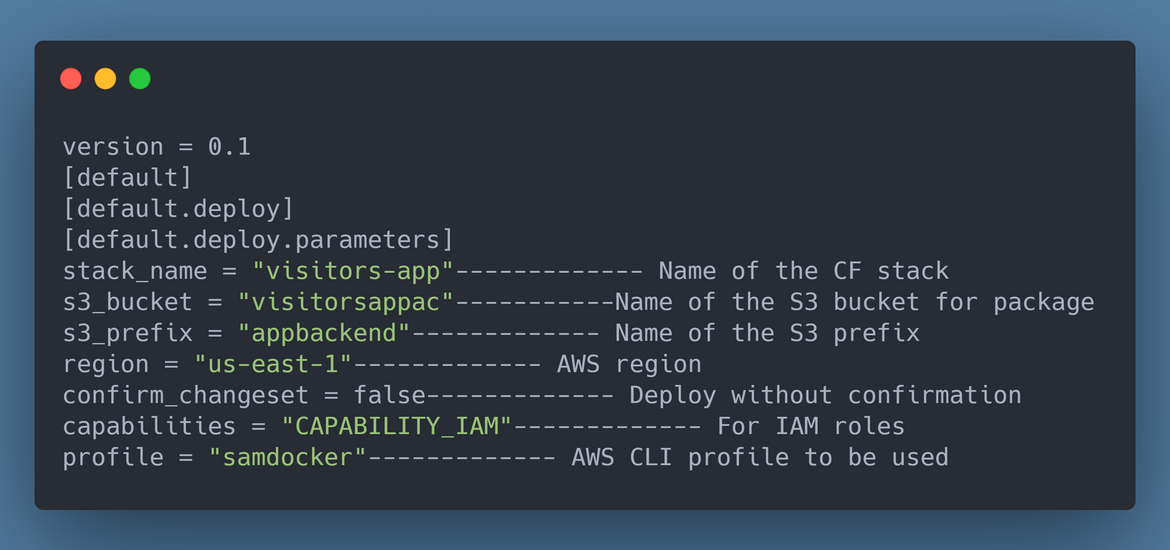
- SAM Config file
There is a config file named samconfig.toml. This provides various config parameters used by the SAM CLI while deploying the Lambda function. Below shows each of the parameters and their meanings:
-
Now that we have all the changes done to the files, we are ready to deploy the Lambda and related components. Follow the steps below to deploy the Serverless components. If you are following from my repo, since I already ran the infra template step above and the infra has been provisioned, no need to run that again.
-
To create the Lambda layers, we will need the Python packages installed in the specified folder. In my SAM template I have specified that the packages will be in package folder. Since Lambda by default looks for a folder named python, so we have to install the packages in package/python folder. Execute these commands to complete the package installation. Execute these in your code root folder. For my repo it will be inside the samtemplates folder.
mkdir package mkdir python python install -r requirements.txt -t package/python -
Once installed, we can now build the SAM package using below command:
sam build
Once the build completes, if needed it can be tested locally by running:sam local invokeOnce satisfied with the test, run the below command to deploy the components to AWS:
sam deploy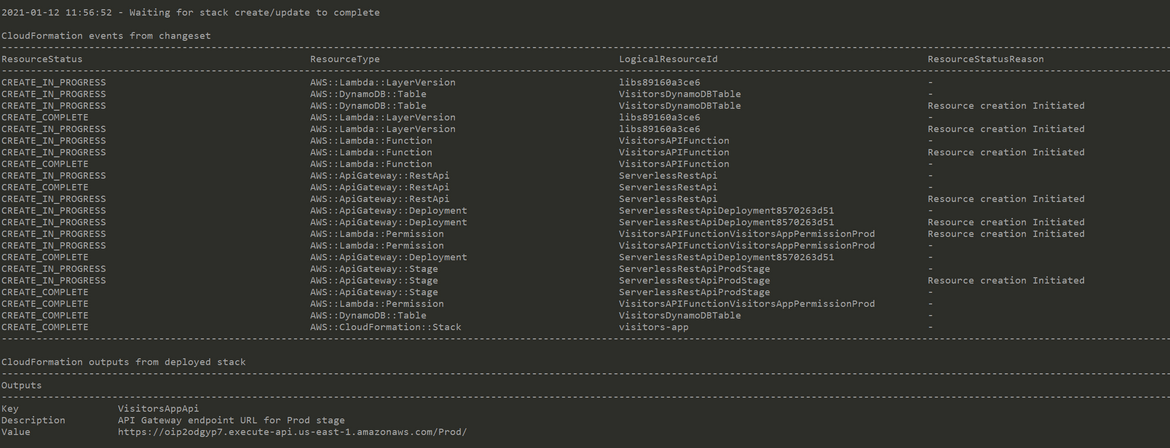
Once the deployment completes, you should get the API endpoint on the CLI. To test the deployment, copy the endpoint and open this page on a browser(if you are following from my repo)<api_gateway_endpoint>/mainpageThis should open the API default page:

You can also login to the AWS console and navigate to the Lambda service to check the Lambda function being created.
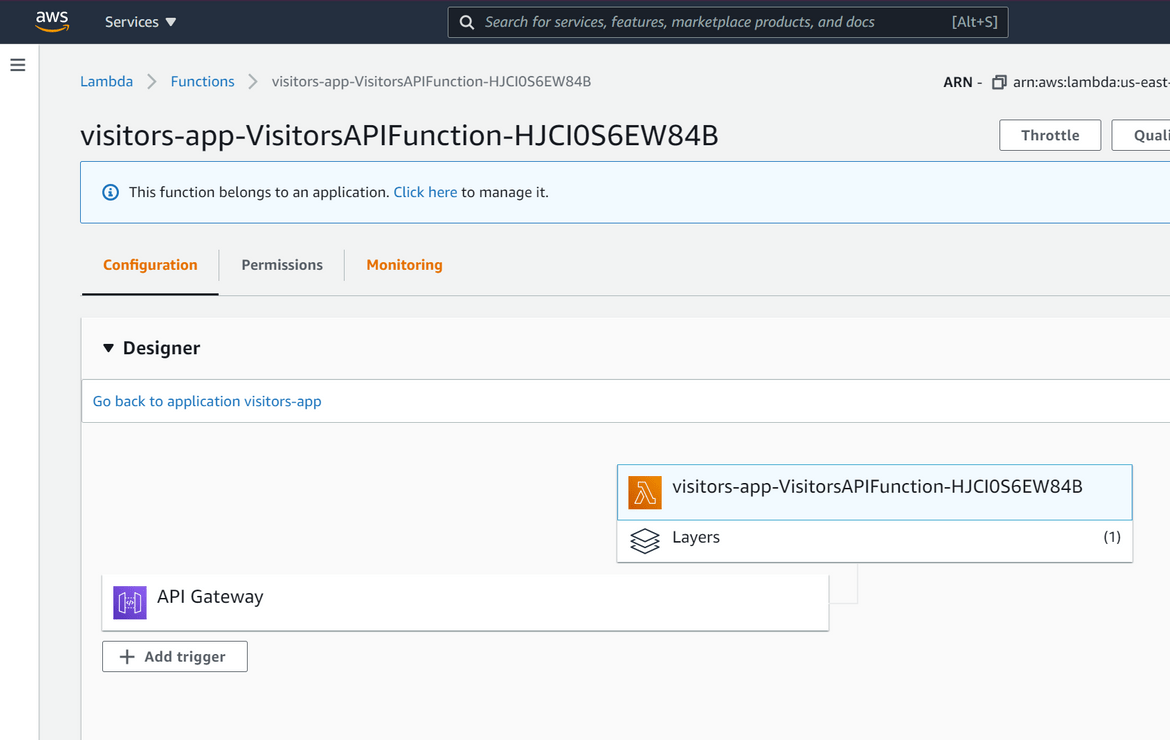
Lets hit the API endpoint to see if we are getting proper count from the DynamoDB. We will be using Postman to test the API. If you dont have Postman, you can directly hit the endpoint from browser too. I will go through the Postman example. Open Postman and provide the endpoint as below. Once you click send, the response should return proper count.
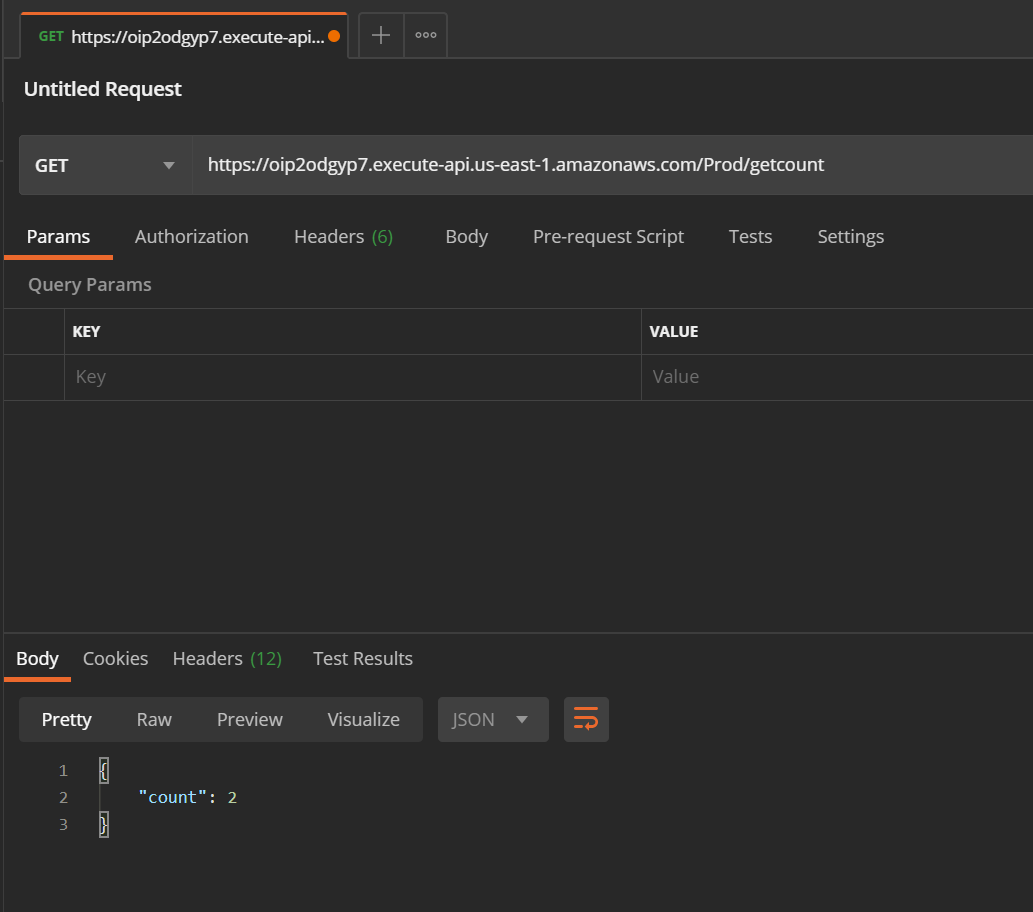
With that we successfully deployed a Lambda function and related Serverless components using SAM templates.
Deploy Docker Images to Lambda
In this method I will be deploying the Lambda function from a Docker image which I will be building locally. The Lambda function will be deployed from this Docker image using SAM (Serverless Application Model). I already went through the SAM template deployment method above and it is just another version of the same deployment. Below image shows an overview of what happens during this deployment.
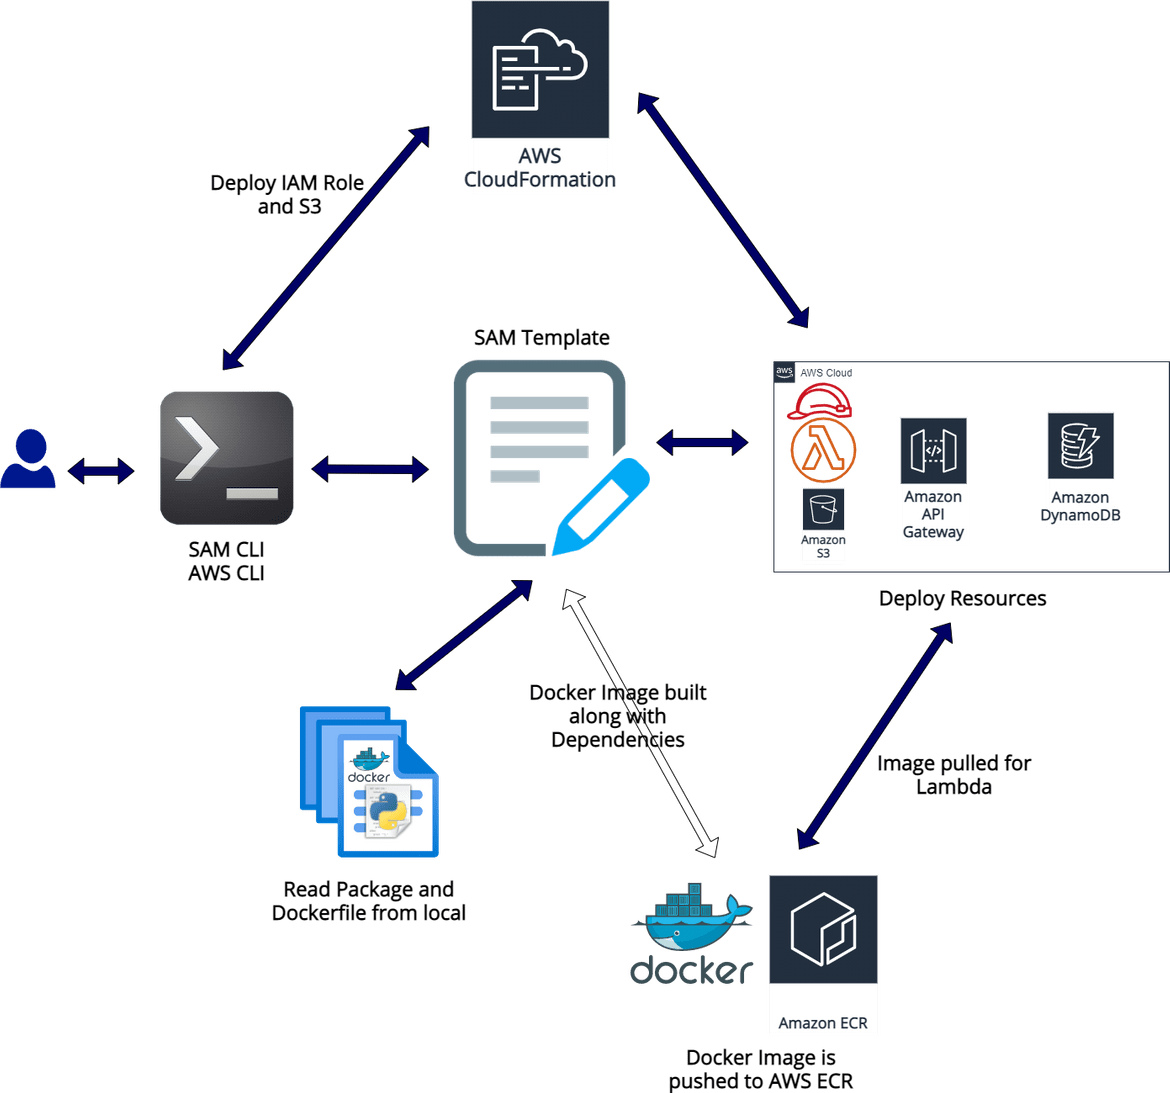
The Lambda function code and dependencies get bundled in the Docker image and is pushed to the AWS image registry. Other components of the API are specified in the SAM template and get deployed accordingly along with the Lambda function.
-
Installation:
Before we start the deployment we need some pre-reqs installed on local system so the deployment can run.-
Install Docker: Since we will be building and pushing a Docker image, we will need Docker installed on the local system. Here I am specifying the command to install Docker on Linux
curl -fsSL https://download.docker.com/linux/ubuntu/gpg | sudo apt-key add - sudo add-apt-repository "deb [arch=amd64] https://download.docker.com/linux/ubuntu $(lsb_release -cs) stable" sudo apt-get update sudo apt-get install docker-ce docker-ce-cli containerd.io - Install SAM: To perform the deployment SAM CLI need to be installed on local machine. I have already specified the steps to install SAM CLI in the above method. Follow the same steps to install SAM CLI.
-
-
Walkthrough:
Now that we have the installations done. Lets go through the steps to deploy the Lambda function. Let me first describe some of parameters needed in the code files. The sample code in my repo for this method is in folder named samdocker.
The Flask code files are the same from the SAM template deployment method from above. No changes needed in that. Below are the changes needed to prepare the files.-
Infra Cloudformation Template
This is the same CloudFormtaion template from the last method. No change needed in that. This will deploy the Role to be used by the Lambda function and an S3 bucket to be used for the packaged Lambda files. If you want SAM to handle this, totally possible and you can skip this step. Unless other specified, SAM will create the role and an S3 bucket inherently for the deployment. But if you are following from my repo, run the below command from samtemplates folder:aws cloudformation create-stack --stack-name AppInfraStack --template-body file://infraCF.yml --capabilities CAPABILITY_IAM CAPABILITY_NAMED_IAM --profile <profile-name>That should create the stack and provision the required resources.
-
SAM Template
Most of the SAM template stays the same from the last method. All resource specs remains the same except the Lambda function spec in the template.yaml file. Below are two extra parts added to the Lambda function resource in the template.yaml file to specify that the deployment package will be a Docker image.PackageType: ImageMetadata: Dockerfile: Dockerfile DockerContext: ./src DockerTag: v1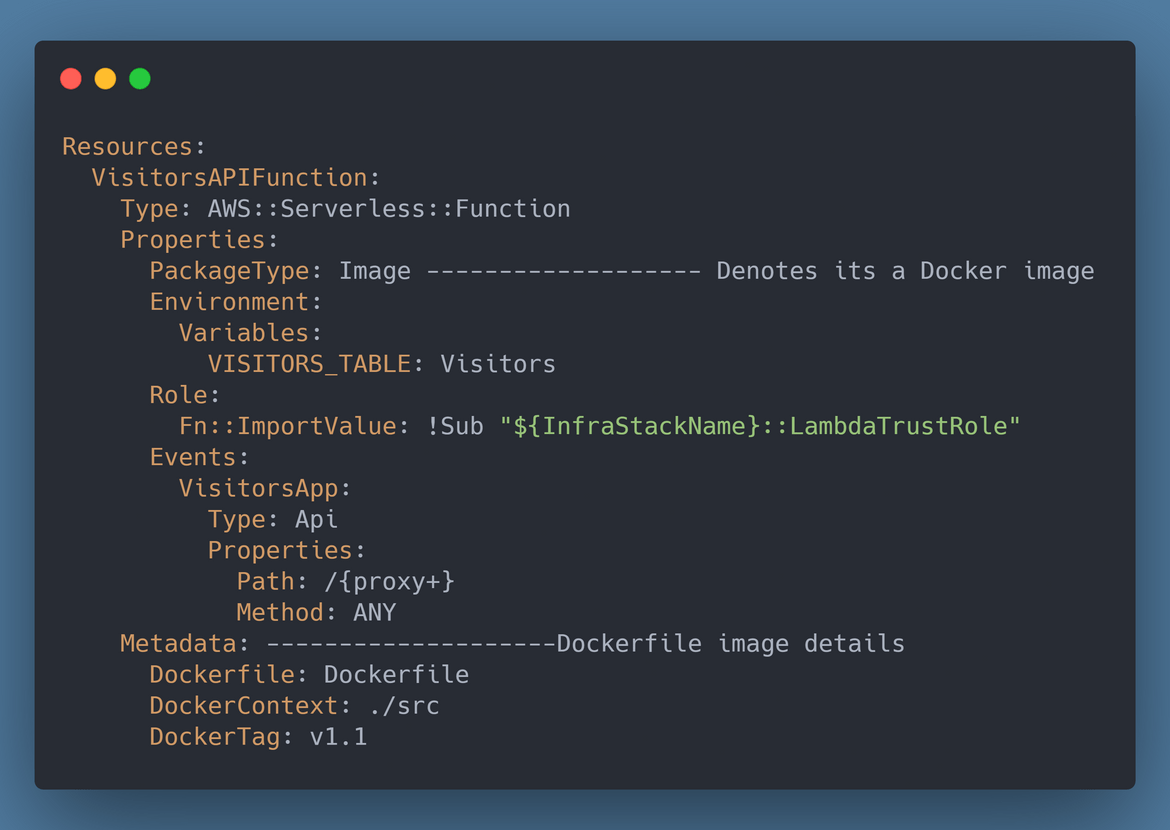
This indicates to the SAM CLI that the Dockerfile to build the Docker image is located in the src folder. This Dockerfile will be used to build the Docker image for the Lambda function. Since we are using a Docker image for the Lambda function, all dependencies will be packaged within the Docker image. So we don’t need the Lambda Layer anymore for this method. The Lambda layer section can be removed from the template.yaml file. -
SAM Config file
This is the file named samconfig.toml. All the contents stay same as the above method. There is just one additional parameter added here.image_repository= <AWS_ECR_repository_uri>This is the AWS ECR Image repository URL where the built Docker image will be pushed by the SAM CLI. The repository need to be created first so you have this repo URL to specify in the config file.
- Login to AWS Console
- Navigate to Elastic Container Registry and create a new Repo
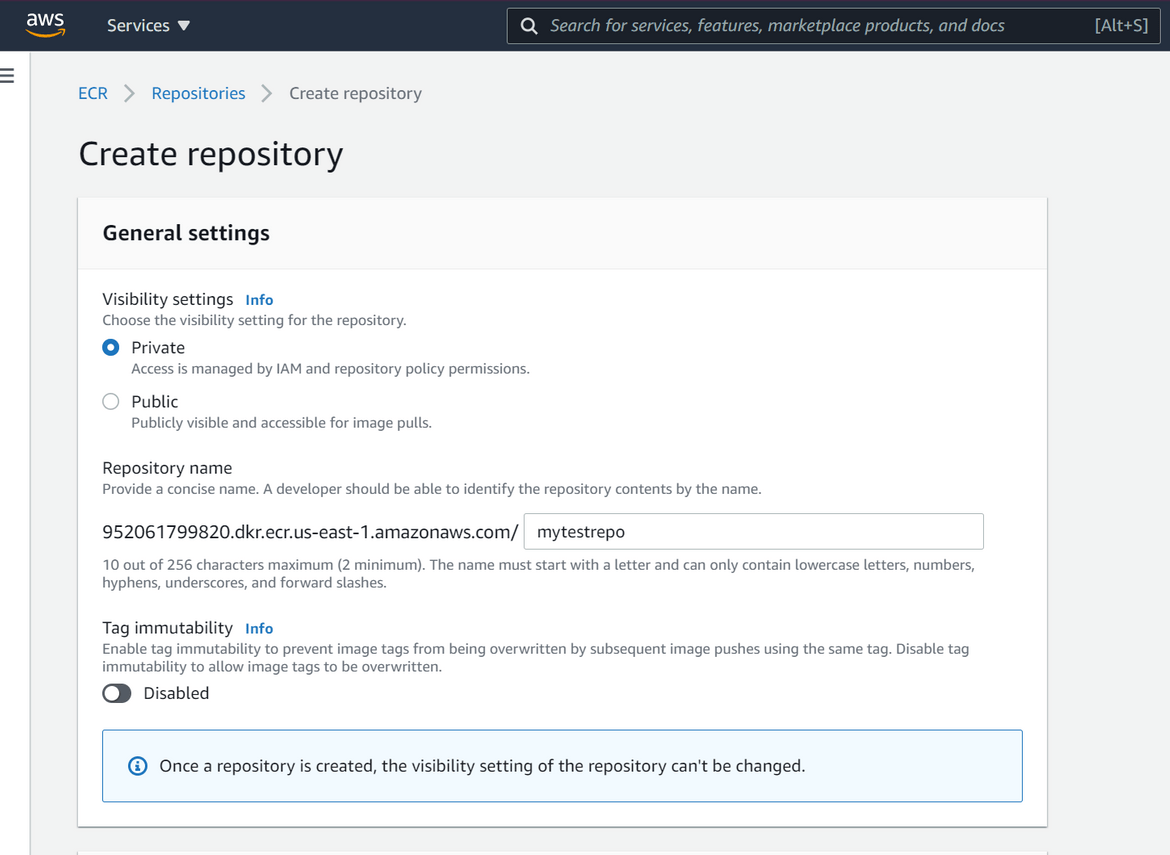
- Once created the URI can be noted from the list page. Get this URI and specify in the samconfig.toml file

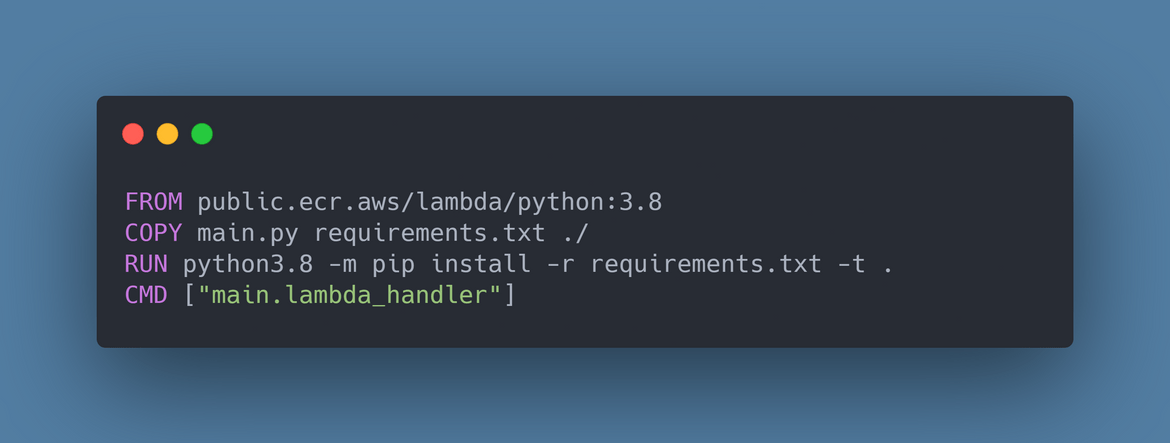
- Dockerfile
This is the file where we define how to build the Docker image. SAM CLI will use this file to build the image and push to the AWS ECR. Here are high level steps followed by the Dockerfile: - Copy the code files from local to a folder within the Docker image
- Install all the Python dependencies from the requirements file in the Docker image
- Execute and start the Flask API
-
Now that we have all the files prepared, we can move on to deploy the Lambda function and other Serverless components.
-
Lets build the SAM package using below command:
sam buildThis will build the Docker image and tag the same.

Once the build completes, if needed it can be tested locally by running:sam local invokeOnce satisfied with the test, run the below command to deploy the components to AWS:
sam deploy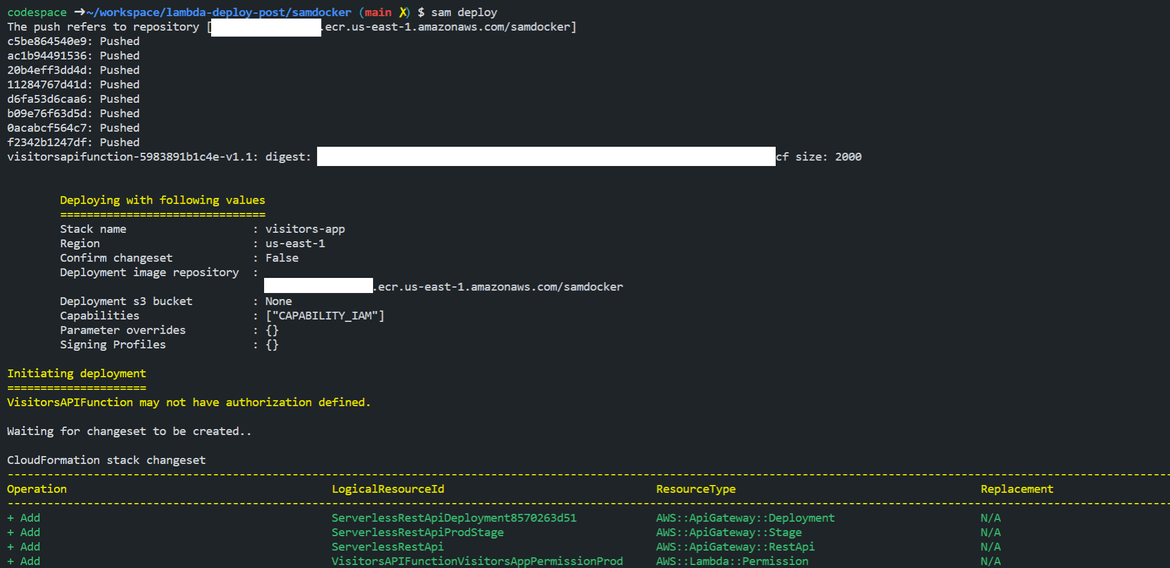
Once the deployment completes, you should get the API endpoint on the CLI. To test the deployment, copy the endpoint and open this page on a browser(if you are following from my repo)<api_gateway_endpoint>/mainpage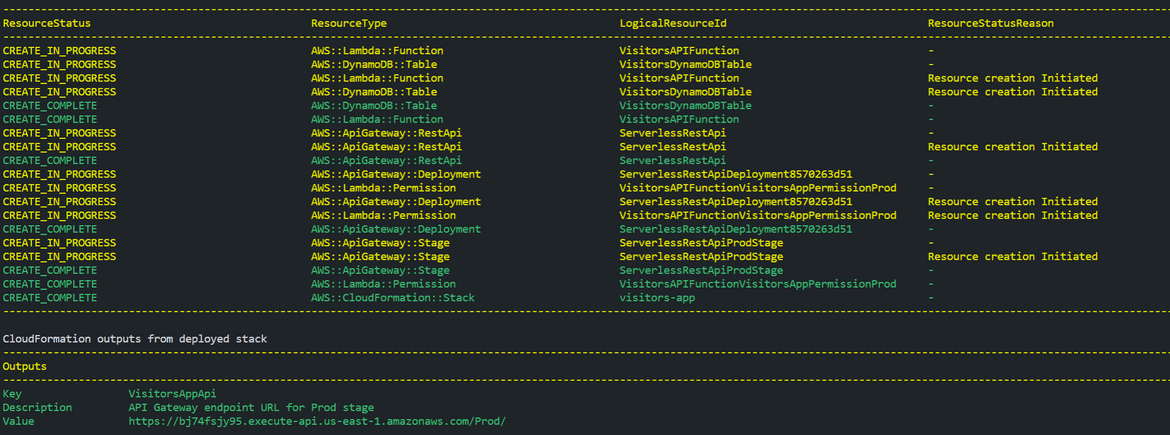
This should open the API default page:

You can also login to the AWS console and navigate to the Lambda service to check the Lambda function being created.
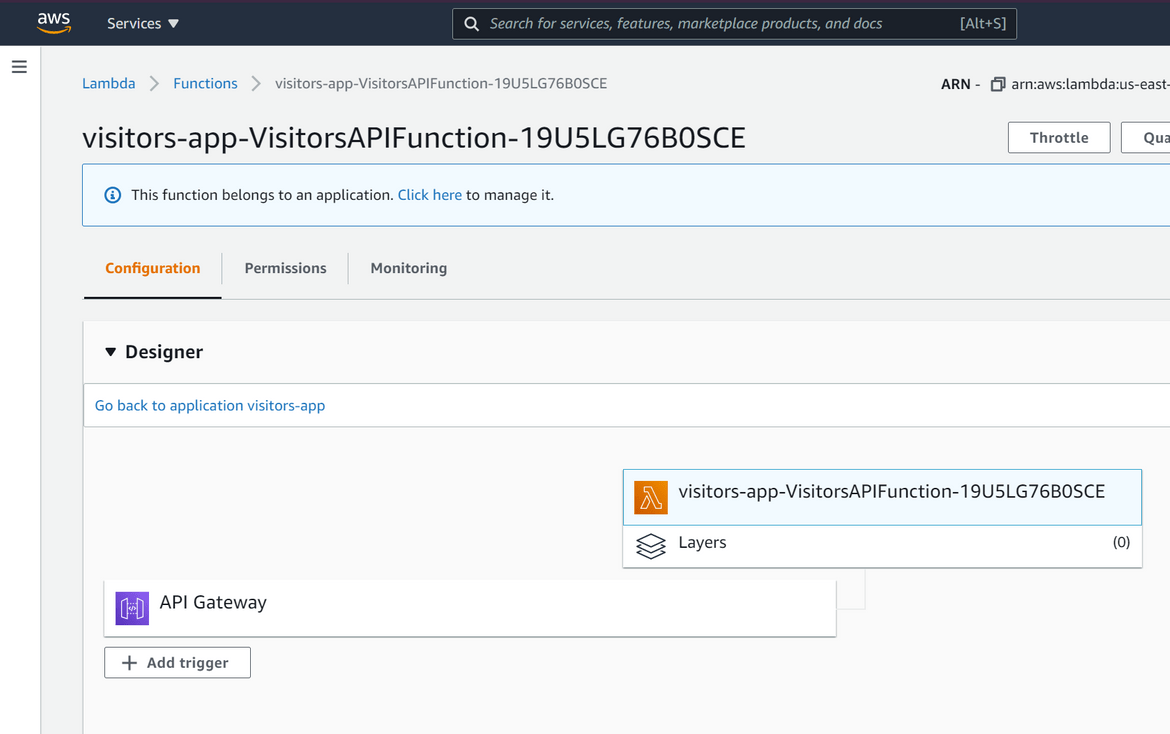
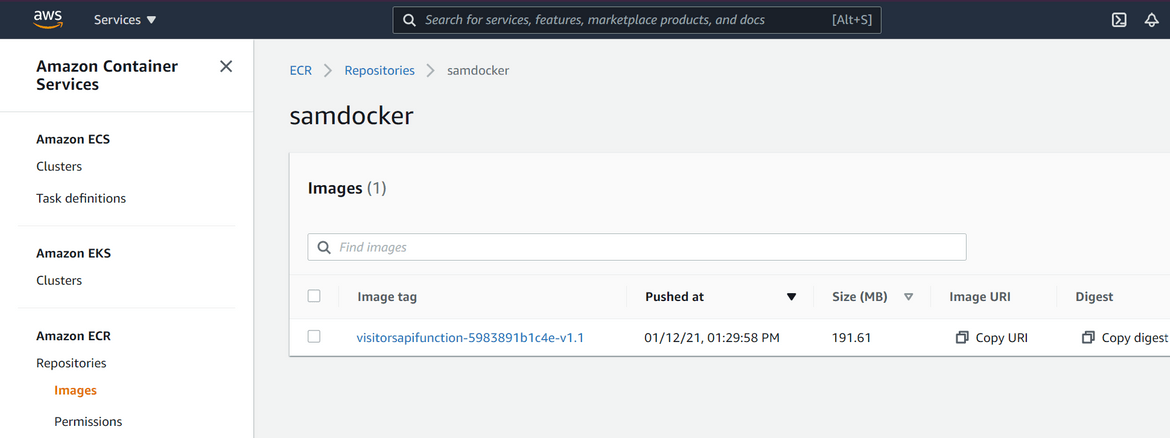
The deploy step also pushes the Docker image to the AWS ECR. You can navigate to the ECR page to view the tag being pushed to the repository
Lets hit the API endpoint to see if we are getting proper count from the DynamoDB. We will be using Postman to test the API. If you dont have Postman, you can directly hit the endpoint from browser too. I will go through the Postman example. Open Postman and provide the endpoint as below. Once you click send, the response should return proper count.
Deploy Using Terraform
In this method I will be using Terraform to deploy the Lambda function and other Serverless components to AWS. Terraform is an Open source Infrastructure as Code tool. It is used to easily deploy infrastructure components to cloud services. Here I will be using AWS as provider to deploy the API components to AWS. Below should provide a good overview of the process
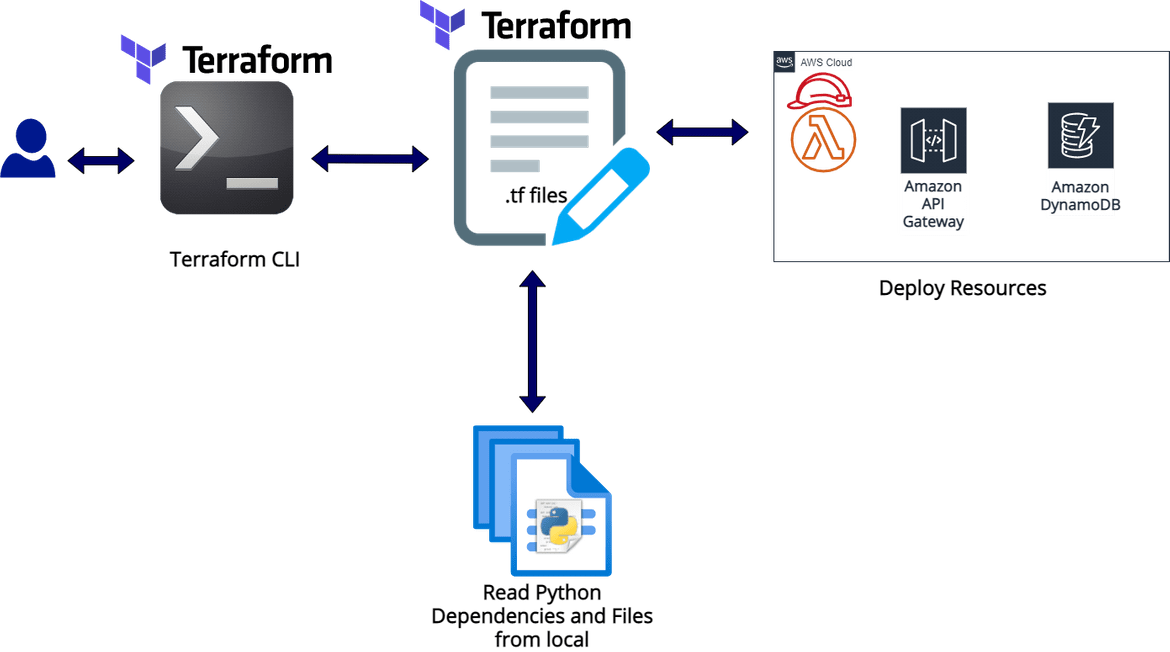
Let us go through the steps to get the components deployed.
-
Installation:
First we need to install Terraform on our local system. Here I am going through steps to install Terraform on Linux. For other systems steps can be found Here
Run the below commands to install Terraform:curl -fsSL https://apt.releases.hashicorp.com/gpg | sudo apt-key add - sudo apt-add-repository "deb [arch=amd64] https://apt.releases.hashicorp.com $(lsb_release -cs) main" sudo apt-get update && sudo apt-get install terraformOnce the installation is done run the below command to test the installation
terraform --version
We will also need AWS CLI configured to be used by Terraform. First install AWS CLI following the steps I already specified in one of the methods above. Once installed, run the below command to configure an AWS CLI profile. If you are following my repo, run this specific command with the same profile name.
aws configure --profile lambdadeployFollow onscreen instructions and provide the IAM credentials (IAM user created earlier) to configure the CLI Profile.
-
Walkthrough: Once the installations are done, we need to prepare the code files and the Terraform file to define the resources which will be deployed. The sample files for this method is in the terraformlambda folder in my repo. You can take my repo to follow along the process. Below are the files and specs needed to be specified for the deployment.
-
Code Files
In my repo I have kept the Flask API code files in the src folder. If you are writing your own code, you can go ahead and develop a normal Flask API as usual. There is just one function which is needed to be added in the main file (main.py)def lambda_handler(event, context): return awsgi.response(app,event,context)Since Terraform will need the code in a packaged format, we will need to zip up the code files in a zip archive. If you are following my repo, zip the files in the src folder and name the file ‘lambdafunctionpayload.zip’. Keep the zip file in the same src folder. We will specify this in the Terraform script in later step.

-
Package Dependencies
We will need to package the Python dependencies used by the Flask API, in a zip archive. Terraform will read this archive file to create the Lambda layer. Run the below commands to install the dependencies in a specified folder. Terraform will read the zip archive from this folder. The path is also specified in the Terraform script. Run these commands in the root folder of the code repo.mkdir package/python pip install -r requirements.txt -t package/pythonOnce installed, navigate to the package folder and zip up the ‘python’ folder to a zip file named ‘lambdalayerpayload.zip’. This zip file will be used by Terraform to create the Lambda layer.

-
Terraform Template file
Now that we have the code files ready lets describe the Serverless components in the Terraform scripts. The Terraform script in my repo is named ‘lambda_deploy.tf’. The script is written in a language called HCL (HashiCorp Configuration Language). I wont go into detail about how to write the file and about each of the statement as that is a separate topic itself. Let me go through each resource section at high level.- Provider section: Since I am using Terraform to deploy AWS resources, in this section I specify AWS specific parameters to be used during resource provisioning. Here I am specifying the AWS CLI to be used for the credentials and the region to be used for the resources.
- Resource: awslambdalayer_version: Here I define the details about the Lambda layer to be created. This will be used by the Lambda function to resolve dependencies. Here I specify the zip package path which we created on an above step (in the package folder).
- Resource: awsiamrolepolicy,awsiam_role: In these two sections I define the IAM related details which will be assigned to the Lambda function. This role will grant access to the Lambda function to access other resources.
- Resource: awslambdafunction: This is specs for the Lambda function. Here I am specifying the path for the code zip file which we created earlier (in src folder). I am also specifying the Layer here so the Lambda function uses this layer.
- Resource: awsapigatewayrestapi,awsapigatewayresource,awsapigatewaymethod,awsapigatewayintegration,awsapigatewaydeployment: These are multiple sections where I define the API Gateway details. In these sections I am defining the API Gateway routes and specify the backend as the Lambda proxy to the Lambda function which is getting created.
- Resource: awslambdapermission: Here I specify the policy on the Lambda function which grants the API gateway to invoke the Lambda function.
- Resource: awsdynamodbtable: Here I am specifying the details for the Dynamo DB table which will be created. I am using some default basic parameters to get the table created. This table will be accessed by the Lambda function to get the data.
-
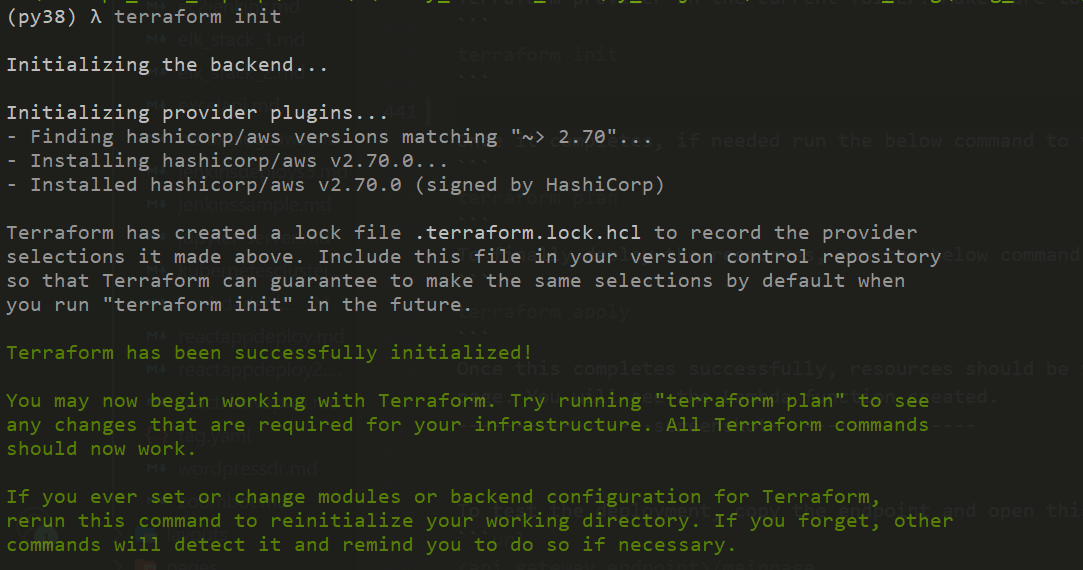
Now that I have prepared all the scripts and files, I am ready to deploy the Lambda and related components to AWS. Run the below command to initialize and install Terraform provider in the current folder. Make sure to run this inside the root code folder.
terraform init
Once it completes, if needed run the below command to view the changes that will happen when Terraform deploys
terraform plan
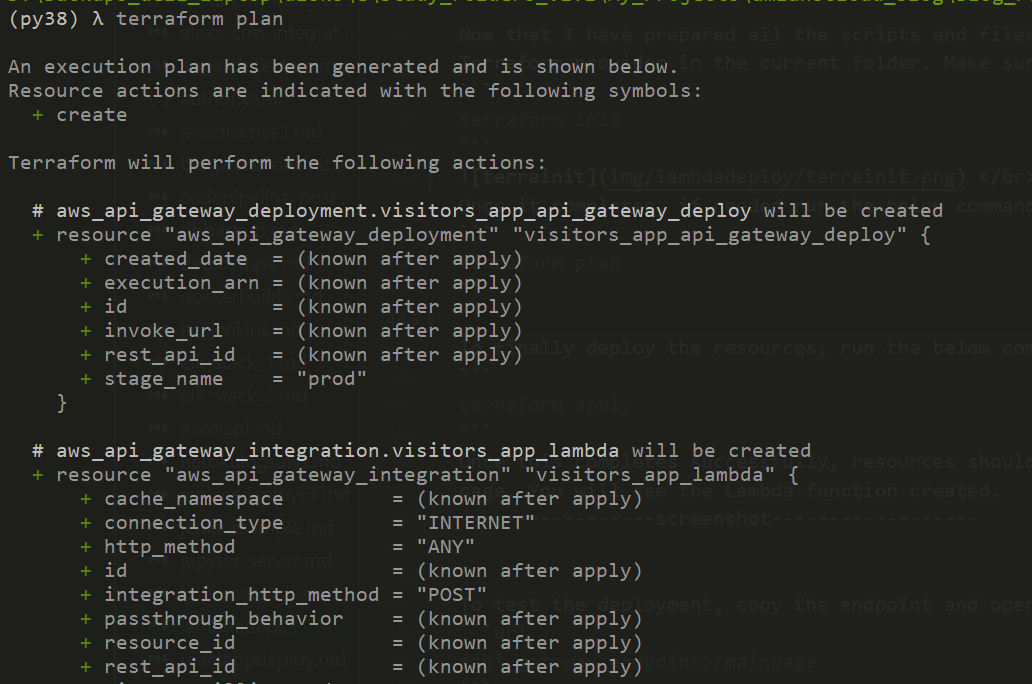
To finally deploy the resources, run the below command and type the confirmation as yes to start the deployment
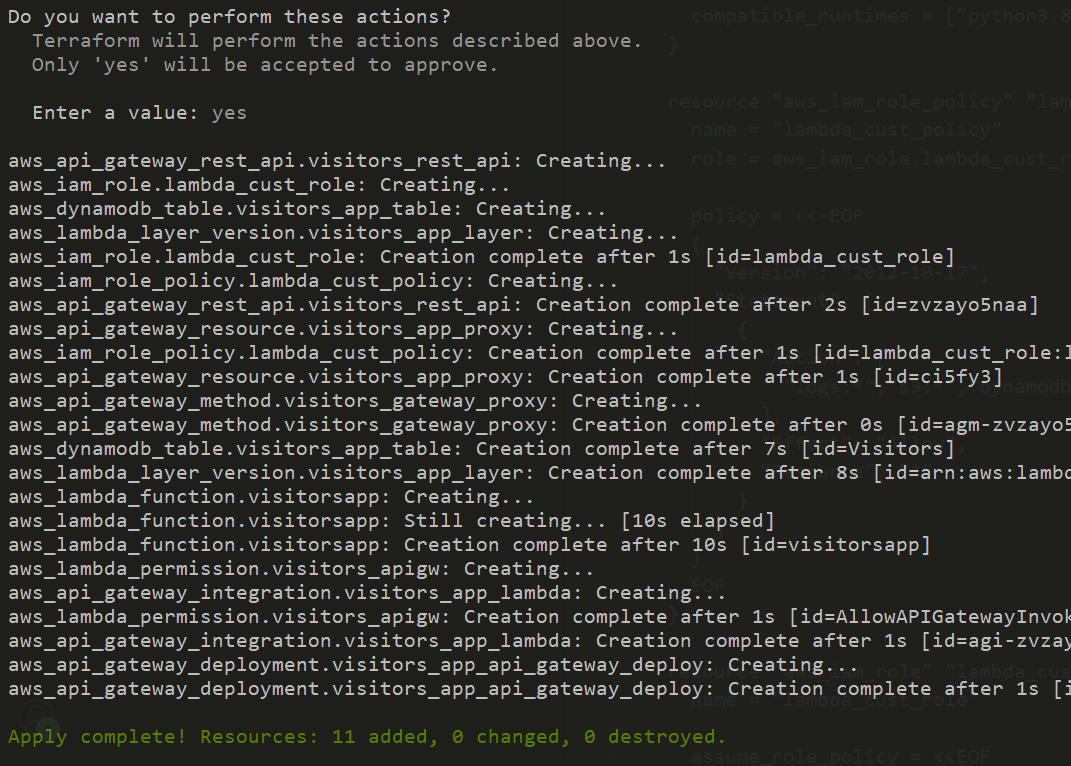
terraform apply
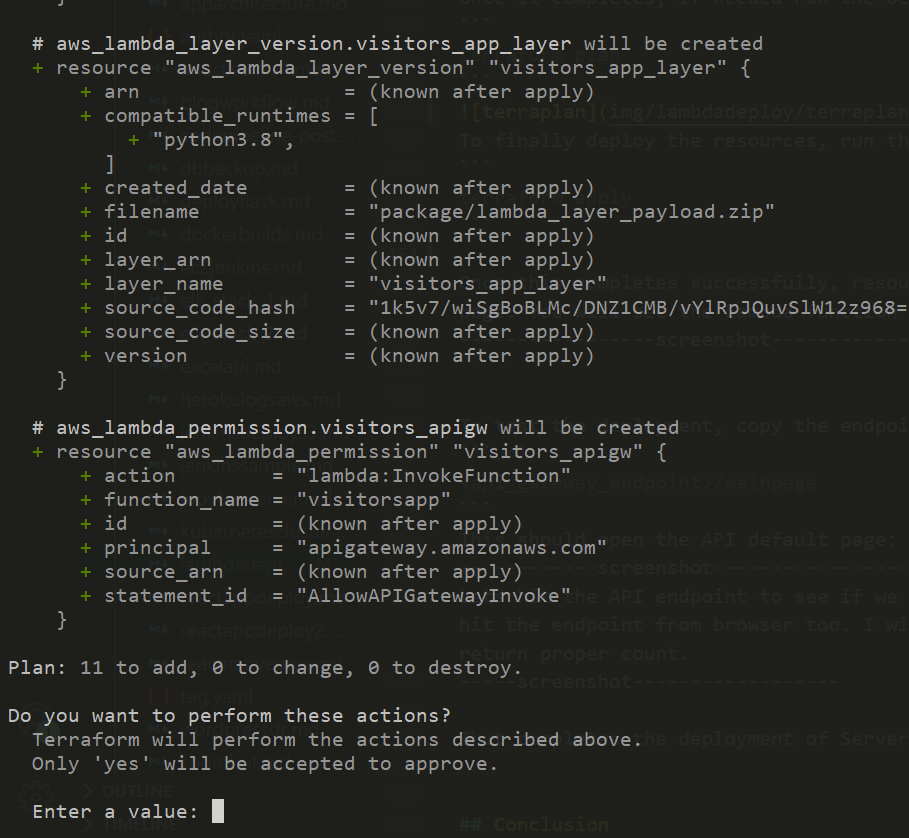
Once this completes successfully, resources should be visible on AWS console.
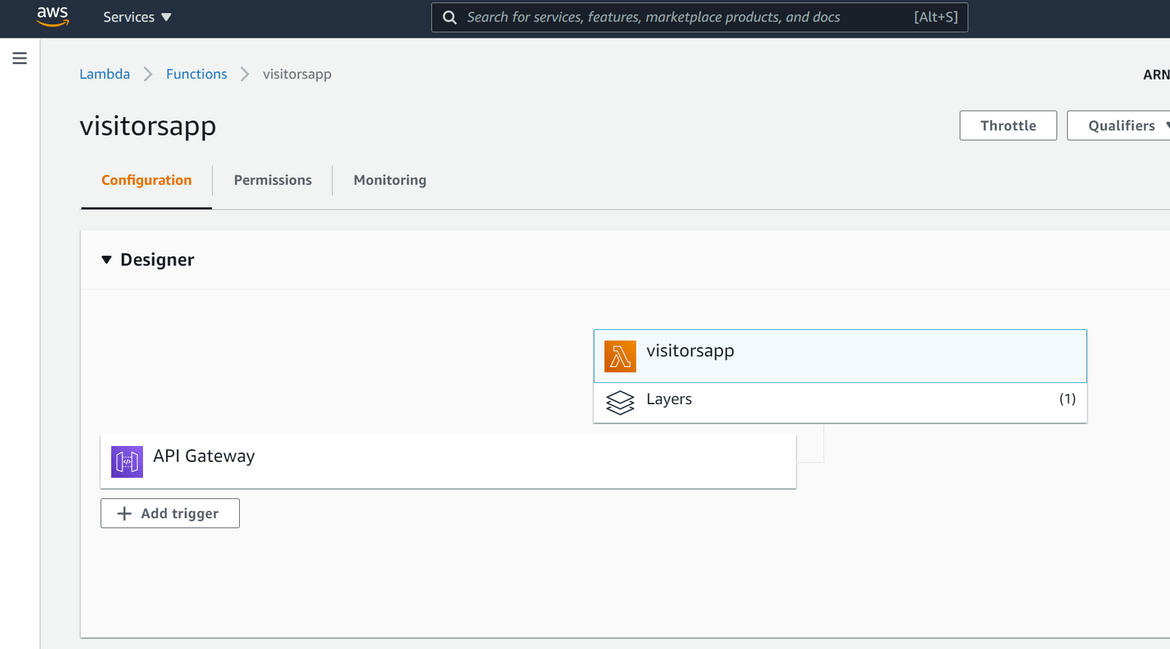
To check the Lambda function, login to AWS console and navigate to the Lambda service page. You will see the Lambda function created.
To test the deployment, copy the endpoint and open this page on a browser(if you are following from my repo)
<api_gateway_endpoint>/mainpage

This should open the API default page:

Lets hit the API endpoint to see if we are getting proper count from the DynamoDB. We will be using Postman to test the API. If you don’t have Postman, you can directly hit the endpoint from browser too. I will go through the Postman example. Open Postman and provide the endpoint as below. Once you click send, the response should return proper count.
That completes the deployment of Serverless components using Terraform.
Conclusion
Hopefully I was able to explain these methods which will help you deploy Serverless components to AWS. Serverless is becoming very popular these days as it helps remove the Server admin overhead from the architecture. It was fun learning these new deployment methods and I hope it helps you with your own deployments. If you have any questions, you can reach me from the Contact page.
